

User's Guide
Page 5
Side Views Product Overview 1 2 3 4 5 1 Video Out 2 USB Port 3 DC-In (5V) 1 2 3 4 Battery compartment 5 Slot for optional MMC/SD card iii
Side Views Product Overview 1 2 3 4 5 1 Video Out 2 USB Port 3 DC-In (5V) 1 2 3 4 Battery compartment 5 Slot for optional MMC/SD card iii

User's Guide
Page 7
... Larger Print 1 What Can I Do With My Camera 2 What Can I Do With My Pictures and Videos 2 Package Contents 3 Charging the Battery 4 Loading the Battery 5 Attaching the Wrist Strap 5 Mode Dial Settings 6 Turning On the Camera 7 Setting the Date and Time 8 Checking Camera Status Area 9 Inserting an MMC/SD Card 10 ...Choosing Internal Memory or MMC/SD Card 11 2 Taking Pictures 13 Auto Mode 13 Sport Mode 14 Night Mode 15 Landscape Mode 16 Close-up Mode 17 Liveview-Framing with the Camera Screen 18 Quickview-...
... Larger Print 1 What Can I Do With My Camera 2 What Can I Do With My Pictures and Videos 2 Package Contents 3 Charging the Battery 4 Loading the Battery 5 Attaching the Wrist Strap 5 Mode Dial Settings 6 Turning On the Camera 7 Setting the Date and Time 8 Checking Camera Status Area 9 Inserting an MMC/SD Card 10 ...Choosing Internal Memory or MMC/SD Card 11 2 Taking Pictures 13 Auto Mode 13 Sport Mode 14 Night Mode 15 Landscape Mode 16 Close-up Mode 17 Liveview-Framing with the Camera Screen 18 Quickview-...

User's Guide
Page 10
... Memory or MMC/SD Card 60 Viewing Camera Information 61 7 Installing the Software 63 Windows System Requirements 63 Mac OS X System Requirements 64 Mac OS 8.6 and 9.x System Requirements 64 Install the Software 65 8 Connecting Camera to Computer 67 Transferring Pictures with the ... Computer 68 9 Using the Camera Dock 6000 69 Camera Dock 6000 Package Contents 69 Installing the Custom Camera Insert 70 Connecting the Camera Dock 6000 71 Docking the Camera 72 Charging the Battery 73 Transferring Pictures 74 Troubleshooting-Camera Dock 6000 75 Earlier Cameras and Docks 75 Using the...
... Memory or MMC/SD Card 60 Viewing Camera Information 61 7 Installing the Software 63 Windows System Requirements 63 Mac OS X System Requirements 64 Mac OS 8.6 and 9.x System Requirements 64 Install the Software 65 8 Connecting Camera to Computer 67 Transferring Pictures with the ... Computer 68 9 Using the Camera Dock 6000 69 Camera Dock 6000 Package Contents 69 Installing the Custom Camera Insert 70 Connecting the Camera Dock 6000 71 Docking the Camera 72 Charging the Battery 73 Transferring Pictures 74 Troubleshooting-Camera Dock 6000 75 Earlier Cameras and Docks 75 Using the...

User's Guide
Page 11
Camera Dock 6000 Specifications 76 10 Troubleshooting 77 Troubleshooting-Camera 77 11 Getting Help 89 Helpful Web Links 89 Help in this Manual 89 Software Help 89 Telephone Customer Support 90 12 Appendix 93 Camera Specifications 93 Original Factory Settings 95 Upgrading Your Software and Firmware 96 Tips, Safety, Maintenance 96 Storage Capacities 98 Locating Pictures and Videos on a Card 99 Picture Naming Conventions 99 Using the Battery 101 Power-Saving Features 102 FCC Compliance and Advisory 102 ix
Camera Dock 6000 Specifications 76 10 Troubleshooting 77 Troubleshooting-Camera 77 11 Getting Help 89 Helpful Web Links 89 Help in this Manual 89 Software Help 89 Telephone Customer Support 90 12 Appendix 93 Camera Specifications 93 Original Factory Settings 95 Upgrading Your Software and Firmware 96 Tips, Safety, Maintenance 96 Storage Capacities 98 Locating Pictures and Videos on a Card 99 Picture Naming Conventions 99 Using the Battery 101 Power-Saving Features 102 FCC Compliance and Advisory 102 ix

User's Guide
Page 14
... support limited Kodak EasyShare software features. 2 Edit-Add special effects to your capabilities. The camera screen offers brilliant color reproduction and low battery consumption. Install the software from Ofoto, a Kodak Company. Or purchase an optional Kodak multimedia card (MMC) or a secure digital (SD) ...organize and retrieve pictures on a computer. Capture Videos with flash, Self Timer, and zoom features. Print-(see page 68) Print pictures directly to your camera functions. Capture Still Pictures -Enjoy point-and-shoot operation with Sound -Capture videos as ...
... support limited Kodak EasyShare software features. 2 Edit-Add special effects to your capabilities. The camera screen offers brilliant color reproduction and low battery consumption. Install the software from Ofoto, a Kodak Company. Or purchase an optional Kodak multimedia card (MMC) or a secure digital (SD) ...organize and retrieve pictures on a computer. Capture Videos with flash, Self Timer, and zoom features. Print-(see page 68) Print pictures directly to your camera functions. Capture Still Pictures -Enjoy point-and-shoot operation with Sound -Capture videos as ...

User's Guide
Page 15
Contents may change without notice.) 3 Chapter 1 Package Contents 1 3 4 2 5 1 Camera 2 Battery charger 3 USB cable 4 Audio/Video cable 5 Battery Not shown: User's Guide, Quick Start Guide, wrist strap, Kodak EasyShare software CD, custom camera insert. (In some countries, the User's Guide is provided on a CD.
Contents may change without notice.) 3 Chapter 1 Package Contents 1 3 4 2 5 1 Camera 2 Battery charger 3 USB cable 4 Audio/Video cable 5 Battery Not shown: User's Guide, Quick Start Guide, wrist strap, Kodak EasyShare software CD, custom camera insert. (In some countries, the User's Guide is provided on a CD.

User's Guide
Page 16
When the indicator light turns green, remove the battery and unplug the charger. You can also charge the battery using the optional Kodak EasyShare printer dock 6000 or the Kodak EasyShare camera dock 6000 (page 73). Charging takes approximately 2 hours. Chapter 1 Charging the Battery 1 Insert the battery into the (included) charger. 2 Insert the plug that matches your electrical outlet. 3 Plug...
When the indicator light turns green, remove the battery and unplug the charger. You can also charge the battery using the optional Kodak EasyShare printer dock 6000 or the Kodak EasyShare camera dock 6000 (page 73). Charging takes approximately 2 hours. Chapter 1 Charging the Battery 1 Insert the battery into the (included) charger. 2 Insert the plug that matches your electrical outlet. 3 Plug...

User's Guide
Page 17
... to the side to remove the battery. Battery Lock Contacts 1 Turn off the camera. 2 Open the battery door. 3 Orient the battery as shown, and push it in place. 4 Close the battery door. Short loop 3 Pull until secure. 5 The battery lock holds the battery in . Chapter 1 Loading the Battery CAUTION: Use only a Kodak EasyShare Li-Ion rechargeable battery. Attaching the Wrist Strap Long...
... to the side to remove the battery. Battery Lock Contacts 1 Turn off the camera. 2 Open the battery door. 3 Orient the battery as shown, and push it in place. 4 Close the battery door. Short loop 3 Pull until secure. 5 The battery lock holds the battery in . Chapter 1 Loading the Battery CAUTION: Use only a Kodak EasyShare Li-Ion rechargeable battery. Attaching the Wrist Strap Long...

User's Guide
Page 20
...time. (Select Cancel if you change the date and time. Joystick/OK Setting the Date & Time, Anytime 1 Turn on your computer operating system, Kodak EasyShare software may allow your computer to change it. AUTO 3 menu Press to highlight Setup, then press the OK button. delete 2 Press to highlight ...and Time Setting the Date & Time, First Time The Date & Time have been reset message appears the first time you turn on the camera or if the battery is removed for details. 8 menu AUTO OFF 2 Go to exit the menu. Press next setting. 5 When finished, press the OK button...
...time. (Select Cancel if you change the date and time. Joystick/OK Setting the Date & Time, Anytime 1 Turn on your computer operating system, Kodak EasyShare software may allow your computer to change it. AUTO 3 menu Press to highlight Setup, then press the OK button. delete 2 Press to highlight ...and Time Setting the Date & Time, First Time The Date & Time have been reset message appears the first time you turn on the camera or if the battery is removed for details. 8 menu AUTO OFF 2 Go to exit the menu. Press next setting. 5 When finished, press the OK button...

User's Guide
Page 21
To redisplay them, press . For Share icons, see Using the Flash, page 22. Status Area Icons (Top of Camera Screen) Auto Sport Night Landscape Close-up Review Video Low battery Exhausted battery (blinking) 9 Screen Icons (Bottom of Camera Screen) Date stamp Burst Self Timer Flash mode Best Best (3:2) 072 Better Good Internal memory Memory Card...
To redisplay them, press . For Share icons, see Using the Flash, page 22. Status Area Icons (Top of Camera Screen) Auto Sport Night Landscape Close-up Review Video Low battery Exhausted battery (blinking) 9 Screen Icons (Bottom of Camera Screen) Date stamp Burst Self Timer Flash mode Best Best (3:2) 072 Better Good Internal memory Memory Card...

User's Guide
Page 31
... can : Delete delete m Review it : Press the Share button to delete the picture. Chapter 2 Quickview-Reviewing the Picture Just Taken After you take a picture, the camera screen displays a Quickview of pictures (see page 41). To delete selectively, do so in the burst series are displayed. OK Share To save...
... can : Delete delete m Review it : Press the Share button to delete the picture. Chapter 2 Quickview-Reviewing the Picture Just Taken After you take a picture, the camera screen displays a Quickview of pictures (see page 41). To delete selectively, do so in the burst series are displayed. OK Share To save...

User's Guide
Page 53
review Review 2 Press the Review button to take a picture anytime-even in Review. 1 Press the Review button. Picture and Video Icons Email Favorite 02 Print # of copies Protect 072 Internal Card Picture/video number Picture Location Low battery Exhausted battery 41 Remember, press the Shutter button to exit Review. The camera screen displays the last menu picture or video taken. 4 Reviewing Pictures and Videos Press the Review button to view and work with your pictures and videos.
review Review 2 Press the Review button to take a picture anytime-even in Review. 1 Press the Review button. Picture and Video Icons Email Favorite 02 Print # of copies Protect 072 Internal Card Picture/video number Picture Location Low battery Exhausted battery 41 Remember, press the Shutter button to exit Review. The camera screen displays the last menu picture or video taken. 4 Reviewing Pictures and Videos Press the Review button to view and work with your pictures and videos.

User's Guide
Page 58
... press and hold . 3 Press the OK button. The interval setting remains until you took them. To run a slide show on a television or on the camera screen. Starting the Slide Show 1 Press the Review button, then press the Menu button. 2 Press to highlight Slide Show , then press the OK button. ...3 Press to highlight Interval, then press the OK button. 2 Select a display interval. To save battery power, use an optional Kodak 5-volt AC adapter (page 76). Each picture and video is displayed once, in the order in which you change it. 46 Then the...
... press and hold . 3 Press the OK button. The interval setting remains until you took them. To run a slide show on a television or on the camera screen. Starting the Slide Show 1 Press the Review button, then press the Menu button. 2 Press to highlight Slide Show , then press the OK button. ...3 Press to highlight Interval, then press the OK button. 2 Select a display interval. To save battery power, use an optional Kodak 5-volt AC adapter (page 76). Each picture and video is displayed once, in the order in which you change it. 46 Then the...

User's Guide
Page 59
... as on the television screen. The Loop setting remains until you cancel it by pressing the OK button or until you change it repeats until battery power is continuously repeated. 1 On the Slide Show menu, press to highlight Loop, then press the OK button. 2 Press to the television ...and videos on a television, computer monitor, or any device equipped with a video input. (Images may not look as good on a television as the camera display. 2 Review pictures and videos on a computer monitor or when printed.) NOTE: Ensure that the Video Out setting is correctly set to NTSC or PAL...
... as on the television screen. The Loop setting remains until you cancel it by pressing the OK button or until you change it repeats until battery power is continuously repeated. 1 On the Slide Show menu, press to highlight Loop, then press the OK button. 2 Press to the television ...and videos on a television, computer monitor, or any device equipped with a video input. (Images may not look as good on a television as the camera display. 2 Review pictures and videos on a computer monitor or when printed.) NOTE: Ensure that the Video Out setting is correctly set to NTSC or PAL...

User's Guide
Page 68
...see page 19 and page 38). Chapter 6 Changing the Default Print Quantity The Default Print Quantity setting determines the value that is displayed on the camera screen after you take a picture or video, Quickview displays it . 56 The picture is 1. 1 Press the Menu button. 2 Press to ... default quantity, then press the OK button. 5 Press the Menu button to exit the menu. This setting remains until you take it. To save battery power, turn off Quickview. 1 Press the Menu button. 2 Press to highlight Setup , then press the OK button. 3 Press to highlight Quickview ...
...see page 19 and page 38). Chapter 6 Changing the Default Print Quantity The Default Print Quantity setting determines the value that is displayed on the camera screen after you take a picture or video, Quickview displays it . 56 The picture is 1. 1 Press the Menu button. 2 Press to ... default quantity, then press the OK button. 5 Press the Menu button to exit the menu. This setting remains until you take it. To save battery power, turn off Quickview. 1 Press the Menu button. 2 Press to highlight Setup , then press the OK button. 3 Press to highlight Quickview ...
User's Guide
Page 81
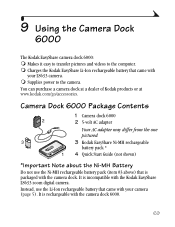
... It is rechargeable with your camera (page 5). m Charges the Kodak EasyShare Li-Ion rechargeable battery that is packaged with the Kodak EasyShare LS633 zoom digital camera. Instead, use the Ni-MH rechargeable battery pack (item #3 above) that came with your LS633 camera. It is incompatible with the camera dock. You can purchase a camera dock at a dealer of Kodak products or at www.kodak.com/go/accessories. m Supplies...
... It is rechargeable with your camera (page 5). m Charges the Kodak EasyShare Li-Ion rechargeable battery that is packaged with the Kodak EasyShare LS633 zoom digital camera. Instead, use the Ni-MH rechargeable battery pack (item #3 above) that came with your LS633 camera. It is incompatible with the camera dock. You can purchase a camera dock at a dealer of Kodak products or at www.kodak.com/go/accessories. m Supplies...

User's Guide
Page 84
... light If a rechargeable battery is now powered by the camera dock instead of the camera batteries. 72 Chapter 9 Docking the Camera To charge the battery or to transfer pictures and videos from the camera to the camera. The camera is in the camera, the first battery charging light glows green. The Transfer light glows green when the camera is securely seated. Foot...
... light If a rechargeable battery is now powered by the camera dock instead of the camera batteries. 72 Chapter 9 Docking the Camera To charge the battery or to transfer pictures and videos from the camera to the camera. The camera is in the camera, the first battery charging light glows green. The Transfer light glows green when the camera is securely seated. Foot...

User's Guide
Page 85
... Light Status Charging Lights Cause Green lights 1 light: Camera is installed in the camera (see page 5). 2 Turn off (see page 72). Chapter 9 Charging the Battery 1 Make sure the Kodak EasyShare Li-Ion rechargeable battery is properly docked. If the camera is damaged. Battery or connector pin is left in the camera dock (see page 102). m Charging stops if you...
... Light Status Charging Lights Cause Green lights 1 light: Camera is installed in the camera (see page 5). 2 Turn off (see page 72). Chapter 9 Charging the Battery 1 Make sure the Kodak EasyShare Li-Ion rechargeable battery is properly docked. If the camera is damaged. Battery or connector pin is left in the camera dock (see page 102). m Charging stops if you...

User's Guide
Page 88
... 5-volt AC adapter that came with camera dock) 76 The adapter cannot charge the battery. Purchase batteries and AC adapters at www.kodak.com/go/accessories. Camera Dock 6000 Specifications Specifications-Kodak EasyShare camera dock 6000 Communication USB with computer Cable (included with Kodak EasyShare cameras) Dimensions Width (without insert) Depth ... status and error conditions Input voltage 5 ±0.25 V DC Power DC input AC adapter (included with the Kodak EasyShare camera dock 6000 to an electrical outlet. DC-In 1 Connect the AC adapter to the DC-In port. 2 ...
... 5-volt AC adapter that came with camera dock) 76 The adapter cannot charge the battery. Purchase batteries and AC adapters at www.kodak.com/go/accessories. Camera Dock 6000 Specifications Specifications-Kodak EasyShare camera dock 6000 Communication USB with computer Cable (included with Kodak EasyShare cameras) Dimensions Width (without insert) Depth ... status and error conditions Input voltage 5 ±0.25 V DC Power DC input AC adapter (included with the Kodak EasyShare camera dock 6000 to an electrical outlet. DC-In 1 Connect the AC adapter to the DC-In port. 2 ...
User's Guide
Page 89
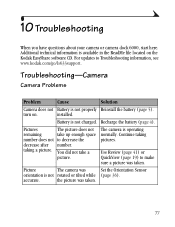
Continue taking a picture. the picture was taken. turn on the Kodak EasyShare software CD. Battery is not rotated or tilted while (page 36). Picture The camera was Set the Orientation Sensor orientation is not charged. 10 Troubleshooting When you have questions about your camera or camera dock 6000, start here. Additional technical information is operating normally. Pictures...
Continue taking a picture. the picture was taken. turn on the Kodak EasyShare software CD. Battery is not rotated or tilted while (page 36). Picture The camera was Set the Orientation Sensor orientation is not charged. 10 Troubleshooting When you have questions about your camera or camera dock 6000, start here. Additional technical information is operating normally. Pictures...


