User Guide
Page 2
... finalizing Kodak Driver Software installation 12 Installing application software 13 Scanner components 14 Locking the scanner 16 3 Using the Scanner 17 Turning the scanner on and off 17 Scanner positions 17 Tilting the scanner body 18 Adjusting the output tray 19 Adjusting the input tray 21 Adjusting the side guides 22 Start and stop scanning 22 Document preparation 23...
... finalizing Kodak Driver Software installation 12 Installing application software 13 Scanner components 14 Locking the scanner 16 3 Using the Scanner 17 Turning the scanner on and off 17 Scanner positions 17 Tilting the scanner body 18 Adjusting the output tray 19 Adjusting the input tray 21 Adjusting the side guides 22 Start and stop scanning 22 Document preparation 23...

User Guide
Page 3
Example 2 . . . . . 69 Creating different settings for each side of a document - Logs tab 83 Using the ISIS Driver 84 The main ISIS Driver window 84 Main tab 85 Layout tab 88 Image Processing tab 89 Scanner tab 91 Auto Color Detect tab 93 Adjustments tab 95 Dropout tab 97 Log tab 98...TWAIN datasource 41 Terminology and features 41 How do I begin 42 Selecting Image settings 43 Selecting Device settings 45 The main Kodak Scanner window 46 The Image Settings window 49 Preview area 50 General tab 51 Size tab 53 Adjustments tab: black and white 56 Adjustments tab: color or ...
Example 2 . . . . . 69 Creating different settings for each side of a document - Logs tab 83 Using the ISIS Driver 84 The main ISIS Driver window 84 Main tab 85 Layout tab 88 Image Processing tab 89 Scanner tab 91 Auto Color Detect tab 93 Adjustments tab 95 Dropout tab 97 Log tab 98...TWAIN datasource 41 Terminology and features 41 How do I begin 42 Selecting Image settings 43 Selecting Device settings 45 The main Kodak Scanner window 46 The Image Settings window 49 Preview area 50 General tab 51 Size tab 53 Adjustments tab: black and white 56 Adjustments tab: color or ...
User Guide
Page 11
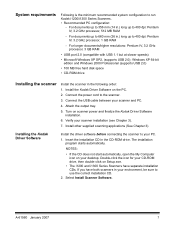
... cord to run Kodak i1200/i1300 Series Scanners. • Recommended PC configuration: - Double-click the icon for your CD-ROM drive, then double-click on your PC. 1. Select Install Scanner Software. For longer documents/higher resolutions: Pentium...Windows XP SP2, (supports USB 2.0); NOTES: • If the CD does not start automatically, open the My Computer icon on Setup.exe. • The i1200 and i1300 Series Scanners have both scanners in the following order: 1. Verify your scanner and PC. 4. Install the Kodak Driver Software on scanner power and finalize the Kodak Driver...
... cord to run Kodak i1200/i1300 Series Scanners. • Recommended PC configuration: - Double-click the icon for your CD-ROM drive, then double-click on your PC. 1. Select Install Scanner Software. For longer documents/higher resolutions: Pentium...Windows XP SP2, (supports USB 2.0); NOTES: • If the CD does not start automatically, open the My Computer icon on Setup.exe. • The i1200 and i1300 Series Scanners have both scanners in the following order: 1. Verify your scanner and PC. 4. Install the Kodak Driver Software on scanner power and finalize the Kodak Driver...

User Guide
Page 16
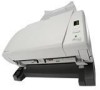
... is attached, the New Hardware window may be complete when the scanner is finished and ready to turn on . 1. Turning on the scanner and finalizing Kodak Driver Software installation When the USB cable and power connections have been made, and the Kodak Software Drivers have been properly installed, the ...installation will be displayed once for the scanner and once for the flatbed. Kodak has successfully tested the i1200/i1300 Series Scanners with Windows XP. 12 A-61560 January 2007 Use the...
... is attached, the New Hardware window may be complete when the scanner is finished and ready to turn on . 1. Turning on the scanner and finalizing Kodak Driver Software installation When the USB cable and power connections have been made, and the Kodak Software Drivers have been properly installed, the ...installation will be displayed once for the scanner and once for the flatbed. Kodak has successfully tested the i1200/i1300 Series Scanners with Windows XP. 12 A-61560 January 2007 Use the...
User Guide
Page 29
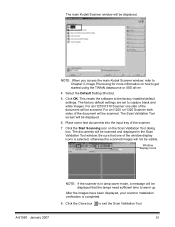
...Validation Tool. Click the Start Scanning icon on how to get started using the TWAIN datasource or ISIS driver. 4. After the images have been displayed, your scanner installation verification is selected, otherwise the scanned images will not be visible. Click the Close box to ...2007 25 This resets the software to warm up. For an i1220 or i1320 Scanner both sides of the document will be displayed. The main Kodak Scanner window will be scanned. NOTE: When you access the main Kodak Scanner window, refer to Chapter 4, Image Processing for more information on the Scan Validation ...
...Validation Tool. Click the Start Scanning icon on how to get started using the TWAIN datasource or ISIS driver. 4. After the images have been displayed, your scanner installation verification is selected, otherwise the scanned images will not be visible. Click the Close box to ...2007 25 This resets the software to warm up. For an i1220 or i1320 Scanner both sides of the document will be displayed. The main Kodak Scanner window will be scanned. NOTE: When you access the main Kodak Scanner window, refer to Chapter 4, Image Processing for more information on the Scan Validation ...

User Guide
Page 31
...61560 January 2007 27 Smart touch functionality Smart touch functionality allows you use frequently by pressing the Start button on the scanner or by selecting the function from the smart touch function listing. Configure - Nine different functions can configure smart touch ...version number and information about smart touch. Function listing - After the scanner, software drivers, and application software are most important to you can be displayed on the scanner. Predefined tasks are installed with the numbers (1 through 9) displayed in the function window on the system tray.
...61560 January 2007 27 Smart touch functionality Smart touch functionality allows you use frequently by pressing the Start button on the scanner or by selecting the function from the smart touch function listing. Configure - Nine different functions can configure smart touch ...version number and information about smart touch. Function listing - After the scanner, software drivers, and application software are most important to you can be displayed on the scanner. Predefined tasks are installed with the numbers (1 through 9) displayed in the function window on the system tray.

User Guide
Page 44
...to all the features of the scanner and is a good way to verify scanner functionality using both the TWAIN datasource and the ISIS driver. displays the user interface for the selected driver. The Scan Validation Tool allows ...you to select a directory to Files is a diagnostic application provided by Kodak. Stop Scanning - Four Image Display mode - Start Scanning - displays two images at a time. 40 A-61560 January 2007 Scan One Page - One Image Display mode - scans the documents in the input tray. closes the Image Viewer window...
...to all the features of the scanner and is a good way to verify scanner functionality using both the TWAIN datasource and the ISIS driver. displays the user interface for the selected driver. The Scan Validation Tool allows ...you to select a directory to Files is a diagnostic application provided by Kodak. Stop Scanning - Four Image Display mode - Start Scanning - displays two images at a time. 40 A-61560 January 2007 Scan One Page - One Image Display mode - scans the documents in the input tray. closes the Image Viewer window...

User Guide
Page 45
... represent some of the names of input documents. If you may be done by using the TWAIN datasource Kodak provides in concert with your scanning application. If you have a Kodak i1210 or i1310 Scanner (simplex scanner) all displayed windows assume the features available on the Scan Validation... scanned during the current Scan Validation Tool session. • To access the TWAIN datasource (or ISIS driver), double-click the Setup icon on the Kodak i1220 or i1320 Scanner (duplex scanner). For example, you could create a Setting Shortcut called "Invoices" and whenever you want to scan ...
... represent some of the names of input documents. If you may be done by using the TWAIN datasource Kodak provides in concert with your scanning application. If you have a Kodak i1210 or i1310 Scanner (simplex scanner) all displayed windows assume the features available on the Scan Validation... scanned during the current Scan Validation Tool session. • To access the TWAIN datasource (or ISIS driver), double-click the Setup icon on the Kodak i1220 or i1320 Scanner (duplex scanner). For example, you could create a Setting Shortcut called "Invoices" and whenever you want to scan ...

User Guide
Page 88
...documents. For the purpose of the window apply to all tabs. See the section entitled, "Starting the Scan Validation Tool" earlier in this driver can be reset to duplicate those settings for Back Image #2. Default when you can select each of 9 tabs. This section provides descriptions of the options on the Kodak i1220/i1320 Scanners.... Copy this manual, all options are limited to access the main ISIS Driver window. Cancel closes the window without saving any choices necessary to set of these options. This driver is...
...documents. For the purpose of the window apply to all tabs. See the section entitled, "Starting the Scan Validation Tool" earlier in this driver can be reset to duplicate those settings for Back Image #2. Default when you can select each of 9 tabs. This section provides descriptions of the options on the Kodak i1220/i1320 Scanners.... Copy this manual, all options are limited to access the main ISIS Driver window. Cancel closes the window without saving any choices necessary to set of these options. This driver is...

User Guide
Page 103
... is only available when Fixed to Transport or Relative to the host. The scan areas defined for each of image data which is returned to Document is first selected. Scan Area dialog box The Scan Area dialog box allows you to define the amount of these in Pixels, Inches or Centimeters... area can choose a different paper size using the drop-down list. 99 A-61560 January 2007 Page Size the default paper size is set when a scanner is selected on the Scanner Settings dialog box. NOTE: Select the side and image to be defined in the main ISIS Driver window.
... is only available when Fixed to Transport or Relative to the host. The scan areas defined for each of image data which is returned to Document is first selected. Scan Area dialog box The Scan Area dialog box allows you to define the amount of these in Pixels, Inches or Centimeters... area can choose a different paper size using the drop-down list. 99 A-61560 January 2007 Page Size the default paper size is set when a scanner is selected on the Scanner Settings dialog box. NOTE: Select the side and image to be defined in the main ISIS Driver window.


