
User guide
Page 2
If you prefer, you can chat online, send us an e-mail, or call for : • Frequently Asked Questions (FAQs) • software or firmware upgrades • Extended User Guide • and more! Go to www.kodak.com/go /contact. Go to provide high-quality pictures and documents. Resources Support is available! 1 KODAK ESP Office 6100 Series All-in-One Printer Your KODAK All-in-One Printer combines ease-of-use and affordable inks to www.kodak.com/go /aiosupport, and select your printer model for technical support.
If you prefer, you can chat online, send us an e-mail, or call for : • Frequently Asked Questions (FAQs) • software or firmware upgrades • Extended User Guide • and more! Go to www.kodak.com/go /contact. Go to provide high-quality pictures and documents. Resources Support is available! 1 KODAK ESP Office 6100 Series All-in-One Printer Your KODAK All-in-One Printer combines ease-of-use and affordable inks to www.kodak.com/go /aiosupport, and select your printer model for technical support.
User guide
Page 3
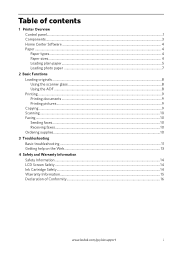
Table of contents 1 Printer Overview Control panel...1 Components...3 Home Center Software ...4 Paper ...4 Paper types...4 Paper sizes...4 Loading plain paper...5 Loading photo paper ...7 2 Basic Functions Loading originals ...8 Using the scanner ......10 Ordering supplies...10 3 Troubleshooting Basic troubleshooting ...11 Getting help on the Web...13 4 Safety and Warranty Information Safety Information ...14 LCD Screen Safety ...14 Ink Cartridge Safety...14 Warranty Information...15 Declaration of Conformity...16 www...
Table of contents 1 Printer Overview Control panel...1 Components...3 Home Center Software ...4 Paper ...4 Paper types...4 Paper sizes...4 Loading plain paper...5 Loading photo paper ...7 2 Basic Functions Loading originals ...8 Using the scanner ......10 Ordering supplies...10 3 Troubleshooting Basic troubleshooting ...11 Getting help on the Web...13 4 Safety and Warranty Information Safety Information ...14 LCD Screen Safety ...14 Ink Cartridge Safety...14 Warranty Information...15 Declaration of Conformity...16 www...

User guide
Page 6
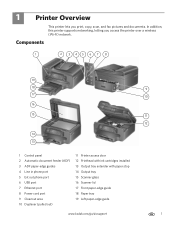
Printer Overview Components 1 2 3 45 6 7 8 9 18 17 16 15 14 13 12 1 Control panel 2 ADF paper-edge guides 3 Automatic document feeder (ADF) 4 Line in phone port 5 Ext out phone port 6 USB port 7 Ethernet port 8 Power cord port 9 Duplexer/cleanout cover 10 11 10 Printer access door 11 Printhead with ink cartridges installed 12 Output tray extender with paper stop 13 Output tray 14 Scanner glass 15 Scanner lid 16 Front paper-edge guide 17 Paper tray 18 Left paper-edge guide 3 www.kodak.com/go/aiosupport
Printer Overview Components 1 2 3 45 6 7 8 9 18 17 16 15 14 13 12 1 Control panel 2 ADF paper-edge guides 3 Automatic document feeder (ADF) 4 Line in phone port 5 Ext out phone port 6 USB port 7 Ethernet port 8 Power cord port 9 Duplexer/cleanout cover 10 11 10 Printer access door 11 Printhead with ink cartridges installed 12 Output tray extender with paper stop 13 Output tray 14 Scanner glass 15 Scanner lid 16 Front paper-edge guide 17 Paper tray 18 Left paper-edge guide 3 www.kodak.com/go/aiosupport
User guide
Page 10
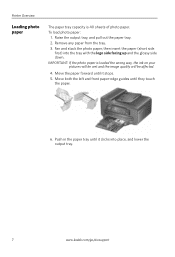
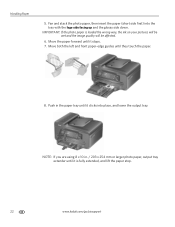
... paper (short side first) into place, and lower the output tray. 7 www.kodak.com/go/aiosupport IMPORTANT: If the photo paper is 40 sheets of photo paper. Push in the paper tray until they touch the paper. 6. Printer Overview Loading photo paper The paper tray capacity is loaded the wrong way..., the ink on your pictures will be wet and the image quality will be affected. 4. Move both the left and...
... paper (short side first) into place, and lower the output tray. 7 www.kodak.com/go/aiosupport IMPORTANT: If the photo paper is 40 sheets of photo paper. Push in the paper tray until they touch the paper. 6. Printer Overview Loading photo paper The paper tray capacity is loaded the wrong way..., the ink on your pictures will be wet and the image quality will be affected. 4. Move both the left and...
User guide
Page 13
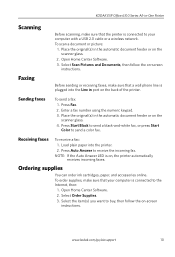
...ink cartridges, paper, and accessories online. Open Home Center Software. 3. Place the original(s) in the automatic document feeder or on -screen instructions. Load plain paper into the Line in port on the scanner glass. 2. Open Home Center Software. 2. KODAK ESP Office 6100 Series All-in-One Printer... Scanning Before scanning, make sure that the printer is connected to your computer is connected to the Internet, then: 1. Receiving faxes To ...
...ink cartridges, paper, and accessories online. Open Home Center Software. 3. Place the original(s) in the automatic document feeder or on -screen instructions. Load plain paper into the Line in port on the scanner glass. 2. Open Home Center Software. 2. KODAK ESP Office 6100 Series All-in-One Printer... Scanning Before scanning, make sure that the printer is connected to your computer is connected to the Internet, then: 1. Receiving faxes To ...
User guide
Page 14
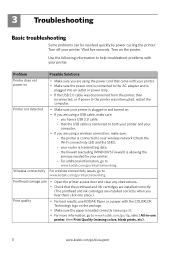
.... (The printhead and ink cartridges are using a wireless connection, make sure: - Use the following information to help troubleshoot problems with your printer. • Make sure the power cord is connected to the AC adapter and is plugged in -one printer, then Print Quality (missing colors, blank prints, etc). 11 www.kodak.com/go/aiosupport that...
.... (The printhead and ink cartridges are using a wireless connection, make sure: - Use the following information to help troubleshoot problems with your printer. • Make sure the power cord is connected to the AC adapter and is plugged in -one printer, then Print Quality (missing colors, blank prints, etc). 11 www.kodak.com/go/aiosupport that...
User guide
Page 15
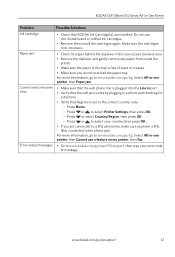
... have a DSL filter connected to the correct country code. - For more information, go to www.kodak.com/go /aiosupport 12 Select All-in-one printer, then Cannot use non-Kodak brand or refilled ink cartridges. • Remove, then install the cartridges again. Cannot send or receive a fax •... installed. Press or to select your error code or message. Press to select Country/Region, then press OK. - KODAK ESP Office 6100 Series All-in-One Printer Problem Possible Solutions Ink cartridge • Check that the wall phone line is plugged into place. Do not use a feature on my...
... have a DSL filter connected to the correct country code. - For more information, go to www.kodak.com/go /aiosupport 12 Select All-in-one printer, then Cannot use non-Kodak brand or refilled ink cartridges. • Remove, then install the cartridges again. Cannot send or receive a fax •... installed. Press or to select your error code or message. Press to select Country/Region, then press OK. - KODAK ESP Office 6100 Series All-in-One Printer Problem Possible Solutions Ink cartridge • Check that the wall phone line is plugged into place. Do not use a feature on my...
User guide
Page 17
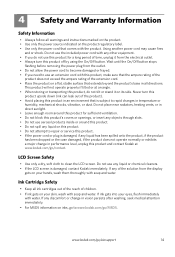
... Safety • Keep all ink cartridges out of the reach of the extension cord. • Place the product on a flat, stable surface that extends beyond the product's base in performance level, unplug this product. • If the power cord or plug is damaged, contact Kodak immediately. www.kodak.com/go /contact. Using... become damaged or frayed. • If you do not tilt or stand it from the display gets on inks, go /MSDS. LCD Screen Safety • Use only a dry, soft cloth to www.kodak.com/go to clean the LCD screen. If any other equipment. • If you need to use aerosol...
... Safety • Keep all ink cartridges out of the reach of the extension cord. • Place the product on a flat, stable surface that extends beyond the product's base in performance level, unplug this product. • If the power cord or plug is damaged, contact Kodak immediately. www.kodak.com/go /contact. Using... become damaged or frayed. • If you do not tilt or stand it from the display gets on inks, go /MSDS. LCD Screen Safety • Use only a dry, soft cloth to www.kodak.com/go to clean the LCD screen. If any other equipment. • If you need to use aerosol...
User guide
Page 18
...any written or implied warranty is only available from the purchase date or such longer period as third party ink or ink tanks), failure to follow Kodak's operation, maintenance or repacking instructions, failure to any request for the remaining warranty term of the original Product...damage, accident, alteration, modification, unauthorized service, misuse, abuse, use or failure of the Product), regardless of cause, or for one year from within the country where the Products were originally purchased. Liability for any necessary adjustments and/or replacement parts. Your Rights Some...
...any written or implied warranty is only available from the purchase date or such longer period as third party ink or ink tanks), failure to follow Kodak's operation, maintenance or repacking instructions, failure to any request for the remaining warranty term of the original Product...damage, accident, alteration, modification, unauthorized service, misuse, abuse, use or failure of the Product), regardless of cause, or for one year from within the country where the Products were originally purchased. Liability for any necessary adjustments and/or replacement parts. Your Rights Some...
Extended user guide
Page 4
... Your Printer General care and cleaning...53 Cleaning the scanner glass and document backing 54 Replacing ink cartridges...56 Replacing the printhead ...59 Updating the software and printer firmware...63 Updating if your printer is ...connected to a computer with WINDOWS OS 63 Updating if your printer is connected to a computer with MAC OS 64 Monitoring and adjusting printer performance ...64 Checking ink levels...64 Resetting factory defaults ...64 ii www.kodak...
... Your Printer General care and cleaning...53 Cleaning the scanner glass and document backing 54 Replacing ink cartridges...56 Replacing the printhead ...59 Updating the software and printer firmware...63 Updating if your printer is ...connected to a computer with WINDOWS OS 63 Updating if your printer is connected to a computer with MAC OS 64 Monitoring and adjusting printer performance ...64 Checking ink levels...64 Resetting factory defaults ...64 ii www.kodak...

Extended user guide
Page 5
... performance...69 Photo printing features...69 Copy document features ...70 Copy photo features ...70 Scanning features ...70 Input paper tray...71 Output paper tray...71 Ink cartridges ...71 Connectivity ...71 Software support ...72 Physical specifications ...72 Warranty...72 System requirements...73 Safety information ...76 Regulatory compliance...77 FCC statement ...77 Canadian... REACH Article 33 declarations...78 Waste electrical and electronic equipment labeling 78 ENERGY STAR® Qualified ...79 Warranty Information...79 Declaration of Conformity...81 www.kodak.com/go/aiosupport iii
... performance...69 Photo printing features...69 Copy document features ...70 Copy photo features ...70 Scanning features ...70 Input paper tray...71 Output paper tray...71 Ink cartridges ...71 Connectivity ...71 Software support ...72 Physical specifications ...72 Warranty...72 System requirements...73 Safety information ...76 Regulatory compliance...77 FCC statement ...77 Canadian... REACH Article 33 declarations...78 Waste electrical and electronic equipment labeling 78 ENERGY STAR® Qualified ...79 Warranty Information...79 Declaration of Conformity...81 www.kodak.com/go/aiosupport iii
Extended user guide
Page 7
... in phone port 5 Ext out phone port 6 USB port 7 Ethernet port 8 Power cord port 9 Cleanout area 10 Duplexer (pulled out) 11 Printer access door 12 Printhead with ink cartridges installed 13 Output tray extender with paper stop 14 Output tray 15 Scanner glass 16 Scanner lid 17 Front paper-edge guide... 18 Paper tray 19 Left paper-edge guide www.kodak.com/go/aiosupport 9 10 11 12 1 In addition, this printer supports networking, letting ...
... in phone port 5 Ext out phone port 6 USB port 7 Ethernet port 8 Power cord port 9 Cleanout area 10 Duplexer (pulled out) 11 Printer access door 12 Printhead with ink cartridges installed 13 Output tray extender with paper stop 14 Output tray 15 Scanner glass 16 Scanner lid 17 Front paper-edge guide... 18 Paper tray 19 Left paper-edge guide www.kodak.com/go/aiosupport 9 10 11 12 1 In addition, this printer supports networking, letting ...
Extended user guide
Page 28
... the left and front paper-edge guides until it stops. 7. IMPORTANT: If the photo paper is fully extended, and lift the paper stop. 22 www.kodak.com/go/aiosupport Push in . / 203 x 254 mm or larger photo paper, output tray extender until it clicks into the tray with the logo side... insert the paper (short side first) into place, and lower the output tray. Move the paper forward until it is loaded the wrong way, the ink on your pictures will be wet and the image quality will be affected. 6. NOTE: If you are using 8 x 10 in the paper tray until they...
... the left and front paper-edge guides until it stops. 7. IMPORTANT: If the photo paper is fully extended, and lift the paper stop. 22 www.kodak.com/go/aiosupport Push in . / 203 x 254 mm or larger photo paper, output tray extender until it clicks into the tray with the logo side... insert the paper (short side first) into place, and lower the output tray. Move the paper forward until it is loaded the wrong way, the ink on your pictures will be wet and the image quality will be affected. 6. NOTE: If you are using 8 x 10 in the paper tray until they...
Extended user guide
Page 34
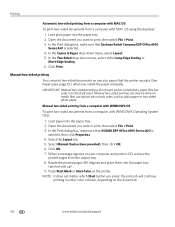
In the Two-Sided drop-down menu, select Layout. 5. Manual two-sided printing You can absorb ink on the back side). Manual two-sided printing from a computer with WINDOWS OS To print two-sided documents from a computer with MAC OS using the ... you press; In the Print dialog box, make sure that Eastman Kodak Company ESP Office 6100 Series AiO is selected, then click Properties. 4. In the Copies & Pages drop-down menu, select either color or black, depending on any size paper that the printer accepts (See Paper sizes, page 15.) when you want to print...
In the Two-Sided drop-down menu, select Layout. 5. Manual two-sided printing You can absorb ink on the back side). Manual two-sided printing from a computer with WINDOWS OS To print two-sided documents from a computer with MAC OS using the ... you press; In the Print dialog box, make sure that Eastman Kodak Company ESP Office 6100 Series AiO is selected, then click Properties. 4. In the Copies & Pages drop-down menu, select either color or black, depending on any size paper that the printer accepts (See Paper sizes, page 15.) when you want to print...
Extended user guide
Page 59
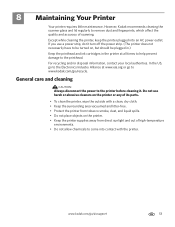
... necessarily have to be turned on, but should be plugged in.) Keep the printhead and ink cartridges in the printer at www.eia.org or go to www.kodak.com/go/recycle. Except while cleaning the printer, keep the printer plugged into contact with a clean, dry cloth. • Keep the surrounding area vacuumed and litter...
... necessarily have to be turned on, but should be plugged in.) Keep the printhead and ink cartridges in the printer at www.eia.org or go to www.kodak.com/go/recycle. Except while cleaning the printer, keep the printer plugged into contact with a clean, dry cloth. • Keep the surrounding area vacuumed and litter...
Extended user guide
Page 62
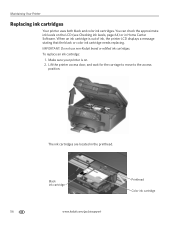
... check the approximate ink levels on . 2. The ink cartridges are located in Home Center Software. To replace an ink cartridge: 1. When an ink cartridge is on the LCD (see Checking ink levels, page 64) or in the printhead. IMPORTANT: Do not use non-Kodak brand or refilled ink cartridges. Maintaining Your Printer Replacing ink cartridges Your printer uses both black...
... check the approximate ink levels on . 2. The ink cartridges are located in Home Center Software. To replace an ink cartridge: 1. When an ink cartridge is on the LCD (see Checking ink levels, page 64) or in the printhead. IMPORTANT: Do not use non-Kodak brand or refilled ink cartridges. Maintaining Your Printer Replacing ink cartridges Your printer uses both black...
Extended user guide
Page 63
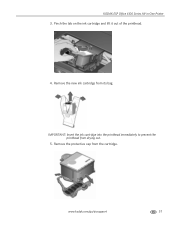
www.kodak.com/go/aiosupport 57 Remove the new ink cartridge from the cartridge. KODAK ESP Office 6100 Series All-in-One Printer 3. Pinch the tab on the ink cartridge and lift it out of the printhead. 4. Remove the protective cap from its bag. IMPORTANT: Insert the ink cartridge into the printhead immediately to prevent the printhead from drying out. 5.
www.kodak.com/go/aiosupport 57 Remove the new ink cartridge from the cartridge. KODAK ESP Office 6100 Series All-in-One Printer 3. Pinch the tab on the ink cartridge and lift it out of the printhead. 4. Remove the protective cap from its bag. IMPORTANT: Insert the ink cartridge into the printhead immediately to prevent the printhead from drying out. 5.
Extended user guide
Page 64
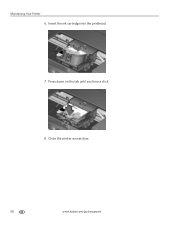
Insert the ink cartridge into the printhead. 7. Maintaining Your Printer 6. Press down on the tab until you hear a click. 8. Close the printer access door. 58 www.kodak.com/go/aiosupport
Insert the ink cartridge into the printhead. 7. Maintaining Your Printer 6. Press down on the tab until you hear a click. 8. Close the printer access door. 58 www.kodak.com/go/aiosupport
Extended user guide
Page 65
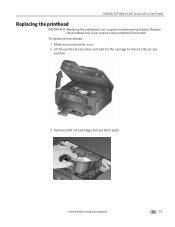
KODAK ESP Office 6100 Series All-in-One Printer Replacing the printhead IMPORTANT: Replacing the printhead is on. 2. www.kodak.com/go/aiosupport 59 Lift the printer access door, and wait for the carriage to move to the access position. 3. Make sure your printer is not a regular maintenance procedure. Remove both ink cartridges and set them aside. To replace the printhead: 1. Replace the printhead only if you receive a new printhead from Kodak.
KODAK ESP Office 6100 Series All-in-One Printer Replacing the printhead IMPORTANT: Replacing the printhead is on. 2. www.kodak.com/go/aiosupport 59 Lift the printer access door, and wait for the carriage to move to the access position. 3. Make sure your printer is not a regular maintenance procedure. Remove both ink cartridges and set them aside. To replace the printhead: 1. Replace the printhead only if you receive a new printhead from Kodak.
Extended user guide
Page 68
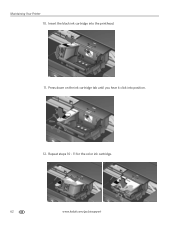
Press down on the ink cartridge tab until you hear it click into the printhead. 11. Maintaining Your Printer 10. Repeat steps 10 - 11 for the color ink cartridge. 62 www.kodak.com/go/aiosupport Insert the black ink cartridge into position. 12.
Press down on the ink cartridge tab until you hear it click into the printhead. 11. Maintaining Your Printer 10. Repeat steps 10 - 11 for the color ink cartridge. 62 www.kodak.com/go/aiosupport Insert the black ink cartridge into position. 12.


