
User Manual
Page 7
...Software First 1 Need This User Guide in Larger Print 1 What Can I Do With My Camera 2 What Can I Do With My Pictures and Videos 2 Package Contents 3 Attaching the Wrist Strap 4 Attaching the Lens Cap Strap 4 Adding Optional Lenses 4 Loading the Battery 5 Mode Dial Settings 6 Turning On the Camera... 7 Setting the Date and Time 8 Checking Camera Status Icons 9 Inserting an SD/MMC Card 10 Choosing Internal Memory or SD/MMC Card 11 Important Battery Information ...
...Software First 1 Need This User Guide in Larger Print 1 What Can I Do With My Camera 2 What Can I Do With My Pictures and Videos 2 Package Contents 3 Attaching the Wrist Strap 4 Attaching the Lens Cap Strap 4 Adding Optional Lenses 4 Loading the Battery 5 Mode Dial Settings 6 Turning On the Camera... 7 Setting the Date and Time 8 Checking Camera Status Icons 9 Inserting an SD/MMC Card 10 Choosing Internal Memory or SD/MMC Card 11 Important Battery Information ...

User Manual
Page 10
...Software 57 8 Connecting to the Computer 59 Connecting to the Computer 59 Printing Pictures From Your Computer 60 Printing From an Optional SD/MMC Card 60 Ordering Prints Online 60 9 Using the Optional Camera Dock II 61 Camera Dock Package Contents 61 Installing the Camera Insert 62 Connecting the Camera... Dock 63 Installing the Battery in the Camera 64 Docking the Camera 65 Charging the Battery 66 Transferring Pictures and ...
...Software 57 8 Connecting to the Computer 59 Connecting to the Computer 59 Printing Pictures From Your Computer 60 Printing From an Optional SD/MMC Card 60 Ordering Prints Online 60 9 Using the Optional Camera Dock II 61 Camera Dock Package Contents 61 Installing the Camera Insert 62 Connecting the Camera... Dock 63 Installing the Battery in the Camera 64 Docking the Camera 65 Charging the Battery 66 Transferring Pictures and ...

User Manual
Page 11
10 Troubleshooting 69 Troubleshooting-Camera 69 Troubleshooting-Camera Dock II 82 11 Getting Help 85 Helpful Web Links 85 Help in this Manual 85 Software Help 85 Telephone Customer Support 86 12 Appendix 89 Camera Specifications 89 Original Factory Settings-Camera 91 Upgrading Your Software and Firmware 92 Tips, Safety, Maintenance 92 Storage Capacities 93 Locating Pictures and Videos on a Card 94 Card File Naming Conventions 94 Power-Saving Features 95 Optional AC Adapter 95 Regulatory Information 95 ix
10 Troubleshooting 69 Troubleshooting-Camera 69 Troubleshooting-Camera Dock II 82 11 Getting Help 85 Helpful Web Links 85 Help in this Manual 85 Software Help 85 Telephone Customer Support 86 12 Appendix 89 Camera Specifications 89 Original Factory Settings-Camera 91 Upgrading Your Software and Firmware 92 Tips, Safety, Maintenance 92 Storage Capacities 93 Locating Pictures and Videos on a Card 94 Card File Naming Conventions 94 Power-Saving Features 95 Optional AC Adapter 95 Regulatory Information 95 ix

User Manual
Page 13
...Failure to do so may cause the software to Page. m Change Scale to open the User's Guide. 4 On a Windows OS-based computer or Mac OS 8.6 or 9.x: m From the File menu, select Print. Need This User Guide in Larger Print? 1 See www.kodak.com/go/dx4530support. 2 Navigate to the...Click View as PDF to 200%. 5 Print as usual. 1 On Mac OS X: m From the File menu, select Page Setup. 1 Getting Started Install Software First Install the software from the Kodak EasyShare software CD before connecting the camera (or optional camera dock) to the computer. See the Quick Start Guide or Installing the...
...Failure to do so may cause the software to Page. m Change Scale to open the User's Guide. 4 On a Windows OS-based computer or Mac OS 8.6 or 9.x: m From the File menu, select Print. Need This User Guide in Larger Print? 1 See www.kodak.com/go/dx4530support. 2 Navigate to the...Click View as PDF to 200%. 5 Print as usual. 1 On Mac OS X: m From the File menu, select Page Setup. 1 Getting Started Install Software First Install the software from the Kodak EasyShare software CD before connecting the camera (or optional camera dock) to the computer. See the Quick Start Guide or Installing the...

User Manual
Page 14
.... Share -Share pictures (print, email, save as Favorites) and videos (email, save as QuickTime movies. Or purchase an optional Kodak secure digital (SD) card or multimedia card (MMC) and: m Automatically print to any printer with Sound -Capture videos as Favorites). Capture Still...Night, Landscape, and Close-up modes to enjoy point-and-shoot operation. Order prints online from the Kodak EasyShare software CD, then: Transfer-Transfer pictures and videos to your camera functions (see page 60) Print pictures directly to organize and retrieve pictures on a computer. Share-Print...
.... Share -Share pictures (print, email, save as Favorites) and videos (email, save as QuickTime movies. Or purchase an optional Kodak secure digital (SD) card or multimedia card (MMC) and: m Automatically print to any printer with Sound -Capture videos as Favorites). Capture Still...Night, Landscape, and Close-up modes to enjoy point-and-shoot operation. Order prints online from the Kodak EasyShare software CD, then: Transfer-Transfer pictures and videos to your camera functions (see page 60) Print pictures directly to organize and retrieve pictures on a computer. Share-Print...

User Manual
Page 15
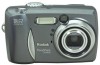
... strap Not shown: User's Guide, Quick Start Guide, Kodak EasyShare software CD. (In some countries, the User's Guide is provided on a CD only. Chapter 1 Package Contents 1 5 4 2 6 3 7 1 Camera 5 Custom camera dock insert (for EasyShare printer dock 4000 or EasyShare camera dock II) 2 CRV3 or equivalent* 6 Lens cap with a Kodak EasyShare camera dock II, a Kodak EasyShare Ni-MH rechargeable battery and AC power adapter are...
... strap Not shown: User's Guide, Quick Start Guide, Kodak EasyShare software CD. (In some countries, the User's Guide is provided on a CD only. Chapter 1 Package Contents 1 5 4 2 6 3 7 1 Camera 5 Custom camera dock insert (for EasyShare printer dock 4000 or EasyShare camera dock II) 2 CRV3 or equivalent* 6 Lens cap with a Kodak EasyShare camera dock II, a Kodak EasyShare Ni-MH rechargeable battery and AC power adapter are...

User Manual
Page 20
..., Anytime 1 Turn on the camera. The time is displayed in a 24-hour format. 4 Press to highlight Date & Time, then press the OK button. OK 2 Go to set the date and time at a later time.) The Date & Time screen appears. See the Kodak EasyShare software Help for an extended time....Press the OK button. (Select Cancel to step 4 below, Setting the Date & Time, Anytime. NOTE: Depending on your computer operating system, Kodak EasyShare software may allow your computer to exit the menu. Press next setting. 5 When finished, press the OK button. 6 Press the Menu button to ...
..., Anytime 1 Turn on the camera. The time is displayed in a 24-hour format. 4 Press to highlight Date & Time, then press the OK button. OK 2 Go to set the date and time at a later time.) The Date & Time screen appears. See the Kodak EasyShare software Help for an extended time....Press the OK button. (Select Cancel to step 4 below, Setting the Date & Time, Anytime. NOTE: Depending on your computer operating system, Kodak EasyShare software may allow your computer to exit the menu. Press next setting. 5 When finished, press the OK button. 6 Press the Menu button to ...

User Manual
Page 57
..., you can share: Tagged Pictures m By print m By email m As Favorites, for easy organization on organizing, printing, or emailing, click the Help button in the Kodak EasyShare software. 45 When they are transferred to tag pictures and videos: m Just after you take them, during Quickview (see page 21 and page 34) m After pressing...
..., you can share: Tagged Pictures m By print m By email m As Favorites, for easy organization on organizing, printing, or emailing, click the Help button in the Kodak EasyShare software. 45 When they are transferred to tag pictures and videos: m Just after you take them, during Quickview (see page 21 and page 34) m After pressing...

User Manual
Page 59
... press the OK button. Press to highlight Email , then press the OK button. 3 Press to the camera's internal memory. For details on your computer, the Kodak EasyShare software email screen opens and lets you immediately send the pictures and videos to the addresses you specified. Chapter 5... Tagging Pictures and Videos for Emailing First, use Kodak EasyShare software to create an email address book on address books and emailing, click the Help button in the Kodak EasyShare software. 47 To send the picture to more than one person, repeat step 3 ...
... press the OK button. Press to highlight Email , then press the OK button. 3 Press to the camera's internal memory. For details on your computer, the Kodak EasyShare software email screen opens and lets you immediately send the pictures and videos to the addresses you specified. Chapter 5... Tagging Pictures and Videos for Emailing First, use Kodak EasyShare software to create an email address book on address books and emailing, click the Help button in the Kodak EasyShare software. 47 To send the picture to more than one person, repeat step 3 ...

User Manual
Page 60
... computer, you can retrieve, organize, and label them by subject, date, event, or any category you choose. For details, click the Help button in the Kodak EasyShare software. 48
... computer, you can retrieve, organize, and label them by subject, date, event, or any category you choose. For details, click the Help button in the Kodak EasyShare software. 48

User Manual
Page 67
...CD-ROM drive m Built-in USB port m Color monitor with a minimum resolution of this product's release date. If you experience compatibility issues between this Kodak product. Windows System Requirements m Personal computer running Windows 98, 98SE, ME, 2000, or XP OS m 233 MHz processor or greater (300 MHz recommended...support this product and future hardware products or operating systems, contact your hardware or operating system manufacturer or retailer. 7 Installing the Software NOTE: This product was designed and manufactured to existing industry standards as of 800 x 600 pixels;
...CD-ROM drive m Built-in USB port m Color monitor with a minimum resolution of this product's release date. If you experience compatibility issues between this Kodak product. Windows System Requirements m Personal computer running Windows 98, 98SE, ME, 2000, or XP OS m 233 MHz processor or greater (300 MHz recommended...support this product and future hardware products or operating systems, contact your hardware or operating system manufacturer or retailer. 7 Installing the Software NOTE: This product was designed and manufactured to existing industry standards as of 800 x 600 pixels;

User Manual
Page 69
... window, click Continue. Mac OS X-double-click the CD icon on the Kodak EasyShare software CD, click the Help button in the Kodak EasyShare software. CAUTION: Install Kodak EasyShare software BEFORE connecting the camera or optional camera dock to the computer. Chapter 7 Install the Software For information on the software applications included on the desktop, then click the Install icon. 57 Mac OS...
... window, click Continue. Mac OS X-double-click the CD icon on the Kodak EasyShare software CD, click the Help button in the Kodak EasyShare software. CAUTION: Install Kodak EasyShare software BEFORE connecting the camera or optional camera dock to the computer. Chapter 7 Install the Software For information on the software applications included on the desktop, then click the Install icon. 57 Mac OS...

User Manual
Page 70
...it back on. If you receive information regarding software updates and registers some of the products included with the camera. m Mac OS 8.6 or 9.x-select Easy to install. See the anti-virus software manual for details. 58 To register later, see www.kodak.com/go/register. 5 If prompted, restart ...commonly used applications. m Windows OS-based computers-select Complete to electronically register your Internet service provider to install the software. You must be connected to your camera and software. Chapter 7 4 Follow the on-screen instructions to register electronically.
...it back on. If you receive information regarding software updates and registers some of the products included with the camera. m Mac OS 8.6 or 9.x-select Easy to install. See the anti-virus software manual for details. 58 To register later, see www.kodak.com/go/register. 5 If prompted, restart ...commonly used applications. m Windows OS-based computers-select Complete to electronically register your Internet service provider to install the software. You must be connected to your camera and software. Chapter 7 4 Follow the on-screen instructions to register electronically.
User Manual
Page 71
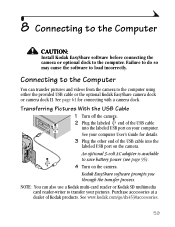
... provided USB cable or the optional Kodak EasyShare camera dock or camera dock II. Failure to do so may cause the software to the computer. Purchase accessories at a dealer of the USB cable into the labeled USB port on the camera. 8 Connecting to the Computer CAUTION: Install Kodak EasyShare software before connecting the camera or optional dock to load incorrectly...
... provided USB cable or the optional Kodak EasyShare camera dock or camera dock II. Failure to do so may cause the software to the computer. Purchase accessories at a dealer of the USB cable into the labeled USB port on the camera. 8 Connecting to the Computer CAUTION: Install Kodak EasyShare software before connecting the camera or optional dock to load incorrectly...

User Manual
Page 72
... service (provided by Ofoto www.ofoto.com) is just one of the many great online print services offered in the Kodak EasyShare software. m Store pictures, and share them delivered to your local photo retailer for details. See your printer User's Guide for professional printing. m Order... high-quality prints, photo greeting cards, frames, and albums-and have them with an SD/MMC slot. m Make prints at an SD/MMC-capable Kodak picture maker. (We suggest contacting a location prior to visiting.) m Take the card to your door. 60 m Edit, enhance, and add borders. Chapter ...
... service (provided by Ofoto www.ofoto.com) is just one of the many great online print services offered in the Kodak EasyShare software. m Store pictures, and share them delivered to your local photo retailer for details. See your printer User's Guide for professional printing. m Order... high-quality prints, photo greeting cards, frames, and albums-and have them with an SD/MMC slot. m Make prints at an SD/MMC-capable Kodak picture maker. (We suggest contacting a location prior to visiting.) m Take the card to your door. 60 m Edit, enhance, and add borders. Chapter ...

User Manual
Page 73
... your pictures and videos to the computer. 9 Using the Optional Camera Dock II The Kodak EasyShare camera dock II makes it easy to transfer your camera in the camera dock. Camera Dock Package Contents 1 2 1 AC power adapter, 7V Some AC adapters may cause the software to load incorrectly. The camera dock is also a rapid battery charger for the included...
... your pictures and videos to the computer. 9 Using the Optional Camera Dock II The Kodak EasyShare camera dock II makes it easy to transfer your camera in the camera dock. Camera Dock Package Contents 1 2 1 AC power adapter, 7V Some AC adapters may cause the software to load incorrectly. The camera dock is also a rapid battery charger for the included...

User Manual
Page 75
... accommodates DC IN 3V your computer. Do not plug the 7V adapter into the camera. 1 Plug the labeled end of the USB cable into a power outlet. Chapter 9 Connecting the Camera Dock After the Kodak EasyShare software is not in the camera dock when connecting the dock to power and to the computer for easy transferring of...
... accommodates DC IN 3V your computer. Do not plug the 7V adapter into the camera. 1 Plug the labeled end of the USB cable into a power outlet. Chapter 9 Connecting the Camera Dock After the Kodak EasyShare software is not in the camera dock when connecting the dock to power and to the computer for easy transferring of...

User Manual
Page 79
... emailing, see the Quick Start Guide or the Kodak EasyShare software Help. Remove the camera from your camera to your computer: 1 Place the camera in the camera dock. NOTE: After transferring pictures and videos, leave the camera in the camera dock. Caution When Using a Tripod Do not connect a tripod to the camera dock. Chapter 9 Transferring Pictures and Videos To transfer...
... emailing, see the Quick Start Guide or the Kodak EasyShare software Help. Remove the camera from your camera to your computer: 1 Place the camera in the camera dock. NOTE: After transferring pictures and videos, leave the camera in the camera dock. Caution When Using a Tripod Do not connect a tripod to the camera dock. Chapter 9 Transferring Pictures and Videos To transfer...

User Manual
Page 81
... not Battery is not charged. Battery is not Remove and reinstall the batteries turn on. Pictures remaining The picture does not The camera is on the Kodak EasyShare software CD. Lens cap is operating normally. Remove the lens cap. the number. 69 number does not take up enough Continue taking a picture. Replace (page 5) or...
... not Battery is not charged. Battery is not Remove and reinstall the batteries turn on. Pictures remaining The picture does not The camera is on the Kodak EasyShare software CD. Lens cap is operating normally. Remove the lens cap. the number. 69 number does not take up enough Continue taking a picture. Replace (page 5) or...

User Manual
Page 87
... user's laptops can turn off . Some Advanced Power See the Power Management Management utilities on the camera (page 7). USB cable is not charged. cannot communicate with the camera. Install the software (page 55). Install Kodak EasyShare software (page 55). 75 software. Battery is not securely Connect cable to disable this feature. computer port (page 59). Disconnect USB...
... user's laptops can turn off . Some Advanced Power See the Power Management Management utilities on the camera (page 7). USB cable is not charged. cannot communicate with the camera. Install the software (page 55). Install Kodak EasyShare software (page 55). 75 software. Battery is not securely Connect cable to disable this feature. computer port (page 59). Disconnect USB...


