
User Manual
Page 4
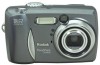
Back View Product Overview 12 3 45 6 14 7 13 8 12 11 10 9 1 Viewfinder 2 Ready light 3 Flash button 4 Mode dial 5 Shutter button 6 Zoom (Wide Angle and Telephoto) 7 Share button 8 Grip 9 Review button 10 Camera screen (LCD) 11Menu button 12 4-way control 13 OK button 14 Delete button ii
Back View Product Overview 12 3 45 6 14 7 13 8 12 11 10 9 1 Viewfinder 2 Ready light 3 Flash button 4 Mode dial 5 Shutter button 6 Zoom (Wide Angle and Telephoto) 7 Share button 8 Grip 9 Review button 10 Camera screen (LCD) 11Menu button 12 4-way control 13 OK button 14 Delete button ii

User Manual
Page 8
... Landscape Mode 18 Taking Pictures in Close-up Mode 19 Liveview-Framing with the Camera Screen 20 Quickview-Reviewing the Picture Just Taken 21 Using the Auto Focus Framing Marks 22 Using the Optical Zoom 23 Using the Digital Zoom 23 Using the Flash 24 Putting Yourself in the Picture 26 Setting... a Video 33 Quickview-Reviewing the Video Just Taken 34 Using the Optical Zoom 34 Putting Yourself in the Video 35 4 Reviewing Pictures and Videos 37 Viewing Pictures and Videos 37 Playing a Video 38 Deleting Pictures and Videos 38 Review Menus 39 Magnifying Pictures 39 vi
... Landscape Mode 18 Taking Pictures in Close-up Mode 19 Liveview-Framing with the Camera Screen 20 Quickview-Reviewing the Picture Just Taken 21 Using the Auto Focus Framing Marks 22 Using the Optical Zoom 23 Using the Digital Zoom 23 Using the Flash 24 Putting Yourself in the Picture 26 Setting... a Video 33 Quickview-Reviewing the Video Just Taken 34 Using the Optical Zoom 34 Putting Yourself in the Video 35 4 Reviewing Pictures and Videos 37 Viewing Pictures and Videos 37 Playing a Video 38 Deleting Pictures and Videos 38 Review Menus 39 Magnifying Pictures 39 vi

User Manual
Page 9
... Videos From Deletion 40 Running a Slide Show 41 Copying Pictures and Videos 43 Displaying Video Date 44 Viewing Picture/Video Information 44 5 Tagging Pictures and Videos 45 When Can I Tag My Pictures and Videos ... for Printing 46 Tagging Pictures and Videos for Emailing 47 Tagging Pictures and Videos as Favorites 48 6 Customizing Your Camera Settings 49 Accessing Setup Mode/Menus 49 Setup Menus 49 Changing the Print Quantity Default 50 Turning Off Quickview 50... Video Out 52 Selecting a Language 52 Formatting Internal Memory or SD/MMC Card 53 Viewing Camera Information 54 vii
... Videos From Deletion 40 Running a Slide Show 41 Copying Pictures and Videos 43 Displaying Video Date 44 Viewing Picture/Video Information 44 5 Tagging Pictures and Videos 45 When Can I Tag My Pictures and Videos ... for Printing 46 Tagging Pictures and Videos for Emailing 47 Tagging Pictures and Videos as Favorites 48 6 Customizing Your Camera Settings 49 Accessing Setup Mode/Menus 49 Setup Menus 49 Changing the Print Quantity Default 50 Turning Off Quickview 50... Video Out 52 Selecting a Language 52 Formatting Internal Memory or SD/MMC Card 53 Viewing Camera Information 54 vii

User Manual
Page 13
... to do so may cause the software to Page. Need This User Guide in Larger Print? 1 See www.kodak.com/go/dx4530support. 2 Navigate to the Manuals section. 3 Click View as usual. 1 m Change Scale to 200%. 5 Print as PDF to the computer. m In the Print... window, select Fit to load incorrectly. On Mac OS X: m From the File menu, select Page Setup. 1 Getting Started Install Software First Install the software from the Kodak EasyShare software CD before connecting the camera (or optional camera...
... to do so may cause the software to Page. Need This User Guide in Larger Print? 1 See www.kodak.com/go/dx4530support. 2 Navigate to the Manuals section. 3 Click View as usual. 1 m Change Scale to 200%. 5 Print as PDF to the computer. m In the Print... window, select Fit to load incorrectly. On Mac OS X: m From the File menu, select Page Setup. 1 Getting Started Install Software First Install the software from the Kodak EasyShare software CD before connecting the camera (or optional camera...

User Manual
Page 49
The icons displayed with a black bar at the top of the screen.) 3 Press the Review button to exit Review. See Checking Camera Status Icons, page 9. 2 Press to take a picture anytime, even in the center of the screen. 37 NOTE: Pictures taken at the Best (3:2) quality... setting are stored in internal memory or on a card. Fast-scrolling images appear in Review. The camera screen displays the last picture or video taken. 4 Reviewing Pictures and Videos Press the Review button to view and work with pictures and videos that are displayed at a 3:2 aspect ratio, as shown, with ...
The icons displayed with a black bar at the top of the screen.) 3 Press the Review button to exit Review. See Checking Camera Status Icons, page 9. 2 Press to take a picture anytime, even in the center of the screen. 37 NOTE: Pictures taken at the Best (3:2) quality... setting are stored in internal memory or on a card. Fast-scrolling images appear in Review. The camera screen displays the last picture or video taken. 4 Reviewing Pictures and Videos Press the Review button to view and work with pictures and videos that are displayed at a 3:2 aspect ratio, as shown, with ...

User Manual
Page 56
Information about the picture or video is displayed. 3 To view information on the camera): 1 Press the Review button, then press the Menu button. 2 Press to highlight Video Date Display, then press the OK button. 3 Press to highlight an option, .... 4 Press the Menu button to exit the menu. Chapter 4 Displaying Video Date To display the capture date and time (only during video playback on the camera. Viewing Picture/Video Information 1 Press the Review button, then press the Menu button. 2 Press to exit the menu. 44 Press the Menu button to highlight About...
Information about the picture or video is displayed. 3 To view information on the camera): 1 Press the Review button, then press the Menu button. 2 Press to highlight Video Date Display, then press the OK button. 3 Press to highlight an option, .... 4 Press the Menu button to exit the menu. Chapter 4 Displaying Video Date To display the capture date and time (only during video playback on the camera. Viewing Picture/Video Information 1 Press the Review button, then press the Menu button. 2 Press to exit the menu. 44 Press the Menu button to highlight About...

User Manual
Page 66
The camera model and the current firmware version appear. 4 Press the Menu button to highlight About , then press the OK button. Chapter 6 Viewing Camera Information 1 Press the Menu button. 2 Press to highlight Setup , then press the OK button. 3 Press to exit the menu. 54
The camera model and the current firmware version appear. 4 Press the Menu button to highlight About , then press the OK button. Chapter 6 Viewing Camera Information 1 Press the Menu button. 2 Press to highlight Setup , then press the OK button. 3 Press to exit the menu. 54

User Manual
Page 111
..., 21 last video, 34 protecting pictures, videos, 40 digital zoom, 23 display problems, 71 displaying slide show, 41 disposal, recycling, 92 docking camera, 62, 65 downloading pictures, 59, 67 E early camera dock, 68 EasyShare software, installing, 55 emailing pictures, videos, 47 exposure compensation..., 27 long time, 28 external video device setting video out, 52 viewing pictures, videos, 42 F favorites, ...
..., 21 last video, 34 protecting pictures, videos, 40 digital zoom, 23 display problems, 71 displaying slide show, 41 disposal, recycling, 92 docking camera, 62, 65 downloading pictures, 59, 67 E early camera dock, 68 EasyShare software, installing, 55 emailing pictures, videos, 47 exposure compensation..., 27 long time, 28 external video device setting video out, 52 viewing pictures, videos, 42 F favorites, ...

User Manual
Page 116
Index support, technical, 85, 86 system folder, card, 94 system requirements Mac, 56 Windows, 55 U universal dock insert, 62 upgrading software, firmware, 92 URLs, Kodak web sites, 85 T tagging for email, 47 for favorites, 48 for print, 46 when to tag, 45 taking pictures, 15 taking videos, 33 telephone support, ... date display, 44 deleting, 38 emailing tagged, 47 file naming, 94 protecting, 40 reviewing, 37 storage capacities, 93 taking, 33 transferring to computer, 59, 67 viewing, 37 viewfinder, using camera screen, 20 viewing camera information, 54 picture, video information, 44 104
Index support, technical, 85, 86 system folder, card, 94 system requirements Mac, 56 Windows, 55 U universal dock insert, 62 upgrading software, firmware, 92 URLs, Kodak web sites, 85 T tagging for email, 47 for favorites, 48 for print, 46 when to tag, 45 taking pictures, 15 taking videos, 33 telephone support, ... date display, 44 deleting, 38 emailing tagged, 47 file naming, 94 protecting, 40 reviewing, 37 storage capacities, 93 taking, 33 transferring to computer, 59, 67 viewing, 37 viewfinder, using camera screen, 20 viewing camera information, 54 picture, video information, 44 104


