
User Manual
Page 6
Product Overview Top, Bottom View AUTO OFF 12 34 8 5 1 Speaker 2 Flash button 3 Mode dial 4 Shutter button 6 7 5 Battery door 6 Tripod socket 7 Dock connector door 8 Lens cap strap post iv
Product Overview Top, Bottom View AUTO OFF 12 34 8 5 1 Speaker 2 Flash button 3 Mode dial 4 Shutter button 6 7 5 Battery door 6 Tripod socket 7 Dock connector door 8 Lens cap strap post iv

User Manual
Page 7
... Contents 3 Attaching the Wrist Strap 4 Attaching the Lens Cap Strap 4 Adding Optional Lenses 4 Loading the Battery 5 Mode Dial Settings 6 Turning On the Camera 7 Setting the Date and Time 8 Checking Camera Status Icons 9 Inserting an SD/MMC Card 10 Choosing Internal Memory or SD/MMC Card 11 Important... Battery Information 13 2 Taking Pictures 15 Taking Pictures in Auto Mode 15 Taking Pictures in ...
... Contents 3 Attaching the Wrist Strap 4 Attaching the Lens Cap Strap 4 Adding Optional Lenses 4 Loading the Battery 5 Mode Dial Settings 6 Turning On the Camera 7 Setting the Date and Time 8 Checking Camera Status Icons 9 Inserting an SD/MMC Card 10 Choosing Internal Memory or SD/MMC Card 11 Important... Battery Information 13 2 Taking Pictures 15 Taking Pictures in Auto Mode 15 Taking Pictures in ...

User Manual
Page 10
... an Optional SD/MMC Card 60 Ordering Prints Online 60 9 Using the Optional Camera Dock II 61 Camera Dock Package Contents 61 Installing the Camera Insert 62 Connecting the Camera Dock 63 Installing the Battery in the Camera 64 Docking the Camera 65 Charging the Battery 66 Transferring Pictures and Videos 67 Caution When Using a Tripod 67 Earlier...
... an Optional SD/MMC Card 60 Ordering Prints Online 60 9 Using the Optional Camera Dock II 61 Camera Dock Package Contents 61 Installing the Camera Insert 62 Connecting the Camera Dock 63 Installing the Battery in the Camera 64 Docking the Camera 65 Charging the Battery 66 Transferring Pictures and Videos 67 Caution When Using a Tripod 67 Earlier...

User Manual
Page 15
...'s Guide, Quick Start Guide, Kodak EasyShare software CD. (In some countries, the User's Guide is provided on a CD only. For details, see page 61. 3 Chapter 1 Package Contents 1 5 4 2 6 3 7 1 Camera 5 Custom camera dock insert (for EasyShare printer dock 4000 or EasyShare camera dock II) 2 CRV3 or equivalent* 6 Lens cap with a Kodak EasyShare camera dock II, a Kodak EasyShare Ni-MH rechargeable battery and AC power adapter...
...'s Guide, Quick Start Guide, Kodak EasyShare software CD. (In some countries, the User's Guide is provided on a CD only. For details, see page 61. 3 Chapter 1 Package Contents 1 5 4 2 6 3 7 1 Camera 5 Custom camera dock insert (for EasyShare printer dock 4000 or EasyShare camera dock II) 2 CRV3 or equivalent* 6 Lens cap with a Kodak EasyShare camera dock II, a Kodak EasyShare Ni-MH rechargeable battery and AC power adapter...

User Manual
Page 17
... you can use alkaline batteries. See page 95 for other types of the camera, slide the battery door and lift to open. Chapter 1 Loading the Battery 1 Turn the Mode dial to Off. 2 On the bottom of batteries you purchased the Kodak EasyShare camera dock II, see page 64 for details on the optional Kodak 3-volt digital camera AC adapter. 5 CRV3 3 Insert...
... you can use alkaline batteries. See page 95 for other types of the camera, slide the battery door and lift to open. Chapter 1 Loading the Battery 1 Turn the Mode dial to Off. 2 On the bottom of batteries you purchased the Kodak EasyShare camera dock II, see page 64 for details on the optional Kodak 3-volt digital camera AC adapter. 5 CRV3 3 Insert...

User Manual
Page 20
... highlighted. Setting the Date & Time, Anytime 1 Turn on your computer operating system, Kodak EasyShare software may allow your computer to the The setting remains until you turn on the camera or if the battery is removed for details. 8 NOTE: Depending on the camera. Chapter 1 Setting the Date and Time Setting the Date & Time, First Time...
... highlighted. Setting the Date & Time, Anytime 1 Turn on your computer operating system, Kodak EasyShare software may allow your computer to the The setting remains until you turn on the camera or if the battery is removed for details. 8 NOTE: Depending on the camera. Chapter 1 Setting the Date and Time Setting the Date & Time, First Time...
User Manual
Page 21
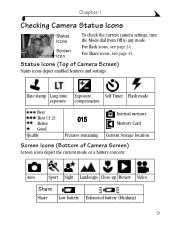
... Good Quality Internal memory 015 Memory Card Pictures remaining Current Storage location Screen Icons (Bottom of Camera Screen) Screen icons depict the current mode or a battery concern: Auto Sport Night Landscape Close-up Review Video Share Share Low battery Exhausted battery (blinking) 9 For flash icons, see page 45. For Share icons, see page 24...
... Good Quality Internal memory 015 Memory Card Pictures remaining Current Storage location Screen Icons (Bottom of Camera Screen) Screen icons depict the current mode or a battery concern: Auto Sport Night Landscape Close-up Review Video Share Share Low battery Exhausted battery (blinking) 9 For flash icons, see page 45. For Share icons, see page 24...

User Manual
Page 25
... of Pictures) * Included with camera) AA (2) lithium batteries Ni-MH rechargeable battery pack* (per charge) 365 - 455 265 - 365 165 - 205 AA (2) Ni-MH rechargeable batteries (per charge) 165 - 205 Kodak Max digital camera batteries, AA (2) 100 - 140 0 500 Battery Life (Approx. Kodak Battery Replacement Types/Battery Life Your camera can use the replacement batteries listed above. For acceptable battery life, and to make sure...
... of Pictures) * Included with camera) AA (2) lithium batteries Ni-MH rechargeable battery pack* (per charge) 365 - 455 265 - 365 165 - 205 AA (2) Ni-MH rechargeable batteries (per charge) 165 - 205 Kodak Max digital camera batteries, AA (2) 100 - 140 0 500 Battery Life (Approx. Kodak Battery Replacement Types/Battery Life Your camera can use the replacement batteries listed above. For acceptable battery life, and to make sure...

User Manual
Page 26
... page 34). - Wipe the contacts with or without a computer, transfers pictures, and is also a battery charger for its included Kodak EasyShare Ni-MH rechargeable battery pack. Battery Safety and Handling m Do not allow batteries to power your camera in the camera. Chapter 1 Extending Battery Life m Limit the following activities that do not work; Using Quickview (see page 61). when...
... page 34). - Wipe the contacts with or without a computer, transfers pictures, and is also a battery charger for its included Kodak EasyShare Ni-MH rechargeable battery pack. Battery Safety and Handling m Do not allow batteries to power your camera in the camera. Chapter 1 Extending Battery Life m Limit the following activities that do not work; Using Quickview (see page 61). when...

User Manual
Page 32
... marks. OK 5 To turn off Liveview, press the OK button. NOTE: Liveview quickly depletes battery power. To change the Liveview setting so that it is on whenever the camera is on Liveview, the camera screen displays a live image of what the lens "sees.") 20 Using the Viewfinder Parallax marks... Auto focus zone When using the viewfinder to any Still position. To conserve battery power, turn off Liveview and use the...
... marks. OK 5 To turn off Liveview, press the OK button. NOTE: Liveview quickly depletes battery power. To change the Liveview setting so that it is on whenever the camera is on Liveview, the camera screen displays a live image of what the lens "sees.") 20 Using the Viewfinder Parallax marks... Auto focus zone When using the viewfinder to any Still position. To conserve battery power, turn off Liveview and use the...

User Manual
Page 33
While the picture is saved. m Share it: Press the Share button to tag the picture for print, email, or as a Favorite. (See Tagging Pictures and Videos, page 45.) m Delete it : If you take a picture, the camera screen displays a Quickview of that picture for approximately 5 seconds. Chapter 2 Quickview-Reviewing the Picture Just Taken After you take no action, the picture Share is displayed, you can turn off the Quickview feature. (See page 50.) 21 To save battery power, you can : Delete m Review it : Press the Delete button while the picture and are displayed.
While the picture is saved. m Share it: Press the Share button to tag the picture for print, email, or as a Favorite. (See Tagging Pictures and Videos, page 45.) m Delete it : If you take a picture, the camera screen displays a Quickview of that picture for approximately 5 seconds. Chapter 2 Quickview-Reviewing the Picture Just Taken After you take no action, the picture Share is displayed, you can turn off the Quickview feature. (See page 50.) 21 To save battery power, you can : Delete m Review it : Press the Delete button while the picture and are displayed.

User Manual
Page 45
... full. Before you prefer: m Press and release-press the Shutter button completely down . NOTE: To conserve battery power, press the OK button to turn off the camera screen. 3 Press the Shutter button using the method that you take videos or to customize video-taking settings. m Press and hold-continue pressing ... capacities. 33 Release the Shutter button to stop recording. A live image, the status bar, and the approximate recording time available appear on the camera screen. 2 Use the viewfinder or camera screen to Video . NOTE: Zoom and flash are not available in Video mode.
... full. Before you prefer: m Press and release-press the Shutter button completely down . NOTE: To conserve battery power, press the OK button to turn off the camera screen. 3 Press the Shutter button using the method that you take videos or to customize video-taking settings. m Press and hold-continue pressing ... capacities. 33 Release the Shutter button to stop recording. A live image, the status bar, and the approximate recording time available appear on the camera screen. 2 Use the viewfinder or camera screen to Video . NOTE: Zoom and flash are not available in Video mode.

User Manual
Page 46
... displays the first frame of the video for email or as a Favorite (see page 50) so that the OK video is not displayed on the camera screen after you can change Optical Zoom before (but not during) video recording. Optical zoom is effective when the lens is displayed, you take it... (T) to zoom in . (0.6 m) to pause the video. Press Wide Angle (W) to adjust the volume. While the frame is no closer than 24 in . To save battery power, you can turn off the Quickview feature (see page 45). Chapter 3 Quickview-Reviewing the Video Just Taken After you take the video. 34 Press...
... displays the first frame of the video for email or as a Favorite (see page 50) so that the OK video is not displayed on the camera screen after you can change Optical Zoom before (but not during) video recording. Optical zoom is effective when the lens is displayed, you take it... (T) to zoom in . (0.6 m) to pause the video. Press Wide Angle (W) to adjust the volume. While the frame is no closer than 24 in . To save battery power, you can turn off the Quickview feature (see page 45). Chapter 3 Quickview-Reviewing the Video Just Taken After you take the video. 34 Press...

User Manual
Page 54
... turns off; When you start a slide show, it repeats until battery power is running. 42 Video out 1 Connect the audio/video cable (included) from the camera video-out port to your television user's guide for details. the television screen acts as on a computer monitor or when printed.) NOTE: Ensure that the ... and videos on a television, computer monitor, or any device equipped with a video input. (Image quality on a television screen may not be as good as the camera display. 2 Review pictures and videos on the television screen.
... turns off; When you start a slide show, it repeats until battery power is running. 42 Video out 1 Connect the audio/video cable (included) from the camera video-out port to your television user's guide for details. the television screen acts as on a computer monitor or when printed.) NOTE: Ensure that the ... and videos on a television, computer monitor, or any device equipped with a video input. (Image quality on a television screen may not be as good as the camera display. 2 Review pictures and videos on the television screen.

User Manual
Page 62
To save battery power, turn off Quickview. 1 Press the Menu button. 2 Press to highlight Setup , then press the OK button. 3 Press to highlight Quickview , then press the OK ... indicate the new default quantity, then press the OK button. 5 Press the Menu button to exit the menu. The default value is displayed on the camera screen for approximately 5 seconds (see the picture or video, press the Review button. This setting remains until you take it . 50 The picture is not...
To save battery power, turn off Quickview. 1 Press the Menu button. 2 Press to highlight Setup , then press the OK button. 3 Press to highlight Quickview , then press the OK ... indicate the new default quantity, then press the OK button. 5 Press the Menu button to exit the menu. The default value is displayed on the camera screen for approximately 5 seconds (see the picture or video, press the Review button. This setting remains until you take it . 50 The picture is not...

User Manual
Page 63
... and on . Chapter 6 Turning On Liveview In Still Modes The Liveview feature lets you change it . use the camera screen as a viewfinder (see page 20). The live image is displayed whenever the camera is on . 5 Press the Menu button to exit the menu. This setting remains until you use it off . The... the OK button. 3 Press to highlight Liveview , then press the OK button. 4 Press to highlight Off, then press the OK button. NOTE: Liveview quickly depletes battery power; This setting remains until you change it . 51 Press the OK button to exit the menu.
... and on . Chapter 6 Turning On Liveview In Still Modes The Liveview feature lets you change it . use the camera screen as a viewfinder (see page 20). The live image is displayed whenever the camera is on . 5 Press the Menu button to exit the menu. This setting remains until you use it off . The... the OK button. 3 Press to highlight Liveview , then press the OK button. 4 Press to highlight Off, then press the OK button. NOTE: Liveview quickly depletes battery power; This setting remains until you change it . 51 Press the OK button to exit the menu.
User Manual
Page 71
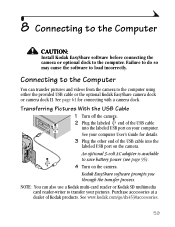
... the labeled USB port on your computer. See www.kodak.com/go/dx4530accessories. 59 NOTE: You can transfer pictures and videos from the camera to the computer using either the provided USB cable or the optional Kodak EasyShare camera dock or camera dock II. See your pictures. Purchase accessories at a...the USB Cable 1 Turn off the camera. 2 Plug the labeled end of Kodak products. Connecting to the Computer You can also use a Kodak multi-card reader or Kodak SD multimedia card reader-writer to save battery power (see page 95). 4 Turn on the camera. Failure to do so may cause ...
... the labeled USB port on your computer. See www.kodak.com/go/dx4530accessories. 59 NOTE: You can transfer pictures and videos from the camera to the computer using either the provided USB cable or the optional Kodak EasyShare camera dock or camera dock II. See your pictures. Purchase accessories at a...the USB Cable 1 Turn off the camera. 2 Plug the labeled end of Kodak products. Connecting to the Computer You can also use a Kodak multi-card reader or Kodak SD multimedia card reader-writer to save battery power (see page 95). 4 Turn on the camera. Failure to do so may cause ...

User Manual
Page 73
... to do so may be different from the Kodak EasyShare software CD before connecting the camera or dock to the camera. (Only the battery can be recharged in the camera dock. See www.kodak.com/go/dx4530accessories. Purchase accessories at a dealer of Kodak products. 9 Using the Optional Camera Dock II The Kodak EasyShare camera dock II makes it easy to transfer your...
... to do so may be different from the Kodak EasyShare software CD before connecting the camera or dock to the camera. (Only the battery can be recharged in the camera dock. See www.kodak.com/go/dx4530accessories. Purchase accessories at a dealer of Kodak products. 9 Using the Optional Camera Dock II The Kodak EasyShare camera dock II makes it easy to transfer your...

User Manual
Page 75
... accommodates DC IN 3V your camera m The AC power adapter, 7V included with the camera dock CAUTION: Use only the 7V AC adapter included with your type of the camera dock and into the labeled USB port on your computer User's Guide for charging the battery. 63 You need: m... The USB cable included with the camera dock. Chapter 9 Connecting the Camera Dock After the Kodak EasyShare software is not in the camera dock when connecting the dock...
... accommodates DC IN 3V your camera m The AC power adapter, 7V included with the camera dock CAUTION: Use only the 7V AC adapter included with your type of the camera dock and into the labeled USB port on your computer User's Guide for charging the battery. 63 You need: m... The USB cable included with the camera dock. Chapter 9 Connecting the Camera Dock After the Kodak EasyShare software is not in the camera dock when connecting the dock...

User Manual
Page 76
If the battery does not install, reposition it . IMPORTANT: The battery is not charged when you receive it and try again. See page 66 for charging instructions. 64 doing so can only be inserted into the camera as shown. CAUTION: The battery can damage your camera. 4 Close the battery door. DO NOT FORCE IT; Chapter 9 Installing the Battery in the Camera The camera dock will only charge the Ni-MH battery (not other batteries). 1 Turn off the camera. 2 Open the battery door. 3 Install the battery as shown.
If the battery does not install, reposition it . IMPORTANT: The battery is not charged when you receive it and try again. See page 66 for charging instructions. 64 doing so can only be inserted into the camera as shown. CAUTION: The battery can damage your camera. 4 Close the battery door. DO NOT FORCE IT; Chapter 9 Installing the Battery in the Camera The camera dock will only charge the Ni-MH battery (not other batteries). 1 Turn off the camera. 2 Open the battery door. 3 Install the battery as shown.


