
User's Guide
Page 6
Product Overview Top, Bottom View AUTO OFF 12 34 5 1 Speaker 2 Flash button 3 Mode dial 4 Shutter button 6 7 5 Battery door 6 Tripod socket 7 Dock connector door iv
Product Overview Top, Bottom View AUTO OFF 12 34 5 1 Speaker 2 Flash button 3 Mode dial 4 Shutter button 6 7 5 Battery door 6 Tripod socket 7 Dock connector door iv

User's Guide
Page 11
9 Using the Optional EASYSHARE Camera Dock II . 61 Camera Dock Package Contents 61 Installing the Camera Insert 62 Connecting the Camera Dock 63 Installing the Battery Pack in the Camera 64 Docking the Camera 65 Charging the Battery Pack 66 Transferring Pictures and Videos 67 Caution When Using a Tripod 67 Earlier Camera Dock Model 68 10 Troubleshooting 69 Troubleshooting-Camera 69 Troubleshooting-Camera Dock II 81 11 Getting Help 85 Helpful Web Links 85 Help in this Manual 85 Software Help 85 Telephone Customer Support 86 ix
9 Using the Optional EASYSHARE Camera Dock II . 61 Camera Dock Package Contents 61 Installing the Camera Insert 62 Connecting the Camera Dock 63 Installing the Battery Pack in the Camera 64 Docking the Camera 65 Charging the Battery Pack 66 Transferring Pictures and Videos 67 Caution When Using a Tripod 67 Earlier Camera Dock Model 68 10 Troubleshooting 69 Troubleshooting-Camera 69 Troubleshooting-Camera Dock II 81 11 Getting Help 85 Helpful Web Links 85 Help in this Manual 85 Software Help 85 Telephone Customer Support 86 ix

User's Guide
Page 13
...page 55. Need This Guide in Larger Print? 1 Getting Started Install Software First Install the software from the KODAK EASYSHARE Software CD before connecting the camera (or optional camera dock) to load incorrectly. Failure to do so may cause the software to the computer. For a large print ...version of this User's Guide: 1 Go to http://www.kodak.com/go/dx4330support. 2 Under Explore EasyShare, click Service and Support. 3 Under ...
...page 55. Need This Guide in Larger Print? 1 Getting Started Install Software First Install the software from the KODAK EASYSHARE Software CD before connecting the camera (or optional camera dock) to load incorrectly. Failure to do so may cause the software to the computer. For a large print ...version of this User's Guide: 1 Go to http://www.kodak.com/go/dx4330support. 2 Under Explore EasyShare, click Service and Support. 3 Under ...

User's Guide
Page 15
...://www.kodak.com/go/accessories. (This camera and dock insert also operate with a KODAK EASYSHARE Camera Dock II, a KODAK EASYSHARE Ni-MH Rechargeable Battery Pack and AC power adapter are included. A KODAK EASYSHARE Camera Dock II may be purchased at your Kodak retail dealer or on a CD only.) * The custom camera dock insert lets your camera was packaged with the original KODAK EASYSHARE Camera Dock.) ** If your camera fit the optional KODAK EASYSHARE Camera Dock II...
...://www.kodak.com/go/accessories. (This camera and dock insert also operate with a KODAK EASYSHARE Camera Dock II, a KODAK EASYSHARE Ni-MH Rechargeable Battery Pack and AC power adapter are included. A KODAK EASYSHARE Camera Dock II may be purchased at your Kodak retail dealer or on a CD only.) * The custom camera dock insert lets your camera was packaged with the original KODAK EASYSHARE Camera Dock.) ** If your camera fit the optional KODAK EASYSHARE Camera Dock II...

User's Guide
Page 17
NOTE: For information on the optional KODAK Digital Camera AC Adapter, 3-Volt, see page 96. * If you purchased the KODAK EASYSHARE Camera Dock II, see page 64 for acceptable battery types. CRV3 AA Important Battery Information The CRV3 battery is not rechargeable. See page 95 for details on installing the KODAK EASYSHARE Ni-MH Rechargeable Battery Pack. 5 For acceptable battery...
NOTE: For information on the optional KODAK Digital Camera AC Adapter, 3-Volt, see page 96. * If you purchased the KODAK EASYSHARE Camera Dock II, see page 64 for acceptable battery types. CRV3 AA Important Battery Information The CRV3 battery is not rechargeable. See page 95 for details on installing the KODAK EASYSHARE Ni-MH Rechargeable Battery Pack. 5 For acceptable battery...

User's Guide
Page 69
...setup.exe where d is the drive letter that are open on the KODAK EASYSHARE Software CD, see the Quick Start Guide or the KODAK EASYSHARE Software Help. Chapter 7 Install the Software For information on the software ...applications included on your computer. 2 Place the KODAK EASYSHARE Software CD into the CD-ROM drive. 3 Load the software: WINDOWS-based computer-if the first install window does not appear, choose Run from the KODAK EASYSHARE Software CD before connecting the camera or dock...
...setup.exe where d is the drive letter that are open on the KODAK EASYSHARE Software CD, see the Quick Start Guide or the KODAK EASYSHARE Software Help. Chapter 7 Install the Software For information on the software ...applications included on your computer. 2 Place the KODAK EASYSHARE Software CD into the CD-ROM drive. 3 Load the software: WINDOWS-based computer-if the first install window does not appear, choose Run from the KODAK EASYSHARE Software CD before connecting the camera or dock...

User's Guide
Page 71
... can transfer pictures and videos from the KODAK EASYSHARE Software CD before connecting the camera or dock to transfer your pictures. See page 61 for connecting with a Camera Dock. Failure to do so may cause the software to the computer using either the provided USB cable or the optional KODAK EASYSHARE Camera Dock or Camera Dock II. Connecting to the Computer You...
... can transfer pictures and videos from the KODAK EASYSHARE Software CD before connecting the camera or dock to transfer your pictures. See page 61 for connecting with a Camera Dock. Failure to do so may cause the software to the computer using either the provided USB cable or the optional KODAK EASYSHARE Camera Dock or Camera Dock II. Connecting to the Computer You...

User's Guide
Page 73
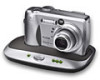
9 Using the Optional EASYSHARE Camera Dock II The KODAK EASYSHARE Camera Dock II makes it easy to transfer your camera in the Camera Dock. Failure to do so may be recharged in the Camera Dock.) To keep the Battery Pack charged, store your pictures and videos to the camera. (Only the Battery Pack can purchase the KODAK EASYSHARE Camera Dock II at a dealer of KODAK products or at http...
9 Using the Optional EASYSHARE Camera Dock II The KODAK EASYSHARE Camera Dock II makes it easy to transfer your camera in the Camera Dock. Failure to do so may be recharged in the Camera Dock.) To keep the Battery Pack charged, store your pictures and videos to the camera. (Only the Battery Pack can purchase the KODAK EASYSHARE Camera Dock II at a dealer of KODAK products or at http...

User's Guide
Page 74
... you do not have the custom insert that was included with your camera, use the universal insert that is used to fit the camera to the Camera Dock. 1 Place the front tabs on the custom insert into the slots in the Camera Dock so that the custom camera insert provides. Chapter 9 Installing the Camera Insert KODAK EASYSHARE digital cameras are not damaged.
... you do not have the custom insert that was included with your camera, use the universal insert that is used to fit the camera to the Camera Dock. 1 Place the front tabs on the custom insert into the slots in the Camera Dock so that the custom camera insert provides. Chapter 9 Installing the Camera Insert KODAK EASYSHARE digital cameras are not damaged.

User's Guide
Page 75
... power adapter, 7V included with the Camera Dock. Use the plug that accommodates DC IN 3V your camera, Camera Dock, or computer. 63 Other adapters may have additional plugs. Chapter 9 Connecting the Camera Dock After the KODAK EASYSHARE Software is loaded (see page 55), connect the Camera Dock to your camera is NOT in the Camera Dock when you are connecting to power and...
... power adapter, 7V included with the Camera Dock. Use the plug that accommodates DC IN 3V your camera, Camera Dock, or computer. 63 Other adapters may have additional plugs. Chapter 9 Connecting the Camera Dock After the KODAK EASYSHARE Software is loaded (see page 55), connect the Camera Dock to your camera is NOT in the Camera Dock when you are connecting to power and...

User's Guide
Page 76
DO NOT FORCE IT; Chapter 9 Installing the Battery Pack in the Camera The Camera Dock will only charge the Battery Pack (not other batteries). 1 Turn off the camera. 2 Open the battery door. 3 Install the Battery Pack as shown. If the Battery Pack does not install, reposition it . CAUTION: The Battery Pack can damage your camera. 4 Close the battery door. IMPORTANT: The Battery Pack is not charged when you receive it and try again. doing so can only be inserted into the camera as shown. See page 66 for charging instructions. 64
DO NOT FORCE IT; Chapter 9 Installing the Battery Pack in the Camera The Camera Dock will only charge the Battery Pack (not other batteries). 1 Turn off the camera. 2 Open the battery door. 3 Install the Battery Pack as shown. If the Battery Pack does not install, reposition it . CAUTION: The Battery Pack can damage your camera. 4 Close the battery door. IMPORTANT: The Battery Pack is not charged when you receive it and try again. doing so can only be inserted into the camera as shown. See page 66 for charging instructions. 64

User's Guide
Page 77
... Power/ Transfer light 3 Place the camera in the camera, the Camera Dock immediately begins charging. 65 The Power/Transfer light glows green when the camera is now powered by the Camera Dock instead of the camera batteries. The camera is properly seated. NOTE: If a KODAK EASYSHARE Ni-MH Rechargeable Battery Pack is installed in the Camera Dock and push down to charge the...
... Power/ Transfer light 3 Place the camera in the camera, the Camera Dock immediately begins charging. 65 The Power/Transfer light glows green when the camera is now powered by the Camera Dock instead of the camera batteries. The camera is properly seated. NOTE: If a KODAK EASYSHARE Ni-MH Rechargeable Battery Pack is installed in the Camera Dock and push down to charge the...

User's Guide
Page 78
... page 81. 66 m The three green charging lights monitor the charging status: Charging Lights on the camera. m Charging stops if you turn on Dock II battery low battery partially charged battery fully charged m Full charging takes about 2.5 hours. NOTE: The Camera Dock only charges the provided KODAK EASYSHARE Ni-MH Rechargeable Battery Pack. m Charging begins immediately.
... page 81. 66 m The three green charging lights monitor the charging status: Charging Lights on the camera. m Charging stops if you turn on Dock II battery low battery partially charged battery fully charged m Full charging takes about 2.5 hours. NOTE: The Camera Dock only charges the provided KODAK EASYSHARE Ni-MH Rechargeable Battery Pack. m Charging begins immediately.

User's Guide
Page 79
... and emailing, see the Quick Start Guide or the KODAK EASYSHARE Software Help. Remove the camera from your camera to your computer: 1 Place the camera in the Camera Dock. NOTE: After transferring pictures and videos, leave the camera in the Camera Dock. Caution When Using a Tripod Do not connect a tripod to the Camera Dock. If the Battery Pack is being charged, charging...
... and emailing, see the Quick Start Guide or the KODAK EASYSHARE Software Help. Remove the camera from your camera to your computer: 1 Place the camera in the Camera Dock. NOTE: After transferring pictures and videos, leave the camera in the Camera Dock. Caution When Using a Tripod Do not connect a tripod to the Camera Dock. If the Battery Pack is being charged, charging...

User's Guide
Page 80
The only difference is charging. pictures and videos are transferring. Chapter 9 Earlier Camera Dock Model If you have the KODAK EASYSHARE Camera Dock, not the Camera Dock II, the functionality is exactly the same as described in the Camera Dock. Indicator light Indicator light status: Steady green-camera is properly seated in this chapter. Blinking green- Blinking red-error condition. IMPORTANT: When...
The only difference is charging. pictures and videos are transferring. Chapter 9 Earlier Camera Dock Model If you have the KODAK EASYSHARE Camera Dock, not the Camera Dock II, the functionality is exactly the same as described in the Camera Dock. Indicator light Indicator light status: Steady green-camera is properly seated in this chapter. Blinking green- Blinking red-error condition. IMPORTANT: When...

User's Guide
Page 81
... turn on the KODAK EASYSHARE Software CD. Pictures remaining The picture does not The camera is not charged. Battery is operating number does not take up enough space to Troubleshooting information, see http://www.kodak.com/go/dx4330support. 10 Troubleshooting There may be times when you have questions about using your camera or Camera Dock. batteries (page...
... turn on the KODAK EASYSHARE Software CD. Pictures remaining The picture does not The camera is not charged. Battery is operating number does not take up enough space to Troubleshooting information, see http://www.kodak.com/go/dx4330support. 10 Troubleshooting There may be times when you have questions about using your camera or Camera Dock. batteries (page...

User's Guide
Page 86
... cable (if using Camera Dock, disconnect cable and remove camera from Dock). The Battery Monitor or Close that software before similar software runs starting the KODAK constantly. Replace (page 5) or recharge the batteries (page 66). USB cable is not securely Connect cable to disable this feature. Install the software (page 55). Install KODAK EASYSHARE Software (page 55...
... cable (if using Camera Dock, disconnect cable and remove camera from Dock). The Battery Monitor or Close that software before similar software runs starting the KODAK constantly. Replace (page 5) or recharge the batteries (page 66). USB cable is not securely Connect cable to disable this feature. Install the software (page 55). Install KODAK EASYSHARE Software (page 55...

User's Guide
Page 93
Computer needs Restart the computer and try to the computer Cause Solution AC adapter or USB Check the connections (page 63). Camera was not pressed. 81 was Replace the camera on the removed from the Camera Dock and press the Camera Dock Connect button. installed. during picture transfer. Connect button Press the Connect button. Software is not securely connected. again. Chapter 10 Troubleshooting-Camera Dock II Camera Dock II Problems Camera Dock Problem Pictures are not transferred to be restarted. cable is not Install the software (page 55).
Computer needs Restart the computer and try to the computer Cause Solution AC adapter or USB Check the connections (page 63). Camera was not pressed. 81 was Replace the camera on the removed from the Camera Dock and press the Camera Dock Connect button. installed. during picture transfer. Connect button Press the Connect button. Software is not securely connected. again. Chapter 10 Troubleshooting-Camera Dock II Camera Dock II Problems Camera Dock Problem Pictures are not transferred to be restarted. cable is not Install the software (page 55).

User's Guide
Page 94
... Comment Light glows steady green Light blinks green Camera is properly seated in Camera Dock. Remove the camera and re-seat it (page 65). Battery is charging. 82 Comment The camera is not seated in camera is not properly seated in The camera and Camera the Camera Dock. Turn off Camera is not a KODAK EASYSHARE Ni-MH Rechargeable Battery Pack. transferred to begin...
... Comment Light glows steady green Light blinks green Camera is properly seated in Camera Dock. Remove the camera and re-seat it (page 65). Battery is charging. 82 Comment The camera is not seated in camera is not properly seated in The camera and Camera the Camera Dock. Turn off Camera is not a KODAK EASYSHARE Ni-MH Rechargeable Battery Pack. transferred to begin...

User's Guide
Page 95
Comment Charging resumes when necessary. Slowly return the camera and Battery Pack to very high or low temperatures. The Battery Pack or connector pins are damaged. Check for damage. Comment Reinstall the Battery Pack (page 64). Chapter 10 Camera Dock Charging Lights Light Status Cause Three green lights Battery is installed incorrectly. Camera Dock Error Light Light Status Cause One blinking red light Battery Pack is fully charged. The camera and Battery Pack have been exposed to room temperature. 83
Comment Charging resumes when necessary. Slowly return the camera and Battery Pack to very high or low temperatures. The Battery Pack or connector pins are damaged. Check for damage. Comment Reinstall the Battery Pack (page 64). Chapter 10 Camera Dock Charging Lights Light Status Cause Three green lights Battery is installed incorrectly. Camera Dock Error Light Light Status Cause One blinking red light Battery Pack is fully charged. The camera and Battery Pack have been exposed to room temperature. 83


