
User's Guide
Page 5
... My Digital Pictures 1 Camera Package Contents 2 Attaching the Wrist Strap 3 Loading the Battery 3 Turning the Camera On and Off 4 Checking the Battery Level 5 Automatic Powerdown Saves Batteries 6 Checking Camera Status 7 Status Bar Icons 7 Inserting an Optional MMC/SD Card 8 Choosing Internal or Removable Memory 10 Checking Your Picture's Location 10 2 Taking Pictures 11 Taking a Picture 11 Previewing Your Picture on the LCD 12 Displaying the Picture Just Taken 13 Using the Flash 14 Using the Zoom 15 Other Picture-Taking Settings...
... My Digital Pictures 1 Camera Package Contents 2 Attaching the Wrist Strap 3 Loading the Battery 3 Turning the Camera On and Off 4 Checking the Battery Level 5 Automatic Powerdown Saves Batteries 6 Checking Camera Status 7 Status Bar Icons 7 Inserting an Optional MMC/SD Card 8 Choosing Internal or Removable Memory 10 Checking Your Picture's Location 10 2 Taking Pictures 11 Taking a Picture 11 Previewing Your Picture on the LCD 12 Displaying the Picture Just Taken 13 Using the Flash 14 Using the Zoom 15 Other Picture-Taking Settings...

User's Guide
Page 6
... Print Sizes 19 Running a Slide Show 20 Starting the Slide Show 20 Other Review Settings 20 4 Customizing Your Camera Settings 21 Setup Options 21 Capture Options 22 Setting Image Quality 22 Setting Macro 22 Turning QuickView On or Off 22 Review Options 23 Starting a Selectable-Interval Slide Show 23 Setting Video Out 23 Print Order 24 Copying Pictures 25 Viewing Camera Information 25 Formatting Camera Memory or MMC/SD Card 26 Selecting a Language 27 Date/Time Settings 27 Setting the Date and Time...
... Print Sizes 19 Running a Slide Show 20 Starting the Slide Show 20 Other Review Settings 20 4 Customizing Your Camera Settings 21 Setup Options 21 Capture Options 22 Setting Image Quality 22 Setting Macro 22 Turning QuickView On or Off 22 Review Options 23 Starting a Selectable-Interval Slide Show 23 Setting Video Out 23 Print Order 24 Copying Pictures 25 Viewing Camera Information 25 Formatting Camera Memory or MMC/SD Card 26 Selecting a Language 27 Date/Time Settings 27 Setting the Date and Time...
User's Guide
Page 11
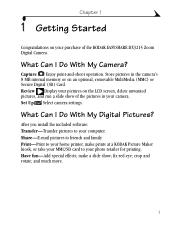
... install the included software: Transfer-Transfer pictures to your home printer, make a slide show of the KODAK EASYSHARE DX3215 Zoom Digital Camera. fix red-eye; and much more. 1 Capture Enjoy point-and-shoot operation. Set Up Select camera settings. Print-Print to your photo retailer for printing. What Can I Do With My Digital Pictures? Share-E-mail pictures to your computer. Have fun-Add special effects; Store pictures in your purchase of the pictures in the camera's 8 MB internal memory or on an optional, removable...
... install the included software: Transfer-Transfer pictures to your home printer, make a slide show of the KODAK EASYSHARE DX3215 Zoom Digital Camera. fix red-eye; and much more. 1 Capture Enjoy point-and-shoot operation. Set Up Select camera settings. Print-Print to your photo retailer for printing. What Can I Do With My Digital Pictures? Share-E-mail pictures to your computer. Have fun-Add special effects; Store pictures in your purchase of the pictures in the camera's 8 MB internal memory or on an optional, removable...
User's Guide
Page 12
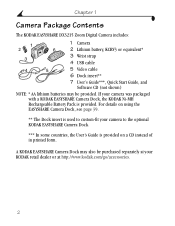
...using the EASYSHARE Camera Dock, see page 39. ** The Dock insert is used to the optional KODAK EASYSHARE Camera Dock. *** In some countries, the User's Guide is provided. A KODAK EASYSHARE Camera Dock may be purchased separately at your KODAK retail dealer or at http://www.kodak.com/go/accessories. 2 Chapter 1 Camera Package Contents The KODAK EASYSHARE DX3215 Zoom Digital Camera includes: 1 2 3 DZoXom32D1ig5ital Camera 6 4 5 1 Camera 2 Lithium battery, KCRV3 or equivalent* 3 Wrist strap 4 USB cable 5 Video cable 6 Dock insert** 7 User's Guide***, Quick Start Guide, and Software...
...using the EASYSHARE Camera Dock, see page 39. ** The Dock insert is used to the optional KODAK EASYSHARE Camera Dock. *** In some countries, the User's Guide is provided. A KODAK EASYSHARE Camera Dock may be purchased separately at your KODAK retail dealer or at http://www.kodak.com/go/accessories. 2 Chapter 1 Camera Package Contents The KODAK EASYSHARE DX3215 Zoom Digital Camera includes: 1 2 3 DZoXom32D1ig5ital Camera 6 4 5 1 Camera 2 Lithium battery, KCRV3 or equivalent* 3 Wrist strap 4 USB cable 5 Video cable 6 Dock insert** 7 User's Guide***, Quick Start Guide, and Software...

User's Guide
Page 27
Chapter 3 3 Reviewing Your Pictures Use Review mode to display and work with the picture indicate the applied features: Print order Frame number Internal memory MMC/SD card Picture Location Best Good Quality Full battery Low battery Exhausted battery 17 Viewing Pictures on an MMC/SD card. The icons displayed with the pictures stored in your camera's internal memory or on the LCD Mode Selector 1 Slide the Mode selector to Capture or Setup . The camera accesses either the internal memory or the MMC/SD card (see page...
Chapter 3 3 Reviewing Your Pictures Use Review mode to display and work with the picture indicate the applied features: Print order Frame number Internal memory MMC/SD card Picture Location Best Good Quality Full battery Low battery Exhausted battery 17 Viewing Pictures on an MMC/SD card. The icons displayed with the pictures stored in your camera's internal memory or on the LCD Mode Selector 1 Slide the Mode selector to Capture or Setup . The camera accesses either the internal memory or the MMC/SD card (see page...

User's Guide
Page 31
Chapter 4 4 Customizing Your Camera Settings Slide the Mode selector to Setup to customize the camera settings. Setup Options Capture Options (page 22) Format (page 26) Review Options (page 23) Language (page 27) Copy (page 25) Date/Time (page 27) About Camera (page 25) 21
Chapter 4 4 Customizing Your Camera Settings Slide the Mode selector to Setup to customize the camera settings. Setup Options Capture Options (page 22) Format (page 26) Review Options (page 23) Language (page 27) Copy (page 25) Date/Time (page 27) About Camera (page 25) 21

User's Guide
Page 32
... the lens. 1 Slide the Mode selector to Setup . 2 Press the buttons to highlight the Capture Options icon, then the buttons to highlight Image Quality. m Best (1280 x 960) 5 x 7 inches. Chapter 4 Capture Options Setting Image Quality 1 Slide the Mode selector to Setup . 2 Press the buttons to highlight the Capture Options buttons to highlight Macro. Pictures are low resolution and file sizes are small. The setting remains until you change it . Turning QuickView...
... the lens. 1 Slide the Mode selector to Setup . 2 Press the buttons to highlight the Capture Options icon, then the buttons to highlight Image Quality. m Best (1280 x 960) 5 x 7 inches. Chapter 4 Capture Options Setting Image Quality 1 Slide the Mode selector to Setup . 2 Press the buttons to highlight the Capture Options buttons to highlight Macro. Pictures are low resolution and file sizes are small. The setting remains until you change it . Turning QuickView...

User's Guide
Page 35
... Select. NOTE: Before using this Camera feature displays information about the camera. 1 Slide the Mode selector to Setup . 2 Press the buttons to highlight About . The information includes camera model and current firmware version. 25 For information on picture numbering after they are copied, delete them manually (see page 66. Chapter 4 Copying Pictures The Copy feature lets you wish to remove the pictures from the camera's internal memory to highlight the Copy menu , then press A progress...
... Select. NOTE: Before using this Camera feature displays information about the camera. 1 Slide the Mode selector to Setup . 2 Press the buttons to highlight About . The information includes camera model and current firmware version. 25 For information on picture numbering after they are copied, delete them manually (see page 66. Chapter 4 Copying Pictures The Copy feature lets you wish to remove the pictures from the camera's internal memory to highlight the Copy menu , then press A progress...

User's Guide
Page 37
... and screen messages in the selected language. Date/Time Settings Setting the Date and Time Set the date and time if you want to use. 4 Press Select to accept the changes and return to the Setup menu. buttons 5 Press Select to adjust the date and time settings. buttons to Setup . 2 Press the Select. The screen text is displayed in different languages. 1 Slide the Mode selector to highlight the Language menu, then press 3 Highlight the language you change it. The date format is displayed in...
... and screen messages in the selected language. Date/Time Settings Setting the Date and Time Set the date and time if you want to use. 4 Press Select to accept the changes and return to the Setup menu. buttons 5 Press Select to adjust the date and time settings. buttons to Setup . 2 Press the Select. The screen text is displayed in different languages. 1 Slide the Mode selector to highlight the Language menu, then press 3 Highlight the language you change it. The date format is displayed in...

User's Guide
Page 38
... STAMP. icon, then the 4 Select ON or OFF. 5 Press Select. The setting remains until you take while Date Stamp is printed in the bottom right corner of pictures you change it. 28 Chapter 4 Selecting a Date/Time Format 1 Slide the Mode selector to Setup . 2 Press the buttons to highlight the Date/Time Set menu. 3 Press the buttons to highlight DISPLAY, then press Select. 4 Press the buttons to imprint the date on . Placing the Date on Pictures Use...
... STAMP. icon, then the 4 Select ON or OFF. 5 Press Select. The setting remains until you take while Date Stamp is printed in the bottom right corner of pictures you change it. 28 Chapter 4 Selecting a Date/Time Format 1 Slide the Mode selector to Setup . 2 Press the buttons to highlight the Date/Time Set menu. 3 Press the buttons to highlight DISPLAY, then press Select. 4 Press the buttons to imprint the date on . Placing the Date on Pictures Use...

User's Guide
Page 44
...a WINDOWS-based Computer m Click Transfer Now to transfer your computer: C:\Kodak Pictures. You can transfer files while the green light is blinking. Your pictures are transferred to the computer. For more information, see Using the EASYSHARE Camera Dock (page 39). m If you wish to change the default location, Click Setup before you have connected as shown in the EASYSHARE Camera Dock. Transferring Your Pictures KODAK Picture Transfer Software automatically opens when you click Transfer Now. 34 ZDoXom32D1ig5ital Camera I P A X E L G E 1.3 M 3 Push the Connect button...
...a WINDOWS-based Computer m Click Transfer Now to transfer your computer: C:\Kodak Pictures. You can transfer files while the green light is blinking. Your pictures are transferred to the computer. For more information, see Using the EASYSHARE Camera Dock (page 39). m If you wish to change the default location, Click Setup before you have connected as shown in the EASYSHARE Camera Dock. Transferring Your Pictures KODAK Picture Transfer Software automatically opens when you click Transfer Now. 34 ZDoXom32D1ig5ital Camera I P A X E L G E 1.3 M 3 Push the Connect button...

User's Guide
Page 57
The MMC/SD card or Transfer pictures to have 7.9 feet (2.4 m) between an effect. Your eye or the picture Leave space around subject was taken. function. batteries (page 3). 47 picture. light is too dark. not properly installed. Chapter 8 Camera Problem Cause Solution Shutter button does Camera is not turned on (page 14). the lens when the objects away from the camera (page 18), or insert a card with available memory. Flash is less than away...
The MMC/SD card or Transfer pictures to have 7.9 feet (2.4 m) between an effect. Your eye or the picture Leave space around subject was taken. function. batteries (page 3). 47 picture. light is too dark. not properly installed. Chapter 8 Camera Problem Cause Solution Shutter button does Camera is not turned on (page 14). the lens when the objects away from the camera (page 18), or insert a card with available memory. Flash is less than away...

User's Guide
Page 66
... have questions concerning the operation of 9:00 a.m. m Canada-call toll free, 1-800-465-6325, between the hours of KODAK software or the camera, you may speak directly to your computer, be at your computer, and have the following information available: Operating system Processor speed (MHz Computer model Amount of memory (MB Exact error message you call the Kodak Digital Imaging Support Centre toll free number associated with your...
... have questions concerning the operation of 9:00 a.m. m Canada-call toll free, 1-800-465-6325, between the hours of KODAK software or the camera, you may speak directly to your computer, be at your computer, and have the following information available: Operating system Processor speed (MHz Computer model Amount of memory (MB Exact error message you call the Kodak Digital Imaging Support Centre toll free number associated with your...
User's Guide
Page 72
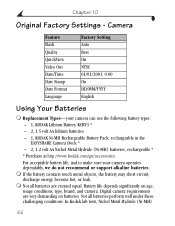
... batteries - 1, KODAK Ni-MH Rechargeable Battery Pack, rechargeable in the EASYSHARE Camera Dock * - 2, 1.2 volt AA Nickel Metal Hydride (Ni-MH) batteries, rechargeable * * Purchase at http://www.kodak.com/go/accessories. Digital camera requirements are created equal. Battery life depends significantly on batteries. Chapter 10 Original Factory Settings - Camera Feature Flash Quality QuickView Video Out Date/Time Date Stamp Date Format Language Factory Setting Auto Best On NTSC 01/01/2001; 0:00 On DD/MM/YYYY English Using Your Batteries m Replacement...
... batteries - 1, KODAK Ni-MH Rechargeable Battery Pack, rechargeable in the EASYSHARE Camera Dock * - 2, 1.2 volt AA Nickel Metal Hydride (Ni-MH) batteries, rechargeable * * Purchase at http://www.kodak.com/go/accessories. Digital camera requirements are created equal. Battery life depends significantly on batteries. Chapter 10 Original Factory Settings - Camera Feature Flash Quality QuickView Video Out Date/Time Date Stamp Date Format Language Factory Setting Auto Best On NTSC 01/01/2001; 0:00 On DD/MM/YYYY English Using Your Batteries m Replacement...
User's Guide
Page 73
.... Do not use cleaning solutions unless they are ready to the "Important Safety Instructions" booklet packed with the painted surface of conditions. Carry spare batteries when using the camera again. m Do not allow any chemicals, such as digital cameras, and do not work. Do not wipe the camera lens or LCD with a soft, lint-free cloth or an untreated lens-cleaning tissue. Refer to take pictures. Once...
.... Do not use cleaning solutions unless they are ready to the "Important Safety Instructions" booklet packed with the painted surface of conditions. Carry spare batteries when using the camera again. m Do not allow any chemicals, such as digital cameras, and do not work. Do not wipe the camera lens or LCD with a soft, lint-free cloth or an untreated lens-cleaning tissue. Refer to take pictures. Once...

User's Guide
Page 75
... files or cannot locate them using typical file sizes, can vary. If you turn the camera on an MMC/SD card use the Print Order feature. Each time you use the card in the camera and the storage location is inserted in different cameras. Chapter 10 Picture Storage Capacities MMC/SD cards are removed. 100K3215 subfolder-contains all the pictures taken when an MMC/SD card is set to Auto. 65 Picture file sizes...
... files or cannot locate them using typical file sizes, can vary. If you turn the camera on an MMC/SD card use the Print Order feature. Each time you use the card in the camera and the storage location is inserted in different cameras. Chapter 10 Picture Storage Capacities MMC/SD cards are removed. 100K3215 subfolder-contains all the pictures taken when an MMC/SD card is set to Auto. 65 Picture file sizes...

User's Guide
Page 80
... with USB cable 33 connect EASYSHARE Camera Dock 40 copy pictures card to memory 25 memory to card 25 to computer 34, 36, 43 customer support numbers 56 customizing camera settings 21 D date, imprinting on pictures 28 date, setting 27 DCIM folder, MMC/SD Card 65 defaults, original settings 62 deleting from internal memory 18 from MMC/SD Card 18 last picture 13 digital pictures, using 33 digital zoom 15 display problems 47 displaying slide show 20 dock insert 2, 40 docking camera 41 downloading pictures 34, 36, 43 E EASYSHARE Camera Dock charging Battery...
... with USB cable 33 connect EASYSHARE Camera Dock 40 copy pictures card to memory 25 memory to card 25 to computer 34, 36, 43 customer support numbers 56 customizing camera settings 21 D date, imprinting on pictures 28 date, setting 27 DCIM folder, MMC/SD Card 65 defaults, original settings 62 deleting from internal memory 18 from MMC/SD Card 18 last picture 13 digital pictures, using 33 digital zoom 15 display problems 47 displaying slide show 20 dock insert 2, 40 docking camera 41 downloading pictures 34, 36, 43 E EASYSHARE Camera Dock charging Battery...

User's Guide
Page 81
... contents 39 power connection 40 specifications 61 transferring pictures 43 USB connection 40 using 39 editing pictures 35 error messages 51 F fax numbers, support 55 FCC compliance 67 file names in internal memory 66 on Memory Card 66 flash auto 14 fill 14 red-eye 14 using 14 folders, MMC/SD Card 65 formatting internal memory 26 Picture Card 26 G guidelines, battery 62 Index H help online service 55 online, Picture Transfer 35 online, software 36 telephone support 56 troubleshooting camera 45 troubleshooting EASYSHARE Camera Dock 52 I included with camera 2, 40 information camera, viewing 25...
... contents 39 power connection 40 specifications 61 transferring pictures 43 USB connection 40 using 39 editing pictures 35 error messages 51 F fax numbers, support 55 FCC compliance 67 file names in internal memory 66 on Memory Card 66 flash auto 14 fill 14 red-eye 14 using 14 folders, MMC/SD Card 65 formatting internal memory 26 Picture Card 26 G guidelines, battery 62 Index H help online service 55 online, Picture Transfer 35 online, software 36 telephone support 56 troubleshooting camera 45 troubleshooting EASYSHARE Camera Dock 52 I included with camera 2, 40 information camera, viewing 25...

User's Guide
Page 84
... file 45 ready light camera on 4 status 50 red-eye, flash 14 regulatory information 67, 68 replacing batteries 62 requirements MACINTOSH system 32 WINDOWS-based system 32 review mode selector 23 mode, using 17 reviewing pictures deleting 18 for printing 18 menus 23 on LCD 17 slide show 20 running slide show 20 S safety 63 SD 8 Secure Digital 8 service and support fax numbers 55 Kodak web site 55 telephone numbers 56 setting clock 27 date and time...
... file 45 ready light camera on 4 status 50 red-eye, flash 14 regulatory information 67, 68 replacing batteries 62 requirements MACINTOSH system 32 WINDOWS-based system 32 review mode selector 23 mode, using 17 reviewing pictures deleting 18 for printing 18 menus 23 on LCD 17 slide show 20 running slide show 20 S safety 63 SD 8 Secure Digital 8 service and support fax numbers 55 Kodak web site 55 telephone numbers 56 setting clock 27 date and time...

User's Guide
Page 85
Index KODAK Picture 31 KODAK Picture Transfer 31 QUICKTIME 31 specifications camera 59 EASYSHARE Camera Dock 61 MACINTOSH system 32 WINDOWS-based system 32 status camera 7 screen icons 7 status bar 7 still mode selector 21 storage capacity, memory 65 strap, wrist 3 System folder, MMC/SD Card 65 system requirements MACINTOSH 32 WINDOWS 32 T taking pictures general 11 menu settings 21 telephone support 56 television, slide show 20 time, setting 27 tips battery guidelines 62 maintenance 63 ReadMe file 45...
Index KODAK Picture 31 KODAK Picture Transfer 31 QUICKTIME 31 specifications camera 59 EASYSHARE Camera Dock 61 MACINTOSH system 32 WINDOWS-based system 32 status camera 7 screen icons 7 status bar 7 still mode selector 21 storage capacity, memory 65 strap, wrist 3 System folder, MMC/SD Card 65 system requirements MACINTOSH 32 WINDOWS 32 T taking pictures general 11 menu settings 21 telephone support 56 television, slide show 20 time, setting 27 tips battery guidelines 62 maintenance 63 ReadMe file 45...


