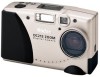
User Manual
Page 3
... 1 Preparing to Take Pictures 2 Loading Batteries 2 Turning the Camera On and Off 2 Checking Batteries 3 Inserting a Camera Memory Card 4 Removing a Camera Memory Card 4 Setting the Clock on Your Camera 5 Adjusting the LCD Brightness 6 2 Taking Pictures 7 Previewing a Picture Before it is Taken 8 Capturing a Picture 9 Zooming in on Your Subject 9 Photographing Close-Ups 10 Putting Yourself in the Picture 11 Viewing and Deleting the Picture Just Taken 12 Setting the Flash 13 Adjusting the Camera Exposure 14 Locking in an Exposure Setting 15 Deleting the Picture Just Taken 16...
... 1 Preparing to Take Pictures 2 Loading Batteries 2 Turning the Camera On and Off 2 Checking Batteries 3 Inserting a Camera Memory Card 4 Removing a Camera Memory Card 4 Setting the Clock on Your Camera 5 Adjusting the LCD Brightness 6 2 Taking Pictures 7 Previewing a Picture Before it is Taken 8 Capturing a Picture 9 Zooming in on Your Subject 9 Photographing Close-Ups 10 Putting Yourself in the Picture 11 Viewing and Deleting the Picture Just Taken 12 Setting the Flash 13 Adjusting the Camera Exposure 14 Locking in an Exposure Setting 15 Deleting the Picture Just Taken 16...

User Manual
Page 4
... 38 Software Overview 38 Kodak Software for Macintosh Computers 39 Software Overview 39 Installing the Software 40 6 Connecting Your Camera 41 Connecting to a Windows-Based Computer 42 Connecting to a Macintosh Computer 43 Starting the Kodak Software for Windows-Based Computers 44 Opening Mounter Software 44 Opening Digital Access TWAIN Acquire Software 44 Opening Camera Controls Software 44 Starting the Kodak Software for Macintosh Computers 45 Opening Picture Transfer Application 45 Opening Digital Access Plug-In Acquire 45 Copying Digital Access Files to the PlugIn Folder 45...
... 38 Software Overview 38 Kodak Software for Macintosh Computers 39 Software Overview 39 Installing the Software 40 6 Connecting Your Camera 41 Connecting to a Windows-Based Computer 42 Connecting to a Macintosh Computer 43 Starting the Kodak Software for Windows-Based Computers 44 Opening Mounter Software 44 Opening Digital Access TWAIN Acquire Software 44 Opening Camera Controls Software 44 Starting the Kodak Software for Macintosh Computers 45 Opening Picture Transfer Application 45 Opening Digital Access Plug-In Acquire 45 Copying Digital Access Files to the PlugIn Folder 45...
User Manual
Page 7
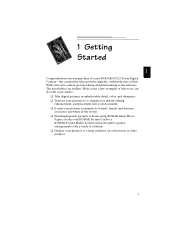
... a button. With your camera: q Take digital pictures in the world. q Transfer your purchase of a new KODAK DC215 Zoom Digital Camera-the camera that takes pictures digitally, without the use of film. q Print high-quality pictures at home using KODAK Inkjet Photo Paper, or take your KODAK Picture Card to a large audience on your pictures to friends, family, and business associates anywhere in unbelievable detail, color, and sharpness. Here is fun and easy. 1 Getting Started 1 Congratulations on a television or video monitor...
... a button. With your camera: q Take digital pictures in the world. q Transfer your purchase of a new KODAK DC215 Zoom Digital Camera-the camera that takes pictures digitally, without the use of film. q Print high-quality pictures at home using KODAK Inkjet Photo Paper, or take your KODAK Picture Card to a large audience on your pictures to friends, family, and business associates anywhere in unbelievable detail, color, and sharpness. Here is fun and easy. 1 Getting Started 1 Congratulations on a television or video monitor...

User Manual
Page 8
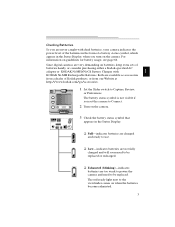
... the camera turn on the back of the camera. POWER WT Review Capture Connect Preferences q To turn on guidelines for power, and insert a KODAK Picture Card (camera memory card) into the camera until it locks in place. E 3 Insert the batteries as an accessory from our Website at http://www.kodak.com/go/accessories Loading Batteries Your camera comes with four AA batteries so you can start taking pictures with your camera, you start taking pictures immediately. The green ready light...
... the camera turn on the back of the camera. POWER WT Review Capture Connect Preferences q To turn on guidelines for power, and insert a KODAK Picture Card (camera memory card) into the camera until it locks in place. E 3 Insert the batteries as an accessory from our Website at http://www.kodak.com/go/accessories Loading Batteries Your camera comes with four AA batteries so you can start taking pictures with your camera, you start taking pictures immediately. The green ready light...
User Manual
Page 9
... digital cameras are too weak to power the camera and need to use. The battery status symbol is not visible if you turn on guidelines for battery usage, see page 66. q Exhausted (blinking)-indicates batteries are very demanding on when the batteries become exhausted. 3 For information on the camera. The red ready light next to Capture, Review, or Preferences. q Low-indicates batteries are not fully charged and will soon need to Connect. 2 Turn...
... digital cameras are too weak to power the camera and need to use. The battery status symbol is not visible if you turn on guidelines for battery usage, see page 66. q Exhausted (blinking)-indicates batteries are very demanding on when the batteries become exhausted. 3 For information on the camera. The red ready light next to Capture, Review, or Preferences. q Low-indicates batteries are not fully charged and will soon need to Connect. 2 Turn...

User Manual
Page 25
... setting. 1 With the camera on the camera memory card. Review Capture Connect Preferences POWER 2 Press a / button until the Quality option you want is highlighted. 3 3 Press the DO-IT button. You can capture more storage space. If you need to take a large number of pictures, or you are going to e-mail or use the pictures online, use the Better setting, which gives you more pictures and more detail in the Status Display. Adjusting...
... setting. 1 With the camera on the camera memory card. Review Capture Connect Preferences POWER 2 Press a / button until the Quality option you want is highlighted. 3 3 Press the DO-IT button. You can capture more storage space. If you need to take a large number of pictures, or you are going to e-mail or use the pictures online, use the Better setting, which gives you more pictures and more detail in the Status Display. Adjusting...

User Manual
Page 27
... to a camera memory card. You also have the ability to Preferences. The next time you want is highlighted. 3 Press the DO-IT button. 3 icon The Templates screen appears. Once the picture is highlighted, then press the DO-IT button. 21 Review Capture Connect Preferences POWER Review Capture Connect Preferences 2 Press a / button until No Template is taken with the Template feature, the template cannot be removed. For...
... to a camera memory card. You also have the ability to Preferences. The next time you want is highlighted. 3 Press the DO-IT button. 3 icon The Templates screen appears. Once the picture is highlighted, then press the DO-IT button. 21 Review Capture Connect Preferences POWER Review Capture Connect Preferences 2 Press a / button until No Template is taken with the Template feature, the template cannot be removed. For...

User Manual
Page 29
... displaying and printing. The Preferences screen reappears. This is the main setting. 5 Press the DO-IT button. Selecting an Image File Type The digital pictures you take with your camera are stored in an image file format that you want is highlighted. Need compatible software application. The Preferences screen appears. You can be used with most software you use if you plan on editing your pictures. 1 With the camera on, set the Slider switch POWER to use...
... displaying and printing. The Preferences screen reappears. This is the main setting. 5 Press the DO-IT button. Selecting an Image File Type The digital pictures you take with your camera are stored in an image file format that you want is highlighted. Need compatible software application. The Preferences screen appears. You can be used with most software you use if you plan on editing your pictures. 1 With the camera on, set the Slider switch POWER to use...

User Manual
Page 34
... number of times the flash fired in the camera. 1 With the camera on, set the Slider switch POWER to the Preferences screen. 28 q Firmware Version-displays the latest firmware version loaded into the camera. The Preferences screen appears. q # Images Captured-displays the total number of pictures taken with the camera. Viewing Camera Information You can look up the amount of use the camera is view-only and cannot be changed. Review Capture Connect Preferences POWER Review Capture Connect Preferences 2 Press a / button...
... number of times the flash fired in the camera. 1 With the camera on, set the Slider switch POWER to the Preferences screen. 28 q Firmware Version-displays the latest firmware version loaded into the camera. The Preferences screen appears. q # Images Captured-displays the total number of pictures taken with the camera. Viewing Camera Information You can look up the amount of use the camera is view-only and cannot be changed. Review Capture Connect Preferences POWER Review Capture Connect Preferences 2 Press a / button...

User Manual
Page 43
...-ROM drive. 5 q Color display monitor with your camera contains software for Windows NT 4.0 or greater. q 32 MB or more of features that let you access and use the pictures stored on the camera memory card. q System 7.6.1 or later. These applications provide a variety of available RAM for Windows-based personal computers and Macintosh computers. 5 Installing Your Software The KODAK DC215 Installer Software (Installer) included with 256 color (thousands of colors recommended).
...-ROM drive. 5 q Color display monitor with your camera contains software for Windows NT 4.0 or greater. q 32 MB or more of features that let you access and use the pictures stored on the camera memory card. q System 7.6.1 or later. These applications provide a variety of available RAM for Windows-based personal computers and Macintosh computers. 5 Installing Your Software The KODAK DC215 Installer Software (Installer) included with 256 color (thousands of colors recommended).
User Manual
Page 45
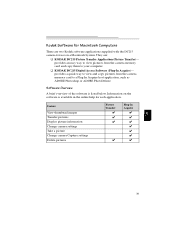
... (Picture Transfer)- Feature View thumbnail images Transfer pictures Display picture information Change camera settings Take a picture Change camera Capture settings Delete pictures Picture Transfer Plug-In Acquire 5 39 They are two Kodak software applications supplied with the DC215 camera for each application. provides a quick way to view and copy pictures from the camera memory card and copy them to a Plug-In Acquire host application, such as ADOBE Photoshop or ADOBE PhotoDeluxe. Software Overview A brief overview of the software is available in the online help for use...
... (Picture Transfer)- Feature View thumbnail images Transfer pictures Display picture information Change camera settings Take a picture Change camera Capture settings Delete pictures Picture Transfer Plug-In Acquire 5 39 They are two Kodak software applications supplied with the DC215 camera for each application. provides a quick way to view and copy pictures from the camera memory card and copy them to a Plug-In Acquire host application, such as ADOBE Photoshop or ADOBE PhotoDeluxe. Software Overview A brief overview of the software is available in the online help for use...

User Manual
Page 51
... 5. Opening Digital Access Plug-In Acquire This application provides a quick way to view and copy pictures from the camera memory card to the Digital Access PlugIn in the PlugIn folder of the compatible software application. 1 Double-click the KODAK DC215 folder on using the software can be found in the online help supplied with an application for the first time, you installed in the DC215 PlugIn folder. 5 Open the PlugIn folder for Macintosh Computers With the camera connected...
... 5. Opening Digital Access Plug-In Acquire This application provides a quick way to view and copy pictures from the camera memory card to the Digital Access PlugIn in the PlugIn folder of the compatible software application. 1 Double-click the KODAK DC215 folder on using the software can be found in the online help supplied with an application for the first time, you installed in the DC215 PlugIn folder. 5 Open the PlugIn folder for Macintosh Computers With the camera connected...

User Manual
Page 53
... KODAK DC215 Digital Access Software (Plug-In Acquire), or the KODAK DC215 Picture Transfer Application. Adjusting Your Monitor for troubleshooting information. Connecting with Your Camera If you are using a Windows-based computer, the serial port and speed setting can point you may need to view pictures from using your monitor display settings. 47 If you are getting messages on how to the PDF documents installed with your computer you in the online help for Better Viewing Your monitor display settings...
... KODAK DC215 Digital Access Software (Plug-In Acquire), or the KODAK DC215 Picture Transfer Application. Adjusting Your Monitor for troubleshooting information. Connecting with Your Camera If you are using a Windows-based computer, the serial port and speed setting can point you may need to view pictures from using your monitor display settings. 47 If you are getting messages on how to the PDF documents installed with your computer you in the online help for Better Viewing Your monitor display settings...

User Manual
Page 54
q Adjusting your document: q Color printing takes more detailed images on KODAK Inkjet Snapshot Paper (Snapshot Paper). If your computer gives you an insufficient memory message, you may need to photocopy documents, you should consider printing the document in grayscale. q Using fresh ink cartridges. If you clearer, crisper, and more time. Copier paper may not offer the same results as black and white. More complex pictures increase...
q Adjusting your document: q Color printing takes more detailed images on KODAK Inkjet Snapshot Paper (Snapshot Paper). If your computer gives you an insufficient memory message, you may need to photocopy documents, you should consider printing the document in grayscale. q Using fresh ink cartridges. If you clearer, crisper, and more time. Copier paper may not offer the same results as black and white. More complex pictures increase...

User Manual
Page 56
... incorrect COM port. to a specific COM port. Conflict with the camera. computer serial port. Solution Turn on laptops section of your can turn off . Some Advanced See the Power Power Management Management utilities on the camera. Change the COM port settings to Auto-Search or to disable this feature. Cause Camera power is not Connect serial cable connected to serial to the page 41. to laptop User's Guide save battery life.
... incorrect COM port. to a specific COM port. Conflict with the camera. computer serial port. Solution Turn on laptops section of your can turn off . Some Advanced See the Power Power Management Management utilities on the camera. Change the COM port settings to Auto-Search or to disable this feature. Cause Camera power is not Connect serial cable connected to serial to the page 41. to laptop User's Guide save battery life.

User Manual
Page 57
... Display reads Full. work . See page 2. Green ready light is blinking and camera does not take a picture. Slider switch is full Batteries need to your computer, delete pictures on the card (see page 34), or insert a card with available memory. Camera memory card is not Set the Slider switch set to be replaced. card. to Capture. 7 Ready light is processing picture. Camera is blinking. SHUTTER button does not Camera is full. See page 2. See page 4. 51 charge. Camera is not charged. The camera memory card is not work...
... Display reads Full. work . See page 2. Green ready light is blinking and camera does not take a picture. Slider switch is full Batteries need to your computer, delete pictures on the card (see page 34), or insert a card with available memory. Camera memory card is not Set the Slider switch set to be replaced. card. to Capture. 7 Ready light is processing picture. Camera is blinking. SHUTTER button does not Camera is full. See page 2. See page 4. 51 charge. Camera is not charged. The camera memory card is not work...
User Manual
Page 59
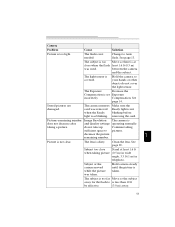
... removed Ready light is covered. The camera memory Make sure the card was blinking. Pictures remaining number Image Resolution The camera is dirty. The lens is does not decrease after and Quality settings operating normally. Subject too close when the flash least 1.6 ft (0.5 m) was taken. Change to pictures. removing the card. See page 65. Stored pictures are damaged. taking sufficient space to Auto flash. Subject or the camera moved while the picture was used. Camera Problem Cause Solution Picture is set Exposure...
... removed Ready light is covered. The camera memory Make sure the card was blinking. Pictures remaining number Image Resolution The camera is dirty. The lens is does not decrease after and Quality settings operating normally. Subject too close when the flash least 1.6 ft (0.5 m) was taken. Change to pictures. removing the card. See page 65. Stored pictures are damaged. taking sufficient space to Auto flash. Subject or the camera moved while the picture was used. Camera Problem Cause Solution Picture is set Exposure...
User Manual
Page 67
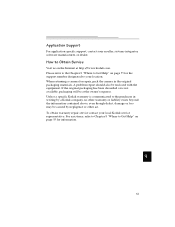
... been discarded or is communicated to Get Help" on page 55 for the support number designated to Obtain Service Visit us on the Internet at the owner's expense. Application Support For application specific support, contact your local Kodak service representative. For assistance, refer to Chapter 8 "Where to Get Help" on page 55 for information. 9 61 A problem report should also be caused by negligence...
... been discarded or is communicated to Get Help" on page 55 for the support number designated to Obtain Service Visit us on the Internet at the owner's expense. Application Support For application specific support, contact your local Kodak service representative. For assistance, refer to Chapter 8 "Where to Get Help" on page 55 for information. 9 61 A problem report should also be caused by negligence...

User Manual
Page 72
... on batteries. q NOT ALL BATTERIES ARE CREATED EQUAL! Battery life depends significantly on battery power, we recommend you limit continuous LCD Preview or Review to observe this precaution may result in some batteries in the battery charger. In Kodak lab tests, Ni-MH rechargeable batteries delivered the outstanding results in digital cameras as ordinary alkaline batteries. If you will obtain better performance from "photo-flash grade" alkaline batteries, such...
... on batteries. q NOT ALL BATTERIES ARE CREATED EQUAL! Battery life depends significantly on battery power, we recommend you limit continuous LCD Preview or Review to observe this precaution may result in some batteries in the battery charger. In Kodak lab tests, Ni-MH rechargeable batteries delivered the outstanding results in digital cameras as ordinary alkaline batteries. If you will obtain better performance from "photo-flash grade" alkaline batteries, such...
User Manual
Page 78
... 43 service numbers 56 setting clock 5 close-up 10 date stamp 22 delete all pictures 34 exposure compensation 14 exposure lock 15 frame 21 language 27 magnify 31 preview 8 print order 32 quality 19 quickview 24 resolution 20 review 30 self-timer 11 slide show 35 telephoto 9 template 21 video out 26 shutter button 9 slide show 35 software, Kodak help 55 installing 40 Macintosh computers 39 starting 44 Windows-based computers 38 specifications, camera 64 stamp, date 22...
... 43 service numbers 56 setting clock 5 close-up 10 date stamp 22 delete all pictures 34 exposure compensation 14 exposure lock 15 frame 21 language 27 magnify 31 preview 8 print order 32 quality 19 quickview 24 resolution 20 review 30 self-timer 11 slide show 35 telephoto 9 template 21 video out 26 shutter button 9 slide show 35 software, Kodak help 55 installing 40 Macintosh computers 39 starting 44 Windows-based computers 38 specifications, camera 64 stamp, date 22...


