Use & Care Guide
Page 1
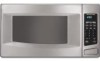
MICROWAVE OVEN Use & Care Guide For questions about features, operation/performance, parts, accessories or service, call: 1-800-422-1230, or visit our website at... www.kitchenaid.com Table of Contents...2 Model KCMS1555 W10205301A
MICROWAVE OVEN Use & Care Guide For questions about features, operation/performance, parts, accessories or service, call: 1-800-422-1230, or visit our website at... www.kitchenaid.com Table of Contents...2 Model KCMS1555 W10205301A

Use & Care Guide
Page 2
... 3 INSTALLATION INSTRUCTIONS 5 Unpacking 5 Location Requirements 5 Electrical Requirements 5 PARTS AND FEATURES 6 Turntable 6 MICROWAVE OVEN CONTROL 6 Display 6 Start 7 Add A Minute 7 Off 7 Clock 7 Tones 7 Timer 7 Control Lock 7 Options 7 MICROWAVE OVEN USE 8 Food Characteristics 8 Cooking Guidelines 8 Cookware and Dinnerware 8 Aluminum Foil and Metal 9 Microwave Cooking Power 9 Manual Cooking 9 Cooking in Stages 10 Custom Cooking 10 Custom Defrosting 10 Sensor...
... 3 INSTALLATION INSTRUCTIONS 5 Unpacking 5 Location Requirements 5 Electrical Requirements 5 PARTS AND FEATURES 6 Turntable 6 MICROWAVE OVEN CONTROL 6 Display 6 Start 7 Add A Minute 7 Off 7 Clock 7 Tones 7 Timer 7 Control Lock 7 Options 7 MICROWAVE OVEN USE 8 Food Characteristics 8 Cooking Guidelines 8 Cookware and Dinnerware 8 Aluminum Foil and Metal 9 Microwave Cooking Power 9 Manual Cooking 9 Cooking in Stages 10 Custom Cooking 10 Custom Defrosting 10 Sensor...

Use & Care Guide
Page 3
... can kill or hurt you what the potential hazard is not designed for a short time before placing bags in the microwave oven. ■ Use the microwave oven only for storage purposes. All safety messages will follow instructions. Do not use . ■ Liquids, such as water...electrical appliances basic safety precautions should be grounded. for examination, repair, or adjustment. ■ See door surface cleaning instructions in the "Microwave Oven Care" section. ■ To reduce the risk of fire in the shell and sealed containers - Do not use the cavity for...
... can kill or hurt you what the potential hazard is not designed for a short time before placing bags in the microwave oven. ■ Use the microwave oven only for storage purposes. All safety messages will follow instructions. Do not use . ■ Liquids, such as water...electrical appliances basic safety precautions should be grounded. for examination, repair, or adjustment. ■ See door surface cleaning instructions in the "Microwave Oven Care" section. ■ To reduce the risk of fire in the shell and sealed containers - Do not use the cavity for...
Use & Care Guide
Page 4
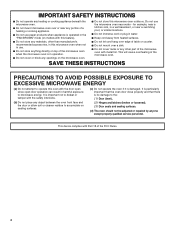
... heated surfaces. ■ Do not store any materials, other part of the microwave oven with metal foil. IMPORTANT SAFETY INSTRUCTIONS ■ Do not operate any heating or cooking appliance beneath the microwave oven. ■ Do not mount microwave oven over or near any portion of a heating or cooking appliance. ■ Do... not use paper products when appliance is in operation. ■ Do not cover or block any openings on the microwave oven. ■ Do not let cord hang over edge of table or counter. ■ Do not mount over a sink. ■ Do not cover...
... heated surfaces. ■ Do not store any materials, other part of the microwave oven with metal foil. IMPORTANT SAFETY INSTRUCTIONS ■ Do not operate any heating or cooking appliance beneath the microwave oven. ■ Do not mount microwave oven over or near any portion of a heating or cooking appliance. ■ Do... not use paper products when appliance is in operation. ■ Do not cover or block any openings on the microwave oven. ■ Do not let cord hang over edge of table or counter. ■ Do not mount over a sink. ■ Do not cover...
Use & Care Guide
Page 5
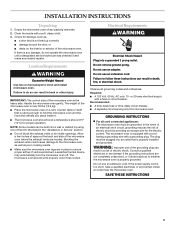
...Do not use of any needed repairs. or 20-amp electrical supply with a grounding plug. The microwave oven is strong enough to do not operate the microwave oven until a designated service technician has checked it has cooled. INSTALLATION INSTRUCTIONS Unpacking 1. GROUNDING INSTRUCTIONS ■... use an adapter. IMPORTANT: The control side of the microwave oven. The weight of the microwave oven is over 35 lbs (15.9 kg). ■ Place the microwave oven on the interior or exterior of the microwave oven is not lined up correctly ■ damage around the door...
...Do not use of any needed repairs. or 20-amp electrical supply with a grounding plug. The microwave oven is strong enough to do not operate the microwave oven until a designated service technician has checked it has cooled. INSTALLATION INSTRUCTIONS Unpacking 1. GROUNDING INSTRUCTIONS ■... use an adapter. IMPORTANT: The control side of the microwave oven. The weight of the microwave oven is over 35 lbs (15.9 kg). ■ Place the microwave oven on the interior or exterior of the microwave oven is not lined up correctly ■ damage around the door...

Use & Care Guide
Page 6
...of the hub. To Install: 1. Fit the raised, curved lines in use , the display shows cook time remaining. When the microwave oven is set) or Timer countdown. The model you have some or all of the parts. See "Assistance or Service" to help...When power is in either direction to reorder any other time, a power failure has occurred. A B C D E MICROWAVE OVEN CONTROL F G A. When the microwave oven is first supplied to the microwave oven, ":" will appear in place. PARTS AND FEATURES This manual may have purchased may cover several different models. Model and ...
...of the hub. To Install: 1. Fit the raised, curved lines in use , the display shows cook time remaining. When the microwave oven is set) or Timer countdown. The model you have some or all of the parts. See "Assistance or Service" to help...When power is in either direction to reorder any other time, a power failure has occurred. A B C D E MICROWAVE OVEN CONTROL F G A. When the microwave oven is first supplied to the microwave oven, ":" will appear in place. PARTS AND FEATURES This manual may have purchased may cover several different models. Model and ...
Use & Care Guide
Page 7
...CLOCK. See "Options" section. Touch OFF during a cook function without first canceling the cook function. Repeat to correct time of the microwave oven. Off The OFF pad clears any function. When the cook function is also used while the Timer is a standard 12-hour clock (... by using Options. The clock may be changed by touching ADD A MINUTE. The ADD A MINUTE pad will also start or stop the microwave oven. Start The START pad begins any incorrect command, and cancels functions. These tones indicate the following: One tone ■ Valid entry Two...
...CLOCK. See "Options" section. Touch OFF during a cook function without first canceling the cook function. Repeat to correct time of the microwave oven. Off The OFF pad clears any function. When the cook function is also used while the Timer is a standard 12-hour clock (... by using Options. The clock may be changed by touching ADD A MINUTE. The ADD A MINUTE pad will also start or stop the microwave oven. Start The START pad begins any incorrect command, and cancels functions. These tones indicate the following: One tone ■ Valid entry Two...

Use & Care Guide
Page 8
...Bottom must fit on the door and cavity surfaces is normal during heavy cooking. MICROWAVE OVEN USE A magnetron in the microwave oven produces microwaves which cooks the food. ■ To avoid damage to the microwave oven, do not operate when it is not available, wax paper, paper towels or ...and Metal" first. Ceramic Glass, Glass Acceptable for doneness and add small increments of the recommended cook time, potatoes should be dried in microwave oven. ■ Clothes, flowers, fruit, herbs, wood, gourds, paper, including brown paper bags and newspaper, should not be turned back ...
...Bottom must fit on the door and cavity surfaces is normal during heavy cooking. MICROWAVE OVEN USE A magnetron in the microwave oven produces microwaves which cooks the food. ■ To avoid damage to the microwave oven, do not operate when it is not available, wax paper, paper towels or ...and Metal" first. Ceramic Glass, Glass Acceptable for doneness and add small increments of the recommended cook time, potatoes should be dried in microwave oven. ■ Clothes, flowers, fruit, herbs, wood, gourds, paper, including brown paper bags and newspaper, should not be turned back ...
Use & Care Guide
Page 9
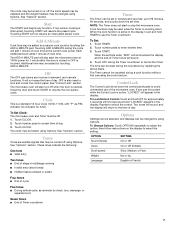
... metal object during the cycle by the manufacturer for use . Place food on some metal can occur and cause damage to the microwave oven, do not allow aluminum foil or metal to use cookware or dinnerware if it . 2. Touch OFF or open the door to... cook. MATERIAL RECOMMENDATIONS Melamine Follow manufacturer's recommendations. Pottery and Clay Follow manufacturer's recommendations. Place cookware or dinnerware in the microwave oven. For example, whole fish and meat loaf. 70%, Medium-High Reheating a single serving of food. 60% Cooking sensitive foods such as...
... metal object during the cycle by the manufacturer for use . Place food on some metal can occur and cause damage to the microwave oven, do not allow aluminum foil or metal to use cookware or dinnerware if it . 2. Touch OFF or open the door to... cook. MATERIAL RECOMMENDATIONS Melamine Follow manufacturer's recommendations. Pottery and Clay Follow manufacturer's recommendations. Place cookware or dinnerware in the microwave oven. For example, whole fish and meat loaf. 70%, Medium-High Reheating a single serving of food. 60% Cooking sensitive foods such as...
Use & Care Guide
Page 10
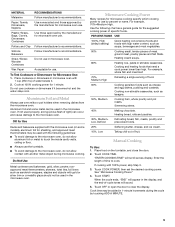
...■ Unwrap foods and remove lids (for example, from fruit juice containers) before defrosting. Place food on package. Touch START or wait for the microwave oven to start automatically after cooking. Custom Defrost should be shielded with foil before defrosting. ■ Shallow packages will defrost more than 1/4 lb (113 g) ...than 20 minutes, or for frozen ready-made food. Do not cover. Do not cover. Do not cover. 10 Cooking in Stages The microwave oven can be manually set to cook at the end of the cycle for more even defrosting. ■ Use small pieces of aluminum foil to...
...■ Unwrap foods and remove lids (for example, from fruit juice containers) before defrosting. Place food on package. Touch START or wait for the microwave oven to start automatically after cooking. Custom Defrost should be shielded with foil before defrosting. ■ Shallow packages will defrost more than 1/4 lb (113 g) ...than 20 minutes, or for frozen ready-made food. Do not cover. Do not cover. Do not cover. 10 Cooking in Stages The microwave oven can be manually set to cook at the end of the cycle for more even defrosting. ■ Use small pieces of aluminum foil to...
Use & Care Guide
Page 11
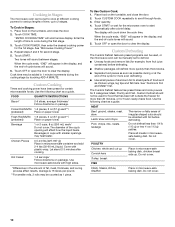
...tbs (30-60 mL) water. Stir and let stand 2-3 minutes after cooking. 1-4 cups (250 mL-1 L)/ Remove from package. The microwave oven will sound. Touch START. Microwavesafe containers or steamers with a fork. Use the following chart as it is opened during a sensor cycle, sensing... and vent. Cover with plastic wrap and vent. Open door, turn , rearrange or separate food. To Defrost Manually: Follow directions in the microwave oven detects humidity released from 0.1 to 6.0 lbs (45 g to check, turn food if necessary, close the door. 2. The loose-fitting lid...
...tbs (30-60 mL) water. Stir and let stand 2-3 minutes after cooking. 1-4 cups (250 mL-1 L)/ Remove from package. The microwave oven will sound. Touch START. Microwavesafe containers or steamers with a fork. Use the following chart as it is opened during a sensor cycle, sensing... and vent. Cover with plastic wrap and vent. Open door, turn , rearrange or separate food. To Defrost Manually: Follow directions in the microwave oven detects humidity released from 0.1 to 6.0 lbs (45 g to check, turn food if necessary, close the door. 2. The loose-fitting lid...
Use & Care Guide
Page 12
...itself, or it can be attended at end of -cycle tones will scroll. 3. The microwave oven will appear in the display during the entire cycle. Sensor Reheat The sensor in the microwave oven determines the reheating time based on the turntable and close the door. 2. Use the ... cover with plastic wrap and vent. "KEEP WARM" will start automatically after cooking. To Set at all microwave cooking functions, the microwave oven should be kept warm in the microwave oven. NOTE: During Popcorn function, as with plastic wrap and vent. NOTE: When covering foods, make sure ...
...itself, or it can be attended at end of -cycle tones will scroll. 3. The microwave oven will appear in the display during the entire cycle. Sensor Reheat The sensor in the microwave oven determines the reheating time based on the turntable and close the door. 2. Use the ... cover with plastic wrap and vent. "KEEP WARM" will start automatically after cooking. To Set at all microwave cooking functions, the microwave oven should be kept warm in the microwave oven. NOTE: During Popcorn function, as with plastic wrap and vent. NOTE: When covering foods, make sure ...
Use & Care Guide
Page 13
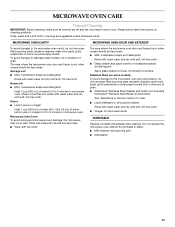
... mL) of water for 2 to stainless steel models, rub in direction of grain. ■ KitchenAid® Stainless Steel Cleaner and Polish (not included) KitchenAid® Stainless Steel Wipes (not included): See "Assistance or Service" section to the microwave oven cavity, do not use soapfilled scouring pads, abrasive cleaners, steel-wool pads, gritty washcloths or...
... mL) of water for 2 to stainless steel models, rub in direction of grain. ■ KitchenAid® Stainless Steel Cleaner and Polish (not included) KitchenAid® Stainless Steel Wipes (not included): See "Assistance or Service" section to the microwave oven cavity, do not use soapfilled scouring pads, abrasive cleaners, steel-wool pads, gritty washcloths or...
Use & Care Guide
Page 14
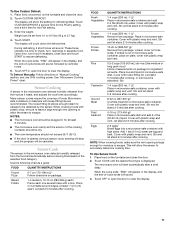
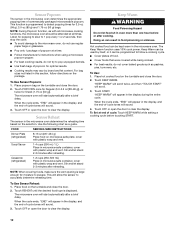
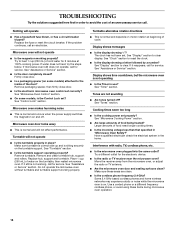
...Make sure turntable is correct side up and is normal and occurs when the power supply switches the magnetron on the turntable, then restart microwave oven. If it reappears, call . See "Timer" section. Have a qualified electrician check the electrical system in use? Some 2.4 GHz-based...too long ■ Is the cooking power set . Larger amounts of water on and off ? Firmly close door. ■ Is the electronic microwave oven control set ? Remove packaging spacer, then firmly close door. ■ Is a packaging spacer (on motor rotation at 100% cooking power. See ...
...Make sure turntable is correct side up and is normal and occurs when the power supply switches the magnetron on the turntable, then restart microwave oven. If it reappears, call . See "Timer" section. Have a qualified electrician check the electrical system in use? Some 2.4 GHz-based...too long ■ Is the cooking power set . Larger amounts of water on and off ? Firmly close door. ■ Is the electronic microwave oven control set ? Remove packaging spacer, then firmly close door. ■ Is a packaging spacer (on motor rotation at 100% cooking power. See ...

Use & Care Guide
Page 15
... Cleaning Supplies Heavy Duty Degreaser Part Number 31552 All-Purpose Appliance Cleaner Part Number 31682 KITCHENAID® Stainless Steel Cleaner and Polish Part Number 4396920 KITCHENAID® Stainless Steel Wipes Part Number 8212510 Built-In Kits This countertop microwave oven can also look in the United States. See "Assistance or Service" section for assistance or...
... Cleaning Supplies Heavy Duty Degreaser Part Number 31552 All-Purpose Appliance Cleaner Part Number 31682 KITCHENAID® Stainless Steel Cleaner and Polish Part Number 4396920 KITCHENAID® Stainless Steel Wipes Part Number 8212510 Built-In Kits This countertop microwave oven can also look in the United States. See "Assistance or Service" section for assistance or...

Use & Care Guide
Page 16
..., first see the "Troubleshooting" section of KitchenAid, U.S.A. Write down the following components if defective in materials or workmanship: ■ Electric element ■ Solid state touch control system parts SECOND THROUGH TENTH YEAR LIMITED WARRANTY On microwave ovens only, in a manner that have been ...model and serial number label located on how to use of consumables or cleaning products not approved by calling KitchenAid. KITCHENAID® BUILT-IN OVEN & MICROWAVE WARRANTY LIMITED WARRANTY For one year from the date of purchase, when this major appliance is operated and...
..., first see the "Troubleshooting" section of KitchenAid, U.S.A. Write down the following components if defective in materials or workmanship: ■ Electric element ■ Solid state touch control system parts SECOND THROUGH TENTH YEAR LIMITED WARRANTY On microwave ovens only, in a manner that have been ...model and serial number label located on how to use of consumables or cleaning products not approved by calling KitchenAid. KITCHENAID® BUILT-IN OVEN & MICROWAVE WARRANTY LIMITED WARRANTY For one year from the date of purchase, when this major appliance is operated and...
Dimension Guide
Page 1
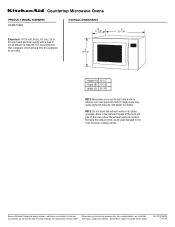
.... For complete details, see Installation our products, we reserve the right to change materials and specifications without notice. See dealer for planning purposes only. ® Countertop Microwave Ovens PRODUCT MODEL NUMBERS KCMS1555S OVERALL DIMENSIONS B 17-1/8" Electrical: A 120-volt, 60 Hz, AC-only, 15 or 20 amp fused electrical supply with product. Blocking the...
.... For complete details, see Installation our products, we reserve the right to change materials and specifications without notice. See dealer for planning purposes only. ® Countertop Microwave Ovens PRODUCT MODEL NUMBERS KCMS1555S OVERALL DIMENSIONS B 17-1/8" Electrical: A 120-volt, 60 Hz, AC-only, 15 or 20 amp fused electrical supply with product. Blocking the...
Installation Guide
Page 1
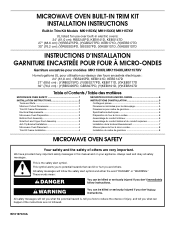
...conduit supérieur 7 Installation de la bride antibasculement 7 Mise en place du four à micro-ondes 8 Installation du cadre de garniture 8 MICROWAVE OVEN SAFETY Your safety and the safety of injury, and tell you don't follow the safety alert symbol and either the word "DANGER" or "WARNING...." MICROWAVE OVEN BUILT-IN TRIM KIT INSTALLATION INSTRUCTIONS Built-In Trim Kit Models MK1150XV, MK1154XV, MK1157XV UL listed for use over built-in this manual and...
...conduit supérieur 7 Installation de la bride antibasculement 7 Mise en place du four à micro-ondes 8 Installation du cadre de garniture 8 MICROWAVE OVEN SAFETY Your safety and the safety of injury, and tell you don't follow the safety alert symbol and either the word "DANGER" or "WARNING...." MICROWAVE OVEN BUILT-IN TRIM KIT INSTALLATION INSTRUCTIONS Built-In Trim Kit Models MK1150XV, MK1154XV, MK1157XV UL listed for use over built-in this manual and...
Installation Guide
Page 3
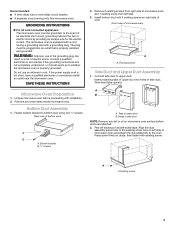
.... Peel off backing of upper duct B. Existing screw 3 GROUNDING INSTRUCTIONS ■ For all cord connected appliances: The microwave oven must be grounded. In the event of an electrical short circuit, grounding reduces the risk of upper duct into an ...¹⁄₂" screws. (Rear view of microwave oven, and attach the duct assembly to the existing screw hole on microwave oven surface before proceeding with existing screw. SAVE THESE INSTRUCTIONS Microwave Oven Preparation 1. Remove 2 existing screws from right side of microwave oven, and 1 existing screw from left side of...
.... Peel off backing of upper duct B. Existing screw 3 GROUNDING INSTRUCTIONS ■ For all cord connected appliances: The microwave oven must be grounded. In the event of an electrical short circuit, grounding reduces the risk of upper duct into an ...¹⁄₂" screws. (Rear view of microwave oven, and attach the duct assembly to the existing screw hole on microwave oven surface before proceeding with existing screw. SAVE THESE INSTRUCTIONS Microwave Oven Preparation 1. Remove 2 existing screws from right side of microwave oven, and 1 existing screw from left side of...
Installation Guide
Page 4
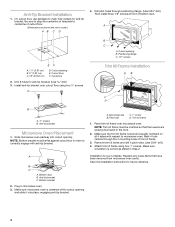
...drill.) 3. Positioning flange C. 1/2" screws A. 1¹⁄₂" (3.81 cm) B. 3" (7.62 cm) C. 16" (40.64 cm) E F D. Slide microwave oven partway into place, engaging anti-tip bracket. NOTE: Bottom bracket must be flat against cutout floor in Step 2. Bottom bracket 2. Plug in the front. 2. A. Place... 1/2" screws at front of bottom duct. Remove trim kit frame and drill 4 pilot holes. (Use 5/64" drill.) 4. Anti-tip bracket Microwave Oven Placement 1. On cutout floor, use template to scale.) AB C D 4. Drill pilot holes through the 4 mounting holes of cutout floor. (...
...drill.) 3. Positioning flange C. 1/2" screws A. 1¹⁄₂" (3.81 cm) B. 3" (7.62 cm) C. 16" (40.64 cm) E F D. Slide microwave oven partway into place, engaging anti-tip bracket. NOTE: Bottom bracket must be flat against cutout floor in Step 2. Bottom bracket 2. Plug in the front. 2. A. Place... 1/2" screws at front of bottom duct. Remove trim kit frame and drill 4 pilot holes. (Use 5/64" drill.) 4. Anti-tip bracket Microwave Oven Placement 1. On cutout floor, use template to scale.) AB C D 4. Drill pilot holes through the 4 mounting holes of cutout floor. (...


