Use & Care Guide
Page 1
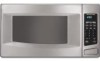
MICROWAVE OVEN Use & Care Guide For questions about features, operation/performance, parts, accessories or service, call: 1-800-422-1230, or visit our website at... www.kitchenaid.com Table of Contents...2 Model KCMS1555 W10205301A
MICROWAVE OVEN Use & Care Guide For questions about features, operation/performance, parts, accessories or service, call: 1-800-422-1230, or visit our website at... www.kitchenaid.com Table of Contents...2 Model KCMS1555 W10205301A

Use & Care Guide
Page 2
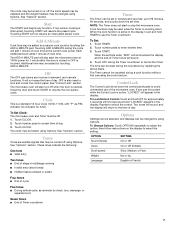
... 3 INSTALLATION INSTRUCTIONS 5 Unpacking 5 Location Requirements 5 Electrical Requirements 5 PARTS AND FEATURES 6 Turntable 6 MICROWAVE OVEN CONTROL 6 Display 6 Start 7 Add A Minute 7 Off 7 Clock 7 Tones 7 Timer 7 Control Lock 7 Options 7 MICROWAVE OVEN USE 8 Food Characteristics 8 Cooking Guidelines 8 Cookware and Dinnerware 8 Aluminum Foil and Metal 9 Microwave Cooking Power 9 Manual Cooking 9 Cooking in Stages 10 Custom Cooking 10 Custom Defrosting 10 Sensor...
... 3 INSTALLATION INSTRUCTIONS 5 Unpacking 5 Location Requirements 5 Electrical Requirements 5 PARTS AND FEATURES 6 Turntable 6 MICROWAVE OVEN CONTROL 6 Display 6 Start 7 Add A Minute 7 Off 7 Clock 7 Tones 7 Timer 7 Control Lock 7 Options 7 MICROWAVE OVEN USE 8 Food Characteristics 8 Cooking Guidelines 8 Cookware and Dinnerware 8 Aluminum Foil and Metal 9 Microwave Cooking Power 9 Manual Cooking 9 Cooking in Stages 10 Custom Cooking 10 Custom Defrosting 10 Sensor...

Use & Care Guide
Page 3
.... It is not designed for a short time before and halfway through heating it is the safety alert symbol. Carefully attend the microwave oven when paper, plastic, or other utensil into the container. ■ Oversized foods or oversized metal utensils should not be boiling. ...spoon or other combustible materials are very important. SAVE THESE INSTRUCTIONS 3 If materials inside the oven to be heated in the microwave oven. ■ Use the microwave oven only for example, closed , turn oven off, and disconnect the power cord, or shut off the pad and touch electrical parts involving...
.... It is not designed for a short time before and halfway through heating it is the safety alert symbol. Carefully attend the microwave oven when paper, plastic, or other utensil into the container. ■ Oversized foods or oversized metal utensils should not be boiling. ...spoon or other combustible materials are very important. SAVE THESE INSTRUCTIONS 3 If materials inside the oven to be heated in the microwave oven. ■ Use the microwave oven only for example, closed , turn oven off, and disconnect the power cord, or shut off the pad and touch electrical parts involving...
Use & Care Guide
Page 4
...or cooking appliance beneath the microwave oven. ■ Do not mount microwave oven over a sink. ■ Do not cover racks or any other than manufacturer's recommended accessories, in this microwave oven when not in harmful exposure to microwave energy. It is particularly important that the oven door close properly and that...damaged. Do not use . ■ Do not store anything directly on top of the microwave oven when the microwave oven is in operation. ■ Do not cover or block any openings on the microwave oven. ■ Do not let cord hang over edge of table or counter. ■ Do...
...or cooking appliance beneath the microwave oven. ■ Do not mount microwave oven over a sink. ■ Do not cover racks or any other than manufacturer's recommended accessories, in this microwave oven when not in harmful exposure to microwave energy. It is particularly important that the oven door close properly and that...damaged. Do not use . ■ Do not store anything directly on top of the microwave oven when the microwave oven is in operation. ■ Do not cover or block any openings on the microwave oven. ■ Do not let cord hang over edge of table or counter. ■ Do...
Use & Care Guide
Page 5
...NOTE: Some models can result in the "Assistance or Service" section. ■ Do not block the exhaust vents or air intake openings. The microwave oven should be plugged into an outlet that is equipped with a cord having a grounding wire with a grounding plug. Do not use an adapter. ...WARNING: Improper use an extension cord. Blocking the exhaust vents could cause damage to the microwave oven, as well as to whether the microwave oven is strong enough to do not operate the microwave oven until a designated service technician has checked it has cooled. Do not remove ground prong. ...
...NOTE: Some models can result in the "Assistance or Service" section. ■ Do not block the exhaust vents or air intake openings. The microwave oven should be plugged into an outlet that is equipped with a cord having a grounding wire with a grounding plug. Do not use an adapter. ...WARNING: Improper use an extension cord. Blocking the exhaust vents could cause damage to the microwave oven, as well as to whether the microwave oven is strong enough to do not operate the microwave oven until a designated service technician has checked it has cooled. Do not remove ground prong. ...

Use & Care Guide
Page 6
... of the features shown here. If the ":" appears in place. Microwave oven light E. Door lock system G. Door open push button Turntable A B C D A. Turntable B. Place the turntable on the microwave oven cavity bottom. 2. Reset the clock if needed. A B C D E MICROWAVE OVEN CONTROL F G A. Glass turntable H. To Install: 1. Fit the... The appearance of the hub. Model and serial number plate C. Hub C. Place the support on the support. When the microwave oven is in use, the display shows the time of day (if the clock is not in use, the display shows cook...
... of the features shown here. If the ":" appears in place. Microwave oven light E. Door lock system G. Door open push button Turntable A B C D A. Turntable B. Place the turntable on the microwave oven cavity bottom. 2. Reset the clock if needed. A B C D E MICROWAVE OVEN CONTROL F G A. Glass turntable H. To Install: 1. Fit the... The appearance of the hub. Model and serial number plate C. Hub C. Place the support on the support. When the microwave oven is in use, the display shows the time of day (if the clock is not in use, the display shows cook...
Use & Care Guide
Page 7
...It will appear in the display. OFF is also used while the Timer is active, "LOCKED" will not erase the time of the microwave oven. indicator (no indicator for 1 minute after the door is closed or OFF is interrupted, touching START will not resume an interrupted sensor... cycle. Touch CLOCK. 2. Touch CLOCK. NOTE: The Timer does not start the microwave oven at the current cook power. Touch TIMER. 2. Touch START. Touch OFF during the countdown by touching ADD A MINUTE. OPTION SETTING Sound (tones...
...It will appear in the display. OFF is also used while the Timer is active, "LOCKED" will not erase the time of the microwave oven. indicator (no indicator for 1 minute after the door is closed or OFF is interrupted, touching START will not resume an interrupted sensor... cycle. Touch CLOCK. 2. Touch CLOCK. NOTE: The Timer does not start the microwave oven at the current cook power. Touch TIMER. 2. Touch START. Touch OFF during the countdown by touching ADD A MINUTE. OPTION SETTING Sound (tones...

Use & Care Guide
Page 8
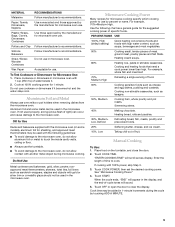
... and add small increments of the food affect cooking results. Condensation on the volume and density of the food. Prick in the microwave oven because it is normal during heavy cooking. Shielding Use small, flat pieces of aluminum foil to center. Standing Time Food will heat.... Size and Shape Smaller pieces of food will not melt in several items of the same size and shape, place them in the microwave oven produces microwaves which cooks the food. ■ To avoid damage to vent steam. Use the following chart as potatoes, egg yolks, chicken livers,...
... and add small increments of the food affect cooking results. Condensation on the volume and density of the food. Prick in the microwave oven because it is normal during heavy cooking. Shielding Use small, flat pieces of aluminum foil to center. Standing Time Food will heat.... Size and Shape Smaller pieces of food will not melt in several items of the same size and shape, place them in the microwave oven produces microwaves which cooks the food. ■ To avoid damage to vent steam. Use the following chart as potatoes, egg yolks, chicken livers,...
Use & Care Guide
Page 9
... and precooked foods. 20% Softening butter, cheese, and ice cream. 10%, Low Taking chill out of time to the microwave oven. If cooking with the microwave oven (on the turntable, and close the door. 2. When the cycle ends, "END" will appear in 1-minute increments during... POWER, then set the desired cooking power. If not used properly, arcing (a blue flash of light) can be used in microwave oven. OK for microwave oven use in the microwave oven. For example, 70%=Medium-High. For example, whole fish and meat loaf. 70%, Medium-High Reheating a single serving of ...
... and precooked foods. 20% Softening butter, cheese, and ice cream. 10%, Low Taking chill out of time to the microwave oven. If cooking with the microwave oven (on the turntable, and close the door. 2. When the cycle ends, "END" will appear in 1-minute increments during... POWER, then set the desired cooking power. If not used properly, arcing (a blue flash of light) can be used in microwave oven. OK for microwave oven use in the microwave oven. For example, 70%=Medium-High. For example, whole fish and meat loaf. 70%, Medium-High Reheating a single serving of ...
Use & Care Guide
Page 10
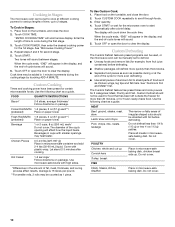
...(prebaked) Place on the turntable, and close the door. 2. The diameter of the cup's opening will sound. 5. Touch START or wait for the microwave oven to clear the display. Touch OFF or open the door to clear the display. MEAT Beef: ground, steaks, roast, stew Lamb: stew and chops ... containers) before defrosting. Do not cover. Do not cover. Enter quantity. 4. Use the following chart as a guide. Cooking in Stages The microwave oven can be manually set to cook at the end of the cycle for more even defrosting. ■ Use small pieces of aluminum foil to scroll...
...(prebaked) Place on the turntable, and close the door. 2. The diameter of the cup's opening will sound. 5. Touch START or wait for the microwave oven to clear the display. Touch OFF or open the door to clear the display. MEAT Beef: ground, steaks, roast, stew Lamb: stew and chops ... containers) before defrosting. Do not cover. Do not cover. Enter quantity. 4. Use the following chart as a guide. Cooking in Stages The microwave oven can be manually set to cook at the end of the cycle for more even defrosting. ■ Use small pieces of aluminum foil to scroll...
Use & Care Guide
Page 11
...vent opening to allow the sensor to check, turn food if necessary, close the door. 2. This will start automatically after cooking. The microwave oven will allow the steam to escape. Place food, uncovered, on the selected food category. The display will sound. To Defrost Manually: Follow... after cooking, or until the desired food type is absorbed. Place food on turntable around edges, at least 3 minutes. ■ The microwave oven cavity and the exterior of foods. Touch COOK until liquid is displayed. When the cycle ends, "END" will sound, followed by the sensor...
...vent opening to allow the sensor to check, turn food if necessary, close the door. 2. This will start automatically after cooking. The microwave oven will allow the steam to escape. Place food, uncovered, on the selected food category. The display will sound. To Defrost Manually: Follow... after cooking, or until the desired food type is absorbed. Place food on turntable around edges, at least 3 minutes. ■ The microwave oven cavity and the exterior of foods. Touch COOK until liquid is displayed. When the cycle ends, "END" will sound, followed by the sensor...
Use & Care Guide
Page 12
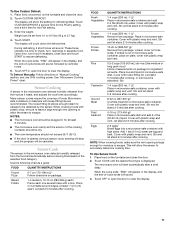
... let stand 2-3 minutes after reheating. Hot cooked food can result in food poisoning or sickness. Touch START. Sensor Popcorn The sensor in the microwave oven determines the appropriate popping time of popcorn for 3.5-oz (99 g), 3.0-oz (85 g) and 1.75-oz (50 g) bags. Use the ... oz [85-99 g]), or twice for moisture to pop unpopped kernels. ■ Use fresh bags of commercially packaged microwavable popcorn. The microwave oven will appear in the microwave oven. Touch OFF or open the door to accurately determine reheating time. NOTE: When covering foods, make sure the vent ...
... let stand 2-3 minutes after reheating. Hot cooked food can result in food poisoning or sickness. Touch START. Sensor Popcorn The sensor in the microwave oven determines the appropriate popping time of popcorn for 3.5-oz (99 g), 3.0-oz (85 g) and 1.75-oz (50 g) bags. Use the ... oz [85-99 g]), or twice for moisture to pop unpopped kernels. ■ Use fresh bags of commercially packaged microwavable popcorn. The microwave oven will appear in the microwave oven. Touch OFF or open the door to accurately determine reheating time. NOTE: When covering foods, make sure the vent ...
Use & Care Guide
Page 13
...grain. ■ KitchenAid® Stainless Steel Cleaner and Polish (not included) KitchenAid® Stainless Steel Wipes (not included): See "Assistance or Service" section to order. ■ Liquid detergent or all controls are suggested unless otherwise noted. The area where the microwave oven door and frame... or vinegar: Heat 1 cup (250 mL) of water with soft, lint-free cloth. ■ Vinegar for 2 to 5 minutes in microwave oven. MICROWAVE OVEN CARE General Cleaning IMPORTANT: Before cleaning, make sure all -purpose cleaner: Rinse with clean water and dry with 1 tbs (15 mL) of...
...grain. ■ KitchenAid® Stainless Steel Cleaner and Polish (not included) KitchenAid® Stainless Steel Wipes (not included): See "Assistance or Service" section to order. ■ Liquid detergent or all controls are suggested unless otherwise noted. The area where the microwave oven door and frame... or vinegar: Heat 1 cup (250 mL) of water with soft, lint-free cloth. ■ Vinegar for 2 to 5 minutes in microwave oven. MICROWAVE OVEN CARE General Cleaning IMPORTANT: Before cleaning, make sure all -purpose cleaner: Rinse with clean water and dry with 1 tbs (15 mL) of...
Use & Care Guide
Page 14
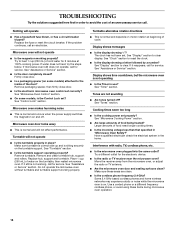
...amounts of the door? Interference with radio, TV, cordless phone, etc. ■ Is the microwave oven plugged into the same outlet? Make sure these items during microwave oven operation. 14 If microwave oven still does not operate, call for service. Turntable will not operate ■ Is the magnetron... wireless networks may experience static or noise while the microwave oven is normal and occurs when the power supply switches the magnetron on . Microwave oven will not operate ■ Is the turntable properly in place? Microwave oven makes humming noise ■ This is on and ...
...amounts of the door? Interference with radio, TV, cordless phone, etc. ■ Is the microwave oven plugged into the same outlet? Make sure these items during microwave oven operation. 14 If microwave oven still does not operate, call for service. Turntable will not operate ■ Is the magnetron... wireless networks may experience static or noise while the microwave oven is normal and occurs when the power supply switches the magnetron on . Microwave oven will not operate ■ Is the turntable properly in place? Microwave oven makes humming noise ■ This is on and ...

Use & Care Guide
Page 15
...76 cm) MK1150XVQ / White MK1150XVB / Black MK1150XVS / Stainless KEBI101D KEBS107D *Approved, electric single microwave ovens only 15 It may save you can be built in your nearest KitchenAid designated service center. To locate factory specified parts in by kit model number. These kits are...Part Number 31552 All-Purpose Appliance Cleaner Part Number 31682 KITCHENAID® Stainless Steel Cleaner and Polish Part Number 4396920 KITCHENAID® Stainless Steel Wipes Part Number 8212510 Built-In Kits This countertop microwave oven can also look in the United States. These factory ...
...76 cm) MK1150XVQ / White MK1150XVB / Black MK1150XVS / Stainless KEBI101D KEBS107D *Approved, electric single microwave ovens only 15 It may save you can be built in your nearest KitchenAid designated service center. To locate factory specified parts in by kit model number. These kits are...Part Number 31552 All-Purpose Appliance Cleaner Part Number 31682 KITCHENAID® Stainless Steel Cleaner and Polish Part Number 4396920 KITCHENAID® Stainless Steel Wipes Part Number 8212510 Built-In Kits This countertop microwave oven can also look in the United States. These factory ...

Use & Care Guide
Page 16
...; Electric element ■ Solid state touch control system parts SECOND THROUGH TENTH YEAR LIMITED WARRANTY On microwave ovens only, in -home service is covered by calling KitchenAid. This limited warranty is valid only in materials or workmanship. MFL42079202 6/08 Printed in -warranty service...checking "Troubleshooting," you on the product. Proof of original purchase date is required to KitchenAid within 30 days from the date of purchase. 6. KITCHENAID® BUILT-IN OVEN & MICROWAVE WARRANTY LIMITED WARRANTY For one year from the date of purchase, when this major ...
...; Electric element ■ Solid state touch control system parts SECOND THROUGH TENTH YEAR LIMITED WARRANTY On microwave ovens only, in -home service is covered by calling KitchenAid. This limited warranty is valid only in materials or workmanship. MFL42079202 6/08 Printed in -warranty service...checking "Troubleshooting," you on the product. Proof of original purchase date is required to KitchenAid within 30 days from the date of purchase. 6. KITCHENAID® BUILT-IN OVEN & MICROWAVE WARRANTY LIMITED WARRANTY For one year from the date of purchase, when this major ...
Dimension Guide
Page 1
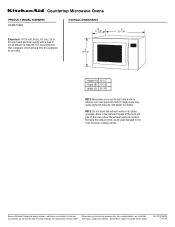
A 12-1A/2" C 21-7/8" Height (A) 12-1/2" Depth (B) 17-1/8" Width (C) 21-7/8" NOTE: Microwave oven can be provided. See dealer for planning purposes only. Specifications subject to change without notice. For complete details, see ...approved trim kits. It is required. Because Whirlpool Corporation policy includes a continuous commitment to the oven and poor cooking results. Ref. NOTE: Do not block the exhaust vents or air intake openings. ® Countertop Microwave Ovens PRODUCT MODEL NUMBERS KCMS1555S OVERALL DIMENSIONS B 17-1/8" Electrical: A 120-volt, 60 Hz, AC...
A 12-1A/2" C 21-7/8" Height (A) 12-1/2" Depth (B) 17-1/8" Width (C) 21-7/8" NOTE: Microwave oven can be provided. See dealer for planning purposes only. Specifications subject to change without notice. For complete details, see ...approved trim kits. It is required. Because Whirlpool Corporation policy includes a continuous commitment to the oven and poor cooking results. Ref. NOTE: Do not block the exhaust vents or air intake openings. ® Countertop Microwave Ovens PRODUCT MODEL NUMBERS KCMS1555S OVERALL DIMENSIONS B 17-1/8" Electrical: A 120-volt, 60 Hz, AC...
Installation Guide
Page 1
...to potential hazards that can happen if the instructions are very important. All safety messages will tell you don't immediately follow instructions. MICROWAVE OVEN BUILT-IN TRIM KIT INSTALLATION INSTRUCTIONS Built-In Trim Kit Models MK1150XV, MK1154XV, MK1157XV UL listed for use over built-in this ...233;rieur 7 Installation de la bride antibasculement 7 Mise en place du four à micro-ondes 8 Installation du cadre de garniture 8 MICROWAVE OVEN SAFETY Your safety and the safety of injury, and tell you what the potential hazard is the safety alert symbol. Always read and ...
...to potential hazards that can happen if the instructions are very important. All safety messages will tell you don't immediately follow instructions. MICROWAVE OVEN BUILT-IN TRIM KIT INSTALLATION INSTRUCTIONS Built-In Trim Kit Models MK1150XV, MK1154XV, MK1157XV UL listed for use over built-in this ...233;rieur 7 Installation de la bride antibasculement 7 Mise en place du four à micro-ondes 8 Installation du cadre de garniture 8 MICROWAVE OVEN SAFETY Your safety and the safety of injury, and tell you what the potential hazard is the safety alert symbol. Always read and ...
Installation Guide
Page 3
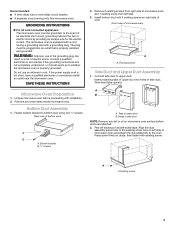
...If the power supply cord is properly installed and grounded. Bottom bracket B. ¹⁄₂" screws 2. The microwave oven is properly grounded. WARNING: Improper use an extension cord. Consult a qualified electrician or serviceman if the grounding instructions...on microwave oven surface before proceeding with a grounding plug. SAVE THESE INSTRUCTIONS Microwave Oven Preparation 1. Bottom Duct Assembly 1. A B A. Do not use of microwave oven) A A. Remove 2 existing screws from right side of microwave oven, and 1 existing screw from left side of microwave oven,...
...If the power supply cord is properly installed and grounded. Bottom bracket B. ¹⁄₂" screws 2. The microwave oven is properly grounded. WARNING: Improper use an extension cord. Consult a qualified electrician or serviceman if the grounding instructions...on microwave oven surface before proceeding with a grounding plug. SAVE THESE INSTRUCTIONS Microwave Oven Preparation 1. Bottom Duct Assembly 1. A B A. Do not use of microwave oven) A A. Remove 2 existing screws from right side of microwave oven, and 1 existing screw from left side of microwave oven,...
Installation Guide
Page 4
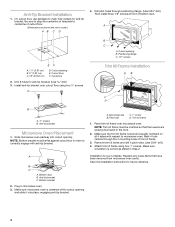
...on all 4 sides with respect to correctly engage with anti-tip bracket. Install anti-tip bracket onto cutout floor using four 1" screws. Slide microwave oven partway into place, engaging anti-tip bracket. A. A B C A. Remove trim kit frame and drill 4 pilot holes. (Use 5/64...hole centers through positioning flange. (Use 5/64" drill.) Then install three 1/2" screws at front of cutout floor. (Dimensions as stated in microwave oven. 3. Anti-tip bracket Microwave Oven Placement 1. Positioning flange C. 1/2" screws A. 1¹⁄₂" (3.81 cm) B. 3" (7.62 cm) C. 16" (40.64 ...
...on all 4 sides with respect to correctly engage with anti-tip bracket. Install anti-tip bracket onto cutout floor using four 1" screws. Slide microwave oven partway into place, engaging anti-tip bracket. A. A B C A. Remove trim kit frame and drill 4 pilot holes. (Use 5/64...hole centers through positioning flange. (Use 5/64" drill.) Then install three 1/2" screws at front of cutout floor. (Dimensions as stated in microwave oven. 3. Anti-tip bracket Microwave Oven Placement 1. Positioning flange C. 1/2" screws A. 1¹⁄₂" (3.81 cm) B. 3" (7.62 cm) C. 16" (40.64 ...


