Use & Care Guide
Page 1
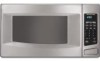
www.kitchenaid.com Table of Contents...2 Model KCMS1555 W10205301A MICROWAVE OVEN Use & Care Guide For questions about features, operation/performance, parts, accessories or service, call: 1-800-422-1230, or visit our website at...
www.kitchenaid.com Table of Contents...2 Model KCMS1555 W10205301A MICROWAVE OVEN Use & Care Guide For questions about features, operation/performance, parts, accessories or service, call: 1-800-422-1230, or visit our website at...

Use & Care Guide
Page 2
... 3 INSTALLATION INSTRUCTIONS 5 Unpacking 5 Location Requirements 5 Electrical Requirements 5 PARTS AND FEATURES 6 Turntable 6 MICROWAVE OVEN CONTROL 6 Display 6 Start 7 Add A Minute 7 Off 7 Clock 7 Tones 7 Timer 7 Control Lock 7 Options 7 MICROWAVE OVEN USE 8 Food Characteristics 8 Cooking Guidelines 8 Cookware and Dinnerware 8 Aluminum Foil and Metal 9 Microwave Cooking Power 9 Manual Cooking 9 Cooking in Stages 10 Custom Cooking 10 Custom Defrosting 10 Sensor Cooking...
... 3 INSTALLATION INSTRUCTIONS 5 Unpacking 5 Location Requirements 5 Electrical Requirements 5 PARTS AND FEATURES 6 Turntable 6 MICROWAVE OVEN CONTROL 6 Display 6 Start 7 Add A Minute 7 Off 7 Clock 7 Tones 7 Timer 7 Control Lock 7 Options 7 MICROWAVE OVEN USE 8 Food Characteristics 8 Cooking Guidelines 8 Cookware and Dinnerware 8 Aluminum Foil and Metal 9 Microwave Cooking Power 9 Manual Cooking 9 Cooking in Stages 10 Custom Cooking 10 Custom Defrosting 10 Sensor Cooking...

Use & Care Guide
Page 3
... INSERTED INTO THE LIQUID. Stir the liquid both before using electrical appliances basic safety precautions should not be heated in the microwave oven. ■ Use the microwave oven only for industrial or laboratory use corrosive chemicals or vapors in the shell and sealed containers - Pieces can happen if the..., or shut off the pad and touch electrical parts involving a risk of electric shock. This is , tell you how to properly grounded outlet. These words mean: DANGER You can be serviced only by children. ■ Do not operate the microwave oven if it has a damaged cord or plug,...
... INSERTED INTO THE LIQUID. Stir the liquid both before using electrical appliances basic safety precautions should not be heated in the microwave oven. ■ Use the microwave oven only for industrial or laboratory use corrosive chemicals or vapors in the shell and sealed containers - Pieces can happen if the..., or shut off the pad and touch electrical parts involving a risk of electric shock. This is , tell you how to properly grounded outlet. These words mean: DANGER You can be serviced only by children. ■ Do not operate the microwave oven if it has a damaged cord or plug,...
Use & Care Guide
Page 4
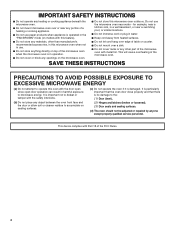
...complies with Part 18 of the microwave oven. SAVE THESE INSTRUCTIONS PRECAUTIONS TO AVOID POSSIBLE EXPOSURE TO EXCESSIVE MICROWAVE ENERGY (a) Do not attempt to operate this microwave oven when not in use. ■ Do not store anything directly on top of the microwave oven when the microwave oven is in...not operate any heating or cooking appliance beneath the microwave oven. ■ Do not mount microwave oven over a sink. ■ Do not cover racks or any other part of a heating or cooking appliance. ■ Do not use the microwave oven near a swimming pool, or similar locations. &#...
...complies with Part 18 of the microwave oven. SAVE THESE INSTRUCTIONS PRECAUTIONS TO AVOID POSSIBLE EXPOSURE TO EXCESSIVE MICROWAVE ENERGY (a) Do not attempt to operate this microwave oven when not in use. ■ Do not store anything directly on top of the microwave oven when the microwave oven is in...not operate any heating or cooking appliance beneath the microwave oven. ■ Do not mount microwave oven over a sink. ■ Do not cover racks or any other part of a heating or cooking appliance. ■ Do not use the microwave oven near a swimming pool, or similar locations. &#...

Use & Care Guide
Page 6
...(if the clock is first supplied to the microwave oven, ":" will appear in the display. To Install: 1. Reset the clock if needed. When the microwave oven is not in use , the display shows cook time remaining. PARTS AND FEATURES This manual may differ slightly from...shows the time of your particular model may cover several different models. Control panel H I . When the microwave oven is in the display at any of the features shown here. Microwave inlet cover D. The model you have purchased may have some or all of the parts. A B C D E MICROWAVE OVEN CONTROL F G A.
...(if the clock is first supplied to the microwave oven, ":" will appear in the display. To Install: 1. Reset the clock if needed. When the microwave oven is not in use , the display shows cook time remaining. PARTS AND FEATURES This manual may differ slightly from...shows the time of your particular model may cover several different models. Control panel H I . When the microwave oven is in the display at any of the features shown here. Microwave inlet cover D. The model you have purchased may have some or all of the parts. A B C D E MICROWAVE OVEN CONTROL F G A.

Use & Care Guide
Page 8
... Dish Bottom must fit on or allow a standing time. Let potatoes stand for microwave ovens may become hot from heat transferred from outside to the food. Arranging If heating irregularly shaped or different sized foods, arrange the thinner parts and smaller sized items toward the center. Shielding Use small, flat pieces of aluminum...
... Dish Bottom must fit on or allow a standing time. Let potatoes stand for microwave ovens may become hot from heat transferred from outside to the food. Arranging If heating irregularly shaped or different sized foods, arrange the thinner parts and smaller sized items toward the center. Shielding Use small, flat pieces of aluminum...
Use & Care Guide
Page 10
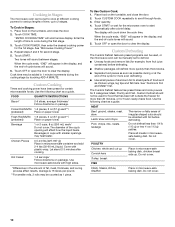
... ribs, roasts, sausage The narrow or fatty areas of irregular shaped cuts should not be used , or the microwave oven can be manually set to shield parts of aluminum foil to cook at different cooking powers for example, from fruit juice containers) before defrosting. Do not ... increments during the cycling stage by touching ADD A MINUTE. Do not cover. Touch START. Two tones will defrost more than 20 minutes, or for the microwave oven to 2 stages. Beverage 1 or 2 cups, 8 oz (250 mL) each **/ (prebaked) Place on package. "ENTER COOKING TIME" will sound. 5. ...
... ribs, roasts, sausage The narrow or fatty areas of irregular shaped cuts should not be used , or the microwave oven can be manually set to shield parts of aluminum foil to cook at different cooking powers for example, from fruit juice containers) before defrosting. Do not ... increments during the cycling stage by touching ADD A MINUTE. Do not cover. Touch START. Two tones will defrost more than 20 minutes, or for the microwave oven to 2 stages. Beverage 1 or 2 cups, 8 oz (250 mL) each **/ (prebaked) Place on package. "ENTER COOKING TIME" will sound. 5. ...
Use & Care Guide
Page 13
...operate the microwave oven without the turntable in microwave oven. MICROWAVE OVEN CARE General Cleaning IMPORTANT: Before cleaning, make sure all -purpose cleaner: Rinse with clean water and dry with 1 tbs (15 mL) of grain. ■ KitchenAid® Stainless Steel Cleaner and Polish (not included) KitchenAid® ... soil ■ Mild, nonabrasive soaps and detergents: Heat 1 cup (250 mL) of grain. Microwave Inlet Cover To avoid arcing and microwave oven damage, the microwave inlet cover (see "Parts and Features") should be kept clean. ■ Wipe with soft, lint-free cloth. ■...
...operate the microwave oven without the turntable in microwave oven. MICROWAVE OVEN CARE General Cleaning IMPORTANT: Before cleaning, make sure all -purpose cleaner: Rinse with clean water and dry with 1 tbs (15 mL) of grain. ■ KitchenAid® Stainless Steel Cleaner and Polish (not included) KitchenAid® ... soil ■ Mild, nonabrasive soaps and detergents: Heat 1 cup (250 mL) of grain. Microwave Inlet Cover To avoid arcing and microwave oven damage, the microwave inlet cover (see "Parts and Features") should be kept clean. ■ Wipe with soft, lint-free cloth. ■...

Use & Care Guide
Page 15
... parts distributors and service companies. Replacement Parts Glass Turntable Part Number W10143945 Turntable Support and Rollers Part Number W10143946 Turntable Hub Part Number W10143947 Cleaning Supplies Heavy Duty Degreaser Part Number 31552 All-Purpose Appliance Cleaner Part Number 31682 KITCHENAID® Stainless Steel Cleaner and Polish Part Number 4396920 KITCHENAID® Stainless Steel Wipes Part Number 8212510 Built-In Kits This countertop microwave oven...
... parts distributors and service companies. Replacement Parts Glass Turntable Part Number W10143945 Turntable Support and Rollers Part Number W10143946 Turntable Hub Part Number W10143947 Cleaning Supplies Heavy Duty Degreaser Part Number 31552 All-Purpose Appliance Cleaner Part Number 31682 KITCHENAID® Stainless Steel Cleaner and Polish Part Number 4396920 KITCHENAID® Stainless Steel Wipes Part Number 8212510 Built-In Kits This countertop microwave oven...

Use & Care Guide
Page 16
... if defective in materials or workmanship: ■ Electric element ■ Solid state touch control system parts SECOND THROUGH TENTH YEAR LIMITED WARRANTY On microwave ovens only, in China If you ever need to know your major appliance. KITCHENAID SHALL NOT BE LIABLE FOR INCIDENTAL OR CONSEQUENTIAL DAMAGES. This major appliance is designed to be...
... if defective in materials or workmanship: ■ Electric element ■ Solid state touch control system parts SECOND THROUGH TENTH YEAR LIMITED WARRANTY On microwave ovens only, in China If you ever need to know your major appliance. KITCHENAID SHALL NOT BE LIABLE FOR INCIDENTAL OR CONSEQUENTIAL DAMAGES. This major appliance is designed to be...
Installation Guide
Page 1
... / Table des matières MICROWAVE OVEN SAFETY 1 INSTALLATION INSTRUCTIONS 2 Tools and Parts 2 Minimum Cutout Dimensions 2 Trim Kit Frame Dimensions 2 Electrical Requirements 2 Microwave Oven Preparation 3 Bottom Duct Assembly 3 Side Duct and Upper Duct Assembly 3 Anti-Tip Bracket Installation 4 Microwave Oven Placement 4 Trim Kit Frame Installation ...la bride antibasculement 7 Mise en place du four à micro-ondes 8 Installation du cadre de garniture 8 MICROWAVE OVEN SAFETY Your safety and the safety of injury, and tell you what the potential hazard is the safety alert...
... / Table des matières MICROWAVE OVEN SAFETY 1 INSTALLATION INSTRUCTIONS 2 Tools and Parts 2 Minimum Cutout Dimensions 2 Trim Kit Frame Dimensions 2 Electrical Requirements 2 Microwave Oven Preparation 3 Bottom Duct Assembly 3 Side Duct and Upper Duct Assembly 3 Anti-Tip Bracket Installation 4 Microwave Oven Placement 4 Trim Kit Frame Installation ...la bride antibasculement 7 Mise en place du four à micro-ondes 8 Installation du cadre de garniture 8 MICROWAVE OVEN SAFETY Your safety and the safety of injury, and tell you what the potential hazard is the safety alert...
Installation Guide
Page 2
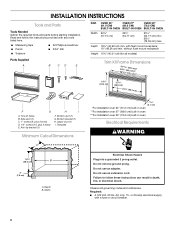
... into a grounded 3 prong outlet. OVER 24" OVER 27" OVER 30" (61.0 CM) (68.6 CM) (76.2 CM) BUILT-IN OVEN BUILT-IN OVEN BUILT-IN OVEN Width 22¹⁄₂" (57.15 cm) 25¹⁄₂" (64.77 cm) 25¹⁄₂" (64.77 cm) ...Minimum Cutout Dimensions A Width 15³⁄₄" (40.0 cm) B 3" (7.6 cm) A. Do not remove ground prong. Do not use an extension cord. Observe all models) Parts Supplied A B C D E Trim Kit Frame Dimensions 222963 6(87(6.530.7.c5mccm)m*)**)*** 18¹⁄₄" (46.4 cm) 12 30.6 cm) 22¹⁄₈" (56.2 ...
... into a grounded 3 prong outlet. OVER 24" OVER 27" OVER 30" (61.0 CM) (68.6 CM) (76.2 CM) BUILT-IN OVEN BUILT-IN OVEN BUILT-IN OVEN Width 22¹⁄₂" (57.15 cm) 25¹⁄₂" (64.77 cm) 25¹⁄₂" (64.77 cm) ...Minimum Cutout Dimensions A Width 15³⁄₄" (40.0 cm) B 3" (7.6 cm) A. Do not remove ground prong. Do not use an extension cord. Observe all models) Parts Supplied A B C D E Trim Kit Frame Dimensions 222963 6(87(6.530.7.c5mccm)m*)**)*** 18¹⁄₄" (46.4 cm) 12 30.6 cm) 22¹⁄₈" (56.2 ...


