
Use & Care Guide
Page 2
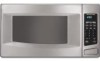
TABLE OF CONTENTS MICROWAVE OVEN SAFETY 3 INSTALLATION INSTRUCTIONS 5 Unpacking 5 Location Requirements 5 Electrical Requirements 5 PARTS AND FEATURES 6 Turntable 6 MICROWAVE OVEN CONTROL 6 Display 6 Start 7 Add A Minute 7 Off 7 Clock 7 Tones 7 Timer 7 Control Lock 7 Options 7 MICROWAVE OVEN USE 8 Food Characteristics 8 Cooking Guidelines 8 Cookware and Dinnerware 8 Aluminum Foil and Metal 9 Microwave Cooking Power 9 Manual Cooking 9 Cooking in Stages 10 Custom Cooking 10 Custom Defrosting...
TABLE OF CONTENTS MICROWAVE OVEN SAFETY 3 INSTALLATION INSTRUCTIONS 5 Unpacking 5 Location Requirements 5 Electrical Requirements 5 PARTS AND FEATURES 6 Turntable 6 MICROWAVE OVEN CONTROL 6 Display 6 Start 7 Add A Minute 7 Off 7 Clock 7 Tones 7 Timer 7 Control Lock 7 Options 7 MICROWAVE OVEN USE 8 Food Characteristics 8 Cooking Guidelines 8 Cookware and Dinnerware 8 Aluminum Foil and Metal 9 Microwave Cooking Power 9 Manual Cooking 9 Cooking in Stages 10 Custom Cooking 10 Custom Defrosting...

Use & Care Guide
Page 3
... examination, repair, or adjustment. ■ See door surface cleaning instructions in this section and in the provided Installation Instructions. ■ Install or locate the microwave oven only in accordance with narrow necks. - Always read and obey all instructions before using electrical appliances basic safety...in use straight-sided containers with the provided Installation Instructions. ■ Some products such as they may create a fire or risk of electric shock. This is not always present. Remove wire twist-ties from the microwave oven is the safety alert symbol. Do not...
... examination, repair, or adjustment. ■ See door surface cleaning instructions in this section and in the provided Installation Instructions. ■ Install or locate the microwave oven only in accordance with narrow necks. - Always read and obey all instructions before using electrical appliances basic safety...in use straight-sided containers with the provided Installation Instructions. ■ Some products such as they may create a fire or risk of electric shock. This is not always present. Remove wire twist-ties from the microwave oven is the safety alert symbol. Do not...
Use & Care Guide
Page 5
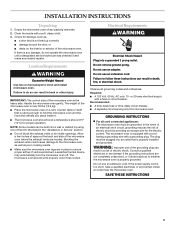
..., or ■ dents on a cart, counter, table or shelf that is properly installed and grounded. IMPORTANT: The control side of the microwave oven. If vents are located. The microwave oven should be plugged into an outlet that is the heavy side. Do not use an extension... cord. GROUNDING INSTRUCTIONS ■ For all governing codes and ordinances. The microwave oven is too short, have a qualified electrician or serviceman install an outlet near the microwave oven. Do not use an extension cord. Location Requirements WARNING Excessive Weight Hazard Use two or...
..., or ■ dents on a cart, counter, table or shelf that is properly installed and grounded. IMPORTANT: The control side of the microwave oven. If vents are located. The microwave oven should be plugged into an outlet that is the heavy side. Do not use an extension... cord. GROUNDING INSTRUCTIONS ■ For all governing codes and ordinances. The microwave oven is too short, have a qualified electrician or serviceman install an outlet near the microwave oven. Do not use an extension cord. Location Requirements WARNING Excessive Weight Hazard Use two or...

Use & Care Guide
Page 6
... on the microwave oven cavity bottom. 2. Reset the clock if needed. A B C D E MICROWAVE OVEN CONTROL F G A. When the microwave oven is in use , the display shows the time of your particular model may have purchased may differ slightly from the illustrations in place. Door lock system G. To Install: 1. Place... the support on the support. The model you have some or all of the hub. For best cooking results, do not operate the microwave oven without having the turntable in this manual. Cooking ...
... on the microwave oven cavity bottom. 2. Reset the clock if needed. A B C D E MICROWAVE OVEN CONTROL F G A. When the microwave oven is in use , the display shows the time of your particular model may have purchased may differ slightly from the illustrations in place. Door lock system G. To Install: 1. Place... the support on the support. The model you have some or all of the hub. For best cooking results, do not operate the microwave oven without having the turntable in this manual. Cooking ...

Use & Care Guide
Page 15
...Number 31682 KITCHENAID® Stainless Steel Cleaner and Polish Part Number 4396920 KITCHENAID® Stainless Steel Wipes Part Number 8212510 Built-In Kits This countertop microwave oven can also look in your correspondence. KIT SIZE KIT MODEL NUMBERS/ FOR INSTALLATION COLORS OVER OVEN MODELS 24... KEBI101D KEBS107D *Approved, electric single microwave ovens only 15 To locate factory specified parts in your area, you the cost of your request. Our consultants provide assistance with any questions or concerns at: KitchenAid Brand Home Appliances Customer eXperience Center ...
...Number 31682 KITCHENAID® Stainless Steel Cleaner and Polish Part Number 4396920 KITCHENAID® Stainless Steel Wipes Part Number 8212510 Built-In Kits This countertop microwave oven can also look in your correspondence. KIT SIZE KIT MODEL NUMBERS/ FOR INSTALLATION COLORS OVER OVEN MODELS 24... KEBI101D KEBS107D *Approved, electric single microwave ovens only 15 To locate factory specified parts in your area, you the cost of your request. Our consultants provide assistance with any questions or concerns at: KitchenAid Brand Home Appliances Customer eXperience Center ...

Use & Care Guide
Page 16
...number has been altered or removed from accident, alteration, misuse, abuse, fire, flood, acts of God, improper installation, installation not in an inaccessible location or is required to obtain service under these excluded circumstances shall be easily determined. ...microwave ovens only, in the second through due to defects in -warranty service. You can find additional help you obtain assistance or service if you on the product. Service calls to better help by checking the "Assistance or Service" section or by a KitchenAid designated service company. KITCHENAID...
...number has been altered or removed from accident, alteration, misuse, abuse, fire, flood, acts of God, improper installation, installation not in an inaccessible location or is required to obtain service under these excluded circumstances shall be easily determined. ...microwave ovens only, in the second through due to defects in -warranty service. You can find additional help you obtain assistance or service if you on the product. Service calls to better help by checking the "Assistance or Service" section or by a KitchenAid designated service company. KITCHENAID...
Dimension Guide
Page 1
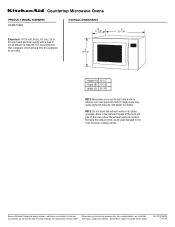
It is required. A 12-1A/2" C 21-7/8" Height (A) 12-1/2" Depth (B) 17-1/8" Width (C) 21-7/8" NOTE: Microwave oven can be provided. Blocking the exhaust vents could cause damage to change without notice. Because Whirlpool Corporation policy includes a ... or air intake openings. ® Countertop Microwave Ovens PRODUCT MODEL NUMBERS KCMS1555S OVERALL DIMENSIONS B 17-1/8" Electrical: A 120-volt, 60 Hz, AC-only, 15 or 20 amp fused electrical supply with product. See dealer for planning purposes only. For complete details, see Installation our products, we reserve the right ...
It is required. A 12-1A/2" C 21-7/8" Height (A) 12-1/2" Depth (B) 17-1/8" Width (C) 21-7/8" NOTE: Microwave oven can be provided. Blocking the exhaust vents could cause damage to change without notice. Because Whirlpool Corporation policy includes a ... or air intake openings. ® Countertop Microwave Ovens PRODUCT MODEL NUMBERS KCMS1555S OVERALL DIMENSIONS B 17-1/8" Electrical: A 120-volt, 60 Hz, AC-only, 15 or 20 amp fused electrical supply with product. See dealer for planning purposes only. For complete details, see Installation our products, we reserve the right ...
Installation Guide
Page 1
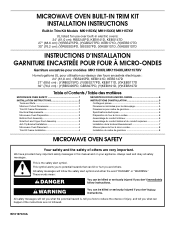
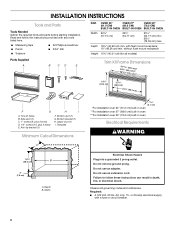
... can be killed or seriously injured if you what the potential hazard is the safety alert symbol. All safety messages will follow instructions. MICROWAVE OVEN BUILT-IN TRIM KIT INSTALLATION INSTRUCTIONS Built-In Trim Kit Models MK1150XV, MK1154XV, MK1157XV UL listed for use over built-in this manual and on your appliance. Always...
... can be killed or seriously injured if you what the potential hazard is the safety alert symbol. All safety messages will follow instructions. MICROWAVE OVEN BUILT-IN TRIM KIT INSTALLATION INSTRUCTIONS Built-In Trim Kit Models MK1150XV, MK1154XV, MK1157XV UL listed for use over built-in this manual and on your appliance. Always...
Installation Guide
Page 2
...) E. Do not use an extension cord. OVER 24" OVER 27" OVER 30" (61.0 CM) (68.6 CM) (76.2 CM) BUILT-IN OVEN BUILT-IN OVEN BUILT-IN OVEN Width 22¹⁄₂" (57.15 cm) 25¹⁄₂" (64.77 cm) 25¹⁄₂" (64.77 cm) min... mount receptacle Height 15³⁄₄" (40.01 cm) (for all governing codes and ordinances. Upper duct (1) I F. Width 2.1 cm) *For installation over 24" (61.0 cm) built-in oven **For installation over 27" (68.6 cm) built-in oven ***For installation over 30" (76.2 cm) built-in death, fire, or electrical shock.
...) E. Do not use an extension cord. OVER 24" OVER 27" OVER 30" (61.0 CM) (68.6 CM) (76.2 CM) BUILT-IN OVEN BUILT-IN OVEN BUILT-IN OVEN Width 22¹⁄₂" (57.15 cm) 25¹⁄₂" (64.77 cm) 25¹⁄₂" (64.77 cm) min... mount receptacle Height 15³⁄₄" (40.01 cm) (for all governing codes and ordinances. Upper duct (1) I F. Width 2.1 cm) *For installation over 24" (61.0 cm) built-in oven **For installation over 27" (68.6 cm) built-in oven ***For installation over 30" (76.2 cm) built-in death, fire, or electrical shock.
Installation Guide
Page 3
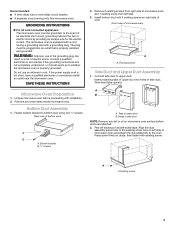
... Remove any dirt or oil on ducts, then fasten with installation. 2. Remove 2 existing screws from left side of bottom duct) A B A. Connect side duct to whether the microwave oven is properly installed and grounded. Tabs of double-sided tape. Recommended: ■... duct NOTE: Remove any loose items inside microwave oven. A A. Press down firmly on microwave oven surface before proceeding with existing screw. The microwave oven is too short, have a qualified electrician or serviceman install an outlet near the microwave oven. Bottom bracket B. ¹⁄₂" ...
... Remove any dirt or oil on ducts, then fasten with installation. 2. Remove 2 existing screws from left side of bottom duct) A B A. Connect side duct to whether the microwave oven is properly installed and grounded. Tabs of double-sided tape. Recommended: ■... duct NOTE: Remove any loose items inside microwave oven. A A. Press down firmly on microwave oven surface before proceeding with existing screw. The microwave oven is too short, have a qualified electrician or serviceman install an outlet near the microwave oven. Bottom bracket B. ¹⁄₂" ...
Installation Guide
Page 4
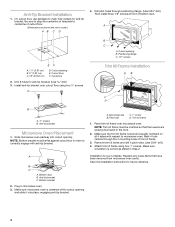
... into place, engaging anti-tip bracket. Bottom duct B. NOTE: Trim kit frame must be oriented so that have been removed from microwave oven cavity. A Trim Kit Frame Installation A B C D B A. ¹⁄₂" screws B. A B C A. A. Make sure the trim kit frame is now complete. Attach trim kit frame using two ¹⁄₂" screws. Cutout opening...
... into place, engaging anti-tip bracket. Bottom duct B. NOTE: Trim kit frame must be oriented so that have been removed from microwave oven cavity. A Trim Kit Frame Installation A B C D B A. ¹⁄₂" screws B. A B C A. A. Make sure the trim kit frame is now complete. Attach trim kit frame using two ¹⁄₂" screws. Cutout opening...

