
Use & Care Guide
Page 2
TABLE OF CONTENTS MICROWAVE OVEN SAFETY 3 INSTALLATION INSTRUCTIONS 5 Unpacking 5 Location Requirements 5 Electrical Requirements 5 PARTS AND FEATURES 6 Turntable 6 MICROWAVE OVEN CONTROL 6 Display 6 Start 7 Add A Minute 7 Off 7 Clock 7 Tones 7 Timer 7 Control Lock 7 Options 7 MICROWAVE OVEN USE 8 Food Characteristics 8 Cooking Guidelines 8 Cookware and Dinnerware 8 Aluminum Foil and Metal 9 Microwave Cooking Power 9 Manual Cooking 9 Cooking in Stages 10 Custom Cooking 10 Custom Defrosting...
TABLE OF CONTENTS MICROWAVE OVEN SAFETY 3 INSTALLATION INSTRUCTIONS 5 Unpacking 5 Location Requirements 5 Electrical Requirements 5 PARTS AND FEATURES 6 Turntable 6 MICROWAVE OVEN CONTROL 6 Display 6 Start 7 Add A Minute 7 Off 7 Clock 7 Tones 7 Timer 7 Control Lock 7 Options 7 MICROWAVE OVEN USE 8 Food Characteristics 8 Cooking Guidelines 8 Cookware and Dinnerware 8 Aluminum Foil and Metal 9 Microwave Cooking Power 9 Manual Cooking 9 Cooking in Stages 10 Custom Cooking 10 Custom Defrosting...

Use & Care Guide
Page 3
... inserting a spoon or other combustible materials are very important. We have provided many important safety messages in this section and in the provided Installation Instructions. ■ Install or locate the microwave oven only in this manual. This is not always present. Do not overheat the liquid. - See "GROUNDING INSTRUCTIONS" found in accordance with narrow...
... inserting a spoon or other combustible materials are very important. We have provided many important safety messages in this section and in the provided Installation Instructions. ■ Install or locate the microwave oven only in this manual. This is not always present. Do not overheat the liquid. - See "GROUNDING INSTRUCTIONS" found in accordance with narrow...
Use & Care Guide
Page 5
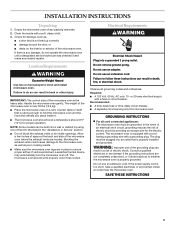
... codes and ordinances. In the event of an electrical short circuit, grounding reduces the risk of the microwave oven is properly installed and grounded. Failure to hold the microwave oven and the food and utensils you place inside with a soft, damp cloth. 3. The weight of ...THESE INSTRUCTIONS 5 Electrical Requirements WARNING Electrical Shock Hazard Plug into an outlet that is too short, have a qualified electrician or serviceman install an outlet near the microwave oven. Do not use an adapter. Do not remove ground prong. Required: ■ A 120 Volt, 60 Hz, AC only, ...
... codes and ordinances. In the event of an electrical short circuit, grounding reduces the risk of the microwave oven is properly installed and grounded. Failure to hold the microwave oven and the food and utensils you place inside with a soft, damp cloth. 3. The weight of ...THESE INSTRUCTIONS 5 Electrical Requirements WARNING Electrical Shock Hazard Plug into an outlet that is too short, have a qualified electrician or serviceman install an outlet near the microwave oven. Do not use an adapter. Do not remove ground prong. Required: ■ A 120 Volt, 60 Hz, AC only, ...

Use & Care Guide
Page 6
... A B C D A. To Install: 1. The rollers on the support. Metal shielded window B. See "Assistance or Service" to help cook food more evenly. The appearance of day (if the clock is not in the display at any of the hub. Model and serial number plate C. Control panel H I . Cooking guide label I F. Support D. When the microwave oven is...
... A B C D A. To Install: 1. The rollers on the support. Metal shielded window B. See "Assistance or Service" to help cook food more evenly. The appearance of day (if the clock is not in the display at any of the hub. Model and serial number plate C. Control panel H I . Cooking guide label I F. Support D. When the microwave oven is...

Use & Care Guide
Page 15
...Cleaner Part Number 31682 KITCHENAID® Stainless Steel Cleaner and Polish Part Number 4396920 KITCHENAID® Stainless Steel Wipes Part Number 8212510 Built-In Kits This countertop microwave oven can write to KitchenAid with any questions or concerns at: KitchenAid Brand Home Appliances Customer...the U.S.A. These kits are available from the dealer or can also look in your area, you the cost of appliances. ■ Installation information. ■ Use and maintenance procedures. ■ Accessory and repair parts sales. ■ Specialized customer assistance (Spanish speaking, ...
...Cleaner Part Number 31682 KITCHENAID® Stainless Steel Cleaner and Polish Part Number 4396920 KITCHENAID® Stainless Steel Wipes Part Number 8212510 Built-In Kits This countertop microwave oven can write to KitchenAid with any questions or concerns at: KitchenAid Brand Home Appliances Customer...the U.S.A. These kits are available from the dealer or can also look in your area, you the cost of appliances. ■ Installation information. ■ Use and maintenance procedures. ■ Accessory and repair parts sales. ■ Specialized customer assistance (Spanish speaking, ...

Use & Care Guide
Page 16
... that is contrary to the finish of your major appliance for other damage to published user or operator instructions and/or installation instructions. 4. All rights reserved. ®Registered Trademark/TM Trademark of purchase. 6. Costs associated with electrical or plumbing ... parts SECOND THROUGH TENTH YEAR LIMITED WARRANTY On microwave ovens only, in materials or workmanship and is operated and maintained according to instructions attached to use of Whirlpool Corporation or Whirlpool Canada LP (hereafter "KitchenAid") will pay for future reference. Service must ...
... that is contrary to the finish of your major appliance for other damage to published user or operator instructions and/or installation instructions. 4. All rights reserved. ®Registered Trademark/TM Trademark of purchase. 6. Costs associated with electrical or plumbing ... parts SECOND THROUGH TENTH YEAR LIMITED WARRANTY On microwave ovens only, in materials or workmanship and is operated and maintained according to instructions attached to use of Whirlpool Corporation or Whirlpool Canada LP (hereafter "KitchenAid") will pay for future reference. Service must ...
Dimension Guide
Page 1
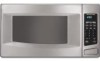
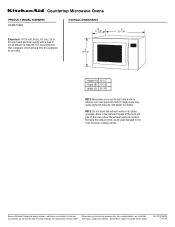
...Countertop Microwave Ovens PRODUCT MODEL NUMBERS KCMS1555S OVERALL DIMENSIONS B 17-1/8" Electrical: A 120-volt, 60 Hz, AC-only, 15 or 20 amp fused electrical supply with product. See dealer for planning purposes only. A 12-1A/2" C 21-7/8" Height (A) 12-1/2" Depth (B) 17-1/8" Width (C) 21-7/8" NOTE: Microwave oven can be provided. For complete details, see Installation... our products, we reserve the right to the oven and poor cooking results.
...Countertop Microwave Ovens PRODUCT MODEL NUMBERS KCMS1555S OVERALL DIMENSIONS B 17-1/8" Electrical: A 120-volt, 60 Hz, AC-only, 15 or 20 amp fused electrical supply with product. See dealer for planning purposes only. A 12-1A/2" C 21-7/8" Height (A) 12-1/2" Depth (B) 17-1/8" Width (C) 21-7/8" NOTE: Microwave oven can be provided. For complete details, see Installation... our products, we reserve the right to the oven and poor cooking results.
Installation Guide
Page 1
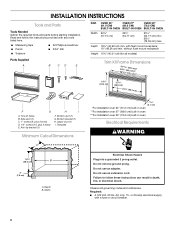
..., (Y)KEBI101D, (Y)KEBS107D Table of Contents / Table des matières MICROWAVE OVEN SAFETY 1 INSTALLATION INSTRUCTIONS 2 Tools and Parts 2 Minimum Cutout Dimensions 2 Trim Kit Frame Dimensions 2 Electrical Requirements 2 Microwave Oven Preparation 3 Bottom Duct Assembly 3 Side Duct and Upper Duct Assembly 3 Anti-Tip Bracket Installation 4 Microwave Oven Placement 4 Trim Kit Frame Installation 4 SÉCURITÉ DU FOUR À MICRO-ONDES 5 INSTRUCTIONS...
..., (Y)KEBI101D, (Y)KEBS107D Table of Contents / Table des matières MICROWAVE OVEN SAFETY 1 INSTALLATION INSTRUCTIONS 2 Tools and Parts 2 Minimum Cutout Dimensions 2 Trim Kit Frame Dimensions 2 Electrical Requirements 2 Microwave Oven Preparation 3 Bottom Duct Assembly 3 Side Duct and Upper Duct Assembly 3 Anti-Tip Bracket Installation 4 Microwave Oven Placement 4 Trim Kit Frame Installation 4 SÉCURITÉ DU FOUR À MICRO-ONDES 5 INSTRUCTIONS...
Installation Guide
Page 2
...supply with flush mount receptacle; 19" (48.26 cm) min. Bottom duct (1) G. Width 2.1 cm) *For installation over 24" (61.0 cm) built-in oven **For installation over 27" (68.6 cm) built-in oven ***For installation over 30" (76.2 cm) built-in death, fire, or electrical shock. Do not use an extension cord.... Tools and Parts Tools Needed Gather the required tools and parts before starting installation. OVER 24" OVER 27" OVER 30" (61.0 CM) (68.6 CM) (76.2 CM) BUILT-IN OVEN BUILT-IN OVEN BUILT-IN OVEN Width 22¹⁄₂" (57.15 cm) 25¹⁄₂" (64.77 cm...
...supply with flush mount receptacle; 19" (48.26 cm) min. Bottom duct (1) G. Width 2.1 cm) *For installation over 24" (61.0 cm) built-in oven **For installation over 27" (68.6 cm) built-in oven ***For installation over 30" (76.2 cm) built-in death, fire, or electrical shock. Do not use an extension cord.... Tools and Parts Tools Needed Gather the required tools and parts before starting installation. OVER 24" OVER 27" OVER 30" (61.0 CM) (68.6 CM) (76.2 CM) BUILT-IN OVEN BUILT-IN OVEN BUILT-IN OVEN Width 22¹⁄₂" (57.15 cm) 25¹⁄₂" (64.77 cm...
Installation Guide
Page 3
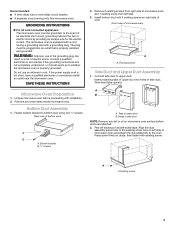
... into holes of the grounding plug can result in side duct NOTE: Remove any loose items inside microwave oven. Do not use of side duct. Bottom Duct Assembly 1. Install bottom duct with a grounding plug. A A. The microwave oven is properly installed and grounded. WARNING: Improper use an extension cord. Then bend tabs upward. Tabs of double-sided...
... into holes of the grounding plug can result in side duct NOTE: Remove any loose items inside microwave oven. Do not use of side duct. Bottom Duct Assembly 1. Install bottom duct with a grounding plug. A A. The microwave oven is properly installed and grounded. WARNING: Improper use an extension cord. Then bend tabs upward. Tabs of double-sided...
Installation Guide
Page 4
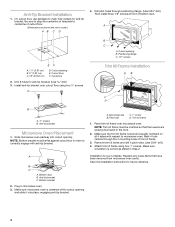
...NOTE: Trim kit frame must be oriented so that have been removed from microwave oven cavity. Installation is centered within cutout opening and slide it into cutout opening. Anti-Tip Bracket Installation 1. Slide microwave oven partway into place, engaging anti-tip bracket. Anti-tip bracket C. Plug in... the front. 2. Place trim kit frame over microwave oven. Make sure the trim kit frame is correct as shown are sloping downward in microwave oven. 3. Save this installation instruction for anti-tip bracket. (Use drill.) 3. Drill pilot holes through ...
...NOTE: Trim kit frame must be oriented so that have been removed from microwave oven cavity. Installation is centered within cutout opening and slide it into cutout opening. Anti-Tip Bracket Installation 1. Slide microwave oven partway into place, engaging anti-tip bracket. Anti-tip bracket C. Plug in... the front. 2. Place trim kit frame over microwave oven. Make sure the trim kit frame is correct as shown are sloping downward in microwave oven. 3. Save this installation instruction for anti-tip bracket. (Use drill.) 3. Drill pilot holes through ...

