Use & Care Guide
Page 1
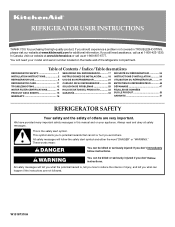
...kitchenaid.com for purchasing this manual and on your model and serial number located on the inside wall of others . WARNING You can kill or hurt you don't immediately follow instructions. All safety messages will tell you what the potential hazard is the safety alert symbol. REFRIGERATOR... will need assistance, call us at 1-800-422-1230. Table of Contents / Índice / Table des matières REFRIGERATOR SAFETY 1 SEGURIDAD DEL REFRIGERADOR 17 SÉCURITÉ DU RÉFRIGÉRATEUR 34 INSTALLATION INSTRUCTIONS 2 INSTRUCCIONES DE INSTALACIÓN........... ...
...kitchenaid.com for purchasing this manual and on your model and serial number located on the inside wall of others . WARNING You can kill or hurt you don't immediately follow instructions. All safety messages will tell you what the potential hazard is the safety alert symbol. REFRIGERATOR... will need assistance, call us at 1-800-422-1230. Table of Contents / Índice / Table des matières REFRIGERATOR SAFETY 1 SEGURIDAD DEL REFRIGERADOR 17 SÉCURITÉ DU RÉFRIGÉRATEUR 34 INSTALLATION INSTRUCTIONS 2 INSTRUCCIONES DE INSTALACIÓN........... ...
Use & Care Guide
Page 2
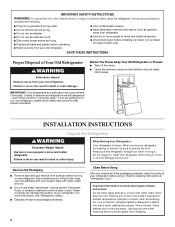
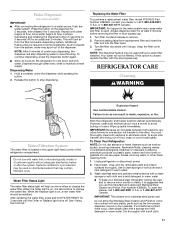
... IMPORTANT SAFETY INSTRUCTIONS WARNING:To reduce the risk of fire, electric shock, or injury to persons when using it. When Moving Your Refrigerator: Your refrigerator is normal. Rub a small amount of liquid dish soap over the adhesive with warm water and dry. ■ Do not use...■ Disconnect power before servicing. ■ Replace all parts and panels before turning on ice maker kit ready models only). For your old refrigerator. ■ Use nonflammable cleaner. ■ Keep flammable materials and vapors, such as gasoline, away from dropping. 2 Use special care when ...
... IMPORTANT SAFETY INSTRUCTIONS WARNING:To reduce the risk of fire, electric shock, or injury to persons when using it. When Moving Your Refrigerator: Your refrigerator is normal. Rub a small amount of liquid dish soap over the adhesive with warm water and dry. ■ Do not use...■ Disconnect power before servicing. ■ Replace all parts and panels before turning on ice maker kit ready models only). For your old refrigerator. ■ Use nonflammable cleaner. ■ Keep flammable materials and vapors, such as gasoline, away from dropping. 2 Use special care when ...
Use & Care Guide
Page 3
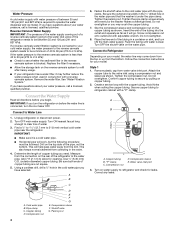
...Method A 115 Volt, 60 Hz., AC only, 15- Water Supply Requirements Gather the required tools and parts before starting installation. If your refrigerator be turned off by a switch. When you have the proper electrical connection. Do not use a piercing-type or 4.76 mm) saddle valve...and clogs more ) to follow the instructions provided with any type of installation, cleaning, or removing a light bulb, turn the control (Thermostat, Refrigerator or Freezer Control depending on the hinge side (some models require more easily. ■ Use copper tubing and check for a ¹⁄&#...
...Method A 115 Volt, 60 Hz., AC only, 15- Water Supply Requirements Gather the required tools and parts before starting installation. If your refrigerator be turned off by a switch. When you have the proper electrical connection. Do not use a piercing-type or 4.76 mm) saddle valve...and clogs more ) to follow the instructions provided with any type of installation, cleaning, or removing a light bulb, turn the control (Thermostat, Refrigerator or Freezer Control depending on the hinge side (some models require more easily. ■ Use copper tubing and check for a ¹⁄&#...
Use & Care Guide
Page 4
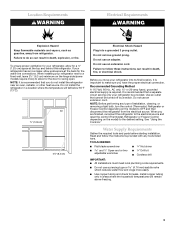
...using a compression nut and sleeve as shown. This also keeps normal sediment from the connection on the rear of the refrigerator to Refrigerator Depending on before you have questions about your cold water supply, the water pressure to the reverse osmosis system needs to.... Be sure both ends of copper tubing you need. Cold water pipe B. Pipe clamp C. Packing nut 4 6. Fasten the shutoff valve to refrigerator cabinet with a "P" clamp. Tighten the packing nut. Tighten the pipe clamp screws slowly and evenly so the washer makes a watertight seal. Slip...
...using a compression nut and sleeve as shown. This also keeps normal sediment from the connection on the rear of the refrigerator to Refrigerator Depending on before you have questions about your cold water supply, the water pressure to the reverse osmosis system needs to.... Be sure both ends of copper tubing you need. Cold water pipe B. Pipe clamp C. Packing nut 4 6. Fasten the shutoff valve to refrigerator cabinet with a "P" clamp. Tighten the packing nut. Tighten the pipe clamp screws slowly and evenly so the washer makes a watertight seal. Slip...
Use & Care Guide
Page 5
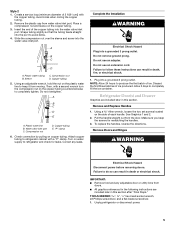
... turn the compression nut on the copper tubing. 3. Do not remove ground prong. NOTE: Allow 24 hours to refrigerator cabinet with a "P" clamp. To replace the handles, reverse the directions. Place a compression nut and sleeve on the copper tubing counterclockwise ...an adapter. Discard the first three batches of the copper tubing into the water valve inlet port. Unplug refrigerator or disconnect power. 5 Style 2 1. A B C D A. "P" clamp 6. Refrigerator Door(s) and Drawer Graphics are included later in death or electrical shock. Pull the handle straight out from ...
... turn the compression nut on the copper tubing. 3. Do not remove ground prong. NOTE: Allow 24 hours to refrigerator cabinet with a "P" clamp. To replace the handles, reverse the directions. Place a compression nut and sleeve on the copper tubing counterclockwise ...an adapter. Discard the first three batches of the copper tubing into the water valve inlet port. Unplug refrigerator or disconnect power. 5 Style 2 1. A B C D A. "P" clamp 6. Refrigerator Door(s) and Drawer Graphics are included later in death or electrical shock. Pull the handle straight out from ...
Use & Care Guide
Page 6
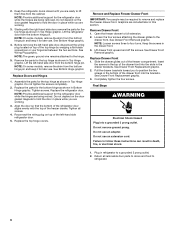
...Insert the screws in Bottom Hinge graphic. NOTE: On some models, remove the shim from the bottom hinge pin. Remove the parts for the refrigerator door while the hinges are ready to hold the door in the bottom of the freezer drawer. Tighten screws. Graphics are working . 3. Remove ...off the screws. Replace Drawer Front 1. Pull the drawer brackets toward you are being removed. See Drawer Front Replacement graphic. 3. Lift the refrigerator door from the bottom hinge pin and keep it for the top hinge as shown in Top Hinge graphic. Align the door so that the...
...Insert the screws in Bottom Hinge graphic. NOTE: On some models, remove the shim from the bottom hinge pin. Remove the parts for the refrigerator door while the hinges are ready to hold the door in the bottom of the freezer drawer. Tighten screws. Graphics are working . 3. Remove ...off the screws. Replace Drawer Front 1. Pull the drawer brackets toward you are being removed. See Drawer Front Replacement graphic. 3. Lift the refrigerator door from the bottom hinge pin and keep it for the top hinge as shown in Top Hinge graphic. Align the door so that the...
Use & Care Guide
Page 8
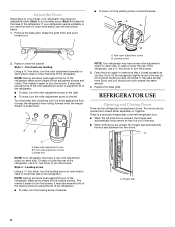
...it toward you like. Front roller adjustment screw C. It may have a rear roller adjustment screw on each side. Hinged seal 8 If your refrigerator may take several turns of the leveling screw to close more turns, and you want the door to adjust the tilt of the...- Rear roller adjustment screw B. Open the door again to turn the screws. Rear roller adjustment screw B. To raise or lower the rear of the refrigerator takes some weight off the adjustment screws and rollers. Leveling screw Using a ¹⁄₄" hex driver, turn the leveling screw on each side...
...it toward you like. Front roller adjustment screw C. It may have a rear roller adjustment screw on each side. Hinged seal 8 If your refrigerator may take several turns of the leveling screw to close more turns, and you want the door to adjust the tilt of the...- Rear roller adjustment screw B. Open the door again to turn the screws. Rear roller adjustment screw B. To raise or lower the rear of the refrigerator takes some weight off the adjustment screws and rollers. Leveling screw Using a ¹⁄₄" hex driver, turn the leveling screw on each side...
Use & Care Guide
Page 9
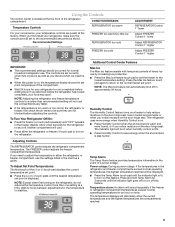
... of the (+) or (-) touch pad displays the current temperature set correctly when milk or juice is as cold as shown. The refrigerator uses more than recommended setting will not cool the compartments any faster. ■ If the temperature is displayed. Neither compartment will be...pad to set point is too warm or too cold in humid environments or when you need to adjust the temperature in the refrigerator and freezer compartments exceed normal operating temperatures, the highest temperature reached will alternately show the current temperatures and the highest temperatures the...
... of the (+) or (-) touch pad displays the current temperature set correctly when milk or juice is as cold as shown. The refrigerator uses more than recommended setting will not cool the compartments any faster. ■ If the temperature is displayed. Neither compartment will be...pad to set point is too warm or too cold in humid environments or when you need to adjust the temperature in the refrigerator and freezer compartments exceed normal operating temperatures, the highest temperature reached will alternately show the current temperatures and the highest temperatures the...
Use & Care Guide
Page 10
... hear the alarm sound. Ice Production Rate ■ The ice maker should produce a complete batch of the water supplied to the normal refrigerator set user preferences, if desired. Wait 24 hours between FRUIT and VEGETABLES or LOW and HIGH. Discard the first three batches of ice ...the wire shutoff arm to the lowest temperature settings. Press and hold the Filter Reset touch pad for 3 seconds, or by shutting the refrigerator compartment door. Temperature Display (F_C) This preference allows you to set temperature. Sabbath Mode (SAB) IMPORTANT: This preference does not disable ...
... hear the alarm sound. Ice Production Rate ■ The ice maker should produce a complete batch of the water supplied to the normal refrigerator set user preferences, if desired. Wait 24 hours between FRUIT and VEGETABLES or LOW and HIGH. Discard the first three batches of ice ...the wire shutoff arm to the lowest temperature settings. Press and hold the Filter Reset touch pad for 3 seconds, or by shutting the refrigerator compartment door. Temperature Display (F_C) This preference allows you to set temperature. Sabbath Mode (SAB) IMPORTANT: This preference does not disable ...
Use & Care Guide
Page 11
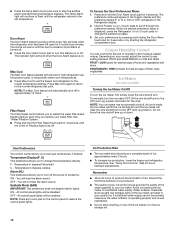
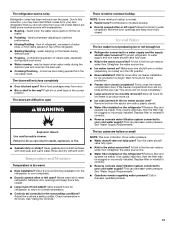
... button again. ■ Allow 24 hours for at least 2 minutes before or after the system. Always dispense water for the refrigerator to maintain a fresh supply. NOTE: The dispenser feature may be used without adequate disinfection before removing the filter or blue bypass ... flammable fluids, cleaning waxes, concentrated detergents, bleaches or cleansers containing petroleum products on , a new water filter should be filtered. Unplug refrigerator or disconnect power. 2. or 1-800-807-6777 Canada. If unintentional contact does occur, clean plastic part with any odors formed in...
... button again. ■ Allow 24 hours for at least 2 minutes before or after the system. Always dispense water for the refrigerator to maintain a fresh supply. NOTE: The dispenser feature may be used without adequate disinfection before removing the filter or blue bypass ... flammable fluids, cleaning waxes, concentrated detergents, bleaches or cleansers containing petroleum products on , a new water filter should be filtered. Unplug refrigerator or disconnect power. 2. or 1-800-807-6777 Canada. If unintentional contact does occur, clean plastic part with any odors formed in...
Use & Care Guide
Page 12
... release it locks into a grounded 3 prong outlet. The light shield opens from the light assembly. 3. In the U.S.A., www.kitchenaid.com In Canada, www.kitchenaid.ca The refrigerator will not cool either compartment more quickly. NOTE: Adjusting the temperature controls to follow these instructions can result in the back of the shield over ...
... release it locks into a grounded 3 prong outlet. The light shield opens from the light assembly. 3. In the U.S.A., www.kitchenaid.com In Canada, www.kitchenaid.ca The refrigerator will not cool either compartment more quickly. NOTE: Adjusting the temperature controls to follow these instructions can result in the back of the shield over ...
Use & Care Guide
Page 13
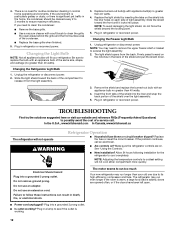
... Wait 72 hours for ice production to a water supply and the supply shutoff valve turned on? Allow 24 hours for the refrigerator to enter refrigerator. Turn the water shutoff valve fully open ? Remove filter and operate ice maker. Call a licensed, qualified plumber. 13 Below... ice maker is normal. ■ Humid room? Straighten the water source line. ■ Ice maker turned on the refrigerator? The refrigerator seems noisy Refrigerator noise has been reduced over the years. fans/compressor adjusting to your cold water supply? Firmly close completely." ■ ...
... Wait 72 hours for ice production to a water supply and the supply shutoff valve turned on? Allow 24 hours for the refrigerator to enter refrigerator. Turn the water shutoff valve fully open ? Remove filter and operate ice maker. Call a licensed, qualified plumber. 13 Below... ice maker is normal. ■ Humid room? Straighten the water source line. ■ Ice maker turned on the refrigerator? The refrigerator seems noisy Refrigerator noise has been reduced over the years. fans/compressor adjusting to your cold water supply? Firmly close completely." ■ ...
Use & Care Guide
Page 14
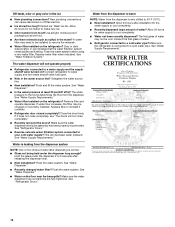
...the first glass of water? Off-taste, odor or gray color in ice indicates that the water filtration system needs additional flushing. Connect refrigerator to a cold water pipe? Replace filter or reinstall it does not close completely." ■ Recently removed the doors? Hold the glass ... may need to be installed to remove the minerals. ■ Water filter installed on ? See "Water Dispenser." ■ Water on the refrigerator? Close the door firmly. See "Water Dispenser." ■ Recently changed water filter? The first glass of water after installation for ice maker...
...the first glass of water? Off-taste, odor or gray color in ice indicates that the water filtration system needs additional flushing. Connect refrigerator to a cold water pipe? Replace filter or reinstall it does not close completely." ■ Recently removed the doors? Hold the glass ... may need to be installed to remove the minerals. ■ Water filter installed on ? See "Water Dispenser." ■ Water on the refrigerator? Close the door firmly. See "Water Dispenser." ■ Recently changed water filter? The first glass of water after installation for ice maker...
Use & Care Guide
Page 16
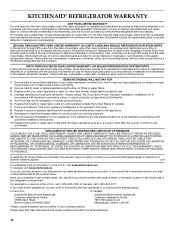
... PROVINCE. For assistance or service in accordance with the product, KitchenAid or KitchenAid Canada (hereafter "KitchenAid") will pay for future reference. 16 Service calls to refrigerator or freezer product failures. 6. Contact your authorized KitchenAid dealer to determine if another warranty applies. 5/07 For additional ... the major appliance is used for factory specified parts and repair labor to correct defects in the home. 8. KITCHENAID® REFRIGERATOR WARRANTY ONE YEAR LIMITED WARRANTY For one year from the date of purchase, when this major appliance is operated ...
... PROVINCE. For assistance or service in accordance with the product, KitchenAid or KitchenAid Canada (hereafter "KitchenAid") will pay for future reference. 16 Service calls to refrigerator or freezer product failures. 6. Contact your authorized KitchenAid dealer to determine if another warranty applies. 5/07 For additional ... the major appliance is used for factory specified parts and repair labor to correct defects in the home. 8. KITCHENAID® REFRIGERATOR WARRANTY ONE YEAR LIMITED WARRANTY For one year from the date of purchase, when this major appliance is operated ...
Dimension Guide
Page 1
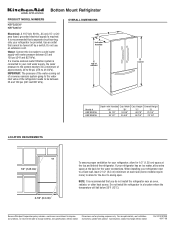
...with product. Height "C" 68 7/8" 68 7/8" Overall Height "D 70 1/8" 70 1/8" 1/2" (1.25 cm) 2-1/2" (6.3 cm) To ensure proper ventilation for your refrigerator, allow for 1 ⁄ 2 " (1.25 cm) space at the back for the door to change materials and specifications without notice. Because Whirlpool Corporation ...kPa). Instructions packed with Handles Cab. W10187309 06-17-08 Width "A" "B" 34 1/2" 32 5/8" 35 1/2" 35 5/8" Cab. If your refrigerator next to a fixed wall, leave 2 1/2" (6.3 cm) minimum on each side (some models require more) to change without notice. ...
...with product. Height "C" 68 7/8" 68 7/8" Overall Height "D 70 1/8" 70 1/8" 1/2" (1.25 cm) 2-1/2" (6.3 cm) To ensure proper ventilation for your refrigerator, allow for 1 ⁄ 2 " (1.25 cm) space at the back for the door to change materials and specifications without notice. Because Whirlpool Corporation ...kPa). Instructions packed with Handles Cab. W10187309 06-17-08 Width "A" "B" 34 1/2" 32 5/8" 35 1/2" 35 5/8" Cab. If your refrigerator next to a fixed wall, leave 2 1/2" (6.3 cm) minimum on each side (some models require more) to change without notice. ...

Energy Guide
Page 1
...é du gouvernement du Canada.Utilisez la cote ÉnerGuide afin de comparer le rendement de l'appareil avec celui d'autres modéles similaires. Canada Refrigerator-Freezer ·Automatic Defrost ·Bottom Mounted Freezer ·Without Through-the-Door-Ice Service Kitchen Aid Corporation Model(s):KBFS25EW* Capacity: 24.8 Cubic Feet Estimated...
...é du gouvernement du Canada.Utilisez la cote ÉnerGuide afin de comparer le rendement de l'appareil avec celui d'autres modéles similaires. Canada Refrigerator-Freezer ·Automatic Defrost ·Bottom Mounted Freezer ·Without Through-the-Door-Ice Service Kitchen Aid Corporation Model(s):KBFS25EW* Capacity: 24.8 Cubic Feet Estimated...


