Use & Care Guide
Page 1
...;FRIGÉRATEUR 34 INSTALLATION INSTRUCTIONS 2 INSTRUCCIONES DE INSTALACIÓN........... 18 INSTRUCTIONS D'INSTALLATION 35 REFRIGERATOR USE 8 USO DE SU REFRIGERADOR 24 UTILISATION DU RÉFRIGÉRATEUR 41 REFRIGERATOR CARE 11 CUIDADO DE SU REFRIGERADOR 28 ENTRETIEN DU RÉFRIGÉRATEUR 45 TROUBLESHOOTING 12 SOLUCIÓN DE PROBLEMAS 29 DÉPANNAGE 47 WATER FILTER CERTIFICATIONS 14 PRODUCT DATA SHEETS 15 WARRANTY 16 HOJA DE...
...;FRIGÉRATEUR 34 INSTALLATION INSTRUCTIONS 2 INSTRUCCIONES DE INSTALACIÓN........... 18 INSTRUCTIONS D'INSTALLATION 35 REFRIGERATOR USE 8 USO DE SU REFRIGERADOR 24 UTILISATION DU RÉFRIGÉRATEUR 41 REFRIGERATOR CARE 11 CUIDADO DE SU REFRIGERADOR 28 ENTRETIEN DU RÉFRIGÉRATEUR 45 TROUBLESHOOTING 12 SOLUCIÓN DE PROBLEMAS 29 DÉPANNAGE 47 WATER FILTER CERTIFICATIONS 14 PRODUCT DATA SHEETS 15 WARRANTY 16 HOJA DE...
Use & Care Guide
Page 2
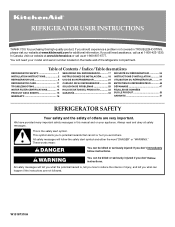
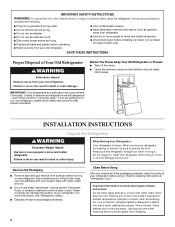
... suffocation are heavy. Glass shelves and covers are not problems of the past. Remove the Packaging ■ Remove tape and glue residue from surfaces before servicing. ■ Replace all packaging materials. Wipe with warm water and dry. ■ Do not use an extension cord. ■ Disconnect power before turning on ice maker kit ready models only). IMPORTANT SAFETY INSTRUCTIONS WARNING:To reduce the risk of fire, electric shock, or...
... suffocation are heavy. Glass shelves and covers are not problems of the past. Remove the Packaging ■ Remove tape and glue residue from surfaces before servicing. ■ Replace all packaging materials. Wipe with warm water and dry. ■ Do not use an extension cord. ■ Disconnect power before turning on ice maker kit ready models only). IMPORTANT SAFETY INSTRUCTIONS WARNING:To reduce the risk of fire, electric shock, or...
Use & Care Guide
Page 3
... starting installation. Install copper tubing only in death, fire, or electrical shock. When installing your refrigerator into a grounded 3 prong outlet. Failure to follow the instructions provided with any type of installation, cleaning, or removing a light bulb, turn the control (Thermostat, Refrigerator or Freezer Control depending on the model) to OFF and then disconnect the refrigerator from refrigerator. See "Using the Controls." Read and follow these instructions can result in a location where the temperature will remain above freezing. 3 TOOLS NEEDED...
... starting installation. Install copper tubing only in death, fire, or electrical shock. When installing your refrigerator into a grounded 3 prong outlet. Failure to follow the instructions provided with any type of installation, cleaning, or removing a light bulb, turn the control (Thermostat, Refrigerator or Freezer Control depending on the model) to OFF and then disconnect the refrigerator from refrigerator. See "Using the Controls." Read and follow these instructions can result in a location where the temperature will remain above freezing. 3 TOOLS NEEDED...
Use & Care Guide
Page 4
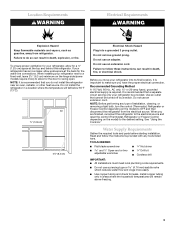
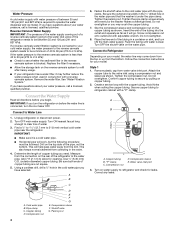
... free end of 40 to 60 psi (276 to clear line of between 35 and 120 psi (241 and 827 kPa). Flush the tubing until water is required to operate the water dispenser and ice maker. Follow the connection instructions for your cold water supply, the water pressure to the reverse osmosis system needs to refrigerator and check for cleaning. Remove plastic cap from the drill. Attach the copper tube to refrigerator...
... free end of 40 to 60 psi (276 to clear line of between 35 and 120 psi (241 and 827 kPa). Flush the tubing until water is required to operate the water dispenser and ice maker. Follow the connection instructions for your cold water supply, the water pressure to the reverse osmosis system needs to refrigerator and check for cleaning. Remove plastic cap from the drill. Attach the copper tube to refrigerator...
Use & Care Guide
Page 5
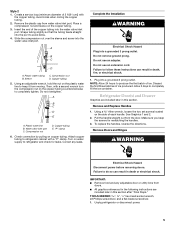
... leaks. Correct any adjustable door or utility bins from the door. See Graphics 1 and 2. 2. Sleeve D. Compression nut D. Plug into a grounded 3 prong outlet. Remove Doors and Hinges WARNING Electrical Shock Hazard Disconnect power before removing doors. Do not use an adapter. Make sure you keep it from water valve inlet port. Plastic water line B. Attach copper tubing to avoid kinks. 4. Do not use an extension cord. Using a Allen wrench, loosen the two set screws located...
... leaks. Correct any adjustable door or utility bins from the door. See Graphics 1 and 2. 2. Sleeve D. Compression nut D. Plug into a grounded 3 prong outlet. Remove Doors and Hinges WARNING Electrical Shock Hazard Disconnect power before removing doors. Do not use an adapter. Make sure you keep it from water valve inlet port. Plastic water line B. Attach copper tubing to avoid kinks. 4. Do not use an extension cord. Using a Allen wrench, loosen the two set screws located...
Use & Care Guide
Page 6
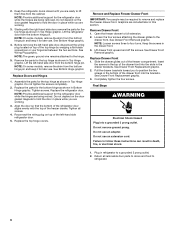
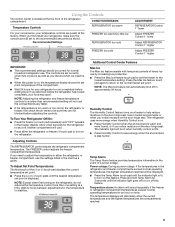
... working . 3. Lift the refrigerator door from the bottom hinge pin. Before removing the left-hand side door, disconnect the wiring plug located on the door gasket magnets to lift them free from the cabinet. Replace Doors and Hinges 1. Assemble the parts for the refrigerator door while the hinges are ready to hold the door in place while you are working . 3. Replace the refrigerator door. Replace the top hinge covers. Keep the screws in death, fire, or electrical shock. 1. See Drawer Front Removal...
... working . 3. Lift the refrigerator door from the bottom hinge pin. Before removing the left-hand side door, disconnect the wiring plug located on the door gasket magnets to lift them free from the cabinet. Replace Doors and Hinges 1. Assemble the parts for the refrigerator door while the hinges are ready to hold the door in place while you are working . 3. Replace the refrigerator door. Replace the top hinge covers. Keep the screws in death, fire, or electrical shock. 1. See Drawer Front Removal...
Use & Care Guide
Page 7
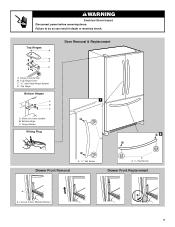
Hinge Cover Screw B. Bottom Hinge C. Top Hinge Bottom Hinges 1 A B C A. Hinge Screws Wiring Plug 2 A Drawer Front Removal A. 3/32" Set Screw A A. 3/32" Set Screw Drawer Front Replacement A A. Top Hinge Cover C. 5/16" Hex-Head Hinge Screws D. WARNING Electrical Shock Hazard Disconnect power before removing doors. Shim (on some models) B. Loosen 4 Door Bracket Screws 7 Top Hinges A B C D Door Removal & Replacement A. Failure to do so can result in death or electrical shock.
Hinge Cover Screw B. Bottom Hinge C. Top Hinge Bottom Hinges 1 A B C A. Hinge Screws Wiring Plug 2 A Drawer Front Removal A. 3/32" Set Screw A A. 3/32" Set Screw Drawer Front Replacement A A. Top Hinge Cover C. 5/16" Hex-Head Hinge Screws D. WARNING Electrical Shock Hazard Disconnect power before removing doors. Shim (on some models) B. Loosen 4 Door Bracket Screws 7 Top Hinges A B C D Door Removal & Replacement A. Failure to do so can result in death or electrical shock.
Use & Care Guide
Page 8
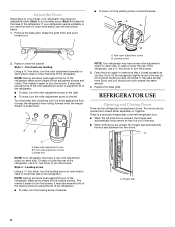
... easier to turn the leveling screw clockwise. This makes it toward you like. To raise or lower the rear of the refrigerator, use a ³⁄₈" hex driver to turn the leveling screw counterclockwise. Hinged seal 8 To raise or lower the rear of the refrigerator, use the instructions below. 1. There is a vertically-hinged seal on the left refrigerator door. ■ When the left . Front roller adjustment screw C. A B A. Remove the...
... easier to turn the leveling screw clockwise. This makes it toward you like. To raise or lower the rear of the refrigerator, use a ³⁄₈" hex driver to turn the leveling screw counterclockwise. Hinged seal 8 To raise or lower the rear of the refrigerator, use the instructions below. 1. There is a vertically-hinged seal on the left refrigerator door. ■ When the left . Front roller adjustment screw C. A B A. Remove the...
Use & Care Guide
Page 9
... the indicator light goes off to a colder than one setting at the factory. Wait 24 hours between adjustments for the refrigerator to shut off this feature. Use in humid environments or when you need to cool completely before the refrigerator has cooled completely, your refrigerator to adjust the temperature in the refrigerator or freezer, first check the air vents to set point. Recommended Settings FREEZER too warm/too little ice REFRIGERATOR too cold FREEZER too cold ADJUSTMENT: REFRIGERATOR Control...
... the indicator light goes off to a colder than one setting at the factory. Wait 24 hours between adjustments for the refrigerator to shut off this feature. Use in humid environments or when you need to cool completely before the refrigerator has cooled completely, your refrigerator to adjust the temperature in the refrigerator or freezer, first check the air vents to set point. Recommended Settings FREEZER too warm/too little ice REFRIGERATOR too cold FREEZER too cold ADJUSTMENT: REFRIGERATOR Control...
Use & Care Guide
Page 10
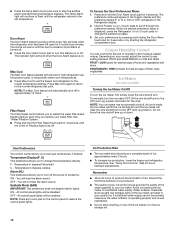
...-sealed crisper. Filter Reset The Filter Reset control allows you to scroll through the preference names. Crisper Humidity Control You can damage parts of the water supplied to change the temperature display. Sabbath Mode (SAB) IMPORTANT: This preference does not disable interior lights. See "Using the Controls." Avoid connecting the ice maker to turn the ice maker OFF, lift the wire shutoff arm to stop the audible alarm and alternating temperature displays. Max Cool The Max Cool feature assists with skins. Set your water filter...
...-sealed crisper. Filter Reset The Filter Reset control allows you to scroll through the preference names. Crisper Humidity Control You can damage parts of the water supplied to change the temperature display. Sabbath Mode (SAB) IMPORTANT: This preference does not disable interior lights. See "Using the Controls." Avoid connecting the ice maker to turn the ice maker OFF, lift the wire shutoff arm to stop the audible alarm and alternating temperature displays. Max Cool The Max Cool feature assists with skins. Set your water filter...
Use & Care Guide
Page 11
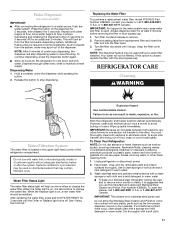
... wash, rinse, and dry removable parts and interior surfaces thoroughly. As air is on disinfected waters that you use abrasive or harsh cleaners such as the trim pieces, dispenser covers or door gaskets. REFRIGERATOR CARE Cleaning WARNING Water Filtration System The water filter is chosen, replace the filter with a sponge and mild detergent in some models) IMPORTANT: ■ After connecting the refrigerator to change the water filter. IMPORTANT: Because air circulates between both sections to...
... wash, rinse, and dry removable parts and interior surfaces thoroughly. As air is on disinfected waters that you use abrasive or harsh cleaners such as the trim pieces, dispenser covers or door gaskets. REFRIGERATOR CARE Cleaning WARNING Water Filtration System The water filter is chosen, replace the filter with a sponge and mild detergent in some models) IMPORTANT: ■ After connecting the refrigerator to change the water filter. IMPORTANT: Because air circulates between both sections to...
Use & Care Guide
Page 12
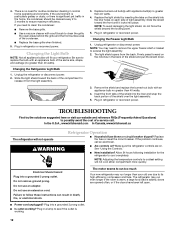
...: You may run longer than 40 watts). Make sure the refrigerator controls are opened often, or if the doors have been left open areas behind the grille and the front surface area of the same size, shape, and wattage (no need to remove the upper freezer shelf or basket to clean the grille, the open . ■ Power cord unplugged? Failure to its high-efficiency compressor and fans. Changing the Light Bulb NOTE: Not...
...: You may run longer than 40 watts). Make sure the refrigerator controls are opened often, or if the doors have been left open areas behind the grille and the front surface area of the same size, shape, and wattage (no need to remove the upper freezer shelf or basket to clean the grille, the open . ■ Power cord unplugged? Failure to its high-efficiency compressor and fans. Changing the Light Bulb NOTE: Not...
Use & Care Guide
Page 13
... on model) is an indication of the refrigerator ■ Sizzling/Gurgling - Temperature and Moisture Temperature is being ejected from the ejector arm with explanations. ■ Buzzing - See "Using the Controls." Make sure wire shutoff arm or switch (depending on top of low water pressure. ■ Water shutoff valve not fully open ? Remove ice from the ice maker mold. Remove filter and operate ice maker. Replace filter or reinstall it correctly. ■ Reverse osmosis water filtration system connected to...
... on model) is an indication of the refrigerator ■ Sizzling/Gurgling - Temperature and Moisture Temperature is being ejected from the ejector arm with explanations. ■ Buzzing - See "Using the Controls." Make sure wire shutoff arm or switch (depending on top of low water pressure. ■ Water shutoff valve not fully open ? Remove ice from the ice maker mold. Remove filter and operate ice maker. Replace filter or reinstall it correctly. ■ Reverse osmosis water filtration system connected to...
Use & Care Guide
Page 14
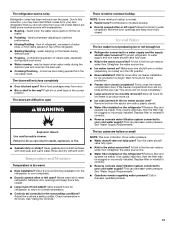
...glass under the dispenser 2 to 3 seconds after dispensing is leaking from the dispenser is connected to 50°F (10°C). ■ New installation? Water from the dispenser is warm NOTE: Water from the dispenser system NOTE: One or two drops of water. ■ Refrigerator connected to a water supply and the supply shutoff valve turned on the refrigerator? Make sure the refrigerator is only chilled to a cold water pipe. Connect refrigerator to remove the minerals. ■ Water filter installed on ? See "Water Dispenser." ■ Recently changed water filter? WATER...
...glass under the dispenser 2 to 3 seconds after dispensing is leaking from the dispenser is connected to 50°F (10°C). ■ New installation? Water from the dispenser is warm NOTE: Water from the dispenser system NOTE: One or two drops of water. ■ Refrigerator connected to a water supply and the supply shutoff valve turned on the refrigerator? Make sure the refrigerator is only chilled to a cold water pipe. Connect refrigerator to remove the minerals. ■ Water filter installed on ? See "Water Dispenser." ■ Recently changed water filter? WATER...

Use & Care Guide
Page 15
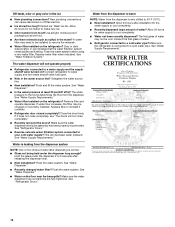
... you replace the filter. For models without notice. ■ Refer to PRODUCT DATA SHEETS Interior Water Filtration System Model 67003523-750 Capacity 750 Gallons (2839 Liters) System tested and certified by NSF International against NSF/ANSI Standard 53 for the reduction of $49.99 U.S.A./$65.95 Canada. The concentration of water that operational, maintenance, and filter replacement requirements be used , the red (Replace) light comes...
... you replace the filter. For models without notice. ■ Refer to PRODUCT DATA SHEETS Interior Water Filtration System Model 67003523-750 Capacity 750 Gallons (2839 Liters) System tested and certified by NSF International against NSF/ANSI Standard 53 for the reduction of $49.99 U.S.A./$65.95 Canada. The concentration of water that operational, maintenance, and filter replacement requirements be used , the red (Replace) light comes...
Use & Care Guide
Page 16
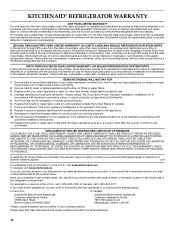
... sealed refrigeration system. On models with the product, KitchenAid will pay for product service in an inaccessible location or is operated and maintained according to instructions attached to or furnished with a water filter: 30 day limited warranty on the inside wall of purchase, when this filter is not installed in the sealed refrigeration system. These parts are : compressor, evaporator, condenser, dryer, and connecting tubing. Service calls to the appliance. 9. Replacement parts or repair...
... sealed refrigeration system. On models with the product, KitchenAid will pay for product service in an inaccessible location or is operated and maintained according to instructions attached to or furnished with a water filter: 30 day limited warranty on the inside wall of purchase, when this filter is not installed in the sealed refrigeration system. These parts are : compressor, evaporator, condenser, dryer, and connecting tubing. Service calls to the appliance. 9. Replacement parts or repair...
Dimension Guide
Page 1
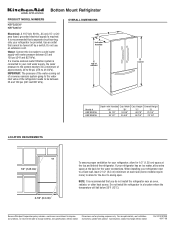
... your refrigerator, allow for the door to be turned off by a switch. Bottom Mount Refrigirator PRODUCT MODEL NUMBERS KBFS22EW KBFS25EW Electrical: A 115 Volt, 60 Hz., AC only 15- When installing your cold water supply, the water pressure to the system needs to change materials and specifications without notice. Do not install the refrigerator in a location where the temperature will fall below 55°F (13°C). Instructions packed with Handles Cab. Specifications subject...
... your refrigerator, allow for the door to be turned off by a switch. Bottom Mount Refrigirator PRODUCT MODEL NUMBERS KBFS22EW KBFS25EW Electrical: A 115 Volt, 60 Hz., AC only 15- When installing your cold water supply, the water pressure to the system needs to change materials and specifications without notice. Do not install the refrigerator in a location where the temperature will fall below 55°F (13°C). Instructions packed with Handles Cab. Specifications subject...

Energy Guide
Page 1
... modéles similaires. Canada Refrigerator-Freezer ·Automatic Defrost ·Bottom Mounted Freezer ·Without Through-the-Door-Ice Service Kitchen Aid Corporation Model(s):KBFS25EW* Capacity: 24.8 Cubic Feet Estimated Yearly Operating Cost $50 $51 $63 Cost Range of Similar Models 474kWh Estimated Yearly Electricity Use Your cost will depend on your utility rates and use. · Cost range based only on models of this is an offense...
... modéles similaires. Canada Refrigerator-Freezer ·Automatic Defrost ·Bottom Mounted Freezer ·Without Through-the-Door-Ice Service Kitchen Aid Corporation Model(s):KBFS25EW* Capacity: 24.8 Cubic Feet Estimated Yearly Operating Cost $50 $51 $63 Cost Range of Similar Models 474kWh Estimated Yearly Electricity Use Your cost will depend on your utility rates and use. · Cost range based only on models of this is an offense...


