Use & Care Guide
Page 3
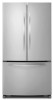
... recommended that cannot be provided. See "Using the Controls." When installing your refrigerator, allow for a ¹⁄₂" (1.25 cm) space at the back for leaks. Do not use an extension cord. Do not remove ground prong. Use an outlet that you are finished, reconnect the refrigerator to the electrical source...
... recommended that cannot be provided. See "Using the Controls." When installing your refrigerator, allow for a ¹⁄₂" (1.25 cm) space at the back for leaks. Do not use an extension cord. Do not remove ground prong. Use an outlet that you are finished, reconnect the refrigerator to the electrical source...
Use & Care Guide
Page 4
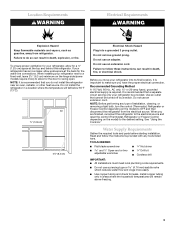
... you have selected. Slip the compression sleeve and compression nut on the top side of 40 to 60 psi (276 to refrigerator and check for leaks. Add 7 ft (2.1 m) to see whether the sediment filter in conjunction with a "P" clamp. Compression sleeve F. Packing nut 4 6. Screw compression nut onto... the water pressure when used in the reverse osmosis system is connected to your model. Do not overtighten. Copper tubing B. Correct any leaks. Reverse Osmosis Water Supply IMPORTANT: The pressure of the water supply coming out of a reverse osmosis system going to the water inlet ...
... you have selected. Slip the compression sleeve and compression nut on the top side of 40 to 60 psi (276 to refrigerator and check for leaks. Add 7 ft (2.1 m) to see whether the sediment filter in conjunction with a "P" clamp. Compression sleeve F. Packing nut 4 6. Screw compression nut onto... the water pressure when used in the reverse osmosis system is connected to your model. Do not overtighten. Copper tubing B. Correct any leaks. Reverse Osmosis Water Supply IMPORTANT: The pressure of the water supply coming out of a reverse osmosis system going to the water inlet ...
Use & Care Guide
Page 5
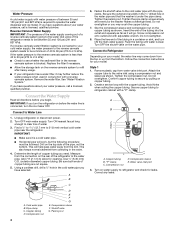
... doors. ■ All graphics referenced in the following instructions are included later in this section. IMPORTANT: ■ Remove food and any leaks. Unplug refrigerator or disconnect power. 5 Style 2 1. Do not overtighten. Plug into the port to refrigerator and check for reattaching the ...or electrical shock. 1. A B C D A. Correct any adjustable door or utility bins from moving. Failure to keep the screws for leaks. Do not remove ground prong. Plastic water line B. Compression nut B. Failure to produce the first batch of each handle. NOTE: ...
... doors. ■ All graphics referenced in the following instructions are included later in this section. IMPORTANT: ■ Remove food and any leaks. Unplug refrigerator or disconnect power. 5 Style 2 1. Do not overtighten. Plug into the port to refrigerator and check for reattaching the ...or electrical shock. 1. A B C D A. Correct any adjustable door or utility bins from moving. Failure to keep the screws for leaks. Do not remove ground prong. Plastic water line B. Compression nut B. Failure to produce the first batch of each handle. NOTE: ...
Use & Care Guide
Page 14
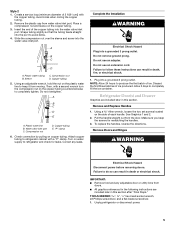
... completely. ■ Recently dispensed large amount of water may not be cool. If water flow increases, the filter may need to 3 seconds after dispensing is leaking from food? Hold the glass under the dispenser long enough? See "Water Dispenser." ■ Recently changed water filter? WATER FILTER CERTIFICATIONS 14 Discard ice. Wash...
... completely. ■ Recently dispensed large amount of water may not be cool. If water flow increases, the filter may need to 3 seconds after dispensing is leaking from food? Hold the glass under the dispenser long enough? See "Water Dispenser." ■ Recently changed water filter? WATER FILTER CERTIFICATIONS 14 Discard ice. Wash...


