Instruction Manual
Page 1
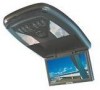
LZH-70W OVERHEAD CONSOLE WITH 7" LCD SCREEN 7 page 2-7 INSTRUCTION MANUAL CONSOLE DE PLAFOND AVEC ÉCRAN ACL À DIAGONALE 7" 7 page 8-13 MODE D'EMPLOI OVERHEAD-KONSOLE MIT 7"-DIAGONAL-LCD-BILDSCHIRM 7 Seite 14-19 BEDIENUNGSANLEITUNG PLAFONDCONSOLE MET 7" DIAGONAAL LCD-SCHERM 7 blz 20-25 GEBRUIKSAANWIJZING CONSOLLE SOVRATESTA CON DISPLAY LCD DIAGONALE A 7 POLLICI 7 pagina 26-31 ISTRUZIONI PER L'USO CONSOLA DE TECHO CON PANTALLA LCD DE 7" 7 pá...
LZH-70W OVERHEAD CONSOLE WITH 7" LCD SCREEN 7 page 2-7 INSTRUCTION MANUAL CONSOLE DE PLAFOND AVEC ÉCRAN ACL À DIAGONALE 7" 7 page 8-13 MODE D'EMPLOI OVERHEAD-KONSOLE MIT 7"-DIAGONAL-LCD-BILDSCHIRM 7 Seite 14-19 BEDIENUNGSANLEITUNG PLAFONDCONSOLE MET 7" DIAGONAAL LCD-SCHERM 7 blz 20-25 GEBRUIKSAANWIJZING CONSOLLE SOVRATESTA CON DISPLAY LCD DIAGONALE A 7 POLLICI 7 pagina 26-31 ISTRUZIONI PER L'USO CONSOLA DE TECHO CON PANTALLA LCD DE 7" 7 pá...
Instruction Manual
Page 2
... button 5 Installing Batteries in the Remote Control 5 Basic Console Operation 5 Turning the console on and off 5 Console dome lights 5 Connecting an auxiliary audio/video source 5 Wired headphone jacks 6 Using the Parental Attention/MUTE Switch 6 Adjusting the Video Picture 6 Picture Quality settings (Contrast/Brightness/Tint/Colour 6 Screen Mode settings (Full/Zoom/Normal/Cinema 6 Resetting the Adjustments 7 Changing the Dome Light Bulbs 7 Troubleshooting Guide 7 Specifications 7 2 LZH-70W Instruction Manual For the latest information about this and other Kenwood products...
... button 5 Installing Batteries in the Remote Control 5 Basic Console Operation 5 Turning the console on and off 5 Console dome lights 5 Connecting an auxiliary audio/video source 5 Wired headphone jacks 6 Using the Parental Attention/MUTE Switch 6 Adjusting the Video Picture 6 Picture Quality settings (Contrast/Brightness/Tint/Colour 6 Screen Mode settings (Full/Zoom/Normal/Cinema 6 Resetting the Adjustments 7 Changing the Dome Light Bulbs 7 Troubleshooting Guide 7 Specifications 7 2 LZH-70W Instruction Manual For the latest information about this and other Kenwood products...
Instruction Manual
Page 3
... glass parts. • Do not touch the liquid crystal fluid if the LCD is not installed by the manufacturer of a vehicle on the LCD screen. • Caution children to avoid touching or scratching the screen, as it to use a new one with soap immediately. • Do not install the console so that does not solve the problem, consult your Kenwood dealer. LZH-70W Instruction Manual 3 The use any...
... glass parts. • Do not touch the liquid crystal fluid if the LCD is not installed by the manufacturer of a vehicle on the LCD screen. • Caution children to avoid touching or scratching the screen, as it to use a new one with soap immediately. • Do not install the console so that does not solve the problem, consult your Kenwood dealer. LZH-70W Instruction Manual 3 The use any...
Instruction Manual
Page 4
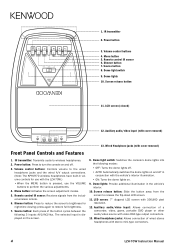
.../AV2/Aux. Auxiliary audio/video input: Allows connection of the button cycles between the following modes: • OFF: Turns the dome lights off. • AUTO: Automatically switches the dome lights on and off in the vehicle's interior. 10. The selected input is pressed, use with stereo mini-type connectors. 4 LZH-70W Instruction Manual Menu button 5. LCD screen (closed) 12. Dome light switch 9. Auxiliary audio/video input (with cover removed) 13. Remote control IR sensor 6. 1. IR transmitter 2. Source button: Each press of a camcorder, video, game, portable DVD...
.../AV2/Aux. Auxiliary audio/video input: Allows connection of the button cycles between the following modes: • OFF: Turns the dome lights off. • AUTO: Automatically switches the dome lights on and off in the vehicle's interior. 10. The selected input is pressed, use with stereo mini-type connectors. 4 LZH-70W Instruction Manual Menu button 5. LCD screen (closed) 12. Dome light switch 9. Auxiliary audio/video input (with cover removed) 13. Remote control IR sensor 6. 1. IR transmitter 2. Source button: Each press of a camcorder, video, game, portable DVD...
Instruction Manual
Page 5
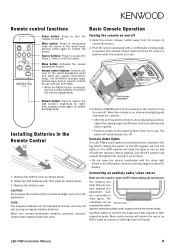
... the screen hinge. Remove the battery cover as shown above . 2. Connecting an auxiliary audio/video source Make sure the console's power is OFF before making any connections The Auxiliary A/V Input lets you connect optional A/V equipment, such as this could discharge the vehicle's battery. 1. Use RCA cables to connect the audio and video signals to access the Video 1, Video 2 and Aux inputs. press again to the wired headphones; When the console is pressed, use . CAUTION: Do not leave the remote control in use the volume buttons...
... the screen hinge. Remove the battery cover as shown above . 2. Connecting an auxiliary audio/video source Make sure the console's power is OFF before making any connections The Auxiliary A/V Input lets you connect optional A/V equipment, such as this could discharge the vehicle's battery. 1. Use RCA cables to connect the audio and video signals to access the Video 1, Video 2 and Aux inputs. press again to the wired headphones; When the console is pressed, use . CAUTION: Do not leave the remote control in use the volume buttons...
Instruction Manual
Page 6
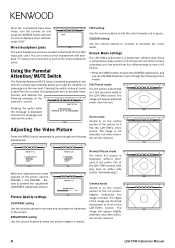
... screen completely, you can connect wired headphones with grey bars on the central portion of passengers in the rear seat. The image will be reduced. 6 LZH-70W Instruction Manual Using the Parental Attention/MUTE Switch The Parental Attention/MUTE Switch (installed separately at the time the console was installed) allows you want appears on -screen display's input indicator reads "AUX". Screen Mode settings The LZH-70W's LCD screen is displayed removes the message and restores the audio. BRIGHTNESS setting Use the volume buttons to increase and decrease the whiteness...
... screen completely, you can connect wired headphones with grey bars on the central portion of passengers in the rear seat. The image will be reduced. 6 LZH-70W Instruction Manual Using the Parental Attention/MUTE Switch The Parental Attention/MUTE Switch (installed separately at the time the console was installed) allows you want appears on -screen display's input indicator reads "AUX". Screen Mode settings The LZH-70W's LCD screen is displayed removes the message and restores the audio. BRIGHTNESS setting Use the volume buttons to increase and decrease the whiteness...
Instruction Manual
Page 7
... the Picture Quality and Screen Mode adjustments to their factory settings: Press the MENU button until "RESET" appears on the screen. • Press the VOLUME + button to reset the adjustments to their factory settings. • Press the MENU button to video source(s) Verify that the video sources are properly connected The video image is dark The screen is cold Liquid Crystal Display screens may appear darker when they are exhausted Make sure the headphones' power switch is turned on Replace the headphone batteries with new ones Specifications Screen...
... the Picture Quality and Screen Mode adjustments to their factory settings: Press the MENU button until "RESET" appears on the screen. • Press the VOLUME + button to reset the adjustments to their factory settings. • Press the MENU button to video source(s) Verify that the video sources are properly connected The video image is dark The screen is cold Liquid Crystal Display screens may appear darker when they are exhausted Make sure the headphones' power switch is turned on Replace the headphone batteries with new ones Specifications Screen...
Installation Manual
Page 1
LZH-70W OVERHEAD CONSOLE WITH 7" LCD SCREEN 7 page 2-7 INSTALLATION MANUAL CONSOLE DE PLAFOND AVEC ÉCRAN ACL À DIAGONALE 7" 7 page 8-13 MANUEL D'INSTALLATION OVERHEAD-KONSOLE MIT 7"-DIAGONAL-LCD-BILDSCHIRM 7 Seite 14-19 INSTALLATION-HANDBUCH PLAFONDCONSOLE MET 7" DIAGONAAL LCD-SCHERM 7 blz 20-25 INSTALLATIE HANDLEIDING CONSOLLE SOVRATESTA CON DISPLAY LCD DIAGONALE A 7 POLLICI 7 pagina 26-31 MANUALE DI INSTALLAZIONE CONSOLA DE TECHO CON PANTALLA LCD DE 7" 7 pá...
LZH-70W OVERHEAD CONSOLE WITH 7" LCD SCREEN 7 page 2-7 INSTALLATION MANUAL CONSOLE DE PLAFOND AVEC ÉCRAN ACL À DIAGONALE 7" 7 page 8-13 MANUEL D'INSTALLATION OVERHEAD-KONSOLE MIT 7"-DIAGONAL-LCD-BILDSCHIRM 7 Seite 14-19 INSTALLATION-HANDBUCH PLAFONDCONSOLE MET 7" DIAGONAAL LCD-SCHERM 7 blz 20-25 INSTALLATIE HANDLEIDING CONSOLLE SOVRATESTA CON DISPLAY LCD DIAGONALE A 7 POLLICI 7 pagina 26-31 MANUALE DI INSTALLAZIONE CONSOLA DE TECHO CON PANTALLA LCD DE 7" 7 pá...
Installation Manual
Page 2
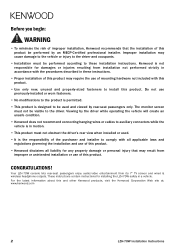
... or unintended installation or use of this product. The monitor screen must not obstruct the driver's rear view when installed or used and viewed by rear-seat passengers only. These instructions contain instructions for installing the LZH-70W safely in motion. • This product must not be performed by the driver while operating the vehicle will create an unsafe condition. • Kenwood does not recommend connecting hanging wires or cables to auxiliary connectors while...
... or unintended installation or use of this product. The monitor screen must not obstruct the driver's rear view when installed or used and viewed by rear-seat passengers only. These instructions contain instructions for installing the LZH-70W safely in motion. • This product must not be performed by the driver while operating the vehicle will create an unsafe condition. • Kenwood does not recommend connecting hanging wires or cables to auxiliary connectors while...
Installation Manual
Page 3
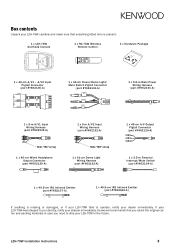
...-cm Dome Light Wiring Harness (part #Y662132-A) 1 x 5.5-m Main Power Wiring Harness (part #Y662133-A) 1 x 46-cm A/V Output Pigtail Connector (part #Y662129-A) 1 x 5.5-m Parental Interrupt/Mute Switch (part #Y662134-A) 1 x 49.5-cm IR1 Infrared Emitter (part #Y662137-A) 1 x 49.5-cm IR2 Infrared Emitter (part #Y662162-A) If anything is present: 1 x LZH-70W Overhead Console 1 x RC-70W Wireless Remote Control 1 x Hardware Package 1 x 46-cm A/V1 - LZH-70W Installation Instructions 3 If your LZH-70W was shipped to you need to operate, notify your LZH-70W carefully and make sure that...
...-cm Dome Light Wiring Harness (part #Y662132-A) 1 x 5.5-m Main Power Wiring Harness (part #Y662133-A) 1 x 46-cm A/V Output Pigtail Connector (part #Y662129-A) 1 x 5.5-m Parental Interrupt/Mute Switch (part #Y662134-A) 1 x 49.5-cm IR1 Infrared Emitter (part #Y662137-A) 1 x 49.5-cm IR2 Infrared Emitter (part #Y662162-A) If anything is present: 1 x LZH-70W Overhead Console 1 x RC-70W Wireless Remote Control 1 x Hardware Package 1 x 46-cm A/V1 - LZH-70W Installation Instructions 3 If your LZH-70W was shipped to you need to operate, notify your LZH-70W carefully and make sure that...
Installation Manual
Page 4
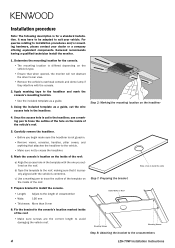
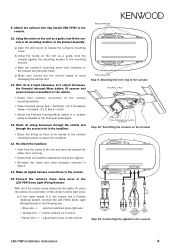
... screws are the correct length to the roof, making sure that it is properly aligned with the vehicle's centerline. Fix the bracket to the console's location marked inside of the roof. 7. It may have to be adapted to the crossmembers 4 LZH-70W Installation Instructions Kenwood recommends having a qualified technician install the monitor. 1. Apply masking tape to trace the outline of the...
... screws are the correct length to the roof, making sure that it is properly aligned with the vehicle's centerline. Fix the bracket to the console's location marked inside of the roof. 7. It may have to be adapted to the crossmembers 4 LZH-70W Installation Instructions Kenwood recommends having a qualified technician install the monitor. 1. Apply masking tape to trace the outline of the...
Installation Manual
Page 5
... the headliner. 13. Wire all pigtail harness connections to the console. 10. 9. Using the marks on the bracket assembly: a) Open the LCD screen to the console LZH-70W Installation Instructions 5 d) Make sure screws are aligned. • Re-install the visors and other hardware removed in the mounting location. Black = Earth • Mount the Parental Interrupt/Mute button in its mounting location on the roof as a guide, hold the console against...
... the headliner. 13. Wire all pigtail harness connections to the console. 10. 9. Using the marks on the bracket assembly: a) Open the LCD screen to the console LZH-70W Installation Instructions 5 d) Make sure screws are aligned. • Re-install the visors and other hardware removed in the mounting location. Black = Earth • Mount the Parental Interrupt/Mute button in its mounting location on the roof as a guide, hold the console against...
Installation Manual
Page 6
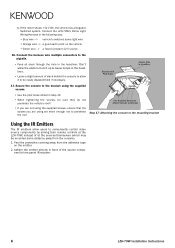
... the hole in front of the source component's front-panel IR receiver. 6 LZH-70W Installation Instructions Adhere the emitter directly in the headliner; b) If the meter shows +12 V DC, the vehicle has a Negative Switched system. Peel the protective covering away from the console). 1. Secure the console to penetrate the roof. Connect the LZH-70W's Dome Light Wiring Harness in Step 10. • When...
... the hole in front of the source component's front-panel IR receiver. 6 LZH-70W Installation Instructions Adhere the emitter directly in the headliner; b) If the meter shows +12 V DC, the vehicle has a Negative Switched system. Peel the protective covering away from the console). 1. Secure the console to penetrate the roof. Connect the LZH-70W's Dome Light Wiring Harness in Step 10. • When...

Installation Manual
Page 7
LZH-70W Installation Instructions 7
LZH-70W Installation Instructions 7

Installation Manual
Page 19
LZH-70W Installationshandbuch 19
LZH-70W Installationshandbuch 19


