Kenwood 702W - LZ - LCD Monitor Support and Manuals
Get Help and Manuals for this Kenwood item
View All Support Options Below
Free Kenwood 702W manuals!
Problems with Kenwood 702W?
Ask a Question
Free Kenwood 702W manuals!
Problems with Kenwood 702W?
Ask a Question
Most Recent Kenwood 702W Questions

Popular Kenwood 702W Manual Pages
Instruction Manual - Page 3
... button. To initialize set for individual items are used to explain more clearly how the controls are not cleared. Cleaning the Unit If the faceplate of the display and the panel appearing in locating a recycle facility nearest to the unit may affect its mechanical parts. Navigation units you can control from the LZ-702W (As of March...
Instruction Manual - Page 4
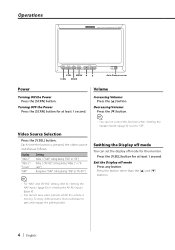
... video pictures, find a safe place to (page 8) or (page 8).
• You cannot view video pictures whilst the vehicle is set the display off mode for at least 1 second. Operations
WIDE LCD TOUCH SCREEN MONITOR LZ-702W
PWR OFF
SCRN
V.OFF V.SEL
SP MODE
MODE
AV OUT MENU
VOLUME
V.SEL MENU ∞ 5 SCRN MODE
Auto Dimmer...
Instruction Manual - Page 5
..."
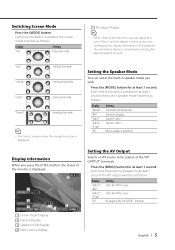
Setting Select the AV IN1 source.
Sound of navigation.
Each time the button is cleared automatically after approximately 5 seconds. Sound of video 2. Display information
When you wish. Press the [MENU] button for at least 1 second, the built-in speaker mode you press the [V.SEL] button, the status of video 1.
Sound of the monitor is...
Instruction Manual - Page 7
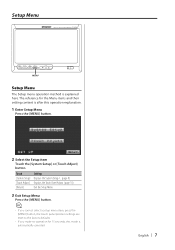
...] button.
• If you cannot select a setup menu item, press the [MENU] button, the touch panel position settings are reset to the factory defaults.
• If you make no operation for the Menu items and their setting content is automatically canceled. English | 7 Setup Menu
WIDE LCD TOUCH SCREEN MONITOR LZ-702W
PWR OFF
SCRN
V.OFF V.SEL
SP MODE...
Instruction Manual - Page 8

... to the rear view camera video display when engaging the shift knob of "AV-IN2". 2 Setting the Rear view camera.
Use this device is shown on the monitor.
Setting the AV-IN2 input
Setup switch method of the navigation picture. The image which appeares in the camera is turned left-side right and displayed. Operate...
Instruction Manual - Page 9
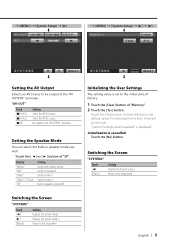
... Mode
You can select the built-in speaker is cancelled. Touch the [ 2 ] or [ 3 ] button of navigation. Return to the "AV OUTPUT" terminals.
English | 9
Switching the Screen
"SYSTEM2"
Touch [2] [3] [Return]
Setting Displays the System Setup-1. Switching the Screen
"SYSTEM3"
Touch [2] [Return]
Setting Displays the System Setup-2. Return to be output at the "AV OUTPUT" terminals...
Instruction Manual - Page 12
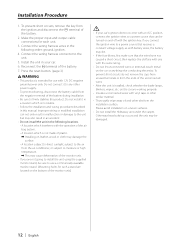
... output cable connections for use a commercially available monitor stand. (Mounting holes for such a stand are working properly.
• Insulate unconnected wires with an ACC position, connect the ignition wires to any other dirt from the installation surface. Do not install it to a power source that the wires have not caused a short circuit, then replace the...
Instruction Manual - Page 13
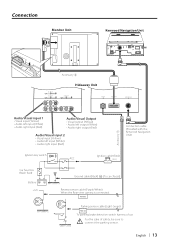
... (Yellow) • Audio left input (White) • Audio right input (Red)
Accessory 1
Connection cable (Provided with the Kenwood Navigation Unit)
Ignition key switch
Ignition cable (Red)
ACC
( 5A )
Car fuse box (Main fuse)
Battery +
+12V
Ground cable (Black) · (To car chassis)
Reverse sensor cable (Purple/White) When the Rear view camera is connected.
REVERSE
Parking sensor...
Instruction Manual - Page 14

..., allow it to the shape
of the installation location.
3 Adjust the shape of the support so that came with another monitor.
14 | English
Fig. 1
Shoe Accessory 5
Accessory 4
Accessory 3
Tighten
Loosen Protective strip
Installation surface
Accessory 5 Installation
Installation for Monitor Unit
Installation location and cleaning Select for installation a location where the stand can be...
Instruction Manual - Page 15
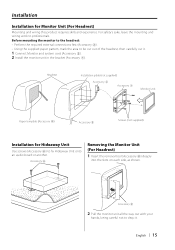
...as shown.
English | 15 For safety's sake, leave the mounting and wiring work to fix Hideaway Unit onto an audio board or another. Headrest
Installation plate (not supplied)
Accessory 2
Accessory 7
Monitor Unit
Paper template (Accessory 9)
Accessory 2
Screws (not supplied)
Installation for Monitor Unit (For Headrest)
Mounting and wiring this product requires skills and experience...
Instruction Manual - Page 16
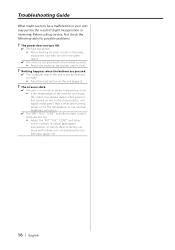
... characteristics of the monitor unit drops, the screen may just be a malfunction in the wires, replace the fuse with one with reference to factory-set levels with the same rating.
✔ The motor is first turned on for possible problems.
? Normal brightness will return.
✔ The "BRT", "BLK", "CONT", and other screen control levels are...
Instruction Manual - Page 17

...equipment may cause harmful interference unless the modifications are expressly approved in the instruction manual.
English | 17
Specifications
Specifications subject to change or modification is given as 99.99% or more,.... Monitor Unit
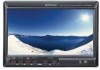
Screen size : 6.95 inches wide 156.2(W) × 82.4(H) × 176.0(Diagonal) mm 6-1/8(W) × 3-1/4(H) inches
Display system : Transparent TN LCD panel...
Instruction Manual - Page 116

操作方法
WIDE LCD TOUCH SCREEN MONITOR LZ-702W
PWR OFF
SCRN
V.OFF V.SEL
SP MODE
MODE
AV OUT MENU
VOLUME
V.SEL MENU ∞ 5 SCRN MODE
電源
SCRN] 按鈕。
SCRN
音&#...
Instruction Manual - Page 119
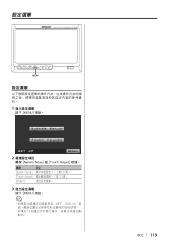
設定選單
WIDE LCD TOUCH SCREEN MONITOR LZ-702W
PWR OFF
SCRN
V.OFF V.SEL
SP MODE
MODE
AV OUT MENU
VOLUME
MENU
設定選單
1
按下 [MENU] 按鈕。
2
觸按 [System Setup] 或 [Touch Adjust] 按鈕。
觸按 [System Setup] [Touch Adjust] [Return]
1。(第...
Instruction Manual - Page 121
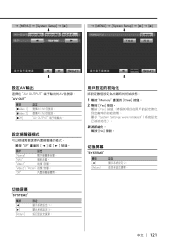
= [MENU] = [System Setup] = [3] «
= [MENU] = [System Setup] = [3] = [3] «
«
設定AV輸出
選..."Memory Clear] 按鈕。 2 觸按 [Yes] 按鈕。
觸按 [Yes System Settings were Initialized No] 按鈕。
切換屏幕
"SYSTEM3"
觸按 [2] [Return]
2
&#...
Kenwood 702W Reviews
We have not received any reviews for Kenwood yet.