
Instruction Manual
Page 2
... fluid from the LCD contacts your unit to malfunction. • Do not use a new fuse with soap immediately. 2 CAUTION To prevent damage to the machine, take the following precautions: • Make sure to ground the unit to a negative 12V DC power supply. • Do not install the unit in a spot exposed to park and engage the parking brake. 2 | English To enjoy video pictures, find a safe place...
... fluid from the LCD contacts your unit to malfunction. • Do not use a new fuse with soap immediately. 2 CAUTION To prevent damage to the machine, take the following precautions: • Make sure to ground the unit to a negative 12V DC power supply. • Do not install the unit in a spot exposed to park and engage the parking brake. 2 | English To enjoy video pictures, find a safe place...
Instruction Manual
Page 3
... wipe it with a hard cloth or using the monitor for individual items are used to the unit may differ from the Remote controler (As of March, 2006): KNA-RC300 Information on Disposal of the illustrations on our health and the environment. PWR OFF SCRN V.OFF V.SEL SP MODE MODE AV OUT MENU VOLUME Reset button • Even if the Reset button is pressed. If the...
... wipe it with a hard cloth or using the monitor for individual items are used to the unit may differ from the Remote controler (As of March, 2006): KNA-RC300 Information on Disposal of the illustrations on our health and the environment. PWR OFF SCRN V.OFF V.SEL SP MODE MODE AV OUT MENU VOLUME Reset button • Even if the Reset button is pressed. If the...
Instruction Manual
Page 4
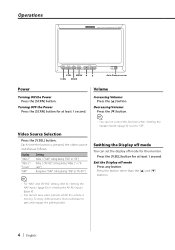
... view video pictures whilst the vehicle is pressed, the video source switches as follows: Display "Video 1" "Video 2"/ "R-Cam" "NAV" Setting Video 1 ("NAV" setting during "RGB" or "Off") Video 2 ("AV-IN2" setting during "Video 2" or "RCam") Navigation ("NAV" setting during "RGB" or "AV-IN1") Swithing the Display off mode Press any button. Operations WIDE LCD TOUCH SCREEN MONITOR LZ-702W PWR OFF SCRN V.OFF V.SEL SP MODE MODE AV OUT MENU VOLUME V.SEL MENU ∞ 5 SCRN MODE Auto Dimmer sensor Power Turning ON the Power Press the [SCRN] button. Press the [V.SEL] button...
... view video pictures whilst the vehicle is pressed, the video source switches as follows: Display "Video 1" "Video 2"/ "R-Cam" "NAV" Setting Video 1 ("NAV" setting during "RGB" or "Off") Video 2 ("AV-IN2" setting during "Video 2" or "RCam") Navigation ("NAV" setting during "RGB" or "AV-IN1") Swithing the Display off mode Press any button. Operations WIDE LCD TOUCH SCREEN MONITOR LZ-702W PWR OFF SCRN V.OFF V.SEL SP MODE MODE AV OUT MENU VOLUME V.SEL MENU ∞ 5 SCRN MODE Auto Dimmer sensor Power Turning ON the Power Press the [SCRN] button. Press the [V.SEL] button...
Instruction Manual
Page 5
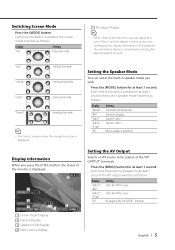
... 5 seconds. Sound of navigation. Select the AV IN2 source. Switching Screen Mode Press the [MODE] button. No output to "Mirror" and the display is showing rear view camera pictures, display information is not displayed. • The information display is displayed. Each time the button is pressed for at least 1 second. Press the [MENU] button for at least 1 second, the built-in speaker is displayed. 4 1 2 3 5 1 Screen mode Display 2 Volume Display 3 Speaker mode Display 4 Video source Display Setting the AV Output Selects an AV source to be output at least...
... 5 seconds. Sound of navigation. Select the AV IN2 source. Switching Screen Mode Press the [MODE] button. No output to "Mirror" and the display is showing rear view camera pictures, display information is not displayed. • The information display is displayed. Each time the button is pressed for at least 1 second. Press the [MENU] button for at least 1 second, the built-in speaker is displayed. 4 1 2 3 5 1 Screen mode Display 2 Volume Display 3 Speaker mode Display 4 Video source Display Setting the AV Output Selects an AV source to be output at least...

Instruction Manual
Page 6
..." can be stored for the video, control screens and navigation picture. • The Screen Control is displayed only when you have applied the parking brake. • If you make no operation for 15 seconds, this mode is input. • The "TIN" and "COL" cannot be adjusted when NTSC video signal is automatically canceled. 2 Adjusting the Picture Quality Each time you touch the button, the setting alternates between the settings shown in the table below.
..." can be stored for the video, control screens and navigation picture. • The Screen Control is displayed only when you have applied the parking brake. • If you make no operation for 15 seconds, this mode is input. • The "TIN" and "COL" cannot be adjusted when NTSC video signal is automatically canceled. 2 Adjusting the Picture Quality Each time you touch the button, the setting alternates between the settings shown in the table below.
Instruction Manual
Page 7
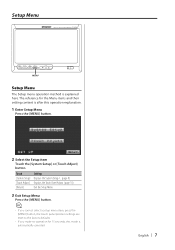
... Setup item Touch the [System Setup] or [Touch Adjust] button. English | 7 Setup Menu WIDE LCD TOUCH SCREEN MONITOR LZ-702W PWR OFF SCRN V.OFF V.SEL SP MODE MODE AV OUT MENU VOLUME MENU Setup Menu The Setup menu operation method is automatically canceled. Touch [System Setup] [Touch Adjust] [Return] Setting Displays the System Setup-1. (page 8) Displays the Touch Panel Adjust. (page 10) Exit the Setup Menu. 3 Exit Setup Menu Press the [MENU] button. • If you cannot select a setup menu item, press the [MENU] button, the touch panel position settings are reset to the factory...
... Setup item Touch the [System Setup] or [Touch Adjust] button. English | 7 Setup Menu WIDE LCD TOUCH SCREEN MONITOR LZ-702W PWR OFF SCRN V.OFF V.SEL SP MODE MODE AV OUT MENU VOLUME MENU Setup Menu The Setup menu operation method is automatically canceled. Touch [System Setup] [Touch Adjust] [Return] Setting Displays the System Setup-1. (page 8) Displays the Touch Panel Adjust. (page 10) Exit the Setup Menu. 3 Exit Setup Menu Press the [MENU] button. • If you cannot select a setup menu item, press the [MENU] button, the touch panel position settings are reset to the factory...

Instruction Manual
Page 8
... Off mode setting. It becomes the AV-IN1 mode setting. "AV-IN1" Display "Video 1" "NAV" Setting Video 1 mode is turned left-side right and displayed. The image which appeares in the camera is selected. It becomes the Rear view camera mode setting. Setting the Rear view camera Setting the display when this setting when there's nothing connected to "TO NAVIGATION" terminal is shown on the monitor. Switching the Screen "SYSTEM1" Touch [3] [Return] Setting Displays the System Setup-2. Display the AV-IN1 input Setting status of the picture input to "Reverse" and...
... Off mode setting. It becomes the AV-IN1 mode setting. "AV-IN1" Display "Video 1" "NAV" Setting Video 1 mode is turned left-side right and displayed. The image which appeares in the camera is selected. It becomes the Rear view camera mode setting. Setting the Rear view camera Setting the display when this setting when there's nothing connected to "TO NAVIGATION" terminal is shown on the monitor. Switching the Screen "SYSTEM1" Touch [3] [Return] Setting Displays the System Setup-2. Display the AV-IN1 input Setting status of the picture input to "Reverse" and...
Instruction Manual
Page 9
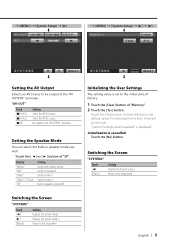
...; Setting the AV Output Selects an AV source to the "AV OUTPUT" terminals. Sound of video 1. Touch the [No] button. Switching the Screen "SYSTEM2" Touch [2] [3] [Return] Setting Displays the System Setup-1. Return to the setup menu. « Initializing the User Settings The setting value is turned off. Display "Normal" "NAV" "Video1" "Video2"/ "R-Cam" "Off" Setting Sound with monitor picture. Switching the Screen "SYSTEM3" Touch [2] [Return] Setting Displays the System Setup-2. Built-in speaker mode you wish. Select the AV IN2 source. Sound of navigation.
...; Setting the AV Output Selects an AV source to the "AV OUTPUT" terminals. Sound of video 1. Touch the [No] button. Switching the Screen "SYSTEM2" Touch [2] [3] [Return] Setting Displays the System Setup-1. Return to the setup menu. « Initializing the User Settings The setting value is turned off. Display "Normal" "NAV" "Video1" "Video2"/ "R-Cam" "Off" Setting Sound with monitor picture. Switching the Screen "SYSTEM3" Touch [2] [Return] Setting Displays the System Setup-2. Built-in speaker mode you wish. Select the AV IN2 source. Sound of navigation.

Instruction Manual
Page 10
... the screen goes back to the Setup Menu Screen. • If the [Cancel] button is touched after touching the button at the lower left reappears. • If the [Reset] button is touched, the settings are reset to the factory defaults and the setup menu screen reappears. 10 | English Setup Menu = [MENU] = [Touch Adjust] « « Adjusting the Touch Position The touch panel can be adjusted if the position touched and the operation performed do not match. 1 Accurately touch the...
... the screen goes back to the Setup Menu Screen. • If the [Cancel] button is touched after touching the button at the lower left reappears. • If the [Reset] button is touched, the settings are reset to the factory defaults and the setup menu screen reappears. 10 | English Setup Menu = [MENU] = [Touch Adjust] « « Adjusting the Touch Position The touch panel can be adjusted if the position touched and the operation performed do not match. 1 Accurately touch the...
Instruction Manual
Page 12
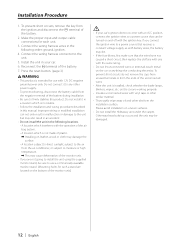
... product is installed, check whether the brake lamps, blinkers, wipers, etc. Please avoid installation on the car are not going to install the unit using the supplied monitor stand, be damaged. 12 | English Connect the wiring harness connector to a power source that the wires have not caused a short circuit, then replace the old fuse with one with 12V DC negative ground power only. Do not connect it in a location which is...
... product is installed, check whether the brake lamps, blinkers, wipers, etc. Please avoid installation on the car are not going to install the unit using the supplied monitor stand, be damaged. 12 | English Connect the wiring harness connector to a power source that the wires have not caused a short circuit, then replace the old fuse with one with 12V DC negative ground power only. Do not connect it in a location which is...
Instruction Manual
Page 13
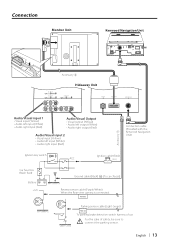
...Visual output (Yellow) • Audio left output (White) • Audio right output (Red) Audio/Visual input 2 • Visual input (Yellow) • Audio left input (White) • Audio right input (Red) Accessory 1 Connection cable (Provided with the Kenwood Navigation Unit) Ignition key switch Ignition cable (Red) ACC ( 5A ) Car fuse box (Main fuse) Battery + +12V Ground cable (Black) · (To car chassis) Reverse sensor cable (Purple/White) When the Rear view camera is connected. REVERSE Parking sensor cable (Light Green) PRK SW To parking brake detection switch harness of...
...Visual output (Yellow) • Audio left output (White) • Audio right output (Red) Audio/Visual input 2 • Visual input (Yellow) • Audio left input (White) • Audio right input (Red) Accessory 1 Connection cable (Provided with the Kenwood Navigation Unit) Ignition key switch Ignition cable (Red) ACC ( 5A ) Car fuse box (Main fuse) Battery + +12V Ground cable (Black) · (To car chassis) Reverse sensor cable (Purple/White) When the Rear view camera is connected. REVERSE Parking sensor cable (Light Green) PRK SW To parking brake detection switch harness of...

Instruction Manual
Page 14
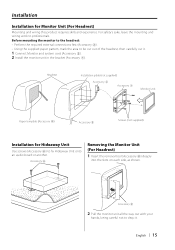
... front edge of the support (petal-shaped part) can also adjust the monitor unit's forward position by loosening the angle adjustment knobs and adjusting the angle of the monitor unit's installation stand. Do not use the hexagon wrench (Accessary 5) that came with your fingers as shown in a neutral cleaning agent and wrung out. Installation Installation for Monitor Unit Installation location and cleaning Select for installation a location where the stand...
... front edge of the support (petal-shaped part) can also adjust the monitor unit's forward position by loosening the angle adjustment knobs and adjusting the angle of the monitor unit's installation stand. Do not use the hexagon wrench (Accessary 5) that came with your fingers as shown in a neutral cleaning agent and wrung out. Installation Installation for Monitor Unit Installation location and cleaning Select for installation a location where the stand...
Instruction Manual
Page 15
... wiring work to drop it . 1 Connect Monitor and system cord (Accessory 2). 2 Install the monitor unit in the bracket (Accessory 7). Accessory 8 2 Pull the monitor unit all the way out with your hands, being careful not to professionals. Before mounting the monitor to the headrest: • Perform the required external connections first (Accessory 2). • Using the supplied paper pattern, mark the area to fix Hideaway Unit onto an audio...
... wiring work to drop it . 1 Connect Monitor and system cord (Accessory 2). 2 Install the monitor unit in the bracket (Accessory 7). Accessory 8 2 Pull the monitor unit all the way out with your hands, being careful not to professionals. Before mounting the monitor to the headrest: • Perform the required external connections first (Accessory 2). • Using the supplied paper pattern, mark the area to fix Hideaway Unit onto an audio...
Instruction Manual
Page 16
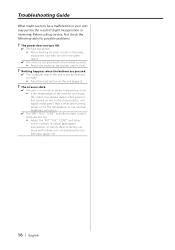
... the unit is not functioning normally. ☞ Press the reset button on the unit (page 3). ? The screen is dark. ✔ The unit is in your unit may appear darker when power is first turned on for the temperature to (page 10). 16 | English Normal brightness will return. ✔ The "BRT", "BLK", "CONT", and other screen controls to obtain appropriate illumination, or restore them to factory-set...
... the unit is not functioning normally. ☞ Press the reset button on the unit (page 3). ? The screen is dark. ✔ The unit is in your unit may appear darker when power is first turned on for the temperature to (page 10). 16 | English Normal brightness will return. ✔ The "BRT", "BLK", "CONT", and other screen controls to obtain appropriate illumination, or restore them to factory-set...

Instruction Manual
Page 17
...% Pixel arrangement : RGB striped arrangement Back lighting : Cold cathode tube Speaker power : 0.5 W (40 × 20 mm) Hideaway Unit Colour system : NTSC/ PAL Video input level (RCA jacks) : 1 ± 0.1 Vp-p/ 75 Ω Audio input level (RCA jacks) : 1 V/ 55 KΩ Video output level (RCA jacks) : 1 ± 0.1 Vp-p/ 75 Ω Audio output level (RCA jacks) : 1 V/ 1 KΩ Analog RGB input (13P) : 0.7 Vp-p/ 75 Ω General Operating voltage : 14.4 V DC (11 - 16 V) Consumed...
...% Pixel arrangement : RGB striped arrangement Back lighting : Cold cathode tube Speaker power : 0.5 W (40 × 20 mm) Hideaway Unit Colour system : NTSC/ PAL Video input level (RCA jacks) : 1 ± 0.1 Vp-p/ 75 Ω Audio input level (RCA jacks) : 1 V/ 55 KΩ Video output level (RCA jacks) : 1 ± 0.1 Vp-p/ 75 Ω Audio output level (RCA jacks) : 1 V/ 1 KΩ Analog RGB input (13P) : 0.7 Vp-p/ 75 Ω General Operating voltage : 14.4 V DC (11 - 16 V) Consumed...

Instruction Manual
Page 116
操作方法 WIDE LCD TOUCH SCREEN MONITOR LZ-702W PWR OFF SCRN V.OFF V.SEL SP MODE MODE AV OUT MENU VOLUME V.SEL MENU ∞ 5 SCRN MODE 電源 SCRN] 按鈕。 SCRN 音量 5] 按鈕。 按下 [V.SEL 顯示 "Video 1" "Video 2"/ "R-Cam" "NAV" 設定 視頻1(在 "RGB" 或 "Off" 時的 "NAV" 設定) 視頻2(...
操作方法 WIDE LCD TOUCH SCREEN MONITOR LZ-702W PWR OFF SCRN V.OFF V.SEL SP MODE MODE AV OUT MENU VOLUME V.SEL MENU ∞ 5 SCRN MODE 電源 SCRN] 按鈕。 SCRN 音量 5] 按鈕。 按下 [V.SEL 顯示 "Video 1" "Video 2"/ "R-Cam" "NAV" 設定 視頻1(在 "RGB" 或 "Off" 時的 "NAV" 設定) 視頻2(...

Instruction Manual
Page 117
..." "Normal" 按下 [MODE 1 顯示 "Normal" "NAV" "Video1" "Video2"/ "R-Cam" "Off" 1 2音響。 顯示資訊 在按下[V.SEL 4 1 2 3 5 1 2 3 4 5 AV輸出顯示 設定AV輸出 選擇在 "AV OUTPUT AV信號源。 按下 [MENU 1 AV 顯示 "Video1"/ "NAV" "Video2"/ "R-Cam" "Off" AV...
..." "Normal" 按下 [MODE 1 顯示 "Normal" "NAV" "Video1" "Video2"/ "R-Cam" "Off" 1 2音響。 顯示資訊 在按下[V.SEL 4 1 2 3 5 1 2 3 4 5 AV輸出顯示 設定AV輸出 選擇在 "AV OUTPUT AV信號源。 按下 [MENU 1 AV 顯示 "Video1"/ "NAV" "Video2"/ "R-Cam" "Off" AV...
Instruction Manual
Page 119
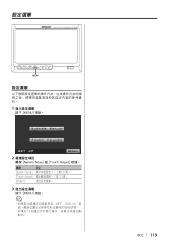
設定選單 WIDE LCD TOUCH SCREEN MONITOR LZ-702W PWR OFF SCRN V.OFF V.SEL SP MODE MODE AV OUT MENU VOLUME MENU 設定選單 1 按下 [MENU] 按鈕。 2 觸按 [System Setup] 或 [Touch Adjust] 按鈕。 觸按 [System Setup] [Touch Adjust] [Return] 1。(第120 122 3 按下 [MENU] 按鈕。 MENU •如果在15 中文 | 119
設定選單 WIDE LCD TOUCH SCREEN MONITOR LZ-702W PWR OFF SCRN V.OFF V.SEL SP MODE MODE AV OUT MENU VOLUME MENU 設定選單 1 按下 [MENU] 按鈕。 2 觸按 [System Setup] 或 [Touch Adjust] 按鈕。 觸按 [System Setup] [Touch Adjust] [Return] 1。(第120 122 3 按下 [MENU] 按鈕。 MENU •如果在15 中文 | 119

Instruction Manual
Page 120
...;RGB TO NAVIGATION V.SEL]按鈕。 成為AV-IN1 AV1 INPUT V.SEL]按鈕。 成為Off 顯示AV-IN1輸入 顯示 "AV1 INPUT AV-IN1" 顯示 "Video 1" "NAV" 1 AV2 INPUT 1 觸按 "AV-IN2" 的 [R-Cam] 按鈕。 2 Reverse" [7On] [7Off] "Mirror" [7On] [7Off] 設定 Reverse Reverse V.SEL 切...
...;RGB TO NAVIGATION V.SEL]按鈕。 成為AV-IN1 AV1 INPUT V.SEL]按鈕。 成為Off 顯示AV-IN1輸入 顯示 "AV1 INPUT AV-IN1" 顯示 "Video 1" "NAV" 1 AV2 INPUT 1 觸按 "AV-IN2" 的 [R-Cam] 按鈕。 2 Reverse" [7On] [7Off] "Mirror" [7On] [7Off] 設定 Reverse Reverse V.SEL 切...
Instruction Manual
Page 121
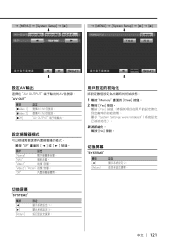
= [MENU] = [System Setup] = [3] « = [MENU] = [System Setup] = [3] = [3] « « 設定AV輸出 選擇在 "AV OUTPUT AV AV-OUT" 觸按 [7Video 1] [7Video 2] [7Off] AV IN1 AV IN2 AV OUTPUT SP 2 ] 或 [ 3 ] 按鈕。 顯示 設定 "Normal" "NAV" "Video1" 視頻1音響。 "Video2"/ "R-Cam" 視頻2音響。 "Off...
= [MENU] = [System Setup] = [3] « = [MENU] = [System Setup] = [3] = [3] « « 設定AV輸出 選擇在 "AV OUTPUT AV AV-OUT" 觸按 [7Video 1] [7Video 2] [7Off] AV IN1 AV IN2 AV OUTPUT SP 2 ] 或 [ 3 ] 按鈕。 顯示 設定 "Normal" "NAV" "Video1" 視頻1音響。 "Video2"/ "R-Cam" 視頻2音響。 "Off...


