Owner's Manual (pdf)
Page 2
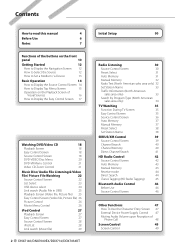
...Auto Memory 37 Manual Memory 37 Preset Select 38 Set Station Name 38 SIRIUS/XM Control 39 Source Control Screen 39 Channel Search 40 Channel Memory 40 Direct Channel Search 41 HD Radio Control 42 Source Control Screen 42 Auto Memory 43 Manual Memory 43 Receive mode 44 Direct Search 44 iTunes Tagging (HD Radio Tagging) 45 Bluetooth Audio Control 46 Before Use 46 Source Control Screen 46 Other Functions 47 How To Use the Character Entry Screen 47 External Device Power Supply Control 47 Muting Audio Volume upon Reception of Phone Call 48 Screen Control...
...Auto Memory 37 Manual Memory 37 Preset Select 38 Set Station Name 38 SIRIUS/XM Control 39 Source Control Screen 39 Channel Search 40 Channel Memory 40 Direct Channel Search 41 HD Radio Control 42 Source Control Screen 42 Auto Memory 43 Manual Memory 43 Receive mode 44 Direct Search 44 iTunes Tagging (HD Radio Tagging) 45 Bluetooth Audio Control 46 Before Use 46 Source Control Screen 46 Other Functions 47 How To Use the Character Entry Screen 47 External Device Power Supply Control 47 Muting Audio Volume upon Reception of Phone Call 48 Screen Control...

Owner's Manual (pdf)
Page 3
... 53 Controlling Tone-based Services 54 Setting Up the Hands-Free Phone 54 Voice Registration 55 Key Word Voice Registration 56 Phone Number Preset 57 SMS (Short Message Service) 57 Audio Control 59 Audio Control Menu 59 Audio Control 59 Equalizer Control 60 Graphic Equalizer Setup 60 Zone Control 61 Space Enhancer 61 Position 62 Remote Controller 84 Battery installation 84 Remote Controller mode switch 84 Common operations (AUD mode) 85 DVD/VCD (DVD mode) 86 Music Disc/Audio file/Video file/ Picture file (AUD mode) 87 Radio (AUD mode) 88...
... 53 Controlling Tone-based Services 54 Setting Up the Hands-Free Phone 54 Voice Registration 55 Key Word Voice Registration 56 Phone Number Preset 57 SMS (Short Message Service) 57 Audio Control 59 Audio Control Menu 59 Audio Control 59 Equalizer Control 60 Graphic Equalizer Setup 60 Zone Control 61 Space Enhancer 61 Position 62 Remote Controller 84 Battery installation 84 Remote Controller mode switch 84 Common operations (AUD mode) 85 DVD/VCD (DVD mode) 86 Music Disc/Audio file/Video file/ Picture file (AUD mode) 87 Radio (AUD mode) 88...
Owner's Manual (pdf)
Page 4
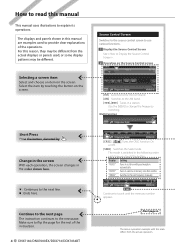
...] Switches the Seek mode. "AUTO2" Tunes in stations in a station with the mark differs from the actual displays or panels used to the next line. ¶ : Ends here. Multi Function Short Press Press the button, denoted by touching the button on the screen. Continue to the next page The instruction continues to change the frequency switching. Selecting a screen item Select and choose an item on the screen. Display Setting "AUTO1" Tunes in memory one...
...] Switches the Seek mode. "AUTO2" Tunes in stations in a station with the mark differs from the actual displays or panels used to the next line. ¶ : Ends here. Multi Function Short Press Press the button, denoted by touching the button on the screen. Continue to the next page The instruction continues to change the frequency switching. Selecting a screen item Select and choose an item on the screen. Display Setting "AUTO1" Tunes in memory one...
Owner's Manual (pdf)
Page 6
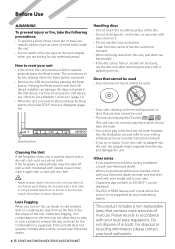
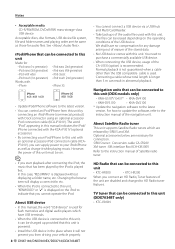
... contact your unit • If the unit or the connected unit fails to remove the USB device, see (page 13). • When the unit is turned on it. • Do not use the disc only after pressing the Reset button, the Initial SETUP screen is pressed. • Remove the USB device before pressing the Reset button. Called lens fogging, this unit is not supported by any extended period. on the disc, or use a disc with...
... contact your unit • If the unit or the connected unit fails to remove the USB device, see (page 13). • When the unit is turned on it. • Do not use the disc only after pressing the Reset button, the Initial SETUP screen is pressed. • Remove the USB device before pressing the Reset button. Called lens fogging, this unit is not supported by any extended period. on the disc, or use a disc with...
Owner's Manual (pdf)
Page 8
... this unit, "KENWOOD" or "✓" is powered. • Install the USB device in the place where it while playing music. In this case, "RESUMING" is longer than the USB compatible cable is played first. Normal playback is not guaranteed when a cable other than 5 m can be connected to this unit must be on. ⁄ • If you start playback after connecting the iPod, the music that you connect an HD Radio, Tuner...
... this unit, "KENWOOD" or "✓" is powered. • Install the USB device in the place where it while playing music. In this case, "RESUMING" is longer than the USB compatible cable is played first. Normal playback is not guaranteed when a cable other than 5 m can be connected to this unit must be on. ⁄ • If you start playback after connecting the iPod, the music that you connect an HD Radio, Tuner...
Owner's Manual (pdf)
Page 19
... text display is in use) English 19 Title ("T"), remaining titles ("R") [PLST] Switches between the original mode and Play list mode. VideoCD Selects a scene (when PBC is On) or a track (when PBC is off ) [PBC] Turns the PBC On or Off. (only when VCD Ver 2.0 is scrolled by touching it the next time. [0] Ejects a disc. [1], [¡] Fast Forwards or Fast Backwards. [4], [¢] DVD-VIDEO...
... text display is in use) English 19 Title ("T"), remaining titles ("R") [PLST] Switches between the original mode and Play list mode. VideoCD Selects a scene (when PBC is On) or a track (when PBC is off ) [PBC] Turns the PBC On or Off. (only when VCD Ver 2.0 is scrolled by touching it the next time. [0] Ejects a disc. [1], [¡] Fast Forwards or Fast Backwards. [4], [¢] DVD-VIDEO...
Owner's Manual (pdf)
Page 22
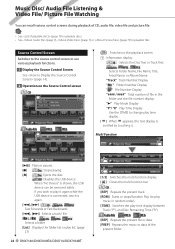
...or stops Random Play (to the playback screen. 1 Information display CD Selects the Disc Text or Track Text. Source Control Screen Switches to the source control screen to use various playback functions. 1 Display the Source Control Screen See (page 14). 2 Operation on the Source Control screen CD 1 AudioFile MPEG JPEG 1 [ ] Switches to play music in the folder and the file number display "3" Play Mode Display "P"/ "R" Play Time Display Use the [TIME] to play time display. [ ] When appears, the text display is shown, the USB device can recall various control screens during playback of...
...or stops Random Play (to the playback screen. 1 Information display CD Selects the Disc Text or Track Text. Source Control Screen Switches to the source control screen to use various playback functions. 1 Display the Source Control Screen See (page 14). 2 Operation on the Source Control screen CD 1 AudioFile MPEG JPEG 1 [ ] Switches to play music in the folder and the file number display "3" Play Mode Display "P"/ "R" Play Time Display Use the [TIME] to play time display. [ ] When appears, the text display is shown, the USB device can recall various control screens during playback of...
Owner's Manual (pdf)
Page 38
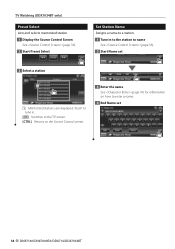
TV Watching (DDX7034BT only) Preset Select Lists and selects memorized station. 1 Display the Source Control Screen See (page 36). 2 Start Preset Select Set Station Name Assigns a name to a station. 1 Tune in . [ ] Switches to the TV screen. [CTRL] Returns to the Source Control screen. 3 Enter the name See (page 47) for information on how to name See (page 36). 2 Start Name set 38 DNX7140/DNX7000EX/DDX714/DDX7034BT Touch to tune in to the station to enter a name. 4 End Name set 3 Select a station 1 1 Memorized stations are displayed.
TV Watching (DDX7034BT only) Preset Select Lists and selects memorized station. 1 Display the Source Control Screen See (page 36). 2 Start Preset Select Set Station Name Assigns a name to a station. 1 Tune in . [ ] Switches to the TV screen. [CTRL] Returns to the Source Control screen. 3 Enter the name See (page 47) for information on how to name See (page 36). 2 Start Name set 38 DNX7140/DNX7000EX/DDX714/DDX7034BT Touch to tune in to the station to enter a name. 4 End Name set 3 Select a station 1 1 Memorized stations are displayed.
Owner's Manual (pdf)
Page 39
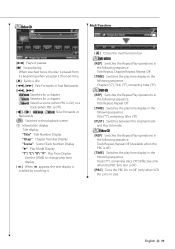
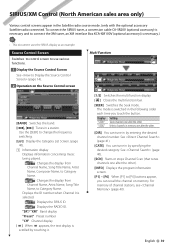
... display "Preset" Preset number "CH" Channel display [ ] When appears, the text display is switched in the following order each time you can recall the channel on the Source Control screen 1 [BAND] Switches the band. [4], [¢] Tunes in the Satellite radio source mode. (only with the optional accessory Satellite radio connected. To connect the SIRIUS tuner, a conversion cable CA-SR20V (optional accessory) is necessary and to change the frequency switching. [List] Display the Category List Screen. (page 40). 1 Information display Displays information concerning music being played...
... display "Preset" Preset number "CH" Channel display [ ] When appears, the text display is switched in the following order each time you can recall the channel on the Source Control screen 1 [BAND] Switches the band. [4], [¢] Tunes in the Satellite radio source mode. (only with the optional accessory Satellite radio connected. To connect the SIRIUS tuner, a conversion cable CA-SR20V (optional accessory) is necessary and to change the frequency switching. [List] Display the Category List Screen. (page 40). 1 Information display Displays information concerning music being played...
Owner's Manual (pdf)
Page 49
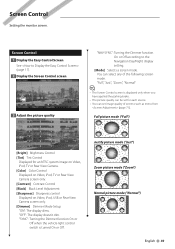
... or Rear View Camera. [Color] Color Control Displayed on Video, iPod, TV or Rear View Camera screen only. [Contrast] Contrast Control [Black] Black Level Adjustment [Sharpness] Sharpness control Displayed on Video, iPod, USB or Rear View Camera screen only. [Dimmer] Dimmer Mode Setup "ON": The display dims. "OFF": The display doesn't dim. "SYNC": Turning the Dimmer function On or Off when the vehicle light control switch is displayed only when you have applied the parking brake. • The picture quality can select any of screens such as menu...
... or Rear View Camera. [Color] Color Control Displayed on Video, iPod, TV or Rear View Camera screen only. [Contrast] Contrast Control [Black] Black Level Adjustment [Sharpness] Sharpness control Displayed on Video, iPod, USB or Rear View Camera screen only. [Dimmer] Dimmer Mode Setup "ON": The display dims. "OFF": The display doesn't dim. "SYNC": Turning the Dimmer function On or Off when the vehicle light control switch is displayed only when you have applied the parking brake. • The picture quality can select any of screens such as menu...
Owner's Manual (pdf)
Page 50
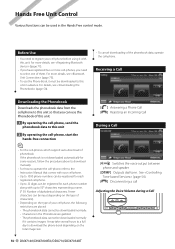
... [ ] Switches the voice output between phone and speaker. [DTMF] Outputs dial tone. Receiving a Call Downloading the Phonebook Downloads the phonebook data from the cell-phone to this unit so that comes with your cell-phone before using it must be used in the Hands Free control mode. Fewer characters can be registered for some reasons, follow the procedure above to download manually. • For how to operate the cell-phone...
... [ ] Switches the voice output between phone and speaker. [DTMF] Outputs dial tone. Receiving a Call Downloading the Phonebook Downloads the phonebook data from the cell-phone to this unit so that comes with your cell-phone before using it must be used in the Hands Free control mode. Fewer characters can be registered for some reasons, follow the procedure above to download manually. • For how to operate the cell-phone...
Owner's Manual (pdf)
Page 51
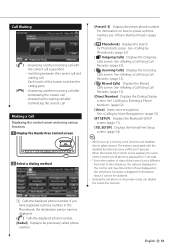
... button switches the calling party. [ ] • Answering another incoming call after terminating the current call • Answering the waiting call after terminating the current call Making a Call Displaying the control screen and using various functions. 1 Display the Hands-Free Control screen TEL 2 Select a dialing method 1 [Preset1-3] Displays the preset phone number. See (page 53). [ Incoming Calls] Displays the Incoming Calls screen. See (page 53). [BT SETUP] Displays the Bluetooth SETUP screen. (page 71) [TEL SETUP] Displays...
... button switches the calling party. [ ] • Answering another incoming call after terminating the current call • Answering the waiting call after terminating the current call Making a Call Displaying the control screen and using various functions. 1 Display the Hands-Free Control screen TEL 2 Select a dialing method 1 [Preset1-3] Displays the preset phone number. See (page 53). [ Incoming Calls] Displays the Incoming Calls screen. See (page 53). [BT SETUP] Displays the Bluetooth SETUP screen. (page 71) [TEL SETUP] Displays...
Owner's Manual (pdf)
Page 63
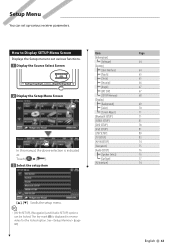
...to Display SETUP Menu Screen Item Page Displays the Setup menu to set various functions. [Information] [Software] 64 1 Display the Source Select Screen [System] [User Interface] 64 [Touch] 65 SRC [Clock] 65 [Security] 66 [Angle] 67 [EXT SW] 67 2 Display the Setup Menu Screen [SETUP Memory] 68 [Display] [Background] 69 [Color] 70 [Screen Adjust] 71 [Bluetooth SETUP] 71 [SIRIUS SETUP] 81 [DVD SETUP] 78 [iPod SETUP] 81 [USB SETUP] 80 [TV SETUP] 83 [AV-IN SETUP] 74 [Navigation] 75 In this manual, the above selection is displayed in reverse video for...
...to Display SETUP Menu Screen Item Page Displays the Setup menu to set various functions. [Information] [Software] 64 1 Display the Source Select Screen [System] [User Interface] 64 [Touch] 65 SRC [Clock] 65 [Security] 66 [Angle] 67 [EXT SW] 67 2 Display the Setup Menu Screen [SETUP Memory] 68 [Display] [Background] 69 [Color] 70 [Screen Adjust] 71 [Bluetooth SETUP] 71 [SIRIUS SETUP] 81 [DVD SETUP] 78 [iPod SETUP] 81 [USB SETUP] 80 [TV SETUP] 83 [AV-IN SETUP] 74 [Navigation] 75 In this manual, the above selection is displayed in reverse video for...
Owner's Manual (pdf)
Page 71
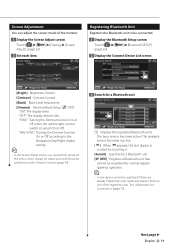
... a Bluetooth unit 1 1 Displays the registered Bluetooth units. See (page 73). "SYNC": Turning the Dimmer function On or Off when the vehicle light control switch is scrolled by normal register (pairing) operation. ⁄ • A new device cannot be connected. 1 Display the Bluetooth Setup screen Touch [ ] > [ (page 63) ] > [Bluetooth SETUP]. 2 Display the Connect Device List screen [Bright] Brightness Control [Contrast] Contrast Control [Black] Black Level Adjustment [Dimmer] Dimmer Mode Setup ( "ON") "ON": The display dims. "OFF": The display doesn't dim. The available service...
... a Bluetooth unit 1 1 Displays the registered Bluetooth units. See (page 73). "SYNC": Turning the Dimmer function On or Off when the vehicle light control switch is scrolled by normal register (pairing) operation. ⁄ • A new device cannot be connected. 1 Display the Bluetooth Setup screen Touch [ ] > [ (page 63) ] > [Bluetooth SETUP]. 2 Display the Connect Device List screen [Bright] Brightness Control [Contrast] Contrast Control [Black] Black Level Adjustment [Dimmer] Dimmer Mode Setup ( "ON") "ON": The display dims. "OFF": The display doesn't dim. The available service...

Owner's Manual (pdf)
Page 73
... Selects the Bluetooth unit to connect. 1 Display the Bluetooth Setup screen Touch [ ] > [ (page 63) ] > [Bluetooth SETUP]. 2 Display the Connect Device List screen 3 Enter PIN code 1 3 Select a registered Bluetooth unit 1 Use the keypad to enter a code number. [Cancel] Cancels registration of PIN code. [Enter] Registers the entered PIN Code. [Clear] Clears the code number. 4 Select the service to use [TEL (HFP)] Connects/disconnects cell-phone to use for Hands Free. [Audio (A2DP)] Connects/disconnects Audio player to use for Bluetooth Audio. [Remove] Deletes registration (pairing...
... Selects the Bluetooth unit to connect. 1 Display the Bluetooth Setup screen Touch [ ] > [ (page 63) ] > [Bluetooth SETUP]. 2 Display the Connect Device List screen 3 Enter PIN code 1 3 Select a registered Bluetooth unit 1 Use the keypad to enter a code number. [Cancel] Cancels registration of PIN code. [Enter] Registers the entered PIN Code. [Clear] Clears the code number. 4 Select the service to use [TEL (HFP)] Connects/disconnects cell-phone to use for Hands Free. [Audio (A2DP)] Connects/disconnects Audio player to use for Bluetooth Audio. [Remove] Deletes registration (pairing...
Owner's Manual (pdf)
Page 76
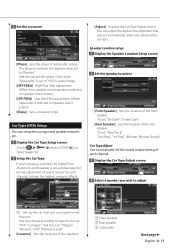
... to get the best sound effects. 1 Display the Speaker Select screen Touch Audio SETUP] > [Speaker Select]. (page 63) 2 Select a speaker you wish to adjust When the speaker type and size are set, the speaker crossover network and equalizer curve are set automatically. 1 2 3 1 Front speaker 2 Rear speaker 3 Subwoofer [Tweeter] You can set automatically when you are using a tweeter together with the 76 DNX7140/DNX7000EX/DDX714/DDX7034BT You can set a crossover frequency of speakers. 1 Select the speaker to set the tweeter to...
... to get the best sound effects. 1 Display the Speaker Select screen Touch Audio SETUP] > [Speaker Select]. (page 63) 2 Select a speaker you wish to adjust When the speaker type and size are set, the speaker crossover network and equalizer curve are set automatically. 1 2 3 1 Front speaker 2 Rear speaker 3 Subwoofer [Tweeter] You can set automatically when you are using a tweeter together with the 76 DNX7140/DNX7000EX/DDX714/DDX7034BT You can set a crossover frequency of speakers. 1 Select the speaker to set the tweeter to...
Owner's Manual (pdf)
Page 77
... is selected on Speaker Select screen) [Slope] Sets a crossover slope. Sets the sub woofer phase. (Only when "Subwoofer" is selected on Speaker Select screen) [LPF FREQ] Low Pass Filter adjustment. (When Subwoofer is set the sound output timing of each channel) to have the highest surround effects. 1 2 Set the speaker locations [Front Speaker] Sets the location of the front speaker. Speaker Location setup 1 Display the Speaker Location Setup screen [Phase] Sets the phase of the speakers. 1 2 3 1 Front speaker 2 Rear speaker 3 Subwoofer Next page 3 English 77 "Door", "Rear Deck...
... is selected on Speaker Select screen) [Slope] Sets a crossover slope. Sets the sub woofer phase. (Only when "Subwoofer" is selected on Speaker Select screen) [LPF FREQ] Low Pass Filter adjustment. (When Subwoofer is set the sound output timing of each channel) to have the highest surround effects. 1 2 Set the speaker locations [Front Speaker] Sets the location of the front speaker. Speaker Location setup 1 Display the Speaker Location Setup screen [Phase] Sets the phase of the speakers. 1 2 3 1 Front speaker 2 Rear speaker 3 Subwoofer Next page 3 English 77 "Door", "Rear Deck...
Owner's Manual (pdf)
Page 79
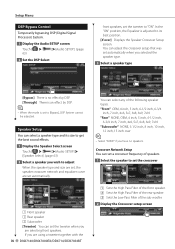
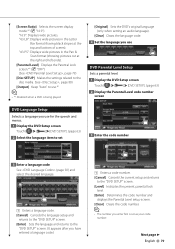
...) [Disc SETUP] Makes the settings related to the disc media. (See , page 80) [Output] Keep "Auto" to use.*1 ⁄ • * Disabled when a DVD is being played. [Original] Sets the DVD's original language (only when setting an audio language). [Clear] Clears the language code. 4 Set the language you use DVD Parental Level Setup Sets a parental level. 1 Display the DVD Setup screen Touch DVD SETUP]. (page 63) 2 Display the Parental Level code number screen DVD Language Setup Selects a language you use for the speech and menus. 1 Display the DVD Setup screen Touch DVD SETUP...
...) [Disc SETUP] Makes the settings related to the disc media. (See , page 80) [Output] Keep "Auto" to use.*1 ⁄ • * Disabled when a DVD is being played. [Original] Sets the DVD's original language (only when setting an audio language). [Clear] Clears the language code. 4 Set the language you use DVD Parental Level Setup Sets a parental level. 1 Display the DVD Setup screen Touch DVD SETUP]. (page 63) 2 Display the Parental Level code number screen DVD Language Setup Selects a language you use for the speech and menus. 1 Display the DVD Setup screen Touch DVD SETUP...
Owner's Manual (pdf)
Page 90
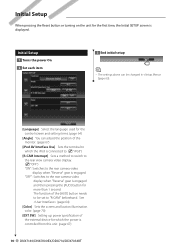
... changed in (page 63). [Language] Select the language used for which the iPod is connected to. ( "iPod") [R-CAM Interrupt] Sets a method to switch to the rear view camera video display. ( "OFF") "ON": Switches to "R-CAM" beforehand. Initial Setup When pressing the Reset button or turning on the unit for more than 1 second. "OFF": Switches to which the power is controlled from this unit. (page 67) 90 DNX7140/DNX7000EX/DDX714/DDX7034BT The function of the monitor...
... changed in (page 63). [Language] Select the language used for which the iPod is connected to. ( "iPod") [R-CAM Interrupt] Sets a method to switch to the rear view camera video display. ( "OFF") "ON": Switches to "R-CAM" beforehand. Initial Setup When pressing the Reset button or turning on the unit for more than 1 second. "OFF": Switches to which the power is controlled from this unit. (page 67) 90 DNX7140/DNX7000EX/DDX714/DDX7034BT The function of the monitor...
Owner's Manual (pdf)
Page 93
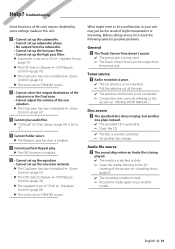
...) ! English 93 Troubleshooting Some functions of this unit. ! • Cannot set up the subwoofer. • Cannot set up subwoofer phase. • No output from the preout jack. Radio reception is poor. ✔ The car antenna is not extended. ☞ Pull the antenna out all the way. ✔ The antenna control wire is not connected. ☞ Connect the wire correctly, referring to the CD cleaning of the rear speakers. ▲ The...
...) ! English 93 Troubleshooting Some functions of this unit. ! • Cannot set up the subwoofer. • Cannot set up subwoofer phase. • No output from the preout jack. Radio reception is poor. ✔ The car antenna is not extended. ☞ Pull the antenna out all the way. ✔ The antenna control wire is not connected. ☞ Connect the wire correctly, referring to the CD cleaning of the rear speakers. ▲ The...


