
User Manual
Page 2
... TV/ Video Control 36 Displaying the TV Picture screen Displaying the Easy Control Panel Displaying the TV Control screen Displaying the TV Menu screen Seek Mode Auto Memory Manual Memory Preset Select Set Station Name DAB Tuner control 40 Displaying the Easy Control Panel Displaying the DAB Tuner Control screen Displaying the DAB Tuner Menu screen Seek Mode Auto Ensemble Memory Service Preset Memory Service Select Language Filter Search for Program Type DAB Information DAB Announcement Character Entry 46 How To Use the Character Entry screen Source Select 47 Displaying the Control screen...
... TV/ Video Control 36 Displaying the TV Picture screen Displaying the Easy Control Panel Displaying the TV Control screen Displaying the TV Menu screen Seek Mode Auto Memory Manual Memory Preset Select Set Station Name DAB Tuner control 40 Displaying the Easy Control Panel Displaying the DAB Tuner Control screen Displaying the DAB Tuner Menu screen Seek Mode Auto Ensemble Memory Service Preset Memory Service Select Language Filter Search for Program Type DAB Information DAB Announcement Character Entry 46 How To Use the Character Entry screen Source Select 47 Displaying the Control screen...
User Manual
Page 3
... the User I/F 2 screen Touch Panel Adjustment Clock Security Code Setup Set Up Memory TV Setup 65 Displaying the TV1 Area Set screen Displaying the TV2 Area Set screen RDS Setup 66 Displaying the RDS Set Up 1 screen Displaying the RDS Set Up 2 screen AMP Control 67 Displaying the AMP Control screen DAB Set Up 68 Displaying the DAB Set Up screen Announcement Selection Sound Effects Menu 70 Sound Effects Menu 70 Displaying the Control screen Displaying the Sound Effects Menu screen Audio Control 71 Displaying the Audio Control 1 screen Displaying the Audio Control 2 screen Equalizer 72...
... the User I/F 2 screen Touch Panel Adjustment Clock Security Code Setup Set Up Memory TV Setup 65 Displaying the TV1 Area Set screen Displaying the TV2 Area Set screen RDS Setup 66 Displaying the RDS Set Up 1 screen Displaying the RDS Set Up 2 screen AMP Control 67 Displaying the AMP Control screen DAB Set Up 68 Displaying the DAB Set Up screen Announcement Selection Sound Effects Menu 70 Sound Effects Menu 70 Displaying the Control screen Displaying the Sound Effects Menu screen Audio Control 71 Displaying the Audio Control 1 screen Displaying the Audio Control 2 screen Equalizer 72...
User Manual
Page 4
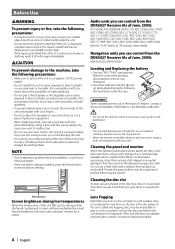
... Reset button to restore factory settings. Cleaning the disc slot As dust can control from the DDX6027 Receiver (As of precision equipment. • When replacing a fuse, only use a hard cloth and a volatile chemical (such as illustrated. 2. Before Use 2WARNING To prevent injury or fire, take the following precautions: • Make sure to ground the unit to a negative 12V DC power supply. • Do not install the unit...
... Reset button to restore factory settings. Cleaning the disc slot As dust can control from the DDX6027 Receiver (As of precision equipment. • When replacing a fuse, only use a hard cloth and a volatile chemical (such as illustrated. 2. Before Use 2WARNING To prevent injury or fire, take the following precautions: • Make sure to ground the unit to a negative 12V DC power supply. • Do not install the unit...
User Manual
Page 6
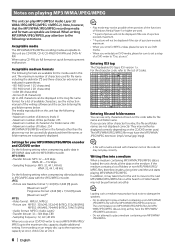
... following setting when compressing video/audio data in the formats other character for entry, the file and folder names are used. • *1 A part of picture will not be displayed if the size of a picture exceeds maximum. • *2 A picture will not be displayed if the size of a DVD writer to "Disc at Once. • Play mode may neither be sure to set a setup of...
... following setting when compressing video/audio data in the formats other character for entry, the file and folder names are used. • *1 A part of picture will not be displayed if the size of a picture exceeds maximum. • *2 A picture will not be displayed if the size of a DVD writer to "Disc at Once. • Play mode may neither be sure to set a setup of...
User Manual
Page 9
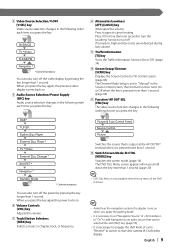
... it is set "Navigation Source" of car to "Reverse" to switch to turn off . w Switch Screen Mode/ M.CTRL [MODE] key Switches the screen mode. (page 14) The DVD Disc Menu screen appears when you hold down the key more than one second to rear view camera (R-CAM) video display. English | 9 4 Video Source Selection/ V.OFF [V.SEL] key Video source selection changes in the following order each time you press the key. Press it again to "Manual" in the Screen Control screen, the Dimmer function turns On...
... it is set "Navigation Source" of car to "Reverse" to switch to turn off . w Switch Screen Mode/ M.CTRL [MODE] key Switches the screen mode. (page 14) The DVD Disc Menu screen appears when you hold down the key more than one second to rear view camera (R-CAM) video display. English | 9 4 Video Source Selection/ V.OFF [V.SEL] key Video source selection changes in the following order each time you press the key. Press it again to "Manual" in the Screen Control screen, the Dimmer function turns On...

User Manual
Page 10
... - MODE PBC ROUTEM VIEW SC1 MENU ZOOM 5 [V.SEL] key Video source selection changes in the following remote control modes. When you press the key, the volume attenuates. NAV Zooms in DVD/VCD/CD/MP3/WMA/JPEG/MPEG player source AUD: Tuner source or attached disc changer source 2 [NAV] switch Pressing the switch until it locks enters into the navigation system control mode. Pressing the switch again returns to the AV control mode. 3 [SRC] key Audio source changes each time you...
... - MODE PBC ROUTEM VIEW SC1 MENU ZOOM 5 [V.SEL] key Video source selection changes in the following remote control modes. When you press the key, the volume attenuates. NAV Zooms in DVD/VCD/CD/MP3/WMA/JPEG/MPEG player source AUD: Tuner source or attached disc changer source 2 [NAV] switch Pressing the switch until it locks enters into the navigation system control mode. Pressing the switch again returns to the AV control mode. 3 [SRC] key Audio source changes each time you...

User Manual
Page 25
... down. H Disc Number Display (Function of Disc Changer) J Track Number Display K Play Time Display L Function Indicator • The functions that can be displayed will differ depending on the models being connected. • The information shown will be different depending on the Disc Changer being used and the information that plays the beginning of each song one after the other). CD/MP3/WMA/JPEG/MPEG/Disc Changer Play Control Disc changer/CD player Control screen CD-CH Menu 45 Disc + 44 46...
... down. H Disc Number Display (Function of Disc Changer) J Track Number Display K Play Time Display L Function Indicator • The functions that can be displayed will differ depending on the models being connected. • The information shown will be different depending on the Disc Changer being used and the information that plays the beginning of each song one after the other). CD/MP3/WMA/JPEG/MPEG/Disc Changer Play Control Disc changer/CD player Control screen CD-CH Menu 45 Disc + 44 46...

User Manual
Page 36
... Display (page 65) 3 Memory Number Display 4 Channel Number Display 5 Channel Up Area Increase the channel. 6 Channel Down Area Decrease the channel. 7 Band/Video Switch Area Switches to TV1, TV2, or VIDEO. 8 Information Display Button Area • For TV picture selection and receiver key operations, see (page 8). • The information display is updated (page 60). p Switches to TV1 or TV2). Displaying the Easy Control Panel TV1 Preset 1 2ch MODE:FULL AV-OUT:DVD 9 Switches the source. TV/ Video Control Various control screens appear in the TV/ Video Source mode...
... Display (page 65) 3 Memory Number Display 4 Channel Number Display 5 Channel Up Area Increase the channel. 6 Channel Down Area Decrease the channel. 7 Band/Video Switch Area Switches to TV1, TV2, or VIDEO. 8 Information Display Button Area • For TV picture selection and receiver key operations, see (page 8). • The information display is updated (page 60). p Switches to TV1 or TV2). Displaying the Easy Control Panel TV1 Preset 1 2ch MODE:FULL AV-OUT:DVD 9 Switches the source. TV/ Video Control Various control screens appear in the TV/ Video Source mode...
User Manual
Page 42
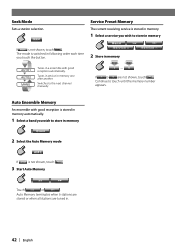
... the button. Auto Memory terminates when 6 stations are stored or when all stations are not shown, touch Next Continue to store in memory Band 2 Select the Auto Memory mode AME If AME is stored in . 42 | English SEEK If SEEK is stored in memory. 1 Select a service you wish to store in memory Band Service + Service - 2 Store in memory 2sec. 2sec. 1 - 6 If 1 to the next channel manually. Seek Mode Sets a station selection. Service Preset Memory The current receiving service...
... the button. Auto Memory terminates when 6 stations are stored or when all stations are not shown, touch Next Continue to store in memory Band 2 Select the Auto Memory mode AME If AME is stored in . 42 | English SEEK If SEEK is stored in memory. 1 Select a service you wish to store in memory Band Service + Service - 2 Store in memory 2sec. 2sec. 1 - 6 If 1 to the next channel manually. Seek Mode Sets a station selection. Service Preset Memory The current receiving service...
User Manual
Page 55
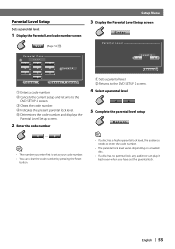
... to the DVD SETUP 2 screen. 3 Clears the code number. 4 Indicates the present parental lock level. 5 Determines the code number and displays the Parental Level Setup screen. 2 Enter the code number Setup Menu 3 Display the Parental Level Setup screen Enter Parental Level Level 5 1 1 Return 2 1 Sets a parental level. 2 Returns to the DVD SETUP 2 screen. 4 Select a parental level 5 Complete the parental level setup Return 0 -9 • The number you enter first is set as your code number. • You can clear the code number by pressing the Reset button. • If a disc has a higher...
... to the DVD SETUP 2 screen. 3 Clears the code number. 4 Indicates the present parental lock level. 5 Determines the code number and displays the Parental Level Setup screen. 2 Enter the code number Setup Menu 3 Display the Parental Level Setup screen Enter Parental Level Level 5 1 1 Return 2 1 Sets a parental level. 2 Returns to the DVD SETUP 2 screen. 4 Select a parental level 5 Complete the parental level setup Return 0 -9 • The number you enter first is set as your code number. • You can clear the code number by pressing the Reset button. • If a disc has a higher...
User Manual
Page 62
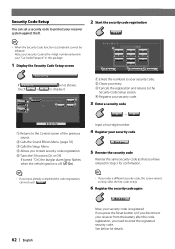
... Code Setup screen. 4 Registers your receiver from the battery after the code registration, you to start security code registration. 5 Turns the SI function On or Off. Before Use Security Code Setup You can set a security code to protect your security code is registered. Note, your Security Code is the 4 digit number entered in your "Car Audio Passport" in this package. 1 Display the Security Code Setup screen Security If Security touch or is off. ( On) Input...
... Code Setup screen. 4 Registers your receiver from the battery after the code registration, you to start security code registration. 5 Turns the SI function On or Off. Before Use Security Code Setup You can set a security code to protect your security code is registered. Note, your Security Code is the 4 digit number entered in your "Car Audio Passport" in this package. 1 Display the Security Code Setup screen Security If Security touch or is off. ( On) Input...

User Manual
Page 65
... Before Use Setup Menu TV Setup The TV signal receiving areas can be set. (with the optional accessory TV Tuner connected only) Displaying the TV1 Area Set screen TV Set Up TV1 Area Set screen 3 Me nu 2 Austria Belgium Denmark Finland Germany Iceland 1 Netherland Norway Po r t u g a l Spain Sweden S w i t z e r l a n d Yo u g o s l a v i a 4 1 2 3 4 5 6 TV1 Area Set 5 1 Returns to the Control screen of the previous source. 2 Calls the Sound Effects Menu. (page 70) 3 Calls the Setup Menu. 4 Sets...
... Before Use Setup Menu TV Setup The TV signal receiving areas can be set. (with the optional accessory TV Tuner connected only) Displaying the TV1 Area Set screen TV Set Up TV1 Area Set screen 3 Me nu 2 Austria Belgium Denmark Finland Germany Iceland 1 Netherland Norway Po r t u g a l Spain Sweden S w i t z e r l a n d Yo u g o s l a v i a 4 1 2 3 4 5 6 TV1 Area Set 5 1 Returns to the Control screen of the previous source. 2 Calls the Sound Effects Menu. (page 70) 3 Calls the Setup Menu. 4 Sets...
User Manual
Page 67
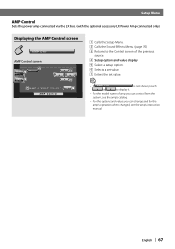
... Setup Menu AMP Control Sets the power amp connected via the LX bus. (with the optional accessory LX Power Amp connected only) Displaying the AMP Control screen AMP Ctrl AMP Control screen 1 Me nu 2 6 3 5 6 5 4 A M P 1 VO LT 1 4 . 4 V AMP Control Set 7 1 Calls the Setup Menu. 2 Calls the Sound Effects Menu. (page 70) 3 Returns to the Control screen of the previous source. 4 Setup option and value display 5 Select a setup option. 6 Selects a set value. 7 Enters the set value. • If AMP Ctrl or is not shown, touch to display it. • For the model...
... Setup Menu AMP Control Sets the power amp connected via the LX bus. (with the optional accessory LX Power Amp connected only) Displaying the AMP Control screen AMP Ctrl AMP Control screen 1 Me nu 2 6 3 5 6 5 4 A M P 1 VO LT 1 4 . 4 V AMP Control Set 7 1 Calls the Setup Menu. 2 Calls the Sound Effects Menu. (page 70) 3 Returns to the Control screen of the previous source. 4 Setup option and value display 5 Select a setup option. 6 Selects a set value. 7 Enters the set value. • If AMP Ctrl or is not shown, touch to display it. • For the model...
User Manual
Page 71
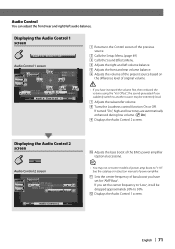
...the Audio Control 1 screen Audio Control 1 screen 5 3 2 4 4 1 5 7 7 6 -1 68 9 1 Returns to "+18". See the catalog or instruction manual of power amplifier. English | 71 If turned "On", high and low tones are automatically enhanced during low volume. ( On) 9 Displays the Audio Control 2 screen. If you set some models of power amp boost to the Control screen of the previous source. 2 Calls the Setup Menu. (page 49) 3 Calls the Sound Effects Menu. 4 Adjusts the right and left audio balance. Displaying the Audio Control 2 screen Audio Control 2 screen Me nu BMS AMP Bass...
...the Audio Control 1 screen Audio Control 1 screen 5 3 2 4 4 1 5 7 7 6 -1 68 9 1 Returns to "+18". See the catalog or instruction manual of power amplifier. English | 71 If turned "On", high and low tones are automatically enhanced during low volume. ( On) 9 Displays the Audio Control 2 screen. If you set some models of power amp boost to the Control screen of the previous source. 2 Calls the Setup Menu. (page 49) 3 Calls the Sound Effects Menu. 4 Adjusts the right and left audio balance. Displaying the Audio Control 2 screen Audio Control 2 screen Me nu BMS AMP Bass...

User Manual
Page 74
... sound source. 6 Switches the front and rear audio sources. (This button appears when the Zone function is On.) Use "Reverse" to "Reverse", the audio source that sets different source sounds for front and rear speakers) On or Off. However, if you have set the front and rear audio source. Zone Control You can set the "Area" to change over the front and rear audio sources. 7 Adjusts the volume of the previous source. 2 Calls the Setup Menu. (page 49) 3 Calls the Sound Effects Menu. 4 Turns...
... sound source. 6 Switches the front and rear audio sources. (This button appears when the Zone function is On.) Use "Reverse" to "Reverse", the audio source that sets different source sounds for front and rear speakers) On or Off. However, if you have set the front and rear audio source. Zone Control You can set the "Area" to change over the front and rear audio sources. 7 Adjusts the volume of the previous source. 2 Calls the Setup Menu. (page 49) 3 Calls the Sound Effects Menu. 4 Turns...
User Manual
Page 76
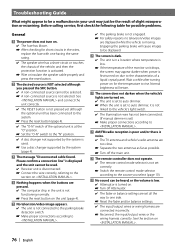
... of the monitor unit drops, the screen may just be displayed. ? The remote controller does not operate. ✔ The remote control mode selector is not connected to the vehicle's light switch. ✔ The illumination wire has not been connected. (If manual dimmer is moving. Turn off the main unit. ? Reset the fader and/or balance settings. ✔ The input/output wires or wiring harness are set correctly. Press the reset button on . 76 | English Before calling service, first check the...
... of the monitor unit drops, the screen may just be displayed. ? The remote controller does not operate. ✔ The remote control mode selector is not connected to the vehicle's light switch. ✔ The illumination wire has not been connected. (If manual dimmer is moving. Turn off the main unit. ? Reset the fader and/or balance settings. ✔ The input/output wires or wiring harness are set correctly. Press the reset button on . 76 | English Before calling service, first check the...

User Manual
Page 78
... vehicle ACC switch was turned OFF. The MP3/WMA track time is turned off random play or magazine random play , but no sound can only be heard. ✔ The computer chip in conformity with the ID3 tag version 1.x. Connect the wire to the disc changer input terminal on until the setting to the MP3/WMA recording conditions. ? Turn off or the source changed. ? The sound skips when...
... vehicle ACC switch was turned OFF. The MP3/WMA track time is turned off random play or magazine random play , but no sound can only be heard. ✔ The computer chip in conformity with the ID3 tag version 1.x. Connect the wire to the disc changer input terminal on until the setting to the MP3/WMA recording conditions. ? Turn off or the source changed. ? The sound skips when...

User Manual 1
Page 3
... connect the + connector of the battery. 2.Make the proper input and output wire connections for each unit. 3.Connect the wire on the wiring harness. 4.Take Connector B on the wiring harness and connect it to the external power connector on and off with battery wires, the battery may have an ACC position, connect the ignition wires to both the rear output terminals (do not connect the connector to the unit. 7.Install the unit in the car. • When only two speakers are working properly. • Mount...
... connect the + connector of the battery. 2.Make the proper input and output wire connections for each unit. 3.Connect the wire on the wiring harness. 4.Take Connector B on the wiring harness and connect it to the external power connector on and off with battery wires, the battery may have an ACC position, connect the ignition wires to both the rear output terminals (do not connect the connector to the unit. 7.Install the unit in the car. • When only two speakers are working properly. • Mount...

User Manual 1
Page 4
...) ILLUMI (Red) Connector A 8642 7531 8642 7531 Connector B Battery wire (Yellow) Dimmer control wire (Orange/White) Ignition wire (Red) 4 | English Connection If you connect the ignition wire (red) and the battery wire (yellow) to connect the parking sensor. Always connect those wires to the vehicle's parking brake detection switch harness using the supplied relay connector. TV tuner (Optional) TV ANTENNA INPUT TO MONITOR UNIT Disc Changer etc.(Optional) Antenna Cord Accessory 4 FM/AM antenna input Connection cable (Included in turn may start a fire...
...) ILLUMI (Red) Connector A 8642 7531 8642 7531 Connector B Battery wire (Yellow) Dimmer control wire (Orange/White) Ignition wire (Red) 4 | English Connection If you connect the ignition wire (red) and the battery wire (yellow) to connect the parking sensor. Always connect those wires to the vehicle's parking brake detection switch harness using the supplied relay connector. TV tuner (Optional) TV ANTENNA INPUT TO MONITOR UNIT Disc Changer etc.(Optional) Antenna Cord Accessory 4 FM/AM antenna input Connection cable (Included in turn may start a fire...

User Manual 1
Page 6
... 1 below to install this unit to the Volkswagen vehicles etc. 1 (Default setting) The A-7 pin (red) of the vehicle's ISO connector is linked with the ignition key Connector Function Guide Pin Numbers for ISO Connectors External Power Connector A-4 A-5 A-6 A-7 A-8 Speaker Connector B-1 B-2 B-3 B-4 B-5 B-6 B-7 B-8 6 | English Cable Colour Yellow Blue/White Orange/White Red Black Purple Purple/Black Gray Gray/Black White White/Black Green Green/Black Functions Battery Power Control Dimmer Ignition (ACC) Earth (Ground) Connection Rear Right (+) Rear Right...
... 1 below to install this unit to the Volkswagen vehicles etc. 1 (Default setting) The A-7 pin (red) of the vehicle's ISO connector is linked with the ignition key Connector Function Guide Pin Numbers for ISO Connectors External Power Connector A-4 A-5 A-6 A-7 A-8 Speaker Connector B-1 B-2 B-3 B-4 B-5 B-6 B-7 B-8 6 | English Cable Colour Yellow Blue/White Orange/White Red Black Purple Purple/Black Gray Gray/Black White White/Black Green Green/Black Functions Battery Power Control Dimmer Ignition (ACC) Earth (Ground) Connection Rear Right (+) Rear Right...


