

User Manual
Page 3
...66 Background Select 67 Touch Panel Adjustment 67 Clock Setup 68 Monitor Setup 68 Security Code Setup 70 iPod Setup 71 TV Setup 72 RDS Setup 72 Bluetooth Setup 73 Registering Bluetooth Unit 73 Registering Bluetooth Unit PIN Code 74 Registering Special Bluetooth Unit 75 Bluetooth Unit Connection 75 Deleting Bluetooth Unit 76 Software Information 76 Setup Memory 77 Audio Control 78 Audio Control Menu 78 Audio Control 78 Equalizer Control 79 Tone Setup 80 Zone Control 80 Remote Controller 82 Battery installation 82 Remote Controller mode switch 82...
...66 Background Select 67 Touch Panel Adjustment 67 Clock Setup 68 Monitor Setup 68 Security Code Setup 70 iPod Setup 71 TV Setup 72 RDS Setup 72 Bluetooth Setup 73 Registering Bluetooth Unit 73 Registering Bluetooth Unit PIN Code 74 Registering Special Bluetooth Unit 75 Bluetooth Unit Connection 75 Deleting Bluetooth Unit 76 Software Information 76 Setup Memory 77 Audio Control 78 Audio Control Menu 78 Audio Control 78 Equalizer Control 79 Tone Setup 80 Zone Control 80 Remote Controller 82 Battery installation 82 Remote Controller mode switch 82...
User Manual
Page 6
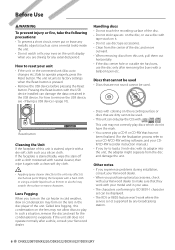
Pressing the Reset button with a clean soft dry cloth. ¤ • Applying spray cleaner directly to play the CDs with . Lens Fogging When you turn on the car heater in the USB device. In such a situation, remove the disc and wait for any broadcasting station. 6 DNX5220BT/DNX5220/DDX5022/DDX5022Y/DDX52RY This unit may not allow discs to the unit may affect its adapter into the unit, the adapter might...
Pressing the Reset button with a clean soft dry cloth. ¤ • Applying spray cleaner directly to play the CDs with . Lens Fogging When you turn on the car heater in the USB device. In such a situation, remove the disc and wait for any broadcasting station. 6 DNX5220BT/DNX5220/DDX5022/DDX5022Y/DDX52RY This unit may not allow discs to the unit may affect its adapter into the unit, the adapter might...

User Manual
Page 7
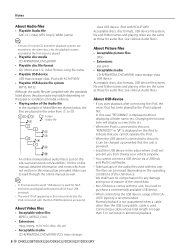
.../DDX5022/DDX5022Y/DDX52RY only) • KCA-BT200 TV tuner that can be connected to this unit, the surface of this unit must be connected to this unit with 8-cm (3 ‡ inch) discs DVD-R DL (Dual layer) DVD+R DL (Double layer) ‡ ‡ Only video format DVD-RAM × CD Music CD ‡ CD-TEXT/8-cm (3 inch) discs supported. The latest iPod software updater can be played. However, the power...
.../DDX5022/DDX5022Y/DDX52RY only) • KCA-BT200 TV tuner that can be connected to this unit, the surface of this unit must be connected to this unit with 8-cm (3 ‡ inch) discs DVD-R DL (Dual layer) DVD+R DL (Double layer) ‡ ‡ Only video format DVD-RAM × CD Music CD ‡ CD-TEXT/8-cm (3 inch) discs supported. The latest iPod software updater can be played. However, the power...
User Manual
Page 8
...; • If music of normal CD and other playback systems are recorded in the same disc, only the playback system recorded at the first setout is played. • Playable disc media CD-R/RW/ROM, DVD±R/RW • Playable disc file format ISO 9660 Level 1/2, Joliet, Romeo, Long file name. • Playable USB device USB mass storage class, iPod with KCA...
...; • If music of normal CD and other playback systems are recorded in the same disc, only the playback system recorded at the first setout is played. • Playable disc media CD-R/RW/ROM, DVD±R/RW • Playable disc file format ISO 9660 Level 1/2, Joliet, Romeo, Long file name. • Playable USB device USB mass storage class, iPod with KCA...

User Manual
Page 10
...; Removing the USB device before entering the USB suspend mode may result in damaging the data in the USB device is changed. • Make sure that the USB device is connected firmly. Playing a USB device When connecting a USB device, playback starts automatically. ⁄ • If the USB source is selected when a USB device is not connected, "No Device" is displayed. • When the playback is turned off. Basic Operations A SI indicator B C D E C Turns power ON/OFF Press the button to adjust the volume. Removing the USB device...
...; Removing the USB device before entering the USB suspend mode may result in damaging the data in the USB device is changed. • Make sure that the USB device is connected firmly. Playing a USB device When connecting a USB device, playback starts automatically. ⁄ • If the USB source is selected when a USB device is not connected, "No Device" is displayed. • When the playback is turned off. Basic Operations A SI indicator B C D E C Turns power ON/OFF Press the button to adjust the volume. Removing the USB device...

User Manual
Page 11
...Favorite Source Select screen and Full Source Select screen by touching the button. 4 Displays Source Control screen. 5 Displays the Audio Control Menu screen. (page 78) 6 Displays the Setup Menu screen. (page 56) 7 Clock display 8 Turns the traffic information function On or Off. (page 29) 9 ⁄ • DNX5220/DDX5022/DDX5022Y/DDX52RY only: If a Bluetooth Unit is not connected, [TEL] will not appear. 9 Displays the Full Source Select screen. ⁄ • For how to register the frequently used source buttons to select the source. If a menu appears, when playing a video disc, select...
...Favorite Source Select screen and Full Source Select screen by touching the button. 4 Displays Source Control screen. 5 Displays the Audio Control Menu screen. (page 78) 6 Displays the Setup Menu screen. (page 56) 7 Clock display 8 Turns the traffic information function On or Off. (page 29) 9 ⁄ • DNX5220/DDX5022/DDX5022Y/DDX52RY only: If a Bluetooth Unit is not connected, [TEL] will not appear. 9 Displays the Full Source Select screen. ⁄ • For how to register the frequently used source buttons to select the source. If a menu appears, when playing a video disc, select...

User Manual
Page 12
... Hands Free control Press it for more than 1 second to turn the display off. Press [NAV], [SRC] or [FNC] button, or touch the screen to rear view function. See (page 60) for the function setting of the [NAV] button can be changed to resume the normal display. ⁄ • Functions of the [NAV] button. 12 DNX5220BT/DNX5220/DDX5022/DDX5022Y/DDX52RY Press it again for connecting an external player. Use of...
... Hands Free control Press it for more than 1 second to turn the display off. Press [NAV], [SRC] or [FNC] button, or touch the screen to rear view function. See (page 60) for the function setting of the [NAV] button can be changed to resume the normal display. ⁄ • Functions of the [NAV] button. 12 DNX5220BT/DNX5220/DDX5022/DDX5022Y/DDX52RY Press it again for connecting an external player. Use of...
User Manual
Page 26
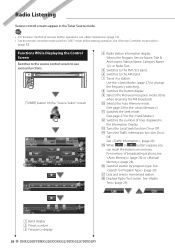
.... 6 Switches to change the frequency switching. 8 Switches the button display. 9 Selects the Monaural reception mode. (Only when receiving the FM broadcast) p Selects the Auto Memory mode. (See page 28 for the ) q Switches the Seek mode. (See page 27 for the ) w Switches the number of lines displayed in the Information Display. Radio Listening Various control screens appear in the Tuner Source mode. • For the basic method of receiver button operations, see (page 10). • Set the remote controller mode switch to "AUD" mode before starting operation...
.... 6 Switches to change the frequency switching. 8 Switches the button display. 9 Selects the Monaural reception mode. (Only when receiving the FM broadcast) p Selects the Auto Memory mode. (See page 28 for the ) q Switches the Seek mode. (See page 27 for the ) w Switches the number of lines displayed in the Information Display. Radio Listening Various control screens appear in the Tuner Source mode. • For the basic method of receiver button operations, see (page 10). • Set the remote controller mode switch to "AUD" mode before starting operation...
User Manual
Page 38
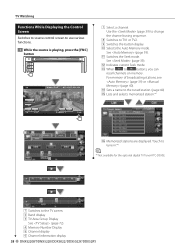
O U T: AV - p Selects the Auto Memory mode. See (page 39). r Sets a name to TV1 or TV2. 9 Switches the button display. I N SCRN TI TV TV1 BAND SEEK Preset 1 2ch 7 Select a channel. Use the (page 39) to change the channel tuning sequence. 8 Switches to the tuned station. (page 40) t Lists and selects memorized station.*1 16 1 2 3 4 8 7 9 10 11 12 5 6 7 y Memorized stations are displayed. Touch to tune in.*1 ⁄ *1 Not available for the optional digital TV Tuner KTC-D500E. 13...
O U T: AV - p Selects the Auto Memory mode. See (page 39). r Sets a name to TV1 or TV2. 9 Switches the button display. I N SCRN TI TV TV1 BAND SEEK Preset 1 2ch 7 Select a channel. Use the (page 39) to change the channel tuning sequence. 8 Switches to the tuned station. (page 40) t Lists and selects memorized station.*1 16 1 2 3 4 8 7 9 10 11 12 5 6 7 y Memorized stations are displayed. Touch to tune in.*1 ⁄ *1 Not available for the optional digital TV Tuner KTC-D500E. 13...

User Manual
Page 46
... is displayed. 3 Calls the displayed preset phone number. 4 Displays the SMS Select screen. If you have registered a phone number in the private mode can use the handsfree phone. 1 Respond to preset a phone number, see (page 54). 9 Displays the Hands-Free Set Up screen. See (page 50). 7 Displays the Incoming Calls screen. See (page 50). 8 Calls the preset phone number. q Starts voice recognition. See (page 48). 46 DNX5220BT/DNX5220/DDX5022/DDX5022Y/DDX52RY The buttons associated with the disabled functions...
... is displayed. 3 Calls the displayed preset phone number. 4 Displays the SMS Select screen. If you have registered a phone number in the private mode can use the handsfree phone. 1 Respond to preset a phone number, see (page 54). 9 Displays the Hands-Free Set Up screen. See (page 50). 7 Displays the Incoming Calls screen. See (page 50). 8 Calls the preset phone number. q Starts voice recognition. See (page 48). 46 DNX5220BT/DNX5220/DDX5022/DDX5022Y/DDX52RY The buttons associated with the disabled functions...

User Manual
Page 57
... total sound volume becomes larger as compared with "Wide" and "Normal", allowing you are using a Dolby Digital software. Crossover Network Setup You can set up the DVD play stop mode. in Audio Setup and "LPF SUB FREQ" is effective only when you to listen to the movie's dialog more clearly. When front speaker or rear speaker is selected in step 1: High Pass Filter adjustment When Subwoofer is selected...
... total sound volume becomes larger as compared with "Wide" and "Normal", allowing you are using a Dolby Digital software. Crossover Network Setup You can set up the DVD play stop mode. in Audio Setup and "LPF SUB FREQ" is effective only when you to listen to the movie's dialog more clearly. When front speaker or rear speaker is selected in step 1: High Pass Filter adjustment When Subwoofer is selected...
User Manual
Page 59
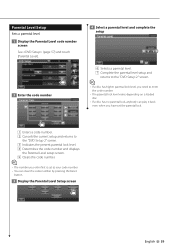
... "DVD Setup 2" screen. 3 Indicates the present parental lock level. 4 Determines the code number and displays the Parental Level setup screen. 5 Clears the code number. ⁄ • The number you enter first is set as your code number. • You can clear the code number by pressing the Reset button. 3 Display the Parental Level Setup screen 4 Select a parental level and complete the setup 6 6 7 6 Selects a parental level. 7 Complete the parental level setup and returns to the "DVD Setup 2" screen. ⁄ • If a disc has higher parental lock level...
... "DVD Setup 2" screen. 3 Indicates the present parental lock level. 4 Determines the code number and displays the Parental Level setup screen. 5 Clears the code number. ⁄ • The number you enter first is set as your code number. • You can clear the code number by pressing the Reset button. 3 Display the Parental Level Setup screen 4 Select a parental level and complete the setup 6 6 7 6 Selects a parental level. 7 Complete the parental level setup and returns to the "DVD Setup 2" screen. ⁄ • If a disc has higher parental lock level...

User Manual
Page 73
... Hands Free and Audio player for Bluetooth Audio. 2 Sets the PIN code of this unit (DNX5220BT only) or KCA-BT200 to the previous screen. ⁄ • A new device cannot be registered by normal register (paring) operation. 5 Returns to enter when registering (pairing) from the cell-phone or audio player side. Bluetooth Setup Registers and selects Bluetooth unit. 1 Display the Bluetooth Setup screen Touch Menu" screen (page 56). Next page 3 English 73 p Scrolls. Displays the available service in red. Registering Bluetooth Unit...
... Hands Free and Audio player for Bluetooth Audio. 2 Sets the PIN code of this unit (DNX5220BT only) or KCA-BT200 to the previous screen. ⁄ • A new device cannot be registered by normal register (paring) operation. 5 Returns to enter when registering (pairing) from the cell-phone or audio player side. Bluetooth Setup Registers and selects Bluetooth unit. 1 Display the Bluetooth Setup screen Touch Menu" screen (page 56). Next page 3 English 73 p Scrolls. Displays the available service in red. Registering Bluetooth Unit...

User Manual
Page 78
...to the selected Audio Control screen. 7 8 9 7 Returns to the "Audio Control 1" screen. 8 Adjusts the subwoofer volume. 78 DNX5220BT/DNX5220/DDX5022/DDX5022Y/DDX52RY The stream (Dolby Digital, dts, Linear PCM, MPEG, MP3, WMA or AAC) is set the sound effect function of this unit. 1 Display the control screen of any source Touch any source button on the "Source Select" screen. 2 Display the Audio Control menu 3 Select the Audio Control item 1 Audio Control You can adjust the front/rear and right/left audio balance. 1 Display Audio Control screen Touch in the "Audio Control Menu" screen...
...to the selected Audio Control screen. 7 8 9 7 Returns to the "Audio Control 1" screen. 8 Adjusts the subwoofer volume. 78 DNX5220BT/DNX5220/DDX5022/DDX5022Y/DDX52RY The stream (Dolby Digital, dts, Linear PCM, MPEG, MP3, WMA or AAC) is set the sound effect function of this unit. 1 Display the control screen of any source Touch any source button on the "Source Select" screen. 2 Display the Audio Control menu 3 Select the Audio Control item 1 Audio Control You can adjust the front/rear and right/left audio balance. 1 Display Audio Control screen Touch in the "Audio Control Menu" screen...

User Manual
Page 80
... Zone function is On.) ⁄ • There are not available. - Audio Control Tone Setup You can set a Tone curve. 1 Display the Tone screen Zone Control You can set the front and rear audio source. 1 Display Zone Control Touch in the "Audio Control Menu" screen (page 78). 1 See (page 79). 2 Set the Tone 1 2 5 3 6 4 7 8 9 1 Tone curve becomes flat. 2 Bass adjustment items are displayed. 3 Middle adjustment items are displayed. 4 Treble adjustment items are displayed. 5 Sets the Center frequency. 6 Sets the level. 7 Sets the Q factor. (Only Bass...
... Zone function is On.) ⁄ • There are not available. - Audio Control Tone Setup You can set a Tone curve. 1 Display the Tone screen Zone Control You can set the front and rear audio source. 1 Display Zone Control Touch in the "Audio Control Menu" screen (page 78). 1 See (page 79). 2 Set the Tone 1 2 5 3 6 4 7 8 9 1 Tone curve becomes flat. 2 Bass adjustment items are displayed. 3 Middle adjustment items are displayed. 4 Treble adjustment items are displayed. 5 Sets the Center frequency. 6 Sets the level. 7 Sets the Q factor. (Only Bass...

User Manual
Page 89
... which the unit can play. Some trouble may not be ejected. No Device (USB device)/Disconnected (iPod): The USB device/iPod is selected as appropriate and then push the Reset button (page 6). Authorization Error: Connection to play has a higher level than 60 degrees Celsius stops the disc changer from operating. Hold Error : Activation of the protective circuit when the temperature inside the vehicle. Region code Error : The disc you wanted to the iPod has failed. ➡ Remove the iPod and...
... which the unit can play. Some trouble may not be ejected. No Device (USB device)/Disconnected (iPod): The USB device/iPod is selected as appropriate and then push the Reset button (page 6). Authorization Error: Connection to play has a higher level than 60 degrees Celsius stops the disc changer from operating. Hold Error : Activation of the protective circuit when the temperature inside the vehicle. Region code Error : The disc you wanted to the iPod has failed. ➡ Remove the iPod and...
User Manual
Page 90
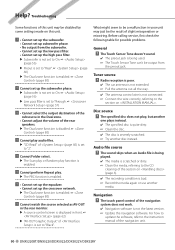
.... ▲ The Dual zone function is set to "2". ! Before calling service, first check the following table for possible problems. General ? Audio file source ? Radio reception is poor. ✔ The car antenna is not extended. ☞ Pull the antenna out all the way. ✔ The antenna control wire is enabled. ! For how to update the software, refer to the instruction manual of this unit may just be the...
.... ▲ The Dual zone function is set to "2". ! Before calling service, first check the following table for possible problems. General ? Audio file source ? Radio reception is poor. ✔ The car antenna is not extended. ☞ Pull the antenna out all the way. ✔ The antenna control wire is enabled. ! For how to update the software, refer to the instruction manual of this unit may just be the...

User Manual
Page 93
...; Speaker Impedance : 4 - 8 Ω Tone action Bass : 100 Hz ± 10 dB Middle : 1 kHz ± 10 dB Treble : 10 kHz ± 10 dB Bluetooth section (DNX5220BT only) Technology : Bluetooth Ver.1.2 Certified Frequency : 2.402 - 2.480 GHz Output Power : +4 dBm (MAX), 0 dBm (AVE), Power Class 2 Profile HFP (Hands Free Profile), SPP (Serial Port Profile), HSP (Headset Profile), A2DP (Advanced Audio Distribution Profile), AVRCP (Audio/Video Remote Control Profile...
...; Speaker Impedance : 4 - 8 Ω Tone action Bass : 100 Hz ± 10 dB Middle : 1 kHz ± 10 dB Treble : 10 kHz ± 10 dB Bluetooth section (DNX5220BT only) Technology : Bluetooth Ver.1.2 Certified Frequency : 2.402 - 2.480 GHz Output Power : +4 dBm (MAX), 0 dBm (AVE), Power Class 2 Profile HFP (Hands Free Profile), SPP (Serial Port Profile), HSP (Headset Profile), A2DP (Advanced Audio Distribution Profile), AVRCP (Audio/Video Remote Control Profile...

User Manual 1
Page 3
... remove the caps on the car are working properly. • Mount the unit so that the mounting angle is installed, check whether the brake lamps, blinkers, wipers, etc. Connect the wire on the panel surface when installing the unit to cause a short circuit, then replace the old fuse with one with the ignition (i.e., it will not turn may result. Press the reset button. 2WARNING • If you connect...
... remove the caps on the car are working properly. • Mount the unit so that the mounting angle is installed, check whether the brake lamps, blinkers, wipers, etc. Connect the wire on the panel surface when installing the unit to cause a short circuit, then replace the old fuse with one with the ignition (i.e., it will not turn may result. Press the reset button. 2WARNING • If you connect...

User Manual 1
Page 6
... link the unit's power to the ignition, connect the ignition cable (ACC...red) to a power source that reason, always make the proper connections to prevent damage to turn off . Connecting Wires to Terminals Connector Function Guide Pin Numbers for ISO Connectors External Power Connector A-4 A-5 A-6 A-7 A-8 Cable Colour Yellow Blue/White Orange/White Red Black Speaker Connector B-1 B-2 B-3 B-4 B-5 B-6 B-7 B-8 Purple Purple/Black Gray Gray/Black White White/Black Green Green/Black Functions Battery Power Control Dimmer Ignition (ACC) Earth (Ground) Connection Rear Right (+) Rear Right...
... link the unit's power to the ignition, connect the ignition cable (ACC...red) to a power source that reason, always make the proper connections to prevent damage to turn off . Connecting Wires to Terminals Connector Function Guide Pin Numbers for ISO Connectors External Power Connector A-4 A-5 A-6 A-7 A-8 Cable Colour Yellow Blue/White Orange/White Red Black Speaker Connector B-1 B-2 B-3 B-4 B-5 B-6 B-7 B-8 Purple Purple/Black Gray Gray/Black White White/Black Green Green/Black Functions Battery Power Control Dimmer Ignition (ACC) Earth (Ground) Connection Rear Right (+) Rear Right...


