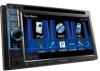
Instruction Manual
Page 2
...radio 29 Listening to the SiriusXM™ Satellite Radio 32 Using other external components 39 AV-IN 39 Using the external navigation unit 40 Sound adjustment 41 Using the sound equalization 41 Adjusting the cross over frequency 42 Changing the display design......43 Setting...items 48 Memorizing/recalling the settings 52 Locking the settings 52 Adjusting the touch position 52 BLUETOOTH OPERATIONS (Only for DDX719/DDX7049BT/DDX419/ DDX4049BT) Information for using Bluetooth® devices 53 Bluetooth operations 53 Connecting Bluetooth devices 54 Using the Bluetooth mobile phone ...
...radio 29 Listening to the SiriusXM™ Satellite Radio 32 Using other external components 39 AV-IN 39 Using the external navigation unit 40 Sound adjustment 41 Using the sound equalization 41 Adjusting the cross over frequency 42 Changing the display design......43 Setting...items 48 Memorizing/recalling the settings 52 Locking the settings 52 Adjusting the touch position 52 BLUETOOTH OPERATIONS (Only for DDX719/DDX7049BT/DDX419/ DDX4049BT) Information for using Bluetooth® devices 53 Bluetooth operations 53 Connecting Bluetooth devices 54 Using the Bluetooth mobile phone ...

Instruction Manual
Page 10
Setting the clock 1 Display screen. 4 Set the clock time. 2 Display screen. 3 * Synchronizes the clock time with FM RBDS. time with the connected navigation unit. Example: 3:00 - 3:29 = 3:00 3:30 - 3:59 = 4:00 5 Finish the procedure. * Appears only when the navigation unit is connected. 10 DDX719/DDX7049BT/DDX419/DDX4049BT/DDX319/DDX3049 Sets the clock manually. (☞ below) 1 Adjust the hour 2 Adjust the minute [Reset]: Sets the minute to "00."
Setting the clock 1 Display screen. 4 Set the clock time. 2 Display screen. 3 * Synchronizes the clock time with FM RBDS. time with the connected navigation unit. Example: 3:00 - 3:29 = 3:00 3:30 - 3:59 = 4:00 5 Finish the procedure. * Appears only when the navigation unit is connected. 10 DDX719/DDX7049BT/DDX419/DDX4049BT/DDX319/DDX3049 Sets the clock manually. (☞ below) 1 Adjust the hour 2 Adjust the minute [Reset]: Sets the minute to "00."
Instruction Manual
Page 13
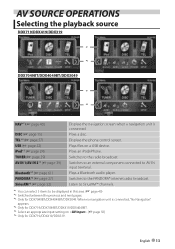
... 1/AV-IN 2*5 (☞ page 39) Bluetooth*4 (☞ page 61) PANDORA*6 (☞ page 27) SiriusXM*6 (☞ page 32) Displays the navigation screen when a navigation unit is connected, "No Navigation" appears. *4 Only for DDX719/DDX7049BT/DDX419/DDX4049BT. *5 Select an appropriate input setting on a USB device. Switches to AV-IN input terminal. Switches to an external component...
... 1/AV-IN 2*5 (☞ page 39) Bluetooth*4 (☞ page 61) PANDORA*6 (☞ page 27) SiriusXM*6 (☞ page 32) Displays the navigation screen when a navigation unit is connected, "No Navigation" appears. *4 Only for DDX719/DDX7049BT/DDX419/DDX4049BT. *5 Select an appropriate input setting on a USB device. Switches to AV-IN input terminal. Switches to an external component...

Instruction Manual
Page 40
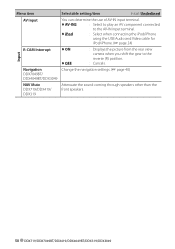
... to display the setup screen for the navigation unit. To cancel the navigation screen DDX7049BT DDX4049BT/ DDX3049 Settings for navigation unit 1 On : Guidance Volume NAV Mute NAV Setup Select front speakers used for the navigation unit. 40 DDX719/DDX7049BT/DDX419/DDX4049BT/DDX319/DDX3049 Adjust the volume of the navigation screen is displayed, the touch panel operations...
... to display the setup screen for the navigation unit. To cancel the navigation screen DDX7049BT DDX4049BT/ DDX3049 Settings for navigation unit 1 On : Guidance Volume NAV Mute NAV Setup Select front speakers used for the navigation unit. 40 DDX719/DDX7049BT/DDX419/DDX4049BT/DDX319/DDX3049 Adjust the volume of the navigation screen is displayed, the touch panel operations...

Instruction Manual
Page 49
... while a video source is required. (☞ page 78) : Activates dimmer. : Cancels. : Activates or deactivates dimmer according to the day/night display setting of the connected navigation unit. Display Scroll ♦ ON ♦ Once : Repeats scrolling. : Scrolls the displayed information once. ♦ OFF : Cancels. • Pressing [
... while a video source is required. (☞ page 78) : Activates dimmer. : Cancels. : Activates or deactivates dimmer according to the day/night display setting of the connected navigation unit. Display Scroll ♦ ON ♦ Once : Repeats scrolling. : Scrolls the displayed information once. ♦ OFF : Cancels. • Pressing [
Instruction Manual
Page 50
...: Select when connecting the iPod/iPhone using the USB Audio and Video cable for iPod/iPhone. (☞ page 24) Input R-CAM Interrupt Navigation DDX7049BT/ DDX4049BT/DDX3049 ♦ ON : Displays the picture from the rear view camera when you shift the gear to the reverse (R) position.... ♦ OFF : Cancels. Change the navigation settings. (☞ page 40) NAV Mute DDX719/DDX419/ DDX319 Attenuate the sound coming through speakers other than the front speakers. 50 DDX719/DDX7049BT/DDX419/DDX4049BT/DDX319/DDX3049
...: Select when connecting the iPod/iPhone using the USB Audio and Video cable for iPod/iPhone. (☞ page 24) Input R-CAM Interrupt Navigation DDX7049BT/ DDX4049BT/DDX3049 ♦ ON : Displays the picture from the rear view camera when you shift the gear to the reverse (R) position.... ♦ OFF : Cancels. Change the navigation settings. (☞ page 40) NAV Mute DDX719/DDX419/ DDX319 Attenuate the sound coming through speakers other than the front speakers. 50 DDX719/DDX7049BT/DDX419/DDX4049BT/DDX319/DDX3049
Instruction Manual
Page 64
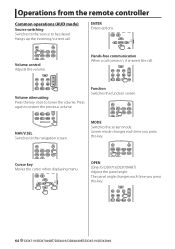
Operations from the remote controller Common operations (AUD mode) Source switching Switches to the source to the navigation screen. ENTER Enters options. NAV/V.SEL Switches to be played. Cursor key Moves the cursor when displaying menu. Volume control Adjusts the ... Hands-free communication When a call comes in, it answers the call . Screen mode changes each time you press this key. 64 DDX719/DDX7049BT/DDX419/DDX4049BT/DDX319/DDX3049 The panel angle changes each time you press this key. MODE Switches the screen mode. Hangs up the incoming/current call . ...
Operations from the remote controller Common operations (AUD mode) Source switching Switches to the source to the navigation screen. ENTER Enters options. NAV/V.SEL Switches to be played. Cursor key Moves the cursor when displaying menu. Volume control Adjusts the ... Hands-free communication When a call comes in, it answers the call . Screen mode changes each time you press this key. 64 DDX719/DDX7049BT/DDX419/DDX4049BT/DDX319/DDX3049 The panel angle changes each time you press this key. MODE Switches the screen mode. Hangs up the incoming/current call . ...
Instruction Manual
Page 71
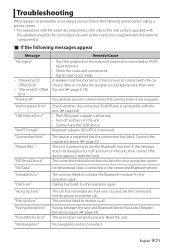
... the connection has failed. "NO Voice Device" The device is not engaged. Connect the registered device. (☞ page 55) The unit is connected. "No Navigation" No navigation unit is preparing to use the connected mobile phone to AV-IN input terminal. • Check the cords and connections. • Signal input is too...
... the connection has failed. "NO Voice Device" The device is not engaged. Connect the registered device. (☞ page 55) The unit is connected. "No Navigation" No navigation unit is preparing to use the connected mobile phone to AV-IN input terminal. • Check the cords and connections. • Signal input is too...

Instruction Manual
Page 78
...to the control terminal of the filmtype antenna. When using , connect either the telephone rings or during conversation. (To connect the Kenwood navigation system, consult your car is required. Orange/White (Dimmer control wire) To car light control switch Red (Ignition wire) ACC ... made, do not let the cable come out from the tab. Connecting Wires to Terminals Bluetooth Microphone (Accessory 9) DDX719/ DDX7049BT/DDX419/DDX4049BT only Purple/White (Reverse sensor wire) Antenna Cord Light Green Subwoofer Preout (monaural) Connect to connect the parking sensor. FM...
...to the control terminal of the filmtype antenna. When using , connect either the telephone rings or during conversation. (To connect the Kenwood navigation system, consult your car is required. Orange/White (Dimmer control wire) To car light control switch Red (Ignition wire) ACC ... made, do not let the cable come out from the tab. Connecting Wires to Terminals Bluetooth Microphone (Accessory 9) DDX719/ DDX7049BT/DDX419/DDX4049BT only Purple/White (Reverse sensor wire) Antenna Cord Light Green Subwoofer Preout (monaural) Connect to connect the parking sensor. FM...

Instruction Manual
Page 80
... • Audio output (3.5φ mini plug) Resistance-free stereo type mini plug Connection cable (Included in the Navigation System) SiriusXM Tuner (commercially available) DDX719/DDX419/DDX319 only Rear Preout • Audio left output (White) • Audio right output (Red) Front Preout ...8226; Audio left input (White) • Audio right input (Red) 80 DDX719/DDX7049BT/DDX419/DDX4049BT/DDX319/DDX3049 Connecting Other Products Navigation System (Optional Accessory) DDX7049BT/DDX4049BT/DDX3049 only ⁄ Navigation units that can be connected to this unit. (As of December, 2011): •...
... • Audio output (3.5φ mini plug) Resistance-free stereo type mini plug Connection cable (Included in the Navigation System) SiriusXM Tuner (commercially available) DDX719/DDX419/DDX319 only Rear Preout • Audio left output (White) • Audio right output (Red) Front Preout ...8226; Audio left input (White) • Audio right input (Red) 80 DDX719/DDX7049BT/DDX419/DDX4049BT/DDX319/DDX3049 Connecting Other Products Navigation System (Optional Accessory) DDX7049BT/DDX4049BT/DDX3049 only ⁄ Navigation units that can be connected to this unit. (As of December, 2011): •...


