Instruction Manual
Page 2
...11 Turning on the power 11 Turning off the power 11 Adjusting the volume 11 Putting the unit in standby 11 Turning off the screen 11 Switching screens 12 AV SOURCE OPERATIONS Selecting the playback source....13 Displaying the source control screen ..........14 Disc operations 15 Playing a disc 15 Playable disc types 16 Playback operations 17 Settings for disc playback 21 USB operations 22 Playing a USB device 22 Listening to the iPod/iPhone device 24 iPod/iPhone playback operations 25 Selecting a track/video from menu on the iPod/iPhone 26 Operating in iPod/iPhone control mode...
...11 Turning on the power 11 Turning off the power 11 Adjusting the volume 11 Putting the unit in standby 11 Turning off the screen 11 Switching screens 12 AV SOURCE OPERATIONS Selecting the playback source....13 Displaying the source control screen ..........14 Disc operations 15 Playing a disc 15 Playable disc types 16 Playback operations 17 Settings for disc playback 21 USB operations 22 Playing a USB device 22 Listening to the iPod/iPhone device 24 iPod/iPhone playback operations 25 Selecting a track/video from menu on the iPod/iPhone 26 Operating in iPod/iPhone control mode...
Instruction Manual
Page 3
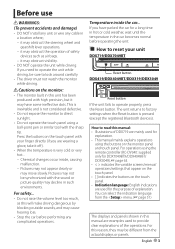
... (except the registered Bluetooth devices). For operations using the remote controller (RC-DV340: supplied only for explanation. • This manual mainly explains operations using a ball-point pen or similar tool with your unit DDX719/DDX7049BT Reset button DDX419/DDX4049BT/DDX319/DDX3049 Reset button If the unit fails to look around carefully. • The driver must not watch the monitor while driving. Chemical changes occur inside the car... it may obstruct...
... (except the registered Bluetooth devices). For operations using the remote controller (RC-DV340: supplied only for explanation. • This manual mainly explains operations using a ball-point pen or similar tool with your unit DDX719/DDX7049BT Reset button DDX419/DDX4049BT/DDX319/DDX3049 Reset button If the unit fails to look around carefully. • The driver must not watch the monitor while driving. Chemical changes occur inside the car... it may obstruct...

Instruction Manual
Page 4
... generate or use radio frequency energy. Location : Top Panel DDX7049BT/DDX4049BT/DDX3049: The marking of products using lasers CLASS 1 LASER PRODUCT The label is attached to this equipment if an unauthorized change or modification is connected. • Consult the dealer or an experienced radio/ TV technician for a Class B digital device, pursuant to provide reasonable protection against harmful interference in a particular installation. Changes or...
... generate or use radio frequency energy. Location : Top Panel DDX7049BT/DDX4049BT/DDX3049: The marking of products using lasers CLASS 1 LASER PRODUCT The label is attached to this equipment if an unauthorized change or modification is connected. • Consult the dealer or an experienced radio/ TV technician for a Class B digital device, pursuant to provide reasonable protection against harmful interference in a particular installation. Changes or...

Instruction Manual
Page 5
... Panel Color Select when connecting the rear view camera. (☞ page 50) Select the color of the buttons on the screen. (☞ page 48) 1 Adjusting the panel angle (Only for DDX719/DDX7049BT) You can change the panel angle. 1 Select an angle (0 - 6). English 5 INTRODUCTIONS Initial Settings Initial setup When you power on the unit for the first time or reset the unit, the initial setting screen appears. • You can also change the settings on the monitor panel...
... Panel Color Select when connecting the rear view camera. (☞ page 50) Select the color of the buttons on the screen. (☞ page 48) 1 Adjusting the panel angle (Only for DDX719/DDX7049BT) You can change the panel angle. 1 Select an angle (0 - 6). English 5 INTRODUCTIONS Initial Settings Initial setup When you power on the unit for the first time or reset the unit, the initial setting screen appears. • You can also change the settings on the monitor panel...
Instruction Manual
Page 9
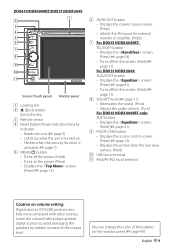
... the buttons on volume setting: Digital devices (CD/USB) produce very little noise compared with other sources. DDX419/DDX4049BT/DDX319/DDX3049 Screen (Touch panel) Monitor panel 1 Loading slot 2 0 (Eject) button Ejects the disc. 3 Remote sensor 4 Reset button/Power indicator/Security indicator • Resets the unit. (☞ page 3) • Lights up while the unit is turned on. • Flashes when the security function is activated. (☞ page 7) 5 MENU/ button • Turns off the power. (Hold) • Turns on the power. (Press) • Displays the screen...
... the buttons on volume setting: Digital devices (CD/USB) produce very little noise compared with other sources. DDX419/DDX4049BT/DDX319/DDX3049 Screen (Touch panel) Monitor panel 1 Loading slot 2 0 (Eject) button Ejects the disc. 3 Remote sensor 4 Reset button/Power indicator/Security indicator • Resets the unit. (☞ page 3) • Lights up while the unit is turned on. • Flashes when the security function is activated. (☞ page 7) 5 MENU/ button • Turns off the power. (Hold) • Turns on the power. (Press) • Displays the screen...
Instruction Manual
Page 13
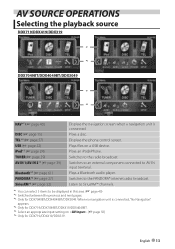
...) iPod*5 (☞ page 24) TUNER (☞ page 29) AV-IN 1/AV-IN 2*5 (☞ page 39) Bluetooth*4 (☞ page 61) PANDORA*6 (☞ page 27) SiriusXM*6 (☞ page 32) Displays the navigation screen when a navigation unit is connected, "No Navigation" appears. *4 Only for DDX719/DDX7049BT/DDX419/DDX4049BT. *5 Select an appropriate input setting on a USB device. Plays a Bluetooth audio player. Displays the phone control screen. Switches to an external component connected to the PANDORA® internet radio...
...) iPod*5 (☞ page 24) TUNER (☞ page 29) AV-IN 1/AV-IN 2*5 (☞ page 39) Bluetooth*4 (☞ page 61) PANDORA*6 (☞ page 27) SiriusXM*6 (☞ page 32) Displays the navigation screen when a navigation unit is connected, "No Navigation" appears. *4 Only for DDX719/DDX7049BT/DDX419/DDX4049BT. *5 Select an appropriate input setting on a USB device. Plays a Bluetooth audio player. Displays the phone control screen. Switches to an external component connected to the PANDORA® internet radio...

Instruction Manual
Page 22
...; This unit may not work as a USB memory, Digital Audio Player etc. is connected... In this case, disconnect the USB device then reset this unit and the USB device. • Operation and power supply may not recognize a memory card inserted into the USB card reader. • When connecting with a USB cable, use the USB 2.0 cable. • The maximum number of characters for some USB devices. • Do not leave a USB device in the car, or expose to direct sunlight or...
...; This unit may not work as a USB memory, Digital Audio Player etc. is connected... In this case, disconnect the USB device then reset this unit and the USB device. • Operation and power supply may not recognize a memory card inserted into the USB card reader. • When connecting with a USB cable, use the USB 2.0 cable. • The maximum number of characters for some USB devices. • Do not leave a USB device in the car, or expose to direct sunlight or...

Instruction Manual
Page 29
Changes the seek mode. • AUTO1: Auto Search • AUTO2: Tunes in stations in the preset station. (Press) • Presets the currently tuned station. (Hold) [Mode] Displays tuner setting screen. (☞ page 30) [TI] Activates/deactivates TI standby reception mode. (☞ page 31) [Mono] * Activates/deactivates monaural mode for a station. • The search method differs according to the selected seek mode. (☞ above) Displays screen. * Appears only when FM is activated. [Text] Displays/hides the information of...
Changes the seek mode. • AUTO1: Auto Search • AUTO2: Tunes in stations in the preset station. (Press) • Presets the currently tuned station. (Hold) [Mode] Displays tuner setting screen. (☞ page 30) [TI] Activates/deactivates TI standby reception mode. (☞ page 31) [Mono] * Activates/deactivates monaural mode for a station. • The search method differs according to the selected seek mode. (☞ above) Displays screen. * Appears only when FM is activated. [Text] Displays/hides the information of...
Instruction Manual
Page 39
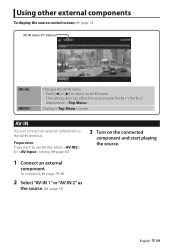
... 1" or "AV-IN 2" as the source. (☞ page 13) English 39 AV-IN name (☞ below) [Mode] [MENU] Changes the AV-IN name. • Press [2] or [3] to use AV-IN2, select for setting. (☞page 50) 3 Turn on . AV-IN You can connect an external component to the AV-IN terminal. Displays screen. Using other external components To display the source control screen, ☞ page 14.
... 1" or "AV-IN 2" as the source. (☞ page 13) English 39 AV-IN name (☞ below) [Mode] [MENU] Changes the AV-IN name. • Press [2] or [3] to use AV-IN2, select for setting. (☞page 50) 3 Turn on . AV-IN You can connect an external component to the AV-IN terminal. Displays screen. Using other external components To display the source control screen, ☞ page 14.

Instruction Manual
Page 40
... Settings for navigation unit 1 On : Guidance Volume NAV Mute NAV Setup Select front speakers used for the navigation unit. 40 DDX719/DDX7049BT/DDX419/DDX4049BT/DDX319/DDX3049 See the instruction manual supplied for the navigation guidance. Adjust the volume of the navigation guidance. (0 to 35) Select to regardless of the navigation screen is fixed to attenuate the sound coming through the front speakers even when you listen to an audio source...
... Settings for navigation unit 1 On : Guidance Volume NAV Mute NAV Setup Select front speakers used for the navigation unit. 40 DDX719/DDX7049BT/DDX419/DDX4049BT/DDX319/DDX3049 See the instruction manual supplied for the navigation guidance. Adjust the volume of the navigation guidance. (0 to 35) Select to regardless of the navigation screen is fixed to attenuate the sound coming through the front speakers even when you listen to an audio source...
Instruction Manual
Page 42
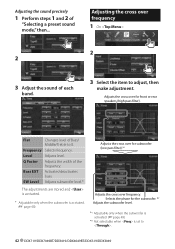
...Bass EXT Activates/deactivates bass. Adjusting the cross over for subwoofer (low pass filter).*1 Adjusts the cross over frequency. Frequency Selects frequency. Q Factor Adjusts the width of "Selecting a preset sound mode," then... SW Level Adjusts subwoofer level.* The adjustments are stored and is activated. * Adjustable only when the subwoofer is set to . 42 DDX719/DDX7049BT/DDX419/DDX4049BT/DDX319/DDX3049 Flat Changes level of each band. 3 Select the item to 0. Adjusts the cross over frequency 1 On : 2 2 3 Adjust the sound of Bass/ Middle/Treble to adjust, then make...
...Bass EXT Activates/deactivates bass. Adjusting the cross over for subwoofer (low pass filter).*1 Adjusts the cross over frequency. Frequency Selects frequency. Q Factor Adjusts the width of "Selecting a preset sound mode," then... SW Level Adjusts subwoofer level.* The adjustments are stored and is activated. * Adjustable only when the subwoofer is set to . 42 DDX719/DDX7049BT/DDX419/DDX4049BT/DDX319/DDX3049 Flat Changes level of each band. 3 Select the item to 0. Adjusts the cross over frequency 1 On : 2 2 3 Adjust the sound of Bass/ Middle/Treble to adjust, then make...
Instruction Manual
Page 48
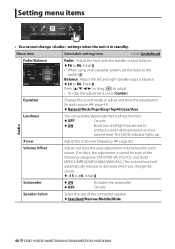
... the center (0). Menu item Selectable setting/item Initial: Underlined Fader/Balance Fader : Adjust the front and rear speaker output balance. ♦ F6 to adjust. • To clear the adjustment, press [Center]. Adjust the cross over You can activate/deactivate the loudness function. ♦ OFF : Cancels. ♦ ON : Boost low and high frequencies to produce a well-balanced sound at a low volume level. Speaker Select Select the size of the following categories: DVD/DVD-VR, VCD...
... the center (0). Menu item Selectable setting/item Initial: Underlined Fader/Balance Fader : Adjust the front and rear speaker output balance. ♦ F6 to adjust. • To clear the adjustment, press [Center]. Adjust the cross over You can activate/deactivate the loudness function. ♦ OFF : Cancels. ♦ ON : Boost low and high frequencies to produce a well-balanced sound at a low volume level. Speaker Select Select the size of the following categories: DVD/DVD-VR, VCD...

Instruction Manual
Page 49
Menu item Selectable setting/item Initial: Underlined Dimmer ♦ Auto ♦ ON ♦ OFF ♦ NAV : Dims the screen and button illumination when you turn on the headlights. • The ILLUMI lead connection is played back. : Cancels. User Customize Change the display design (background and panel color). (☞ page 43) OSD Clock ♦ ON ♦ OFF : Displays the clock while a video source is required. (☞ page 78) : Activates dimmer. : Cancels. : Activates or deactivates dimmer according...
Menu item Selectable setting/item Initial: Underlined Dimmer ♦ Auto ♦ ON ♦ OFF ♦ NAV : Dims the screen and button illumination when you turn on the headlights. • The ILLUMI lead connection is played back. : Cancels. User Customize Change the display design (background and panel color). (☞ page 43) OSD Clock ♦ ON ♦ OFF : Displays the clock while a video source is required. (☞ page 78) : Activates dimmer. : Cancels. : Activates or deactivates dimmer according...
Instruction Manual
Page 62
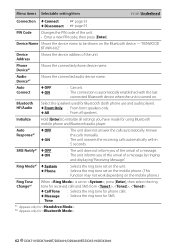
Menu items Selectable setting/item Initial: Underlined Connection ♦ Connect : ☞ page 55 ♦ Disconnect : ☞ page 55 PIN Code Changes the PIN code of the unit. Device Name Shows the device name to initialize all speakers. Device Address Shows the device address of the unit. • Enter a new PIN code, then press [Enter]. Bluetooth HF/Audio Select the speakers used for . 62 DDX719/DDX7049BT/DDX419/DDX4049BT/DDX319/DDX3049 Ring Mode*1 ♦ System ♦ Phone : Selects the ring tone...
Menu items Selectable setting/item Initial: Underlined Connection ♦ Connect : ☞ page 55 ♦ Disconnect : ☞ page 55 PIN Code Changes the PIN code of the unit. Device Name Shows the device name to initialize all speakers. Device Address Shows the device address of the unit. • Enter a new PIN code, then press [Enter]. Bluetooth HF/Audio Select the speakers used for . 62 DDX719/DDX7049BT/DDX419/DDX4049BT/DDX319/DDX3049 Ring Mode*1 ♦ System ♦ Phone : Selects the ring tone...
Instruction Manual
Page 71
... 3, 78). "Connection Error" "Please Wait..." "Initialize Error" "Dial Error" The unit has failed to receive a call has not ended yet. "Hung Up Error" "Pick Up Error" The call . Register the device again. (☞ page 54) The panel does not work properly. Reset the unit. Connect the registered device. (☞ page 55) The unit is too weak. Park your car, and use the Bluetooth function. Wire or insulate the speaker cord as the instructions supplied...
... 3, 78). "Connection Error" "Please Wait..." "Initialize Error" "Dial Error" The unit has failed to receive a call has not ended yet. "Hung Up Error" "Pick Up Error" The call . Register the device again. (☞ page 54) The panel does not work properly. Reset the unit. Connect the registered device. (☞ page 55) The unit is too weak. Park your car, and use the Bluetooth function. Wire or insulate the speaker cord as the instructions supplied...

Instruction Manual
Page 73
...; Record the tracks using other players. Disc in general DivX/MPEG1/MPEG2/ JPEG/MP3/WMA/WAV/AAC AV-IN No picture appears on the screen. • Turn on the video component if it is not supported by the unit. AME automatic presetting does not work at all. • Adjust the volume to the optimum level. • Check the cords and connections. Store stations manually. (☞ page 30...
...; Record the tracks using other players. Disc in general DivX/MPEG1/MPEG2/ JPEG/MP3/WMA/WAV/AAC AV-IN No picture appears on the screen. • Turn on the video component if it is not supported by the unit. AME automatic presetting does not work at all. • Adjust the volume to the optimum level. • Check the cords and connections. Store stations manually. (☞ page 30...
Instruction Manual
Page 75
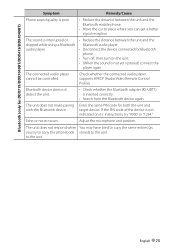
... detect the unit. • Check whether the Bluetooth adapter (KS-UBT1) is inserted correctly. • Search from the Bluetooth device again. If the PIN code of the device is not indicated on the unit. • (When the sound is not yet restored) connect the player again. The connected audio player cannot be controlled. The unit does not make pairing Enter the same PIN code for Bluetooth phone. • Turn off, then turn on its instructions, try...
... detect the unit. • Check whether the Bluetooth adapter (KS-UBT1) is inserted correctly. • Search from the Bluetooth device again. If the PIN code of the device is not indicated on the unit. • (When the sound is not yet restored) connect the player again. The connected audio player cannot be controlled. The unit does not make pairing Enter the same PIN code for Bluetooth phone. • Turn off, then turn on its instructions, try...
Instruction Manual
Page 76
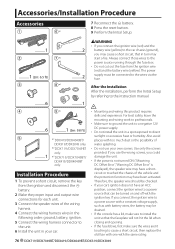
... disconnect the battery. 2 Make the proper input and output wire connections for each unit. 3 Connect the speaker wires of water splashing. • Do not use the wrong screws, you may cause a short circuit, that in turn may start a fire. For best safety, leave the mounting and wiring work to professionals. • Make sure to ground the unit to the wires via the fuse. battery. 8 Press the reset button. 9 Perform the Initial Setup. ..........1 2 7*2 ..........1 (2m...
... disconnect the battery. 2 Make the proper input and output wire connections for each unit. 3 Connect the speaker wires of water splashing. • Do not use the wrong screws, you may cause a short circuit, that in turn may start a fire. For best safety, leave the mounting and wiring work to professionals. • Make sure to ground the unit to the wires via the fuse. battery. 8 Press the reset button. 9 Perform the Initial Setup. ..........1 2 7*2 ..........1 (2m...

Instruction Manual
Page 78
...wire) Antenna Cord Light Green Subwoofer Preout (monaural) Connect to the vehicle's parking brake detection switch harness. Orange/White (Dimmer control wire) To car light control switch Red (Ignition wire) ACC Ignition key switch Yellow (Battery wire) Black (Ground wire) - (To car chassis) Car fuse box (Main fuse) 78 DDX719/DDX7049BT/DDX419/DDX4049BT/DDX319/DDX3049 Battery FM/AM antenna input Accessory 1 FUSE ( 10A ) ⁄ Connect to vehicle's reverse lamp harness when using the optional rear view camera. Brown (Mute control wire) Light blue/Yellow (Steering remote control...
...wire) Antenna Cord Light Green Subwoofer Preout (monaural) Connect to the vehicle's parking brake detection switch harness. Orange/White (Dimmer control wire) To car light control switch Red (Ignition wire) ACC Ignition key switch Yellow (Battery wire) Black (Ground wire) - (To car chassis) Car fuse box (Main fuse) 78 DDX719/DDX7049BT/DDX419/DDX4049BT/DDX319/DDX3049 Battery FM/AM antenna input Accessory 1 FUSE ( 10A ) ⁄ Connect to vehicle's reverse lamp harness when using the optional rear view camera. Brown (Mute control wire) Light blue/Yellow (Steering remote control...

Instruction Manual
Page 92
... junto ! l (c) Products wiltl the w~l number defaced, altered or missing. (d) Periodic check-ups whrch do aparelho conforme o manual de instr..;iles. TO OBTAIN WARRANTY SERVICE Shou ldyour Kenwood productrequ ire warranty service.deliver it the repairsare covered by KENWOOD. Products repaired within warranty will be returned freight prepaid to anyexteriorfinishes, cosmetic parts, tape heads, adaptors, antennas. KENWOOD garantit,sous reservedestermeset des conditions...
... junto ! l (c) Products wiltl the w~l number defaced, altered or missing. (d) Periodic check-ups whrch do aparelho conforme o manual de instr..;iles. TO OBTAIN WARRANTY SERVICE Shou ldyour Kenwood productrequ ire warranty service.deliver it the repairsare covered by KENWOOD. Products repaired within warranty will be returned freight prepaid to anyexteriorfinishes, cosmetic parts, tape heads, adaptors, antennas. KENWOOD garantit,sous reservedestermeset des conditions...


