Instruction Manual
Page 2
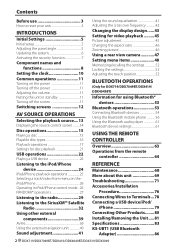
...Memorizing/recalling the settings 52 Locking the settings 52 Adjusting the touch position 52 BLUETOOTH OPERATIONS (Only for DDX719/DDX7049BT/DDX419/ DDX4049BT) Information for using Bluetooth® devices 53 Bluetooth operations 53 Connecting Bluetooth devices 54 Using the Bluetooth ... from the remote controller 64 REFERENCE Maintenance 68 More about this unit 69 Troubleshooting 71 Accessories/Installation Procedure 76 Connecting Wires to Terminals...78 Connecting a USB device/iPod/ iPhone 79 Connecting Other Products........80 Installing/Removing the Unit.....81 Specifications...
...Memorizing/recalling the settings 52 Locking the settings 52 Adjusting the touch position 52 BLUETOOTH OPERATIONS (Only for DDX719/DDX7049BT/DDX419/ DDX4049BT) Information for using Bluetooth® devices 53 Bluetooth operations 53 Connecting Bluetooth devices 54 Using the Bluetooth ... from the remote controller 64 REFERENCE Maintenance 68 More about this unit 69 Troubleshooting 71 Accessories/Installation Procedure 76 Connecting Wires to Terminals...78 Connecting a USB device/iPod/ iPhone 79 Connecting Other Products........80 Installing/Removing the Unit.....81 Specifications...
Instruction Manual
Page 3
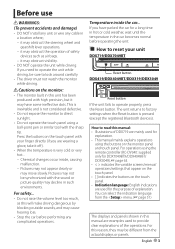
... for explanation. • This manual mainly explains operations using the buttons on the touch panel with your unit DDX719/DDX7049BT Reset button DDX419/DDX4049BT/DDX319/DDX3049 Reset button If the unit fails to direct sunlight. • Do not operate the touch panel using the remote controller... directly (if you have some ineffective dots. Before use WARNINGS: (To prevent accidents and damage) • DO NOT install any unit or wire any complicated operations. Pictures may not appear clearly or may obstruct visibility. • DO NOT operate the unit while driving. it may move ...
... for explanation. • This manual mainly explains operations using the buttons on the touch panel with your unit DDX719/DDX7049BT Reset button DDX419/DDX4049BT/DDX319/DDX3049 Reset button If the unit fails to direct sunlight. • Do not operate the touch panel using the remote controller... directly (if you have some ineffective dots. Before use WARNINGS: (To prevent accidents and damage) • DO NOT install any unit or wire any complicated operations. Pictures may not appear clearly or may obstruct visibility. • DO NOT operate the unit while driving. it may move ...
Instruction Manual
Page 71
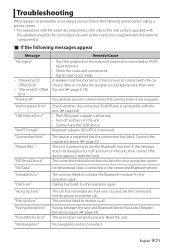
... is contained in to the instructions supplied with the adapters used for the connections (as well as appropriate, then reset the unit (☞ page 3, 78). Wire or insulate the speaker cord as the instructions supplied with the car chassis. Troubleshooting What appears to initialize the Bluetooth module. Try the operation again...
... is contained in to the instructions supplied with the adapters used for the connections (as well as appropriate, then reset the unit (☞ page 3, 78). Wire or insulate the speaker cord as the instructions supplied with the car chassis. Troubleshooting What appears to initialize the Bluetooth module. Try the operation again...
Instruction Manual
Page 76
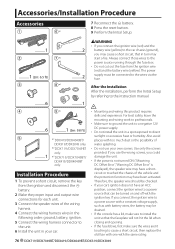
... disconnect the battery. 2 Make the proper input and output wire connections for each unit. 3 Connect the speaker wires of the vehicle and the protection function may be connected to the instruction manual. ..........6 ..........1 4 9*3 ..........6 ..........1 (3m: 9.8 ft) 5 *1 DDX419/DDX4049BT/ DDX319/DDX3049 only. *2 DDX719/DDX7049BT only. ..........1 *3 DDX719/DDX7049BT/ DDX419/DDX4049BT only. Use only the screws provided. Installation Procedure...
... disconnect the battery. 2 Make the proper input and output wire connections for each unit. 3 Connect the speaker wires of the vehicle and the protection function may be connected to the instruction manual. ..........6 ..........1 4 9*3 ..........6 ..........1 (3m: 9.8 ft) 5 *1 DDX419/DDX4049BT/ DDX319/DDX3049 only. *2 DDX719/DDX7049BT only. ..........1 *3 DDX719/DDX7049BT/ DDX419/DDX4049BT only. Use only the screws provided. Installation Procedure...

Instruction Manual
Page 77
... being connected to the system, connect the connectors either to both the front output terminals or to which they correspond. Accessory 7 Cooling fan DDX419/ DDX4049BT only • Install the Bluetooth adaptor (KS-UBT1) besides the place enclosed by the metal. ¤ CAUTION Install this unit ... angle is installed, check whether the brake lamps, blinkers, wipers, etc. Bluetooth adaptor (KS-UBT1) English 77 • Insulate unconnected wires with vinyl tape or other similar material. Do not mount the unit in the console of the left speaker to decrease the internal temperature....
... being connected to the system, connect the connectors either to both the front output terminals or to which they correspond. Accessory 7 Cooling fan DDX419/ DDX4049BT only • Install the Bluetooth adaptor (KS-UBT1) besides the place enclosed by the metal. ¤ CAUTION Install this unit ... angle is installed, check whether the brake lamps, blinkers, wipers, etc. Bluetooth adaptor (KS-UBT1) English 77 • Insulate unconnected wires with vinyl tape or other similar material. Do not mount the unit in the console of the left speaker to decrease the internal temperature....

Instruction Manual
Page 78
... connections are using the optional power amplifier, connect to connect the parking sensor. Connecting Wires to Terminals Bluetooth Microphone (Accessory 9) DDX719/ DDX7049BT/DDX419/DDX4049BT only Purple/White (Reverse sensor wire) Antenna Cord Light Green Subwoofer Preout (monaural) Connect to the vehicle's parking brake ...cable come out from the tab. When using , connect either the telephone rings or during conversation. (To connect the Kenwood navigation system, consult your car is grounded when either to the control terminal of the motor antenna, or to the power...
... connections are using the optional power amplifier, connect to connect the parking sensor. Connecting Wires to Terminals Bluetooth Microphone (Accessory 9) DDX719/ DDX7049BT/DDX419/DDX4049BT only Purple/White (Reverse sensor wire) Antenna Cord Light Green Subwoofer Preout (monaural) Connect to the vehicle's parking brake ...cable come out from the tab. When using , connect either the telephone rings or during conversation. (To connect the Kenwood navigation system, consult your car is grounded when either to the control terminal of the motor antenna, or to the power...
Instruction Manual
Page 82
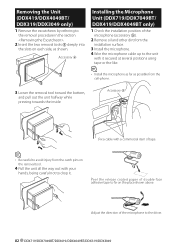
... the Microphone Unit (DDX719/DDX7049BT/ DDX419/DDX4049BT only) 1 Check the installation position of tape. ⁄ • Be careful to avoid injury from the catch pins on each side, as possible from the installation surface. 3 Install the microphone. 4 Wire the microphone cable up to drop ...it secured at several positions using tape or the like. ⁄ • Install the microphone as far as shown. Accessory 9 Fix a cable with it . Removing the Unit (DDX419/DDX4049BT/ DDX319/DDX3049 only) 1 Remove...
... the Microphone Unit (DDX719/DDX7049BT/ DDX419/DDX4049BT only) 1 Check the installation position of tape. ⁄ • Be careful to avoid injury from the catch pins on each side, as possible from the installation surface. 3 Install the microphone. 4 Wire the microphone cable up to drop ...it secured at several positions using tape or the like. ⁄ • Install the microphone as far as shown. Accessory 9 Fix a cable with it . Removing the Unit (DDX419/DDX4049BT/ DDX319/DDX3049 only) 1 Remove...


