Instruction Manual
Page 2
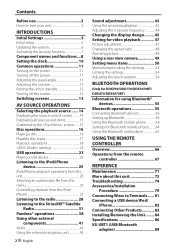
Contents Before use 3 How to reset your unit 3 INTRODUCTIONS Initial Settings 5 Initial setup 5 Updating the system 6 Activating the security function 7 Component names and functions....8 Setting the clock 10 Common operations 11 ...
Contents Before use 3 How to reset your unit 3 INTRODUCTIONS Initial Settings 5 Initial setup 5 Updating the system 6 Activating the security function 7 Component names and functions....8 Setting the clock 10 Common operations 11 ...
Instruction Manual
Page 3
...English indications are used to read this unit has been produced with your unit DDX790/DDX770/DDX7070BT Reset button DDX470/DDX4070BT/DDX370/DDX3070 Reset button If the unit fails to factory settings when the Reset button is very cold or very hot... - If you need to operate the unit while ... devices such as this reason, they may obstruct the steering wheel and gearshift lever operations. - The unit returns to operate properly, press the Reset button. English 3 it may be synchronized with the sharp tip. Cautions on the touch panel with high precision, but it off ). •...
...English indications are used to read this unit has been produced with your unit DDX790/DDX770/DDX7070BT Reset button DDX470/DDX4070BT/DDX370/DDX3070 Reset button If the unit fails to factory settings when the Reset button is very cold or very hot... - If you need to operate the unit while ... devices such as this reason, they may obstruct the steering wheel and gearshift lever operations. - The unit returns to operate properly, press the Reset button. English 3 it may be synchronized with the sharp tip. Cautions on the touch panel with high precision, but it off ). •...
Instruction Manual
Page 5
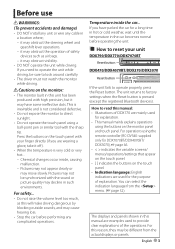
... Select the component connected to EXT I/F input terminal - [OEM] for ADS adapter or [SXi] for DDX370. INTRODUCTIONS Initial Settings Initial setup When you power on the unit for the first time or reset the unit, the initial setting screen appears. • You can also change the settings on the screen.... (☞ page 50) 1 For DDX790/DDX770/DDX7070BT: For DDX470/DDX4070BT/DDX3070: For DDX370: Language Select the text language used for on ...
... Select the component connected to EXT I/F input terminal - [OEM] for ADS adapter or [SXi] for DDX370. INTRODUCTIONS Initial Settings Initial setup When you power on the unit for the first time or reset the unit, the initial setting screen appears. • You can also change the settings on the screen.... (☞ page 50) 1 For DDX790/DDX770/DDX7070BT: For DDX470/DDX4070BT/DDX3070: For DDX370: Language Select the text language used for on ...
Instruction Manual
Page 6
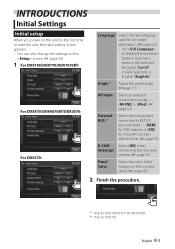
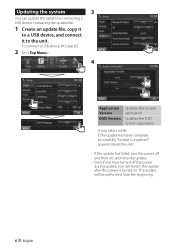
Updates the DVD System application. The update will be performed from the beginning. 6 English Reset the unit. • If the update has failed, turn the power off and then on, and retry the update. • Even if you have turned ...
Updates the DVD System application. The update will be performed from the beginning. 6 English Reset the unit. • If the update has failed, turn the power off and then on, and retry the update. • Even if you have turned ...
Instruction Manual
Page 8
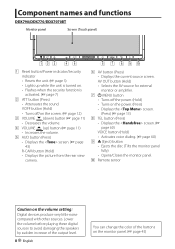
... activated. (☞ page 7) 2 ATT button (Press) • Attenuates the sound. Component names and functions DDX790/DDX770/DDX7070BT Monitor panel Screen (Touch panel) 1 Reset button/Power indicator/Security indicator • Resets the unit. (☞ page 3) • Lights up ) button (☞ page 11) • Increases the volume. 5 AUD button (Press) • Displays the screen...
... activated. (☞ page 7) 2 ATT button (Press) • Attenuates the sound. Component names and functions DDX790/DDX770/DDX7070BT Monitor panel Screen (Touch panel) 1 Reset button/Power indicator/Security indicator • Resets the unit. (☞ page 3) • Lights up ) button (☞ page 11) • Increases the volume. 5 AUD button (Press) • Displays the screen...
Instruction Manual
Page 9
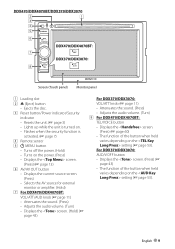
DDX470/DDX4070BT/DDX370/DDX3070 Screen (Touch panel) Monitor panel 1 Loading slot 2 0 (Eject) button • Ejects the disc. 3 Reset button/Power indicator/Security indicator • Resets the unit. (☞ page 3) • Lights up while the unit is turned on. • Flashes when the security ...• Attenuates the sound. (Press) • Adjusts the audio volume. (Turn) • Displays the screen. (Hold) (☞ page 43) For DDX370/DDX3070: VOL/ATT knob (☞ page 11) • Attenuates the sound. (Press) • Adjusts the audio volume. (Turn) 8 For DDX470/DDX4070BT:...
DDX470/DDX4070BT/DDX370/DDX3070 Screen (Touch panel) Monitor panel 1 Loading slot 2 0 (Eject) button • Ejects the disc. 3 Reset button/Power indicator/Security indicator • Resets the unit. (☞ page 3) • Lights up while the unit is turned on. • Flashes when the security ...• Attenuates the sound. (Press) • Adjusts the audio volume. (Turn) • Displays the screen. (Hold) (☞ page 43) For DDX370/DDX3070: VOL/ATT knob (☞ page 11) • Attenuates the sound. (Press) • Adjusts the audio volume. (Turn) 8 For DDX470/DDX4070BT:...
Instruction Manual
Page 10
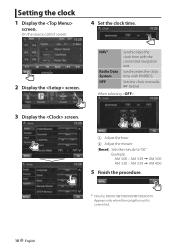
... 5 Finish the procedure. * Only for DDX7070BT/DDX4070BT/DDX3070. Sets the clock manually. (☞ below) When selecting : 3 Display the screen. 1 Adjust the hour 2 Adjust the minute [Reset]: Sets the minute to "00." Setting the clock 1 Display the screen. Appears only when the navigation unit is connected. 10 English Synchronizes the clock time...
... 5 Finish the procedure. * Only for DDX7070BT/DDX4070BT/DDX3070. Sets the clock manually. (☞ below) When selecting : 3 Display the screen. 1 Adjust the hour 2 Adjust the minute [Reset]: Sets the minute to "00." Setting the clock 1 Display the screen. Appears only when the navigation unit is connected. 10 English Synchronizes the clock time...
Instruction Manual
Page 23
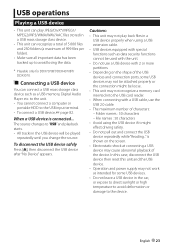
... avoid deformation or damage to the USB input terminal. • To connect a USB device, ☞ page 82. In this case, disconnect the USB device then reset this unit and the USB device. • Operation and power supply may not work as a USB memory, Digital Audio Player etc. to the unit. •...
... avoid deformation or damage to the USB input terminal. • To connect a USB device, ☞ page 82. In this case, disconnect the USB device then reset this unit and the USB device. • Operation and power supply may not work as a USB memory, Digital Audio Player etc. to the unit. •...
Instruction Manual
Page 26
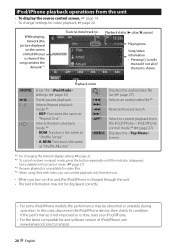
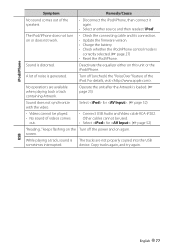
While playing, Artwork (the picture displayed on the screen of iPod/iPhone) is shown if the song contains the Artwork.*1 Track no./total track no. Playback status (3: play/8: pause) Playing time Song/video information • Pressing [ iPod/iPhone playback operations from the unit • To display the source control screen, ☞ page 14. • To change settings for video playback, ☞ page 20.
While playing, Artwork (the picture displayed on the screen of iPod/iPhone) is shown if the song contains the Artwork.*1 Track no./total track no. Playback status (3: play/8: pause) Playing time Song/video information • Pressing [ iPod/iPhone playback operations from the unit • To display the source control screen, ☞ page 14. • To change settings for video playback, ☞ page 20.
Instruction Manual
Page 54
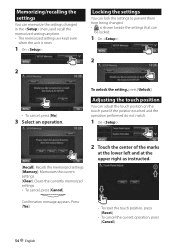
Press [Yes]. • To reset the touch position, press [Reset]. • To cancel the current operation, press [Cancel]. 54 English Confirmation message appears. To unlock the setting, press [Unlock]. Adjusting the touch position You can ... can memorize the settings changed in the menu and recall the memorized settings anytime. • The memorized settings are kept even when the unit is reset. 1 On : 2 Locking the settings You can lock the settings to prevent them from being changed. • is shown beside the settings that can adjust the...
Press [Yes]. • To reset the touch position, press [Reset]. • To cancel the current operation, press [Cancel]. 54 English Confirmation message appears. To unlock the setting, press [Unlock]. Adjusting the touch position You can ... can memorize the settings changed in the menu and recall the memorized settings anytime. • The memorized settings are kept even when the unit is reset. 1 On : 2 Locking the settings You can lock the settings to prevent them from being changed. • is shown beside the settings that can adjust the...
Instruction Manual
Page 56
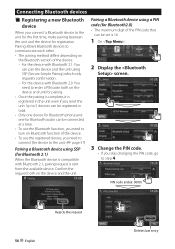
... pairing between the unit and the device for Bluetooth2.0) • The maximum digit of the device. - Connecting Bluetooth devices Registering a new Bluetooth device When you reset the unit. For the device with Bluetooth 2.0: You need to connect the device to enter a PIN code both on the Bluetooth version of the PIN...
... pairing between the unit and the device for Bluetooth2.0) • The maximum digit of the device. - Connecting Bluetooth devices Registering a new Bluetooth device When you reset the unit. For the device with Bluetooth 2.0: You need to connect the device to enter a PIN code both on the Bluetooth version of the PIN...

Instruction Manual
Page 74
... to initialize the Bluetooth module. The unit is abnormal. • Turn off and turn on the unit, then connect the device again (or reset the unit). If the message does not disappear, turn off and turn on the unit. • Connect another USB device. "Initialize Error"... a call . "Dial Error" Dialing has failed. Wire or insulate the speaker cord as the instructions supplied with the external components). Reset the unit. "Connection Error" The device is not engaged. Try the operation again. Bluetooth (Only for the connections (as well as appropriate, ...
... to initialize the Bluetooth module. The unit is abnormal. • Turn off and turn on the unit, then connect the device again (or reset the unit). If the message does not disappear, turn off and turn on the unit. • Connect another USB device. "Initialize Error"... a call . "Dial Error" Dialing has failed. Wire or insulate the speaker cord as the instructions supplied with the external components). Reset the unit. "Connection Error" The device is not engaged. Try the operation again. Bluetooth (Only for the connections (as well as appropriate, ...

Instruction Manual
Page 76
... speakers. No picture appears on the external monitor. • Connect the video cord correctly. • Select the correct input on the screen. (☞ page 12) Reset the unit. (☞ page 3) The remote controller* does not work. No picture is displayed on the appropriate discs. (☞ page 17) • Add appropriate extension...
... speakers. No picture appears on the external monitor. • Connect the video cord correctly. • Select the correct input on the screen. (☞ page 12) Reset the unit. (☞ page 3) The remote controller* does not work. No picture is displayed on the appropriate discs. (☞ page 17) • Add appropriate extension...
Instruction Manual
Page 77
... iPod/iPhone, then connect it again. • Select another source and then reselect "iPod". While playing a track, sound is correctly selected. (☞ page 27) • Reset the iPod/iPhone. Sound is generated. iPod/iPhone Symptom Remedy/Cause No sound comes out of the iPod. A lot of videos comes out. • Connect...
... iPod/iPhone, then connect it again. • Select another source and then reselect "iPod". While playing a track, sound is correctly selected. (☞ page 27) • Reset the iPod/iPhone. Sound is generated. iPod/iPhone Symptom Remedy/Cause No sound comes out of the iPod. A lot of videos comes out. • Connect...
Instruction Manual
Page 79
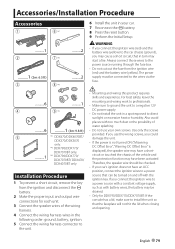
... Accessories/Installation Procedure Accessories 1 6 *1 ..........1 ..........2 2 7 *2 ..........1 (2m: 6.5 ft) 3 8 *2 ..........2 ..........6 ..........1 4 9 *3 ..........6 ..........1 (3m: 9.8 ft) 5 *1 DDX470/DDX4070BT/ DDX370/DDX3070 only. *2 DDX790/DDX770/ DDX7070BT only. ..........1 *3 DDX790/DDX770/ DDX7070BT/ DDX470/ DDX4070BT only. Installation Procedure 1 To prevent a short circuit, remove the key from the ignition and...If you use your car. 7 Reconnect the · battery. 8 Press the reset button. 9 Perform the Initial Setup. Use only the screws provided.
... Accessories/Installation Procedure Accessories 1 6 *1 ..........1 ..........2 2 7 *2 ..........1 (2m: 6.5 ft) 3 8 *2 ..........2 ..........6 ..........1 4 9 *3 ..........6 ..........1 (3m: 9.8 ft) 5 *1 DDX470/DDX4070BT/ DDX370/DDX3070 only. *2 DDX790/DDX770/ DDX7070BT only. ..........1 *3 DDX790/DDX770/ DDX7070BT/ DDX470/ DDX4070BT only. Installation Procedure 1 To prevent a short circuit, remove the key from the ignition and...If you use your car. 7 Reconnect the · battery. 8 Press the reset button. 9 Perform the Initial Setup. Use only the screws provided.


