
Instruction Manual
Page 2
Contents Before use 3 How to reset your unit 3 INTRODUCTIONS Initial Settings 5 Initial setup 5 Adjusting the panel angle 5 Updating the system 6 Activating the security function 7 Component names and functions 8 Setting the clock ... device/iPod/ iPhone 79 Connecting Other Products........80 Installing/Removing the Unit.....81 Specifications 83 KS-UBT1 (USB Bluetooth Adapter 86 2 DDX719/DDX7049BT/DDX419/DDX4049BT/DDX319/DDX3049
Contents Before use 3 How to reset your unit 3 INTRODUCTIONS Initial Settings 5 Initial setup 5 Adjusting the panel angle 5 Updating the system 6 Activating the security function 7 Component names and functions 8 Setting the clock ... device/iPod/ iPhone 79 Connecting Other Products........80 Installing/Removing the Unit.....81 Specifications 83 KS-UBT1 (USB Bluetooth Adapter 86 2 DDX719/DDX7049BT/DDX419/DDX4049BT/DDX319/DDX3049
Instruction Manual
Page 3
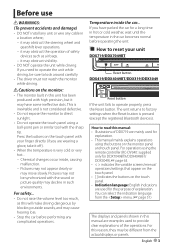
.... • This manual mainly explains operations using a ball-point pen or similar tool with your unit DDX719/DDX7049BT Reset button DDX419/DDX4049BT/DDX319/DDX3049 Reset button If the unit fails to read this manual: • Illustrations of explanation. If you need to operate the...where; - Press the buttons on the monitor panel and touch panel. English 3 Temperature inside , causing malfunction. - The unit returns to reset your finger directly (if you have some ineffective dots. Before use WARNINGS: (To prevent accidents and damage) • DO NOT install any ...
.... • This manual mainly explains operations using a ball-point pen or similar tool with your unit DDX719/DDX7049BT Reset button DDX419/DDX4049BT/DDX319/DDX3049 Reset button If the unit fails to read this manual: • Illustrations of explanation. If you need to operate the...where; - Press the buttons on the monitor panel and touch panel. English 3 Temperature inside , causing malfunction. - The unit returns to reset your finger directly (if you have some ineffective dots. Before use WARNINGS: (To prevent accidents and damage) • DO NOT install any ...
Instruction Manual
Page 5
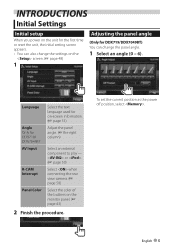
... the current position as the power off position, select . INTRODUCTIONS Initial Settings Initial setup When you power on the unit for the first time or reset the unit, the initial setting screen appears. • You can also change the panel angle. 1 Select an angle (0 - 6). English 5 Language Select the text language used...
... the current position as the power off position, select . INTRODUCTIONS Initial Settings Initial setup When you power on the unit for the first time or reset the unit, the initial setting screen appears. • You can also change the panel angle. 1 Select an angle (0 - 6). English 5 Language Select the text language used...
Instruction Manual
Page 6
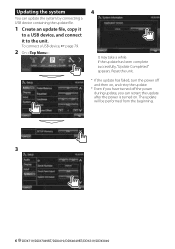
To connect a USB device, ☞ page 79. 2 On : 4 It may take a while. Reset the unit. * If the update has failed, turn the power off the power during update, you can update the system by connecting a USB device containing ... update file, copy it to a USB device, and connect it to the unit. The update will be performed from the beginning. 3 6 DDX719/DDX7049BT/DDX419/DDX4049BT/DDX319/DDX3049 If the update has been complete successfully, "Update Completed" appears. Updating the system You can restart the update after the power is turned on...
To connect a USB device, ☞ page 79. 2 On : 4 It may take a while. Reset the unit. * If the update has failed, turn the power off the power during update, you can update the system by connecting a USB device containing ... update file, copy it to a USB device, and connect it to the unit. The update will be performed from the beginning. 3 6 DDX719/DDX7049BT/DDX419/DDX4049BT/DDX319/DDX3049 If the update has been complete successfully, "Update Completed" appears. Updating the system You can restart the update after the power is turned on...
Instruction Manual
Page 8
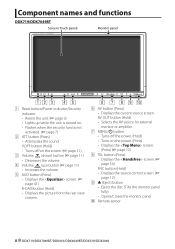
p Remote sensor 8 DDX719/DDX7049BT/DDX419/DDX4049BT/DDX319/DDX3049 AV OUT button (Hold) • Selects the AV source for external monitor or amplifier. 7 MENU/ button • Turns off /on the screen. (☞ page... is activated. (☞ page 7) 2 ATT button (Press) • Attenuates the sound. Component names and functions DDX719/DDX7049BT Screen (Touch panel) Monitor panel 1 Reset button/Power indicator/Security indicator • Resets the unit. (☞ page 3) • Lights up ) button (☞ page 11) • Increases the volume. 5 AUD button (Press) • Displays the ...
p Remote sensor 8 DDX719/DDX7049BT/DDX419/DDX4049BT/DDX319/DDX3049 AV OUT button (Hold) • Selects the AV source for external monitor or amplifier. 7 MENU/ button • Turns off /on the screen. (☞ page... is activated. (☞ page 7) 2 ATT button (Press) • Attenuates the sound. Component names and functions DDX719/DDX7049BT Screen (Touch panel) Monitor panel 1 Reset button/Power indicator/Security indicator • Resets the unit. (☞ page 3) • Lights up ) button (☞ page 11) • Increases the volume. 5 AUD button (Press) • Displays the ...
Instruction Manual
Page 9
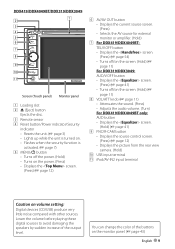
DDX419/DDX4049BT/DDX319/DDX3049 Screen (Touch panel) Monitor panel 1 Loading slot 2 0 (Eject) button Ejects the disc. 3 Remote sensor 4 Reset button/Power indicator/Security indicator • Resets the unit. (☞ page 3) • Lights up while the unit is turned on. • Flashes when the security function is ...TEL/V.OFF button • Displays the screen. (Press) (☞ page 54) • Turns off/on the screen. (Hold) (☞ page 11) For DDX319/DDX3049: AUD/V.OFF button • Displays the screen. (Press) (☞ page 41) • Turns off/on the screen. (Hold) (☞ page 11)...
DDX419/DDX4049BT/DDX319/DDX3049 Screen (Touch panel) Monitor panel 1 Loading slot 2 0 (Eject) button Ejects the disc. 3 Remote sensor 4 Reset button/Power indicator/Security indicator • Resets the unit. (☞ page 3) • Lights up while the unit is turned on. • Flashes when the security function is ...TEL/V.OFF button • Displays the screen. (Press) (☞ page 54) • Turns off/on the screen. (Hold) (☞ page 11) For DDX319/DDX3049: AUD/V.OFF button • Displays the screen. (Press) (☞ page 41) • Turns off/on the screen. (Hold) (☞ page 11)...
Instruction Manual
Page 10
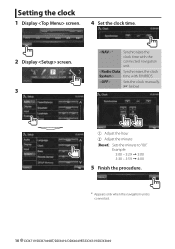
Setting the clock 1 Display screen. 4 Set the clock time. 2 Display screen. 3 * Synchronizes the clock time with FM RBDS. Example: 3:00 - 3:29 = 3:00 3:30 - 3:59 = 4:00 5 Finish the procedure. * Appears only when the navigation unit is connected. 10 DDX719/DDX7049BT/DDX419/DDX4049BT/DDX319/DDX3049 Sets the clock manually. (☞ below) 1 Adjust the hour 2 Adjust the minute [Reset]: Sets the minute to "00." time with the connected navigation unit.
Setting the clock 1 Display screen. 4 Set the clock time. 2 Display screen. 3 * Synchronizes the clock time with FM RBDS. Example: 3:00 - 3:29 = 3:00 3:30 - 3:59 = 4:00 5 Finish the procedure. * Appears only when the navigation unit is connected. 10 DDX719/DDX7049BT/DDX419/DDX4049BT/DDX319/DDX3049 Sets the clock manually. (☞ below) 1 Adjust the hour 2 Adjust the minute [Reset]: Sets the minute to "00." time with the connected navigation unit.

Instruction Manual
Page 22
... can connect a USB mass storage class device such as a USB memory, Digital Audio Player etc. In this case, disconnect the USB device then reset this unit and the USB device. • Operation and power supply may not recognize a memory card inserted into the USB card reader. •... abnormal playback of 999 files per folder). • Make sure all important data has been backed up to the device. 22 DDX719/DDX7049BT/DDX419/DDX4049BT/DDX319/DDX3049 Connecting a USB device You can recognize a total of 5 000 files and 250 folders (a maximum of the device. Folder names : 50 characters...
... can connect a USB mass storage class device such as a USB memory, Digital Audio Player etc. In this case, disconnect the USB device then reset this unit and the USB device. • Operation and power supply may not recognize a memory card inserted into the USB card reader. •... abnormal playback of 999 files per folder). • Make sure all important data has been backed up to the device. 22 DDX719/DDX7049BT/DDX419/DDX4049BT/DDX319/DDX3049 Connecting a USB device You can recognize a total of 5 000 files and 250 folders (a maximum of the device. Folder names : 50 characters...
Instruction Manual
Page 25
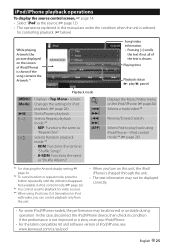
iPod/iPhone playback operations To display the source control screen, ☞ page 14. • Select "iPod" as the source. (☞ page 13) • The operations explained in this manual are under the condition when the unit is selected for controlling playback. (☞ below) While playing, Artwork (the picture displayed on the screen of iPod/iPhone) is shown if the song contains the Artwork.*1 Song/video information • Pressing [
iPod/iPhone playback operations To display the source control screen, ☞ page 14. • Select "iPod" as the source. (☞ page 13) • The operations explained in this manual are under the condition when the unit is selected for controlling playback. (☞ below) While playing, Artwork (the picture displayed on the screen of iPod/iPhone) is shown if the song contains the Artwork.*1 Song/video information • Pressing [
Instruction Manual
Page 52
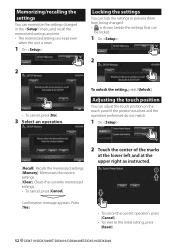
... You can be locked. 1 On : 2 • To cancel, press [No]. 3 Select an operation. Press [Yes]. • To cancel the current operation, press [Cancel]. • To reset to prevent them from being changed. • is shown beside the settings that can adjust the touch position on the touch panel if the position... can memorize the settings changed in the menu and recall the memorized settings anytime. • The memorized settings are kept even when the unit is reset. 1 On : 2 Locking the settings You can lock the settings to the initial setting, press...
... You can be locked. 1 On : 2 • To cancel, press [No]. 3 Select an operation. Press [Yes]. • To cancel the current operation, press [Cancel]. • To reset to prevent them from being changed. • is shown beside the settings that can adjust the touch position on the touch panel if the position... can memorize the settings changed in the menu and recall the memorized settings anytime. • The memorized settings are kept even when the unit is reset. 1 On : 2 Locking the settings You can lock the settings to the initial setting, press...
Instruction Manual
Page 54
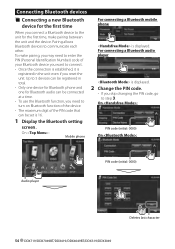
...unit and the device. On : PIN code (initial: 0000) On : Audio player PIN code (initial: 0000) Deletes last character 54 DDX719/DDX7049BT/DDX419/DDX4049BT/DDX319/DDX3049 On : Mobile phone For connecting a Bluetooth mobile phone is displayed. 2 Change the PIN code. • If you skip changing the PIN code, ...go to step 3. Up to 5 devices can be registered in the unit even if you reset the unit. Pairing allows Bluetooth devices to turn on Bluetooth function of the device. • The maximum digit of your Bluetooth device you want ...
...unit and the device. On : PIN code (initial: 0000) On : Audio player PIN code (initial: 0000) Deletes last character 54 DDX719/DDX7049BT/DDX419/DDX4049BT/DDX319/DDX3049 On : Mobile phone For connecting a Bluetooth mobile phone is displayed. 2 Change the PIN code. • If you skip changing the PIN code, ...go to step 3. Up to 5 devices can be registered in the unit even if you reset the unit. Pairing allows Bluetooth devices to turn on Bluetooth function of the device. • The maximum digit of your Bluetooth device you want ...
Instruction Manual
Page 71
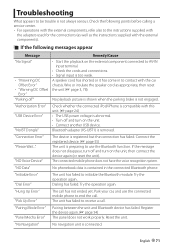
... the cords and connections. • Signal input is abnormal. • Turn off and turn on the unit, then connect the device again (or reset the unit). "Pairing Mode Error" "Panel Mecha Error" Pairing between the unit and Bluetooth device has failed. "No Navigation" No navigation unit is .... Troubleshooting What appears to receive a call. A speaker cord has shorted or it has come in the connected Bluetooth phone. Try the operation again. Reset the unit. "NO Voice Device" The device is not engaged. "Hung Up Error" "Pick Up Error" The call . Register the device again....
... the cords and connections. • Signal input is abnormal. • Turn off and turn on the unit, then connect the device again (or reset the unit). "Pairing Mode Error" "Panel Mecha Error" Pairing between the unit and Bluetooth device has failed. "No Navigation" No navigation unit is .... Troubleshooting What appears to receive a call. A speaker cord has shorted or it has come in the connected Bluetooth phone. Try the operation again. Reset the unit. "NO Voice Device" The device is not engaged. "Hung Up Error" "Pick Up Error" The call . Register the device again....
Instruction Manual
Page 73
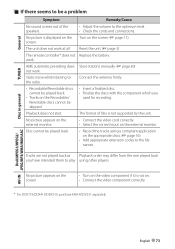
Turn on the screen. (☞ page 11) Reset the unit. (☞ page 3) The remote controller* does not work . Connect the antenna firmly. • Recordable/Rewritable discs cannot be played back. • Tracks on .../ JPEG/MP3/WMA/WAV/AAC AV-IN No picture appears on the screen. • Turn on . • Connect the video component correctly. * For DDX719/DDX419/DDX319, purchase KNA-RCDV331 separately. No picture is displayed on the external monitor. The unit does not work at all. • Adjust the volume to the...
Turn on the screen. (☞ page 11) Reset the unit. (☞ page 3) The remote controller* does not work . Connect the antenna firmly. • Recordable/Rewritable discs cannot be played back. • Tracks on .../ JPEG/MP3/WMA/WAV/AAC AV-IN No picture appears on the screen. • Turn on . • Connect the video component correctly. * For DDX719/DDX419/DDX319, purchase KNA-RCDV331 separately. No picture is displayed on the external monitor. The unit does not work at all. • Adjust the volume to the...
Instruction Manual
Page 74
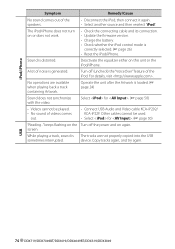
... Remedy/Cause No sound comes out of the iPod. For details, visit . Operate the unit after the Artwork is correctly selected. (☞ page 26) • Reset the iPod/iPhone. screen. The iPod/iPhone does not turn on or does not work. • Check the connecting cable and its connection. • Update... the speakers. • Disconnect the iPod, then connect it again. • Select another source and then reselect "iPod". device. USB 74 DDX719/DDX7049BT/DDX419/DDX4049BT/DDX319/DDX3049
... Remedy/Cause No sound comes out of the iPod. For details, visit . Operate the unit after the Artwork is correctly selected. (☞ page 26) • Reset the iPod/iPhone. screen. The iPod/iPhone does not turn on or does not work. • Check the connecting cable and its connection. • Update... the speakers. • Disconnect the iPod, then connect it again. • Select another source and then reselect "iPod". device. USB 74 DDX719/DDX7049BT/DDX419/DDX4049BT/DDX319/DDX3049

Instruction Manual
Page 76
battery. 8 Press the reset button. 9 Perform the Initial Setup. ..........1 2 7*2 ..........1 (2m: 6.5 ft) 3 8*2 ..........2 ..........2 2WARNING • If you connect the ignition wire (red) and the...supply. • Do not install the unit in a spot exposed to the instruction manual. ..........6 ..........1 4 9*3 ..........6 ..........1 (3m: 9.8 ft) 5 *1 DDX419/DDX4049BT/ DDX319/DDX3049 only. *2 DDX719/DDX7049BT only. ..........1 *3 DDX719/DDX7049BT/ DDX419/DDX4049BT only. If you may start a fire. After the Installation After the installation, perform the Initial Setup...
battery. 8 Press the reset button. 9 Perform the Initial Setup. ..........1 2 7*2 ..........1 (2m: 6.5 ft) 3 8*2 ..........2 ..........2 2WARNING • If you connect the ignition wire (red) and the...supply. • Do not install the unit in a spot exposed to the instruction manual. ..........6 ..........1 4 9*3 ..........6 ..........1 (3m: 9.8 ft) 5 *1 DDX419/DDX4049BT/ DDX319/DDX3049 only. *2 DDX719/DDX7049BT only. ..........1 *3 DDX719/DDX7049BT/ DDX419/DDX4049BT only. If you may start a fire. After the Installation After the installation, perform the Initial Setup...


