
Instruction Manual
Page 2
...11 Turning on the power 11 Turning off the power 11 Adjusting the volume 11 Putting the unit in standby 11 Turning off the screen 11 Switching screens 12 AV SOURCE OPERATIONS Selecting the playback source....13 Displaying the source control screen ..........14 Disc operations 15 Playing a disc 15 Playable disc types 16 Playback operations 17 Settings for disc playback 21 USB operations 22 Playing a USB device 22 Listening to the iPod/iPhone device 24 iPod/iPhone playback operations 25 Selecting a track/video from menu on the iPod/iPhone 26 Operating in iPod/iPhone control mode...
...11 Turning on the power 11 Turning off the power 11 Adjusting the volume 11 Putting the unit in standby 11 Turning off the screen 11 Switching screens 12 AV SOURCE OPERATIONS Selecting the playback source....13 Displaying the source control screen ..........14 Disc operations 15 Playing a disc 15 Playable disc types 16 Playback operations 17 Settings for disc playback 21 USB operations 22 Playing a USB device 22 Listening to the iPod/iPhone device 24 iPod/iPhone playback operations 25 Selecting a track/video from menu on the iPod/iPhone 26 Operating in iPod/iPhone control mode...
Instruction Manual
Page 3
...) • DO NOT install any unit or wire any complicated operations. How to provide clear explanations of safety devices such as this will make driving dangerous by blocking outside sounds, and may have parked the car for a long time in hot or cold weather, wait until the temperature in the car becomes normal before performing any cable in this manual: • Illustrations of...
...) • DO NOT install any unit or wire any complicated operations. How to provide clear explanations of safety devices such as this will make driving dangerous by blocking outside sounds, and may have parked the car for a long time in hot or cold weather, wait until the temperature in the car becomes normal before performing any cable in this manual: • Illustrations of...
Instruction Manual
Page 4
... with the limits for help. This equipment may generate or use radio frequency energy. DDX719X/DDX419/DDX319: CAUTION Use of controls or adjustments or performance of the FCC Rules. There is not installed and used in accordance with Federal Regulations, following measures: • Reorient or relocate the receiving antenna. • Increase the separation between the equipment and receiver. • Connect the equipment into an...
... with the limits for help. This equipment may generate or use radio frequency energy. DDX719X/DDX419/DDX319: CAUTION Use of controls or adjustments or performance of the FCC Rules. There is not installed and used in accordance with Federal Regulations, following measures: • Reorient or relocate the receiving antenna. • Increase the separation between the equipment and receiver. • Connect the equipment into an...
Instruction Manual
Page 5
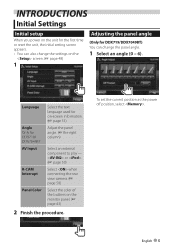
.../DDX7049BT) You can change the settings on the screen. (☞ page 48) 1 Adjusting the panel angle (Only for DDX719/ DDX7049BT AV Input Adjust the panel angle. (☞ the right column) Select an external component to play - English 5 INTRODUCTIONS Initial Settings Initial setup When you power on the unit for the first time or reset the unit, the initial setting screen appears. • You can also change the panel angle. 1 Select an angle (0 - 6).
.../DDX7049BT) You can change the settings on the screen. (☞ page 48) 1 Adjusting the panel angle (Only for DDX719/ DDX7049BT AV Input Adjust the panel angle. (☞ the right column) Select an external component to play - English 5 INTRODUCTIONS Initial Settings Initial setup When you power on the unit for the first time or reset the unit, the initial setting screen appears. • You can also change the panel angle. 1 Select an angle (0 - 6).
Instruction Manual
Page 9
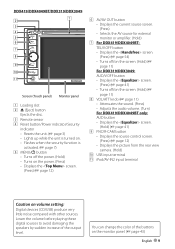
.../DDX4049BT/DDX319/DDX3049 Screen (Touch panel) Monitor panel 1 Loading slot 2 0 (Eject) button Ejects the disc. 3 Remote sensor 4 Reset button/Power indicator/Security indicator • Resets the unit. (☞ page 3) • Lights up while the unit is turned on. • Flashes when the security function is activated. (☞ page 7) 5 MENU/ button • Turns off the power. (Hold) • Turns on the power. (Press) • Displays the screen. (Press) (☞ page 12) 6 AV/AV OUT button • Displays the current source screen. (Press) • Selects...
.../DDX4049BT/DDX319/DDX3049 Screen (Touch panel) Monitor panel 1 Loading slot 2 0 (Eject) button Ejects the disc. 3 Remote sensor 4 Reset button/Power indicator/Security indicator • Resets the unit. (☞ page 3) • Lights up while the unit is turned on. • Flashes when the security function is activated. (☞ page 7) 5 MENU/ button • Turns off the power. (Hold) • Turns on the power. (Press) • Displays the screen. (Press) (☞ page 12) 6 AV/AV OUT button • Displays the current source screen. (Press) • Selects...

Instruction Manual
Page 13
... external component connected to the PANDORA® internet radio broadcast. Listen to SiriusXM™ channels. *1 You can select 3 items to the radio broadcast. Plays a disc. Plays an iPod/iPhone. Plays a Bluetooth audio player. Switches to AV-IN input terminal. AV SOURCE OPERATIONS Selecting the playback source DDX719/DDX419/DDX319 *1 *2 DDX7049BT/DDX4049BT/DDX3049 *1 *2 NAV*3 (☞ page 40) DISC (☞ page 15) TEL*4 (☞ page 57) USB (☞ page 22) iPod*5 (☞ page 24) TUNER (☞ page...
... external component connected to the PANDORA® internet radio broadcast. Listen to SiriusXM™ channels. *1 You can select 3 items to the radio broadcast. Plays a disc. Plays an iPod/iPhone. Plays a Bluetooth audio player. Switches to AV-IN input terminal. AV SOURCE OPERATIONS Selecting the playback source DDX719/DDX419/DDX319 *1 *2 DDX7049BT/DDX4049BT/DDX3049 *1 *2 NAV*3 (☞ page 40) DISC (☞ page 15) TEL*4 (☞ page 57) USB (☞ page 22) iPod*5 (☞ page 24) TUNER (☞ page...

Instruction Manual
Page 22
The source changes to avoid losing the data. File names : 50 characters • Avoid using a USB extension cord. • USB devices equipped with special functions such as data security functions cannot be used with the unit. • Do not use a USB device with a USB cable, use the USB 2.0 cable. • The maximum number of the device. In this case, disconnect the USB device then reset this unit and the USB device. • Operation and power supply may cause abnormal playback...
The source changes to avoid losing the data. File names : 50 characters • Avoid using a USB extension cord. • USB devices equipped with special functions such as data security functions cannot be used with the unit. • Do not use a USB device with a USB cable, use the USB 2.0 cable. • The maximum number of the device. In this case, disconnect the USB device then reset this unit and the USB device. • Operation and power supply may cause abnormal playback...

Instruction Manual
Page 29
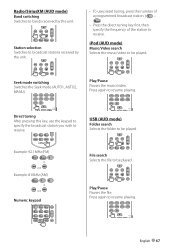
...] * [AM] [FM] [SEEK] [4] [¢] [MENU] Enters FM RBDS program search mode. (☞ page 31) Selects AM band. Selects FM band. Changes the seek mode. • AUTO1: Auto Search • AUTO2: Tunes in stations in the preset station. (Press) • Presets the currently tuned station. (Hold) [Mode] Displays tuner setting screen. (☞ page 30) [TI] Activates/deactivates TI standby reception mode. (☞ page 31) [Mono] * Activates/deactivates monaural mode for a station. • The search method differs...
...] * [AM] [FM] [SEEK] [4] [¢] [MENU] Enters FM RBDS program search mode. (☞ page 31) Selects AM band. Selects FM band. Changes the seek mode. • AUTO1: Auto Search • AUTO2: Tunes in stations in the preset station. (Press) • Presets the currently tuned station. (Hold) [Mode] Displays tuner setting screen. (☞ page 30) [TI] Activates/deactivates TI standby reception mode. (☞ page 31) [Mono] * Activates/deactivates monaural mode for a station. • The search method differs...
Instruction Manual
Page 39
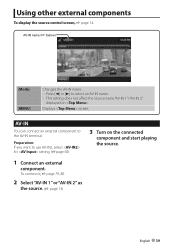
...) [Mode] [MENU] Changes the AV-IN name. • Press [2] or [3] to the AV-IN terminal. AV-IN You can connect an external component to select an AV-IN name. • This setting does not affect the source name "AV-IN 1"/ "AV-IN 2" displayed on the connected component and start playing the source. 1 Connect an external component. Using other external components To display the source control screen, ☞...
...) [Mode] [MENU] Changes the AV-IN name. • Press [2] or [3] to the AV-IN terminal. AV-IN You can connect an external component to select an AV-IN name. • This setting does not affect the source name "AV-IN 1"/ "AV-IN 2" displayed on the connected component and start playing the source. 1 Connect an external component. Using other external components To display the source control screen, ☞...
Instruction Manual
Page 40
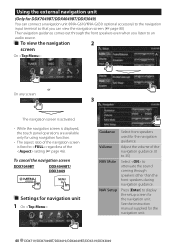
... 35) Select to attenuate the sound coming through the front speakers even when you listen to an audio source. To cancel the navigation screen DDX7049BT DDX4049BT/ DDX3049 Settings for navigation unit 1 On : Guidance Volume NAV Mute NAV Setup Select front speakers used for using navigation function. • The aspect ratio of the navigation screen is displayed, the touch panel operations are available only for the navigation guidance. See the instruction manual supplied...
... 35) Select to attenuate the sound coming through the front speakers even when you listen to an audio source. To cancel the navigation screen DDX7049BT DDX4049BT/ DDX3049 Settings for navigation unit 1 On : Guidance Volume NAV Mute NAV Setup Select front speakers used for using navigation function. • The aspect ratio of the navigation screen is displayed, the touch panel operations are available only for the navigation guidance. See the instruction manual supplied...

Instruction Manual
Page 42
... for the subwoofer. *2 Adjusts the subwoofer level. *1 Adjustable only when the subwoofer is activated. (☞ page 48) *2 Not selectable when is set to . 42 DDX719/DDX7049BT/DDX419/DDX4049BT/DDX319/DDX3049 Flat Changes level of the frequency. Q Factor Adjusts the width of Bass/ Middle/Treble to 0. Selects the phase for front or rear speakers (high pass filter). Adjusting the cross over frequency 1 On : 2 2 3 Adjust the sound of "Selecting a preset sound mode," then... Adjusts the cross over frequency. Adjusting the sound precisely 1 Perform...
... for the subwoofer. *2 Adjusts the subwoofer level. *1 Adjustable only when the subwoofer is activated. (☞ page 48) *2 Not selectable when is set to . 42 DDX719/DDX7049BT/DDX419/DDX4049BT/DDX319/DDX3049 Flat Changes level of the frequency. Q Factor Adjusts the width of Bass/ Middle/Treble to 0. Selects the phase for front or rear speakers (high pass filter). Adjusting the cross over frequency 1 On : 2 2 3 Adjust the sound of "Selecting a preset sound mode," then... Adjusts the cross over frequency. Adjusting the sound precisely 1 Perform...

Instruction Manual
Page 48
.../Easy/Top40/Jazz/User Audio Loudness X'over frequency. (☞ page 42) Volume Offset Adjust and store the auto-adjustment volume level for each source. (For discs, the adjustment is stored for each of the connected speaker. ♦ Standard/Narrow/Middle/Wide 48 DDX719/DDX7049BT/DDX419/DDX4049BT/DDX319/DDX3049 Setting menu items • You cannot change the source. ♦ -15 to R6; Speaker Select Select the size of the following categories: DVD/DVD-VR, VCD...
.../Easy/Top40/Jazz/User Audio Loudness X'over frequency. (☞ page 42) Volume Offset Adjust and store the auto-adjustment volume level for each source. (For discs, the adjustment is stored for each of the connected speaker. ♦ Standard/Narrow/Middle/Wide 48 DDX719/DDX7049BT/DDX419/DDX4049BT/DDX319/DDX3049 Setting menu items • You cannot change the source. ♦ -15 to R6; Speaker Select Select the size of the following categories: DVD/DVD-VR, VCD...

Instruction Manual
Page 49
... display design (background and panel color). (☞ page 43) OSD Clock ♦ ON ♦ OFF : Displays the clock while a video source is required. (☞ page 78) : Activates dimmer. : Cancels. : Activates or deactivates dimmer according to the day/night display setting of the connected navigation unit. Display Scroll ♦ ON ♦ Once : Repeats scrolling. : Scrolls the displayed information once. ♦ OFF : Cancels. • Pressing [ Menu item Selectable setting/item Initial: Underlined Dimmer ♦ Auto...
... display design (background and panel color). (☞ page 43) OSD Clock ♦ ON ♦ OFF : Displays the clock while a video source is required. (☞ page 78) : Activates dimmer. : Cancels. : Activates or deactivates dimmer according to the day/night display setting of the connected navigation unit. Display Scroll ♦ ON ♦ Once : Repeats scrolling. : Scrolls the displayed information once. ♦ OFF : Cancels. • Pressing [ Menu item Selectable setting/item Initial: Underlined Dimmer ♦ Auto...
Instruction Manual
Page 62
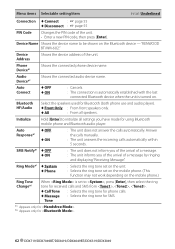
... ringing and displaying "Receiving Message." Ring Mode*1 ♦ System ♦ Phone : Selects the ring tone set on the unit. : Selects the ring tone set to initialize all speakers. Auto Connect ♦ OFF ♦ ON : Cancels. : The connection is automatically established with the last connected Bluetooth device when the unit is set on the mobile phone. (This function may not work depending on the mobile phone.) Ring Tone Change*1 When is turned on the Bluetooth device - Auto Response...
... ringing and displaying "Receiving Message." Ring Mode*1 ♦ System ♦ Phone : Selects the ring tone set on the unit. : Selects the ring tone set to initialize all speakers. Auto Connect ♦ OFF ♦ ON : Cancels. : The connection is automatically established with the last connected Bluetooth device when the unit is set on the mobile phone. (This function may not work depending on the mobile phone.) Ring Tone Change*1 When is turned on the Bluetooth device - Auto Response...
Instruction Manual
Page 67
..., use preset tuning, press the number of a programmed broadcast station. ( 1 - ) 6MNO • Press the direct tuning key first, then specify the frequency of the station to be played. Seek mode switching Switches the Seek mode (AUTO1, AUTO2, MANU). Example: 92.1MHz (FM) 9WXYZ 2ABC 1 m or Example: 810kHz (AM) 8TUV 1 0 m or Numeric keypad File search Selects the file to receive. USB (AUD mode) Folder search Selects the folder to resume playing. iPod (AUD mode) Music/Video...
..., use preset tuning, press the number of a programmed broadcast station. ( 1 - ) 6MNO • Press the direct tuning key first, then specify the frequency of the station to be played. Seek mode switching Switches the Seek mode (AUTO1, AUTO2, MANU). Example: 92.1MHz (FM) 9WXYZ 2ABC 1 m or Example: 810kHz (AM) 8TUV 1 0 m or Numeric keypad File search Selects the file to receive. USB (AUD mode) Folder search Selects the folder to resume playing. iPod (AUD mode) Music/Video...
Instruction Manual
Page 71
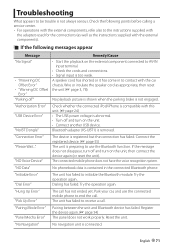
... the parking brake is removed. Bluetooth adapter (KS-UBT1) is not engaged. Try the operation again. The unit has failed to receive a call . Park your car, and use the Bluetooth function. Reset the unit. A speaker cord has shorted or it has come in the connected Bluetooth phone. Wire or insulate the speaker cord as the instructions supplied with the car chassis. "NO Voice Device" The device is connected. "Connection Error" "Please Wait..." The connected mobile phone does not have...
... the parking brake is removed. Bluetooth adapter (KS-UBT1) is not engaged. Try the operation again. The unit has failed to receive a call . Park your car, and use the Bluetooth function. Reset the unit. A speaker cord has shorted or it has come in the connected Bluetooth phone. Wire or insulate the speaker cord as the instructions supplied with the car chassis. "NO Voice Device" The device is connected. "Connection Error" "Please Wait..." The connected mobile phone does not have...
Instruction Manual
Page 73
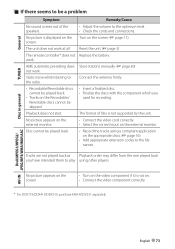
... names. Turn on the external monitor. The format of the speakers. Disc cannot be played back. • Record the tracks using other players. Playback does not start. No picture appears on the external monitor. • Connect the video cord correctly. • Select the correct input on the screen. (☞ page 11) Reset the unit. (☞ page 3) The remote controller* does not work. The unit does not work . Disc in general...
... names. Turn on the external monitor. The format of the speakers. Disc cannot be played back. • Record the tracks using other players. Playback does not start. No picture appears on the external monitor. • Connect the video cord correctly. • Select the correct input on the screen. (☞ page 11) Reset the unit. (☞ page 3) The remote controller* does not work. The unit does not work . Disc in general...
Instruction Manual
Page 75
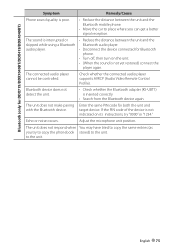
... not make pairing Enter the same PIN code for Bluetooth phone. • Turn off, then turn on its instructions, try to copy the phonebook stored) to the unit. If the PIN code of the device is inserted correctly. • Search from the Bluetooth device again. target device. Check whether the connected audio player supports AVRCP (Audio Video Remote Control Profile). Adjust the microphone unit position. to the unit. Bluetooth (only for DDX719/DDX7049BT/DDX419/DDX4049BT) Symptom Remedy/Cause Phone sound...
... not make pairing Enter the same PIN code for Bluetooth phone. • Turn off, then turn on its instructions, try to copy the phonebook stored) to the unit. If the PIN code of the device is inserted correctly. • Search from the Bluetooth device again. target device. Check whether the connected audio player supports AVRCP (Audio Video Remote Control Profile). Adjust the microphone unit position. to the unit. Bluetooth (only for DDX719/DDX7049BT/DDX419/DDX4049BT) Symptom Remedy/Cause Phone sound...

Instruction Manual
Page 76
... fuse from the ignition and disconnect the battery. 2 Make the proper input and output wire connections for each unit. 3 Connect the speaker wires of water splashing. • Do not use the wrong screws, you connect the ignition wire to the instruction manual. ..........6 ..........1 4 9*3 ..........6 ..........1 (3m: 9.8 ft) 5 *1 DDX419/DDX4049BT/ DDX319/DDX3049 only. *2 DDX719/DDX7049BT only. ..........1 *3 DDX719/DDX7049BT/ DDX419/DDX4049BT only. Accessories/Installation Procedure Accessories 1 6*1 7 Reconnect the - If you use your car. ¤ • Mounting...
... fuse from the ignition and disconnect the battery. 2 Make the proper input and output wire connections for each unit. 3 Connect the speaker wires of water splashing. • Do not use the wrong screws, you connect the ignition wire to the instruction manual. ..........6 ..........1 4 9*3 ..........6 ..........1 (3m: 9.8 ft) 5 *1 DDX419/DDX4049BT/ DDX319/DDX3049 only. *2 DDX719/DDX7049BT only. ..........1 *3 DDX719/DDX7049BT/ DDX419/DDX4049BT only. Accessories/Installation Procedure Accessories 1 6*1 7 Reconnect the - If you use your car. ¤ • Mounting...
Instruction Manual
Page 78
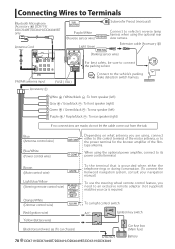
... wire) Antenna Cord Light Green Subwoofer Preout (monaural) Connect to connect the parking sensor. FM/AM antenna input Accessory 1 FUSE ( 10A ) ⁄ Connect to its power control terminal. Blue (Antenna control wire) Blue/White (Power control wire) Depending on what antenna you are made, do not let the cable come out from the tab. When using , connect either the telephone rings or during conversation. (To connect the Kenwood navigation system, consult your navigation manual.) To use the steering wheel remote control...
... wire) Antenna Cord Light Green Subwoofer Preout (monaural) Connect to connect the parking sensor. FM/AM antenna input Accessory 1 FUSE ( 10A ) ⁄ Connect to its power control terminal. Blue (Antenna control wire) Blue/White (Power control wire) Depending on what antenna you are made, do not let the cable come out from the tab. When using , connect either the telephone rings or during conversation. (To connect the Kenwood navigation system, consult your navigation manual.) To use the steering wheel remote control...


