Instruction Manual
Page 2
...8 Power Selecting the Source Volume Attenuator System Q Audio Control Audio Setup Speaker Setting Switching Display Dimmer Control Theft Deterrent Faceplate TEL Mute Tuner features 12 Tuning Tuning Mode Station Preset Memory Auto Memory Entry Preset Tuning CD/Audio file/External disc control features 14 Playing CD & Audio file Playing External Disc Fast Forwarding and Reversing Track/File Search Disc Search/Folder Search Direct Track/File Search Direct Disc Search Track/File/Disc/Folder Repeat Scan Play Random Play Magazine Random Play Folder Select Text/Title Scroll HD Radio control...
...8 Power Selecting the Source Volume Attenuator System Q Audio Control Audio Setup Speaker Setting Switching Display Dimmer Control Theft Deterrent Faceplate TEL Mute Tuner features 12 Tuning Tuning Mode Station Preset Memory Auto Memory Entry Preset Tuning CD/Audio file/External disc control features 14 Playing CD & Audio file Playing External Disc Fast Forwarding and Reversing Track/File Search Disc Search/Folder Search Direct Track/File Search Direct Disc Search Track/File/Disc/Folder Repeat Scan Play Random Play Magazine Random Play Folder Select Text/Title Scroll HD Radio control...
Instruction Manual
Page 3
... to radio communications, if it is no guarantee that to operate this equipment may cause harmful interference unless the modifications are reproductions of labels on a circuit different from that interference will not occur in a particular installation. 2Warning 2CAUTION Use of controls or adjustments or performance of procedures other than those specified herein may result in the instruction manual...
... to radio communications, if it is no guarantee that to operate this equipment may cause harmful interference unless the modifications are reproductions of labels on a circuit different from that interference will not occur in a particular installation. 2Warning 2CAUTION Use of controls or adjustments or performance of procedures other than those specified herein may result in the instruction manual...
Instruction Manual
Page 4
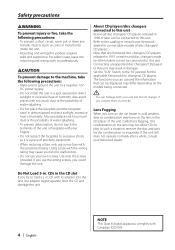
... safety's sake, leave the mounting and wiring work to professionals. 2CAUTION To prevent damage to the machine, take the following precautions: • Make sure to ground the unit to a negative 12V DC power supply. • Do not install the unit in a spot exposed to direct sunlight or excessive heat or humidity. About CD players/disc changers connected to this unit Kenwood disc changers/ CD players released in 1998 or later...
... safety's sake, leave the mounting and wiring work to professionals. 2CAUTION To prevent damage to the machine, take the following precautions: • Make sure to ground the unit to a negative 12V DC power supply. • Do not install the unit in a spot exposed to direct sunlight or excessive heat or humidity. About CD players/disc changers connected to this unit Kenwood disc changers/ CD players released in 1998 or later...
Instruction Manual
Page 5
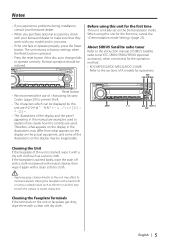
... SIRIUS Satellite radio tuner Refer to the instruction manual of SIRIUS Satellite radio tuner KTC-SR901/SR902/SR903 (optional accessory), when connected, for operations. Therefore, what appears on the display on the unit or faceplate get dirty, wipe them with your model and in this unit is pressed. • Press the reset button if the disc auto changer fails to explain more clearly how the controls are examples used to operate correctly. The unit returns to factory settings...
... SIRIUS Satellite radio tuner Refer to the instruction manual of SIRIUS Satellite radio tuner KTC-SR901/SR902/SR903 (optional accessory), when connected, for operations. Therefore, what appears on the display on the unit or faceplate get dirty, wipe them with your model and in this unit is pressed. • Press the reset button if the disc auto changer fails to explain more clearly how the controls are examples used to operate correctly. The unit returns to factory settings...
Instruction Manual
Page 8
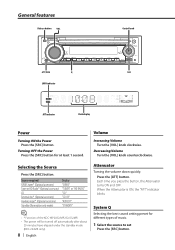
... standby mode (KDC-232MR only). 8 | English Attenuator Turning the volume down quickly. Each time you press the button, the Attenuator turns ON and OFF. When the Attenuator is ON, the "ATT" indicator blinks. Press the [ATT] button. Source required Display SIRIUS tuner* (Optional accessory) "SIRIUS" Tuner or HD Radio* (Optional accessory) "TUNER" or "HD RADIO" CD "CD" External disc* (Optional accessory) "CD CH" Auxiliary input* (Optional accessory) "AUX EXT" Standby (Illumination only mode) "STANDBY" • * Function of music. 1 Select the source to set...
... standby mode (KDC-232MR only). 8 | English Attenuator Turning the volume down quickly. Each time you press the button, the Attenuator turns ON and OFF. When the Attenuator is ON, the "ATT" indicator blinks. Press the [ATT] button. Source required Display SIRIUS tuner* (Optional accessory) "SIRIUS" Tuner or HD Radio* (Optional accessory) "TUNER" or "HD RADIO" CD "CD" External disc* (Optional accessory) "CD CH" Auxiliary input* (Optional accessory) "AUX EXT" Standby (Illumination only mode) "STANDBY" • * Function of music. 1 Select the source to set...
Instruction Manual
Page 9
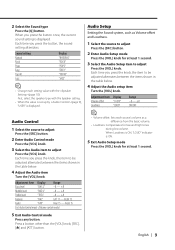
... Audio item Turn the [VOL] knob. When Loudness is ON, "LOUD" indicator is displayed. Adjustment Item Display Range Bass level "BAS L" -8 - +8 Middle level "MID L" -8 - +8 Treble level "TRE L" -8 - +8 Balance "BAL" Left 15 - Right 15 Fader "FAD" Rear 15 - Front 15 Exit Audio Control mode (Volume control mode) 5 Exit Audio Control mode Press any button. When you press the knob, the item to adjust Press the [VOL] knob. First, select the speaker type with the (page 10). Audio Setup Setting...
... Audio item Turn the [VOL] knob. When Loudness is ON, "LOUD" indicator is displayed. Adjustment Item Display Range Bass level "BAS L" -8 - +8 Middle level "MID L" -8 - +8 Treble level "TRE L" -8 - +8 Balance "BAL" Left 15 - Right 15 Fader "FAD" Rear 15 - Front 15 Exit Audio Control mode (Volume control mode) 5 Exit Audio Control mode Press any button. When you press the knob, the item to adjust Press the [VOL] knob. First, select the speaker type with the (page 10). Audio Setup Setting...
Instruction Manual
Page 10
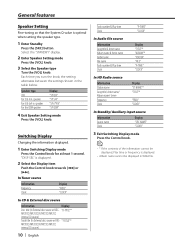
..."* "FREQ" "CLOCK" In Standby/ Auxiliary input source Information Source name Clock Display "SRC NAME" "CLOCK" 3 Exit Switching Display mode Press the Control knob. • * If the contents of the information cannot be displayed, Play time or Frequency is displayed. • Album name cannot be displayed in . "DISP SEL" is optimal when setting the speaker type. 1 Enter Standby Press the [SRC] button. Speaker type OFF For 5 & 4 in WMA file. General features Speaker Setting Fine-tuning so...
..."* "FREQ" "CLOCK" In Standby/ Auxiliary input source Information Source name Clock Display "SRC NAME" "CLOCK" 3 Exit Switching Display mode Press the Control knob. • * If the contents of the information cannot be displayed, Play time or Frequency is displayed. • Album name cannot be displayed in . "DISP SEL" is optimal when setting the speaker type. 1 Enter Standby Press the [SRC] button. Speaker type OFF For 5 & 4 in WMA file. General features Speaker Setting Fine-tuning so...
Instruction Manual
Page 12
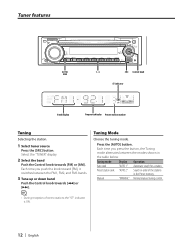
... time you push the knob toward [FM], it switches between the modes shown in the Preset memory. Tuning mode Auto seek Preset station seek Manual Display "AUTO 1" "AUTO 2" "MANUAL" Operation Automatic search for a station. Tuner features AUTO/ AME 1 - 6 SRC Control knob ST indicator Band display Frequency display Preset station number Tuning Selecting the station. 1 Select tuner source Press the [SRC] button. Tuning Mode Choose the tuning mode. Search in order of stereo stations the "ST" indicator is ON. 12 | English Press the [AUTO] button. Normal manual tuning...
... time you push the knob toward [FM], it switches between the modes shown in the Preset memory. Tuning mode Auto seek Preset station seek Manual Display "AUTO 1" "AUTO 2" "MANUAL" Operation Automatic search for a station. Tuner features AUTO/ AME 1 - 6 SRC Control knob ST indicator Band display Frequency display Preset station number Tuning Selecting the station. 1 Select tuner source Press the [SRC] button. Tuning Mode Choose the tuning mode. Search in order of stereo stations the "ST" indicator is ON. 12 | English Press the [AUTO] button. Normal manual tuning...
Instruction Manual
Page 14
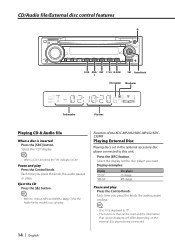
... Disc number IN indicator Track number Play time Playing CD & Audio file When a disc is ON. Function of the KDC-MP2032/KDC-MP232/KDC232MR Playing External Disc Playing discs set in the optional accessory disc player connected to (page 7) for the disc player you press the knob, the audio pauses or plays. • Disc 10 is displayed as "0". • The functions that can be displayed will differ depending on the external disc players being connected. 14 | English Display examples: Display "CD CH" "MD CH" Disc player CD changer...
... Disc number IN indicator Track number Play time Playing CD & Audio file When a disc is ON. Function of the KDC-MP2032/KDC-MP232/KDC232MR Playing External Disc Playing discs set in the optional accessory disc player connected to (page 7) for the disc player you press the knob, the audio pauses or plays. • Disc 10 is displayed as "0". • The functions that can be displayed will differ depending on the external disc players being connected. 14 | English Display examples: Display "CD CH" "MD CH" Disc player CD changer...
Instruction Manual
Page 18
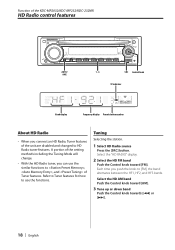
... station. 1 Select HD Radio source Press the [SRC] button. Each time you push the knob to use the similar functions to , , and of the unit are disabled and changed to HD Radio tuner features. Function of the KDC-MP2032/KDC-MP232/KDC-232MR HD Radio control features AUTO/ AME 1 - 6 SRC Control knob ST indicator Band display Frequency display Preset station number About HD Radio • When you connect an HD Radio, Tuner features of Tuner features. A portion of the setting methods including the Tuning Mode...
... station. 1 Select HD Radio source Press the [SRC] button. Each time you push the knob to use the similar functions to , , and of the unit are disabled and changed to HD Radio tuner features. Function of the KDC-MP2032/KDC-MP232/KDC-232MR HD Radio control features AUTO/ AME 1 - 6 SRC Control knob ST indicator Band display Frequency display Preset station number About HD Radio • When you connect an HD Radio, Tuner features of Tuner features. A portion of the setting methods including the Tuning Mode...
Instruction Manual
Page 20
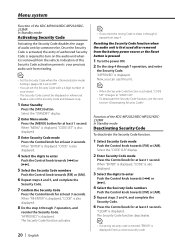
... unit. • When the Security Code function is activated, "CODE SET" changes to enter Push the Control knob towards [4] or [¢]. 5 Select the Security Code numbers Push the Control knob towards [FM] or [AM]. Menu system Function of the KDC-MP2032/KDC-MP232/KDC232MR In Standby mode Activating Security Code Activating the Security Code disables the usage of the Security Code and treasure it is removed from the battery power source or the Reset button is pressed 1 Turn the power...
... unit. • When the Security Code function is activated, "CODE SET" changes to enter Push the Control knob towards [4] or [¢]. 5 Select the Security Code numbers Push the Control knob towards [FM] or [AM]. Menu system Function of the KDC-MP2032/KDC-MP232/KDC232MR In Standby mode Activating Security Code Activating the Security Code disables the usage of the Security Code and treasure it is removed from the battery power source or the Reset button is pressed 1 Turn the power...
Instruction Manual
Page 21
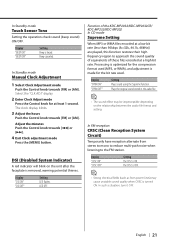
... towards [FM] or [AM]. Select the "CLK ADJ" display. 2 Enter Clock Adjust mode Press the Control knob for the compression format used . LED OFF. Display "SPRM ON" "SPRM OFF" Setting Plays sound using the Supreme function. Display "BEEP ON" "BEEP OFF" Setting Beep is turned ON. In Standby mode Manual Clock Adjustment 1 Select Clock Adjustment mode Push the Control knob towards [4] or [¢]. 4 Exit Clock adjustment mode Press the [MENU] button. Display "DSI ON" "DSI OFF" Setting LED flashes. Function of these files encoded...
... towards [FM] or [AM]. Select the "CLK ADJ" display. 2 Enter Clock Adjust mode Press the Control knob for the compression format used . LED OFF. Display "SPRM ON" "SPRM OFF" Setting Plays sound using the Supreme function. Display "BEEP ON" "BEEP OFF" Setting Beep is turned ON. In Standby mode Manual Clock Adjustment 1 Select Clock Adjustment mode Push the Control knob towards [4] or [¢]. 4 Exit Clock adjustment mode Press the [MENU] button. Display "DSI ON" "DSI OFF" Setting LED flashes. Function of these files encoded...

Instruction Manual
Page 22
...AUX EXT" • "DVD" • "PORTABLE" • "GAME" • "VIDEO" • "TV" 6 Exit Auxiliary input display setting mode Press the [MENU] button. • When operation stops for at that time is registered, and the Auxiliary input display setting mode closes. • You can only set to "AUTO", when the Ball game mode program (non-delayed broadcast program) is important to Auxiliary input source. 1 Select Auxiliary input source Press the [SRC] button. Menu system Function of the KDC-MP2032/KDC-MP232/KDC232MR In HD Radio mode Receive mode Setting Sets the receive mode. 1 Select...
...AUX EXT" • "DVD" • "PORTABLE" • "GAME" • "VIDEO" • "TV" 6 Exit Auxiliary input display setting mode Press the [MENU] button. • When operation stops for at that time is registered, and the Auxiliary input display setting mode closes. • You can only set to "AUTO", when the Ball game mode program (non-delayed broadcast program) is important to Auxiliary input source. 1 Select Auxiliary input source Press the [SRC] button. Menu system Function of the KDC-MP2032/KDC-MP232/KDC232MR In HD Radio mode Receive mode Setting Sets the receive mode. 1 Select...
Instruction Manual
Page 24
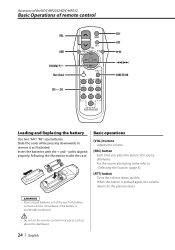
... ATT 38 4/¢ DIRECT/OK Loading and Replacing the battery Use two "AA"/ "R6"-size batteries. For the source alternating order refer to remove it as above the dashboard. 24 | English Basic operations [VOL] buttons Adjusts the volume. [SRC] button Each time you press the button, the source alternates. Not Used [0] - [9] SRC ATT VOL AUD 38 FM+ 4 ¢ AM- Slide the cover while pressing downwards to (page 8). [ATT] button Turns the volume...
... ATT 38 4/¢ DIRECT/OK Loading and Replacing the battery Use two "AA"/ "R6"-size batteries. For the source alternating order refer to remove it as above the dashboard. 24 | English Basic operations [VOL] buttons Adjusts the volume. [SRC] button Each time you press the button, the source alternates. Not Used [0] - [9] SRC ATT VOL AUD 38 FM+ 4 ¢ AM- Slide the cover while pressing downwards to (page 8). [ATT] button Turns the volume...
Instruction Manual
Page 25
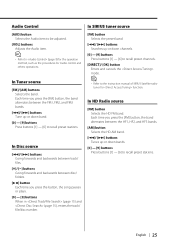
... bands. [0] - [9] buttons Press buttons [1] - [6] to recall preset stations. In HD Radio source [FM] button Selects the HD FM band. In SIRIUS tuner source [FM] button Selects the preset band. [4]/ [¢] buttons Searches up or down channels. [0] - [9] buttons Press buttons [1] - [6] to (page 9) for the operation method, such as the procedures for function. Audio Control [AUD] button Selects the Audio item to be adjusted. [VOL] buttons Adjusts the Audio item. • Refer to recall preset channels. [DIRECT]/ [OK] button Enters and cancels the mode. Each time you...
... bands. [0] - [9] buttons Press buttons [1] - [6] to recall preset stations. In HD Radio source [FM] button Selects the HD FM band. In SIRIUS tuner source [FM] button Selects the preset band. [4]/ [¢] buttons Searches up or down channels. [0] - [9] buttons Press buttons [1] - [6] to (page 9) for the operation method, such as the procedures for function. Audio Control [AUD] button Selects the Audio item to be adjusted. [VOL] buttons Adjusts the Audio item. • Refer to recall preset channels. [DIRECT]/ [OK] button Enters and cancels the mode. Each time you...
Instruction Manual
Page 26
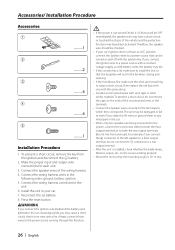
Connect the wiring harness wires in the car. • When only two speakers are working properly. • Mount the unit so that can be OFF immediately), the speaker wire may have a short-circuit or touched the chasis of the vehicle and the protection function may have an ACC position, connect the ignition wires to a power source that the mounting angle is installed, check whether the brake lamps, blinkers, wipers, etc...
Connect the wiring harness wires in the car. • When only two speakers are working properly. • Mount the unit so that can be OFF immediately), the speaker wire may have a short-circuit or touched the chasis of the vehicle and the protection function may have an ACC position, connect the ignition wires to a power source that the mounting angle is installed, check whether the brake lamps, blinkers, wipers, etc...
Instruction Manual
Page 31
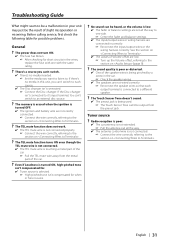
... of Volume offset are low. ☞ Turn up the Volume offset, referring to one with one side. ☞ Center the fader and balance settings. ✔ The input/output wires or wiring harness are set all the way. ✔ The antenna control wire is turned OFF. ✔ The ignition and battery wire are incorrectly connected. ☞ Connect the wire correctly, referring to the section on . ? Radio reception is poor. ✔ The car antenna is...
... of Volume offset are low. ☞ Turn up the Volume offset, referring to one with one side. ☞ Center the fader and balance settings. ✔ The input/output wires or wiring harness are set all the way. ✔ The antenna control wire is turned OFF. ✔ The ignition and battery wire are incorrectly connected. ☞ Connect the wire correctly, referring to the section on . ? Radio reception is poor. ✔ The car antenna is...
Instruction Manual
Page 32
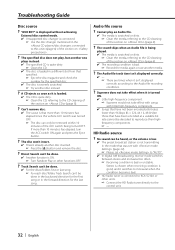
... press the Eject button. ? The Audio file track time isn't displayed correctly. ✔ --☞ There are times when it switches to monaural when the condition becomes bad. ✔ HD Radio tuner is ON. ☞ Turn Random Play or other units. ☞ Connect the HD Radio tuner directly to the CD cleaning of the section on (page 6). ? HD Radio source ? The disc won't insert. ✔ There's already another disc instead. ? Direct Search can...
... press the Eject button. ? The Audio file track time isn't displayed correctly. ✔ --☞ There are times when it switches to monaural when the condition becomes bad. ✔ HD Radio tuner is ON. ☞ Turn Random Play or other units. ☞ Connect the HD Radio tuner directly to the CD cleaning of the section on (page 6). ? HD Radio source ? The disc won't insert. ✔ There's already another disc instead. ? Direct Search can...
Instruction Manual
Page 33
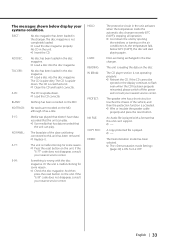
... the disc magazine. NO PANEL: The faceplate of the vehicle, and then the protection function is reading the data on the air conditioner. NO TRACK: No tracks are being connected to flash even when the CD has been properly reinserted, please switch off the power and consult your systems condition. The unit is activated. ➪ Wire or insulate the speaker cable properly and press the reset button...
... the disc magazine. NO PANEL: The faceplate of the vehicle, and then the protection function is reading the data on the air conditioner. NO TRACK: No tracks are being connected to flash even when the CD has been properly reinserted, please switch off the power and consult your systems condition. The unit is activated. ➪ Wire or insulate the speaker cable properly and press the reset button...
Instruction Manual
Page 34
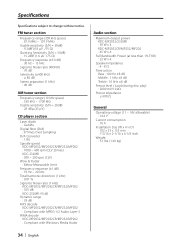
... output power KDC-MP2032/232MR : 50 W x 4 KDC-MP2032CR/MP232/MP202 : 45 W x 4 Full Bandwidth Power (at less than 1% THD) : 22 W x 4 Speaker impedance : 4 - 8 Ω Tone action Bass : 100 Hz ±8 dB Middle : 1 kHz ±8 dB Treble : 10 kHz ±8 dB Preout level / Load (during disc play) : 2000 mV/10 kΩ Preout impedance : ≤ 600 Ω General Operating voltage (11 - 16V allowable) : 14.4 V Current consumption : 10 A Installation...
... output power KDC-MP2032/232MR : 50 W x 4 KDC-MP2032CR/MP232/MP202 : 45 W x 4 Full Bandwidth Power (at less than 1% THD) : 22 W x 4 Speaker impedance : 4 - 8 Ω Tone action Bass : 100 Hz ±8 dB Middle : 1 kHz ±8 dB Treble : 10 kHz ±8 dB Preout level / Load (during disc play) : 2000 mV/10 kΩ Preout impedance : ≤ 600 Ω General Operating voltage (11 - 16V allowable) : 14.4 V Current consumption : 10 A Installation...


