Instruction Manual
Page 2
... Power Selecting the Source Volume Attenuator System Q Audio Control Audio Setup Speaker Setting Clock Display Adjusting Clock Theft Deterrent Faceplate Tuner features Tuning Tuning Mode Station Preset Memory Auto Memory Entry Preset Tuning CRSC (Clean Reception System Circuit) CD player features Playing CD Fast Forwarding and Reversing Track Search Track Repeat Scan Play Random...
... Power Selecting the Source Volume Attenuator System Q Audio Control Audio Setup Speaker Setting Clock Display Adjusting Clock Theft Deterrent Faceplate Tuner features Tuning Tuning Mode Station Preset Memory Auto Memory Entry Preset Tuning CRSC (Clean Reception System Circuit) CD player features Playing CD Fast Forwarding and Reversing Track Search Track Repeat Scan Play Random...
Instruction Manual
Page 8
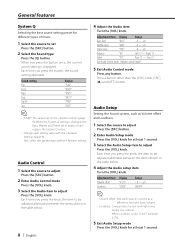
...button. Adjustment Item Display Volume offset "V-OF" Loudness "LOUD" Range -8 - ±0 ON/OFF • Volume offset: Sets each setting value with the Speaker setting. Each time you press the button once, the current sound setting is displayed. Each time you press the knob, the item to adjust Press... any button. When Loudness is ON, "LOUD" indicator is changed, the Bass, Middle, and Treble set on the (page 8). First, select the speaker type with the (page 9). When the System Q setting is ON. 5 Exit Audio Setup mode Press the [VOL] knob for low and high tones...
...button. Adjustment Item Display Volume offset "V-OF" Loudness "LOUD" Range -8 - ±0 ON/OFF • Volume offset: Sets each setting value with the Speaker setting. Each time you press the button once, the current sound setting is displayed. Each time you press the knob, the item to adjust Press... any button. When Loudness is ON, "LOUD" indicator is changed, the Bass, Middle, and Treble set on the (page 8). First, select the speaker type with the (page 9). When the System Q setting is ON. 5 Exit Audio Setup mode Press the [VOL] knob for low and high tones...
Instruction Manual
Page 9
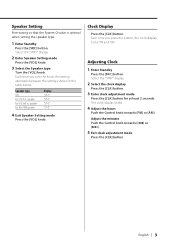
Clock Display Press the [CLK] button. Adjust the minutes Push the Control knob towards [FM] or [AM]. speaker For 6 & 6x9 in the table below. Adjusting Clock 1 Enter Standby Press the [SRC] button. English | 9 Each time you press the button, the clock display ...clock display Press the [CLK] button. 3 Enter clock adjustment mode Press the [CLK] button for at least 2 seconds. Speaker Setting Fine-tuning so that the System Q value is optimal when setting the speaker type. 1 Enter Standby Press the [SRC] button. The clock display blinks. 4 Adjust the hours Push the Control knob towards...
Clock Display Press the [CLK] button. Adjust the minutes Push the Control knob towards [FM] or [AM]. speaker For 6 & 6x9 in the table below. Adjusting Clock 1 Enter Standby Press the [SRC] button. English | 9 Each time you press the button, the clock display ...clock display Press the [CLK] button. 3 Enter clock adjustment mode Press the [CLK] button for at least 2 seconds. Speaker Setting Fine-tuning so that the System Q value is optimal when setting the speaker type. 1 Enter Standby Press the [SRC] button. The clock display blinks. 4 Adjust the hours Push the Control knob towards...
Instruction Manual
Page 15
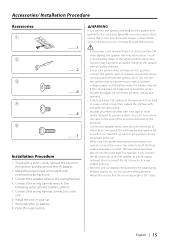
...fuse blows, first make sure the wires aren't touching to a rear output terminal. • After the unit is 30° or less. Therefore, the speaker wire should be checked. • If your car. 7. The unit may have a short-circuit or touched the chasis of the wiring harness. 4. Connect...input and output wire connections for each unit. 3. If you connect the + connector of the unconnected wires or the terminals. • Connect the speaker wires correctly to the terminals to the car chassis (ground), you connect the ignition wire (red) and the battery wire (yellow) to which they...
...fuse blows, first make sure the wires aren't touching to a rear output terminal. • After the unit is 30° or less. Therefore, the speaker wire should be checked. • If your car. 7. The unit may have a short-circuit or touched the chasis of the wiring harness. 4. Connect...input and output wire connections for each unit. 3. If you connect the + connector of the unconnected wires or the terminals. • Connect the speaker wires correctly to the terminals to the car chassis (ground), you connect the ignition wire (red) and the battery wire (yellow) to which they...
Instruction Manual
Page 16
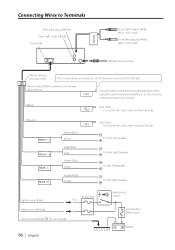
... optional power amplifier, or to Terminals Rear left output (White) Rear right output (Red) Fuse (10A) FRONT Front right output (Red) (KDC-1032 only) Front left speaker To rear right speaker Ignition wire (Red) Car fuse box ACC Battery wire (Yellow) Ground wire (Black) · (To car chassis) 16 | English + ...Green Purple/Black Purple Not Used Do not let the wire come out from the tab. Battery To front left speaker To front right speaker To rear left output (White) (KDC-1032 only) FM/AM antenna input Wiring harness (Accessory1) If no connections are made, do not let the wire ...
... optional power amplifier, or to Terminals Rear left output (White) Rear right output (Red) Fuse (10A) FRONT Front right output (Red) (KDC-1032 only) Front left speaker To rear right speaker Ignition wire (Red) Car fuse box ACC Battery wire (Yellow) Ground wire (Black) · (To car chassis) 16 | English + ...Green Purple/Black Purple Not Used Do not let the wire come out from the tab. Battery To front left speaker To front right speaker To rear left output (White) (KDC-1032 only) FM/AM antenna input Wiring harness (Accessory1) If no connections are made, do not let the wire ...
Instruction Manual
Page 20
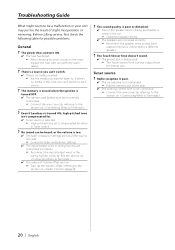
...compensated for when in this unit, you want to listen to. See the section on . 20 | English Radio reception is poor. ✔ The car antenna is connected to a different speaker. ? Troubleshooting Guide What might seem to be a malfunction in your unit may just be output from the preout...10004; The fader or balance settings are incorrectly connected. ☞ Connect the wire correctly, referring to the section on . ✔ The values of the speaker wires is being used. ☞ The Touch Sensor Tone can 't switch. ✔ There's no media in Tuner source. ? No sound can 't switch...
...compensated for when in this unit, you want to listen to. See the section on . 20 | English Radio reception is poor. ✔ The car antenna is connected to a different speaker. ? Troubleshooting Guide What might seem to be a malfunction in your unit may just be output from the preout...10004; The fader or balance settings are incorrectly connected. ☞ Connect the wire correctly, referring to the section on . ✔ The values of the speaker wires is being used. ☞ The Touch Sensor Tone can 't switch. ✔ There's no media in Tuner source. ? No sound can 't switch...

Instruction Manual
Page 22
... : 40 dB AM tuner section Frequency range (10 kHz space) : 530 kHz - 1700 kHz Usable sensitivity (S/N = 20dB) : 28 dBμ (25 μV) CD player section Laser diode : GaAlAs Digital filter (D/A) : 8 Times Over Sampling D/A Converter : 1 Bit Spindle speed : 500 - 200 rpm (CLV) Wow & Flutter : Below ...dB Dynamic range : 93 dB Channel separation : 85 dB Audio section Maximum output power : 45 W x 4 Full Bandwidth Power (at less than 1% THD) : 22 W x 4 Speaker impedance : 4 - 8 Ω Tone action Bass : 100 Hz ±8 dB Middle : 1 kHz ±8 dB Treble : 10 kHz ±8 dB Preout level / Load (...
... : 40 dB AM tuner section Frequency range (10 kHz space) : 530 kHz - 1700 kHz Usable sensitivity (S/N = 20dB) : 28 dBμ (25 μV) CD player section Laser diode : GaAlAs Digital filter (D/A) : 8 Times Over Sampling D/A Converter : 1 Bit Spindle speed : 500 - 200 rpm (CLV) Wow & Flutter : Below ...dB Dynamic range : 93 dB Channel separation : 85 dB Audio section Maximum output power : 45 W x 4 Full Bandwidth Power (at less than 1% THD) : 22 W x 4 Speaker impedance : 4 - 8 Ω Tone action Bass : 100 Hz ±8 dB Middle : 1 kHz ±8 dB Treble : 10 kHz ±8 dB Preout level / Load (...


