
Operation Manual
Page 1
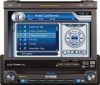
VM9412 Installation and Operation Manual BAND AS Multimedia Receiver DISP CLOSE BAND AS Press Audio VM9412 SRC REAR RPT SCN ANGLE / TILT PICTURE WIDE DISP OPEN Enter PTY RDM STOP MUTE DIV ® video 160 Watts Peak Watts en Crête Vatios el Máximo 40W x 4
VM9412 Installation and Operation Manual BAND AS Multimedia Receiver DISP CLOSE BAND AS Press Audio VM9412 SRC REAR RPT SCN ANGLE / TILT PICTURE WIDE DISP OPEN Enter PTY RDM STOP MUTE DIV ® video 160 Watts Peak Watts en Crête Vatios el Máximo 40W x 4
Operation Manual
Page 3
... DVD/VCD Video Operation 22 DVD/CD Audio Operation 25 MP3/WMA/iPod Operation 26 Troubleshooting ...29 Specifications ...32 i If you take a few minutes to look through it, you will find the instructions in this owner's manual clear and easy to use all the features of your new Jensen VM9412 Mobile Multimedia Receiver for choosing a Jensen...
... DVD/VCD Video Operation 22 DVD/CD Audio Operation 25 MP3/WMA/iPod Operation 26 Troubleshooting ...29 Specifications ...32 i If you take a few minutes to look through it, you will find the instructions in this owner's manual clear and easy to use all the features of your new Jensen VM9412 Mobile Multimedia Receiver for choosing a Jensen...
Operation Manual
Page 5
... Channel Name, Artist, Song and Categories Displayed on your Jensen VM9412 installed by a reputable installation shop. All Audio Channels • 4VRMS Line Output -... Remote control • Burn Up To 1500 MP3 / WMA Files onto a DVD+R/RW • Audible Forward / Reverse Track Search • Random, Repeat and...Receiver. High Speed Direct Connect Interface to Access iPod Playlists, Artists, Albums, Songs, **Photos and **Video (** Requires Photo or Video iPod) • Power Management Charges iPod while Connected • Requires jLinkCable (Sold Separately) MediaLink3 • Under Dash...
... Channel Name, Artist, Song and Categories Displayed on your Jensen VM9412 installed by a reputable installation shop. All Audio Channels • 4VRMS Line Output -... Remote control • Burn Up To 1500 MP3 / WMA Files onto a DVD+R/RW • Audible Forward / Reverse Track Search • Random, Repeat and...Receiver. High Speed Direct Connect Interface to Access iPod Playlists, Artists, Albums, Songs, **Photos and **Video (** Requires Photo or Video iPod) • Power Management Charges iPod while Connected • Requires jLinkCable (Sold Separately) MediaLink3 • Under Dash...

Operation Manual
Page 6
...damage to the unit and result in "Monitor Left/Right Angle Adjustment" on page 12. 2 Under these tools and supplies to install your VM9412: • Torx type, flat-head and Philips screwdrivers • Wire cutters and strippers • Tools to remove existing radio (...will become active. WARNING! WARNING! Never use the video display function while driving the vehicle. VM9412 Optional Equipment • NAV101 The VM9412 is "camera ready." Never install this unit where operation and viewing could interfere with the NAV101 navigation module. Never disassemble or...
...damage to the unit and result in "Monitor Left/Right Angle Adjustment" on page 12. 2 Under these tools and supplies to install your VM9412: • Torx type, flat-head and Philips screwdrivers • Wire cutters and strippers • Tools to remove existing radio (...will become active. WARNING! WARNING! Never use the video display function while driving the vehicle. VM9412 Optional Equipment • NAV101 The VM9412 is "camera ready." Never install this unit where operation and viewing could interfere with the NAV101 navigation module. Never disassemble or...
Operation Manual
Page 9
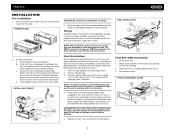
.... NOTE: For proper operation of the chassis. 1. FINAL INSTALLATION 5 4 1 BAND AS Press Audio VM9412 SRC REAR RPT SCN PTY RDM STOP DISP OPEN MUTE Enter 3 2 Final ISO-DIN Installation 1. Slide radio chassis into place. Reinstall dash panel. Install the half-sleeve. a. Wiring Complete wiring as necessary so ...AS Press Audio VM9412 SRC REAR RPT SCN PTY RDM STOP DISP OPEN MUTE Enter 4 1 2 5 Locate the series of bend-tabs along the top, bottom and sides of the tabs outward as illustrated in -line with final mounting of the CD/DVD player, the ...
.... NOTE: For proper operation of the chassis. 1. FINAL INSTALLATION 5 4 1 BAND AS Press Audio VM9412 SRC REAR RPT SCN PTY RDM STOP DISP OPEN MUTE Enter 3 2 Final ISO-DIN Installation 1. Slide radio chassis into place. Reinstall dash panel. Install the half-sleeve. a. Wiring Complete wiring as necessary so ...AS Press Audio VM9412 SRC REAR RPT SCN PTY RDM STOP DISP OPEN MUTE Enter 4 1 2 5 Locate the series of bend-tabs along the top, bottom and sides of the tabs outward as illustrated in -line with final mounting of the CD/DVD player, the ...

Operation Manual
Page 19
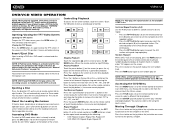
...the OFF button (on the right side of your rear monitors, as illustrated below. Controlling the Rear Zone Screen(s) If you have a rear touch screen installed, you can touch the screen to rear zone, move the F/R switch (32) located on the SOURCE MENU) to one of the screen. NOTE: You...or rear zone touch screen or the remote control. You can be played simultaneously on the front screen while DVD video is available to select a source for the front or rear zone. VM9412 MULTI-ZONE OPERATION Independent sources can be a Touch Screen. Connecting the Rear Zone Touch Screen You can connect...
...the OFF button (on the right side of your rear monitors, as illustrated below. Controlling the Rear Zone Screen(s) If you have a rear touch screen installed, you can touch the screen to rear zone, move the F/R switch (32) located on the SOURCE MENU) to one of the screen. NOTE: You...or rear zone touch screen or the remote control. You can be played simultaneously on the front screen while DVD video is available to select a source for the front or rear zone. VM9412 MULTI-ZONE OPERATION Independent sources can be a Touch Screen. Connecting the Rear Zone Touch Screen You can connect...
Operation Manual
Page 26
VM9412 DVD/VCD VIDEO OPERATION NOTE: When properly installed, DVD video cannot be authorized (see "General Sub-menu Features" on screen. Rear video screens, if applicable, will not play the next random track. Normal operation resumes. Accessing DVD Mode To switch to DVD mode when a disc is already...a disc in the "IN" position, it moves out before closing. AUDIO A-B SUBTITLE 1/2 MENU TITLE 2/2 DISP Stopping Playback Touch the stop DVD play button (>) to fast forward. Fast Forward Playback Press the /\ button on the joystick or the >> button on the remote control to stop...
VM9412 DVD/VCD VIDEO OPERATION NOTE: When properly installed, DVD video cannot be authorized (see "General Sub-menu Features" on screen. Rear video screens, if applicable, will not play the next random track. Normal operation resumes. Accessing DVD Mode To switch to DVD mode when a disc is already...a disc in the "IN" position, it moves out before closing. AUDIO A-B SUBTITLE 1/2 MENU TITLE 2/2 DISP Stopping Playback Touch the stop DVD play button (>) to fast forward. Fast Forward Playback Press the /\ button on the joystick or the >> button on the remote control to stop...
Operation Manual
Page 31
...TV Signal = NTSC, and Widescreen = On. Photo Playback While iPod photos can be displayed on the TFT monitor. VM9412 16. Folder name 19. 1/2 or 2/2: Touch this page button to the next track on -screen buttons 20. ...25. Touch to access the Video menu 24. NOTE: When burning MP3 / WMA files onto a DVD disc, use the iPod to the last mode accessed when the iPod is plugged back into the unit...panel, or press the >/|| button (18) on the iPod. NOTE: After disconnecting your iPod, the VM9412 will play in the sequence of pages and files in one of the page. Browse all files Controlling...
...TV Signal = NTSC, and Widescreen = On. Photo Playback While iPod photos can be displayed on the TFT monitor. VM9412 16. Folder name 19. 1/2 or 2/2: Touch this page button to the next track on -screen buttons 20. ...25. Touch to access the Video menu 24. NOTE: When burning MP3 / WMA files onto a DVD disc, use the iPod to the last mode accessed when the iPod is plugged back into the unit...panel, or press the >/|| button (18) on the iPod. NOTE: After disconnecting your iPod, the VM9412 will play in the sequence of pages and files in one of the page. Browse all files Controlling...
Operation Manual
Page 33
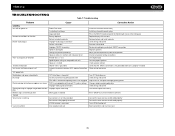
... settings Improper video signal connections Prolonged image or improper height/width ratio dis- VM9412 TROUBLESHOOTING Table 7: Troubleshooting Problem Cause Corrective Action GENERAL Unit will not power on...Car battery fuse blown Illegal operation Remote control does not function Battery depleted Battery installed incorrectly No/low audio output Improper audio output connection Volume set too low Improper...that it's properly insulated Check wiring and correct Turn TFT Auto Open on screen DVD is not compatible with unit Speaker is shorted Tel-Mute malfunction "MUTE" wire ...
... settings Improper video signal connections Prolonged image or improper height/width ratio dis- VM9412 TROUBLESHOOTING Table 7: Troubleshooting Problem Cause Corrective Action GENERAL Unit will not power on...Car battery fuse blown Illegal operation Remote control does not function Battery depleted Battery installed incorrectly No/low audio output Improper audio output connection Volume set too low Improper...that it's properly insulated Check wiring and correct Turn TFT Auto Open on screen DVD is not compatible with unit Speaker is shorted Tel-Mute malfunction "MUTE" wire ...
Operation Manual
Page 37
..., humidity, excessive temperature, extreme environmental conditions or external natural causes Please review the "Care and Maintenance" section of your Installation and Operation Manual for additional information regarding the proper use , be repaired or replaced with a new or reconditioned product (... Radios/Headunits Audiovox Electronics Corporation ("the Company") is committed to quality and customer service, and are not covered by improper installation, mishandling, misuse, neglect, accident, blown fuse, battery leakage, theft or improper storage • Products whose factory serial ...
..., humidity, excessive temperature, extreme environmental conditions or external natural causes Please review the "Care and Maintenance" section of your Installation and Operation Manual for additional information regarding the proper use , be repaired or replaced with a new or reconditioned product (... Radios/Headunits Audiovox Electronics Corporation ("the Company") is committed to quality and customer service, and are not covered by improper installation, mishandling, misuse, neglect, accident, blown fuse, battery leakage, theft or improper storage • Products whose factory serial ...


