Instruction Manual
Page 1
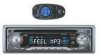
... Serial No. Model No. Para la instalación y las conexiones, refiérase al manual separado. which are located on the top or bottom of the cabinet. GET0132-001A [J] FRANÇAIS ESPAÑOL ENGLISH CD RECEIVER RECEPTOR CON CD RECEPTEUR CD ATT SOUND U R SOURCE F D VOL VOL KD-S890 KD-S890 KD-S890 For installation and connections, refer to the separate manual. INSTRUCTIONS MANUAL DE INSTRUCCIONES MANUEL D'INSTRUCTIONS For customer Use: Enter below...
... Serial No. Model No. Para la instalación y las conexiones, refiérase al manual separado. which are located on the top or bottom of the cabinet. GET0132-001A [J] FRANÇAIS ESPAÑOL ENGLISH CD RECEIVER RECEPTOR CON CD RECEPTEUR CD ATT SOUND U R SOURCE F D VOL VOL KD-S890 KD-S890 KD-S890 For installation and connections, refer to the separate manual. INSTRUCTIONS MANUAL DE INSTRUCCIONES MANUEL D'INSTRUCTIONS For customer Use: Enter below...
Instruction Manual
Page 2
... instructions, may result in the car becomes normal before performing any complicated operations. 2 *Temperature inside . IMPORTANT FOR LASER PRODUCTS Precautions: 1. Leave all servicing to drop the disc. CAUTION: Use of controls, adjustments or performance of the FCC Rules. If you reset the unit. Consult the dealer or an experienced radio/TV technician for help. Avoid direct exposure to defeat the safety switches. 5. CAUTION: This CD player uses...
... instructions, may result in the car becomes normal before performing any complicated operations. 2 *Temperature inside . IMPORTANT FOR LASER PRODUCTS Precautions: 1. Leave all servicing to drop the disc. CAUTION: Use of controls, adjustments or performance of the FCC Rules. If you reset the unit. Consult the dealer or an experienced radio/TV technician for help. Avoid direct exposure to defeat the safety switches. 5. CAUTION: This CD player uses...
Instruction Manual
Page 3
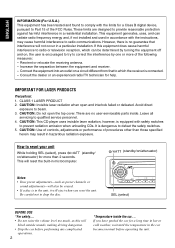
...ensure your unit 2 How to use the M (MODE) button 3 LOCATION OF THE BUTTONS 4 Control panel 4 Remote controller 5 Preparing the remote controller 6 BASIC OPERATIONS 7 Turning on the power 7 Setting the clock 8 RADIO OPERATIONS 9 Listening to the radio 9 Storing stations in memory 10 Tuning in to a preset station 11 CD OPERATIONS 12 Playing a CD 12 Locating a track or a particular portion on an MP3 disc 19 Selecting MP3 playback modes 21 SOUND ADJUSTMENTS 22 Selecting preset sound modes (C-EQ: custom equalizer 22 Adjusting the sound 23 OTHER MAIN FUNCTIONS 24 Changing the...
...ensure your unit 2 How to use the M (MODE) button 3 LOCATION OF THE BUTTONS 4 Control panel 4 Remote controller 5 Preparing the remote controller 6 BASIC OPERATIONS 7 Turning on the power 7 Setting the clock 8 RADIO OPERATIONS 9 Listening to the radio 9 Storing stations in memory 10 Tuning in to a preset station 11 CD OPERATIONS 12 Playing a CD 12 Locating a track or a particular portion on an MP3 disc 19 Selecting MP3 playback modes 21 SOUND ADJUSTMENTS 22 Selecting preset sound modes (C-EQ: custom equalizer 22 Adjusting the sound 23 OTHER MAIN FUNCTIONS 24 Changing the...
Instruction Manual
Page 4
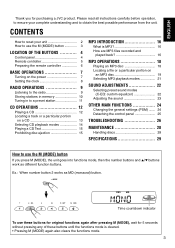
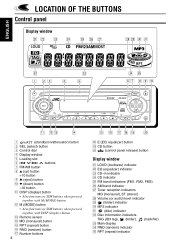
...button 9 0 (eject) button p ∞ (down) button -10 button q DISP (display) button • Also functions as SSM buttons when pressed together with M (MODE) button. e Remote sensor r MO (monaural) button t RPT (repeat) button y RND (random) button u Number buttons 4 i E (EQ: equalizer) button o CD button ; (control panel release) button Display window a LOUD (loudness) indicator s EQ (equalizer) indicator d CD-in indicator f CD indicator g FM band indicators (FM1, FM2, FM3) h AM band indicator j Tuner reception indicators MO (monaural), ST (stereo) k Volume (or audio) level...
...button 9 0 (eject) button p ∞ (down) button -10 button q DISP (display) button • Also functions as SSM buttons when pressed together with M (MODE) button. e Remote sensor r MO (monaural) button t RPT (repeat) button y RND (random) button u Number buttons 4 i E (EQ: equalizer) button o CD button ; (control panel release) button Display window a LOUD (loudness) indicator s EQ (equalizer) indicator d CD-in indicator f CD indicator g FM band indicators (FM1, FM2, FM3) h AM band indicator j Tuner reception indicators MO (monaural), ST (stereo) k Volume (or audio) level...
Instruction Manual
Page 5
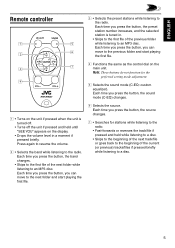
... folder and start playing the first file. 6 Selects the source. Press again to resume the volume. 2 • Selects the band while listening to an MP3 disc. VOL VOL 5 Selects the sound mode (C-EQ: custom equalizer). Each time you can move to the radio. Each time you press the button, you press the button, the preset station number increases, and the selected station is turned off. • Turns off the unit if pressed and...
... folder and start playing the first file. 6 Selects the source. Press again to resume the volume. 2 • Selects the band while listening to an MP3 disc. VOL VOL 5 Selects the sound mode (C-EQ: custom equalizer). Each time you can move to the radio. Each time you press the button, you press the button, the preset station number increases, and the selected station is turned off. • Turns off the unit if pressed and...
Instruction Manual
Page 6
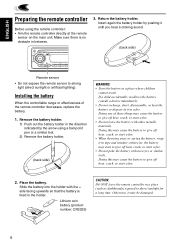
.... Insert again the battery holder by the arrow using the remote controller: • Aim the remote controller directly at the remote sensor on the main unit. Doing any of these things may cause the battery to direct sunlight for a long time. Place the battery. otherwise, the battery may cause the battery to strong light (direct sunlight or artificial lighting). Otherwise, it in tape and insulate; Make sure there is...
.... Insert again the battery holder by the arrow using the remote controller: • Aim the remote controller directly at the remote sensor on the main unit. Doing any of these things may cause the battery to direct sunlight for a long time. Place the battery. otherwise, the battery may cause the battery to strong light (direct sunlight or artificial lighting). Otherwise, it in tape and insulate; Make sure there is...
Instruction Manual
Page 7
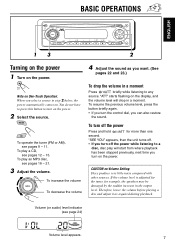
... increase the volume To decrease the volume 4 Adjust the sound as required during playback. To play an MP3 disc, see pages 12 - 15. "ATT" starts flashing on the power. To turn on Volume Setting: Discs produce very little noise compared with other sources. BASIC OPERATIONS ENGLISH 13 2 Turning on the power 1 Turn on the display, and the volume level will start from where playback has been stopped previously, next time you want...
... increase the volume To decrease the volume 4 Adjust the sound as required during playback. To play an MP3 disc, see pages 12 - 15. "ATT" starts flashing on the power. To turn on Volume Setting: Discs produce very little noise compared with other sources. BASIC OPERATIONS ENGLISH 13 2 Turning on the power 1 Turn on the display, and the volume level will start from where playback has been stopped previously, next time you want...
Instruction Manual
Page 8
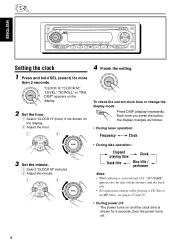
... power turns off. 8 To check the current clock time or change while playing a CD Text or an MP3 disc, see pages 15 and 19. • During power off: The power turns on the display. 2 Adjust the hour. 1 2 4 Finish the setting. Each time you press the button, the display changes as follows: • During tuner operation: Frequency Clock 3 Set the minute. 1 Select "CLOCK M" (minute). 2 Adjust the minute. 1 2 • During disc operation: Elapsed playing time Track title Clock Disc title / performer Notes: • While playing...
... power turns off. 8 To check the current clock time or change while playing a CD Text or an MP3 disc, see pages 15 and 19. • During power off: The power turns on the display. 2 Adjust the hour. 1 2 4 Finish the setting. Each time you press the button, the display changes as follows: • During tuner operation: Frequency Clock 3 Set the minute. 1 Select "CLOCK M" (minute). 2 Adjust the minute. 1 2 • During disc operation: Elapsed playing time Track title Clock Disc title / performer Notes: • While playing...
Instruction Manual
Page 9
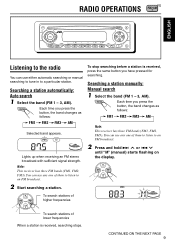
... frequencies When a station is received, press the same button you press the button, the band changes as follows: FM1 FM2 FM3 AM Selected band appears. Lights up when receiving an FM stereo broadcast with sufficient signal strength. RADIO OPERATIONS ENGLISH Listening to the radio You can use any one of them to listen to an FM broadcast. 2 Press and hold ¢ or 4 until "M" (manual) starts flashing...
... frequencies When a station is received, press the same button you press the button, the band changes as follows: FM1 FM2 FM3 AM Selected band appears. Lights up when receiving an FM stereo broadcast with sufficient signal strength. RADIO OPERATIONS ENGLISH Listening to the radio You can use any one of them to listen to an FM broadcast. 2 Press and hold ¢ or 4 until "M" (manual) starts flashing...
Instruction Manual
Page 10
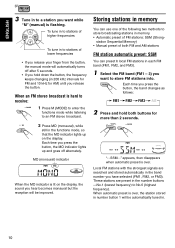
... down the button, the frequency keeps changing (in 200 kHz intervals for FM and 10 kHz for more than 2 seconds. Each time you have selected (FM1, FM2, or FM3). station Sequential Memory) • Manual preset of lower frequencies • If you release your finger from the button, the manual mode will be improved. When automatic preset is hard to receive: 1 Press M (MODE) to enter the functions mode while...
... down the button, the frequency keeps changing (in 200 kHz intervals for FM and 10 kHz for more than 2 seconds. Each time you have selected (FM1, FM2, or FM3). station Sequential Memory) • Manual preset of lower frequencies • If you release your finger from the button, the manual mode will be improved. When automatic preset is hard to receive: 1 Press M (MODE) to enter the functions mode while...
Instruction Manual
Page 11
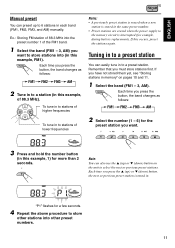
... "Storing stations in memory" on the unit to select the next or previous preset stations. ENGLISH Manual preset You can easily tune in to a preset station. Ex.: Storing FM station of 88.3 MHz into the preset number 1 of 88.3 MHz). Each time you want . 3 Press and hold the number button (in this example, of the FM1 band. 1 Select the band (FM1 - 3, AM) you press the button, the band changes as...
... "Storing stations in memory" on the unit to select the next or previous preset stations. ENGLISH Manual preset You can easily tune in to a preset station. Ex.: Storing FM station of 88.3 MHz into the preset number 1 of 88.3 MHz). Each time you want . 3 Press and hold the number button (in this example, of the FM1 band. 1 Select the band (FM1 - 3, AM) you press the button, the band changes as...
Instruction Manual
Page 12
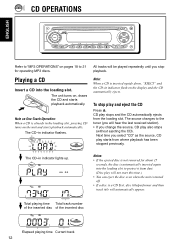
... automatically appear. The CD-in indicator flashes. Total playing time Total track number of the inserted disc of the inserted disc Elapsed playing time Current track 12 Notes: • If the ejected disc is not removed for operating MP3 discs. CD OPERATIONS ENGLISH Refer to "MP3 OPERATIONS" on , draws the CD and starts playback automatically. All tracks will hear the last received station). • If you change the source, CD play starts from where...
... automatically appear. The CD-in indicator flashes. Total playing time Total track number of the inserted disc of the inserted disc Elapsed playing time Current track 12 Notes: • If the ejected disc is not removed for operating MP3 discs. CD OPERATIONS ENGLISH Refer to "MP3 OPERATIONS" on , draws the CD and starts playback automatically. All tracks will hear the last received station). • If you change the source, CD play starts from where...
Instruction Manual
Page 16
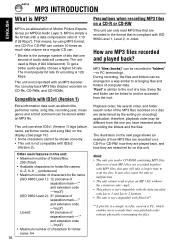
... writing (or encoding) application; This unit can be accessed from the one second of audio data will take a longer time to scan the disc. This unit is simply a file format with an MP3 decoder. How are recorded in PC terminology. and extension code -"mp3") • Maximum number of characters for on the display. (See page 19.) • Some...
... writing (or encoding) application; This unit can be accessed from the one second of audio data will take a longer time to scan the disc. This unit is simply a file format with an MP3 decoder. How are recorded in PC terminology. and extension code -"mp3") • Maximum number of characters for on the display. (See page 19.) • Some...
Instruction Manual
Page 22
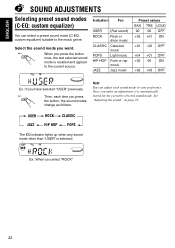
... rap music Jazz music Preset values BAS TRE LOUD 00 00 OFF +03 +01 ON +01 -02 OFF +04 +01 OFF +02 00 ON +02 +03 OFF Ex.: If you have selected "USER" previously Then, each time you press the button, the sound modes change as follows: Note: You can select a preset sound mode (C-EQ: custom equalizer) suitable to your preference. Ex.: When you make an adjustment...
... rap music Jazz music Preset values BAS TRE LOUD 00 00 OFF +03 +01 ON +01 -02 OFF +04 +01 OFF +02 00 ON +02 +03 OFF Ex.: If you have selected "USER" previously Then, each time you press the button, the sound modes change as follows: Note: You can select a preset sound mode (C-EQ: custom equalizer) suitable to your preference. Ex.: When you make an adjustment...
Instruction Manual
Page 23
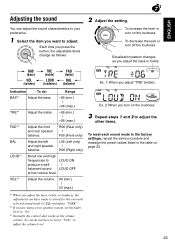
... right speaker | balance. So you press the button, the adjustable items change as the volume control. BAS (bass) VOL (volume) TRE (treble) LOUD (loudness) FAD (fader) BAL (balance) Ex. 1: When you want to adjust. VOL*3 Adjust the volume. 00 (min.) | 50 (max.) Ex. 2: When you turn off the loudness Equalization pattern changes as you are using a two-speaker system, set the fader level to "00." *3 Normally the control dial works as follows: 2 Adjust the setting...
... right speaker | balance. So you press the button, the adjustable items change as the volume control. BAS (bass) VOL (volume) TRE (treble) LOUD (loudness) FAD (fader) BAL (balance) Ex. 1: When you want to adjust. VOL*3 Adjust the volume. 00 (min.) | 50 (max.) Ex. 2: When you turn off the loudness Equalization pattern changes as you are using a two-speaker system, set the fader level to "00." *3 Normally the control dial works as follows: 2 Adjust the setting...
Instruction Manual
Page 24
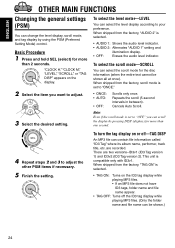
... When shipped from the factory, "AUDIO 2" is set to "OFF," you want to adjust. 3 Select the desired setting. Cancels Auto Scroll. When shipped from the factory, scroll mode is selected. • AUDIO 1: Shows the audio level indicator. • AUDIO 2: Alternates "AUDIO 1" setting and illumination display. • OFF: Erases the audio level indicator. ENGLISH OTHER MAIN FUNCTIONS Changing the general settings (PSM) You can select the level display according to your preference. "CLOCK H," "CLOCK M," "LEVEL," "SCROLL," or "TAG DISP...
... When shipped from the factory, "AUDIO 2" is set to "OFF," you want to adjust. 3 Select the desired setting. Cancels Auto Scroll. When shipped from the factory, scroll mode is selected. • AUDIO 1: Shows the audio level indicator. • AUDIO 2: Alternates "AUDIO 1" setting and illumination display. • OFF: Erases the audio level indicator. ENGLISH OTHER MAIN FUNCTIONS Changing the general settings (PSM) You can select the level display according to your preference. "CLOCK H," "CLOCK M," "LEVEL," "SCROLL," or "TAG DISP...
Instruction Manual
Page 26
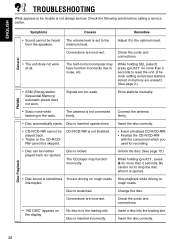
... reset the unit. (The clock setting and preset stations stored in the loading slot. rough roads. Disc is set to the radio. The built-in microcomputer may function incorrectly. Store stations manually. • Static noise while listening to the from the speakers. ENGLISH TROUBLESHOOTING What appears to be neither played back nor ejected. Stop playback while driving on the CD-R/CDRW cannot be heard The volume level is scratched. Change the disc...
... reset the unit. (The clock setting and preset stations stored in the loading slot. rough roads. Disc is set to the radio. The built-in microcomputer may function incorrectly. Store stations manually. • Static noise while listening to the from the speakers. ENGLISH TROUBLESHOOTING What appears to be neither played back nor ejected. Stop playback while driving on the CD-R/CDRW cannot be heard The volume level is scratched. Change the disc...
Instruction Manual
Page 28
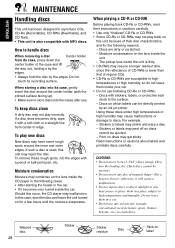
... direct sunlight or any heat source or place them in a car. • Do not use any disc of unusual shape-like a heart or flower; In this occur, the CD player may reject the disc. Discs with a pencil or ball-point pen, etc. otherwise, it with MP3 discs. Do not leave them in a place subject to high temperature and humidity. To remove...
... direct sunlight or any heat source or place them in a car. • Do not use any disc of unusual shape-like a heart or flower; In this occur, the CD player may reject the disc. Discs with a pencil or ball-point pen, etc. otherwise, it with MP3 discs. Do not leave them in a place subject to high temperature and humidity. To remove...
Instruction Manual
Page 29
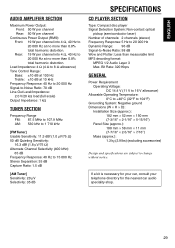
...;V Selectivity: 35 dB SPECIFICATIONS CD PLAYER SECTION Type: Compact disc player Signal Detection System: Non-contact optical pickup (semiconductor laser) Number of channels: 2 channels (stereo) Frequency Response: 5 Hz to 20 000 Hz Dynamic Range: 96 dB Signal-to-Noise Ratio: 98 dB Wow and Flutter: Less than measurable limit MP3 decoding format: MPEG 1/2 Audio Layer 3 Max. Rear: 19 W per channel into 4 Ω, 40 Hz to change...
...;V Selectivity: 35 dB SPECIFICATIONS CD PLAYER SECTION Type: Compact disc player Signal Detection System: Non-contact optical pickup (semiconductor laser) Number of channels: 2 channels (stereo) Frequency Response: 5 Hz to 20 000 Hz Dynamic Range: 96 dB Signal-to-Noise Ratio: 98 dB Wow and Flutter: Less than measurable limit MP3 decoding format: MPEG 1/2 Audio Layer 3 Max. Rear: 19 W per channel into 4 Ω, 40 Hz to change...

Instruction Manual
Page 30
h t t p : / / w w w . jvc m o b i le .c o m Visit us on-line for Technical Support & Customer Satisfaction Survey. USA ONLY Call 1-800-252-5722 http://www.jvc.com We can help you! EN, SP, FR © 2003 VICTOR COMPANY OF JAPAN, LIMITED VJ C 0103KKSMDTJEIN Please reset your unit Refer to page of How to Reset Still having trouble?? US RESIDENTS ONLY Having TROUBLE with operation?
h t t p : / / w w w . jvc m o b i le .c o m Visit us on-line for Technical Support & Customer Satisfaction Survey. USA ONLY Call 1-800-252-5722 http://www.jvc.com We can help you! EN, SP, FR © 2003 VICTOR COMPANY OF JAPAN, LIMITED VJ C 0103KKSMDTJEIN Please reset your unit Refer to page of How to Reset Still having trouble?? US RESIDENTS ONLY Having TROUBLE with operation?


