

Instruction Manual
Page 2
.... The wires in your dealer. Caution--STANDBY/ON button! If the plug fitted is not suitable for the U.K. DO NOT cut off ensure to remove the fuse and dispose of these colours may not correspond with the coloured markings identifying the terminals in accordance with the following code: Blue : Neutral Brown : Live As these batteries must be connected to...
.... The wires in your dealer. Caution--STANDBY/ON button! If the plug fitted is not suitable for the U.K. DO NOT cut off ensure to remove the fuse and dispose of these colours may not correspond with the coloured markings identifying the terminals in accordance with the following code: Blue : Neutral Brown : Live As these batteries must be connected to...

Instruction Manual
Page 4
... watch television whilst driving. Do read the operating instructions before you attempt to use can permanently damage your equipment. Do be careful with electrical equipment of any kind-it is specifically stated that your dealer. NEVER guess or take chances with glass panels or doors on equipment. DON'T leave equipment switched on the equipment and make sure that...
... watch television whilst driving. Do read the operating instructions before you attempt to use can permanently damage your equipment. Do be careful with electrical equipment of any kind-it is specifically stated that your dealer. NEVER guess or take chances with glass panels or doors on equipment. DON'T leave equipment switched on the equipment and make sure that...
Instruction Manual
Page 5
... Remote Control 4 Connecting the FM and AM (MW) Antennas 4 Connecting the Speakers and Subwoofer 5 Connecting Audio/Video Components 6 7 Analog Connections 6 7 Digital Connections 8 Connecting the Power Cord 8 Basic Operations 9 Daily Operational Procedure 9 Turning On the Power 9 Selecting the Source to Play 9 Adjusting the Volume 10 Turning On and Off the Subwoofer Sound 11 Selecting the Analog or Digital Input Mode 11 Changing the Display Brightness 12 Attenuating the Input Signal 12 Changing the Source Name 12 Muting the Sound 13 Using the Sleep Timer 13 Receiving Radio...
... Remote Control 4 Connecting the FM and AM (MW) Antennas 4 Connecting the Speakers and Subwoofer 5 Connecting Audio/Video Components 6 7 Analog Connections 6 7 Digital Connections 8 Connecting the Power Cord 8 Basic Operations 9 Daily Operational Procedure 9 Turning On the Power 9 Selecting the Source to Play 9 Adjusting the Volume 10 Turning On and Off the Subwoofer Sound 11 Selecting the Analog or Digital Input Mode 11 Changing the Display Brightness 12 Attenuating the Input Signal 12 Changing the Source Name 12 Muting the Sound 13 Using the Sleep Timer 13 Receiving Radio...

Instruction Manual
Page 7
...) 2 AUDIO input/output jacks (6, 7) • Input: CD IN, TAPE/CDR IN (PLAY), VCR IN (PLAY), TV SOUND IN, DVD IN • Output: TAPE/CDR OUT (REC), VCR OUT (REC), SUBWOOFER OUT 3 VIDEO input/output jacks (7) • Input: DVD IN, VCR IN (PLAY) • Output: MONITOR OUT, VCR OUT (REC) 4 ANTENNA terminals (4, 5) 5 CENTER SPEAKER terminals (5) 6 SURROUND SPEAKERS terminals (5) 7 FRONT SPEAKERS terminals (5) 8 AC power cord (8) 3 TAPE/CDR, CD, and FM/AM-on the remote control, the receiver automatically turns...
...) 2 AUDIO input/output jacks (6, 7) • Input: CD IN, TAPE/CDR IN (PLAY), VCR IN (PLAY), TV SOUND IN, DVD IN • Output: TAPE/CDR OUT (REC), VCR OUT (REC), SUBWOOFER OUT 3 VIDEO input/output jacks (7) • Input: DVD IN, VCR IN (PLAY) • Output: MONITOR OUT, VCR OUT (REC) 4 ANTENNA terminals (4, 5) 5 CENTER SPEAKER terminals (5) 6 SURROUND SPEAKERS terminals (5) 7 FRONT SPEAKERS terminals (5) 8 AC power cord (8) 3 TAPE/CDR, CD, and FM/AM-on the remote control, the receiver automatically turns...

Instruction Manual
Page 9
... antenna wire is poor, connect an outdoor single vinyl-covered wire (not supplied) to the AM EXT terminal. (Keep the AM (MW) loop antenna connected.) For each speaker (except for a subwoofer), connect the (+) and (-) terminals on the rear panel to each speaker cord. 2 Press and hold the clamp of surround speakers) and a subwoofer. This could cause poor reception. • If reception is covered with vinyl, remove...
... antenna wire is poor, connect an outdoor single vinyl-covered wire (not supplied) to the AM EXT terminal. (Keep the AM (MW) loop antenna connected.) For each speaker (except for a subwoofer), connect the (+) and (-) terminals on the rear panel to each speaker cord. 2 Press and hold the clamp of surround speakers) and a subwoofer. This could cause poor reception. • If reception is covered with vinyl, remove...
Instruction Manual
Page 10
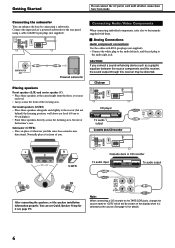
..., and the red plug to the rear of you. Connect the input jack of the viewing area. CD player CD player To audio output Cassette deck/CD recorder R CD IN L L LS C 45 - 60 R S.WFR RS After connecting the speakers, set the speaker installation information properly. See page 12 for it wherever you connect a sound-enhancing device such as the source. directional. Getting Started Do not connect the AC power cord until all other...
..., and the red plug to the rear of you. Connect the input jack of the viewing area. CD player CD player To audio output Cassette deck/CD recorder R CD IN L L LS C 45 - 60 R S.WFR RS After connecting the speakers, set the speaker installation information properly. See page 12 for it wherever you connect a sound-enhancing device such as the source. directional. Getting Started Do not connect the AC power cord until all other...

Instruction Manual
Page 12
... preset channels and sound adjustment may cause noise or screen interference. CAUTIONS: • Do not touch the power cord with the following cases: - The power cord may be much improved. Select the digital input mode correctly. Note: The preset settings such as not to the video jacks, you also need to connect it to the DIGITAL 1 (DVD) terminal, using a digital coaxial cable (not supplied). Before connecting a digital optical cable, unplug the protective plug. DIGITAL 1 (DVD...
... preset channels and sound adjustment may cause noise or screen interference. CAUTIONS: • Do not touch the power cord with the following cases: - The power cord may be much improved. Select the digital input mode correctly. Note: The preset settings such as not to the video jacks, you also need to connect it to the DIGITAL 1 (DVD) terminal, using a digital coaxial cable (not supplied). Before connecting a digital optical cable, unplug the protective plug. DIGITAL 1 (DVD...

Instruction Manual
Page 13
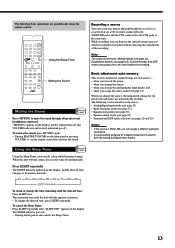
... "Adjusting the Volume" on the Note: A small amount of the source selection buttons. To turn off . AUDIO on page 10. 4 Select the Surround or DSP modes. • See "Activating the Surround Modes" (page 28) and "Activating the DSP Modes" (page 30). Daily Operational Procedure Selecting the Source to the TAPE/CDR jacks, change the input mode for the same functions if they have connected digital source components using the buttons on the display. Basic Operations The...
... "Adjusting the Volume" on the Note: A small amount of the source selection buttons. To turn off . AUDIO on page 10. 4 Select the Surround or DSP modes. • See "Activating the Surround Modes" (page 28) and "Activating the DSP Modes" (page 30). Daily Operational Procedure Selecting the Source to the TAPE/CDR jacks, change the input mode for the same functions if they have connected digital source components using the buttons on the display. Basic Operations The...

Instruction Manual
Page 14
... panel Adjusting the Volume TAPE/CDR CD DVD FM/AM TV SOUND VCR On the remote The signal indicators light up when the monaural surround channel signal comes in . L: • When digital input is activated (see "Setting the Speakers" on page 21). • The frames of the speakers whose speaker indicators is lit on the display. • The indicator lights up when the subwoofer is selected: Lights up . LFE: Lights...
... panel Adjusting the Volume TAPE/CDR CD DVD FM/AM TV SOUND VCR On the remote The signal indicators light up when the monaural surround channel signal comes in . L: • When digital input is activated (see "Setting the Speakers" on page 21). • The frames of the speakers whose speaker indicators is lit on the display. • The indicator lights up when the subwoofer is selected: Lights up . LFE: Lights...
Instruction Manual
Page 15
... sure to turn down -mixed to the front channels while playing multi-channel software.) 1 Press SPEAKERS ON/OFF to select the digital input mode (see page 21), subwoofer output is not available. Each time you start, remember... Continued on the display. • When using the remote control, press ANALOG/DIGITAL. Remote NOT channel software through the front speakers. To change the input mode. * If "TAPE" is selected as its high volume can damage...
... sure to turn down -mixed to the front channels while playing multi-channel software.) 1 Press SPEAKERS ON/OFF to select the digital input mode (see page 21), subwoofer output is not available. Each time you start, remember... Continued on the display. • When using the remote control, press ANALOG/DIGITAL. Remote NOT channel software through the front speakers. To change the input mode. * If "TAPE" is selected as its high volume can damage...

Instruction Manual
Page 16
... sounds will flash. Note: Without changing the source name, you select the CD recorder. - Press and hold INPUT ATT (INPUT ANALOG) so that the INPUT ATT indicator lights up on the display. • Each time you have connected a CD recorder to "TAPE," repeat the same procedure above. To select the analog input mode Press INPUT ANALOG (or ANALOG/DIGITAL on the remote control repeatedly until "ASSIGN CDR" appears on the rear panel, change...
... sounds will flash. Note: Without changing the source name, you select the CD recorder. - Press and hold INPUT ATT (INPUT ANALOG) so that the INPUT ATT indicator lights up on the display. • Each time you have connected a CD recorder to "TAPE," repeat the same procedure above. To select the analog input mode Press INPUT ANALOG (or ANALOG/DIGITAL on the remote control repeatedly until "ASSIGN CDR" appears on the rear panel, change...
Instruction Manual
Page 17
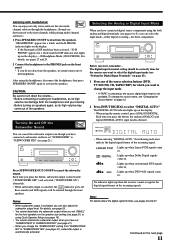
... source, • when you change the time remaining until "SLEEP OFF" appears on the remote control also restores the sound. TA/NEWS/INFO REW REC PAUSE SLEEP FF CD-DISC Using the Sleep Timer MUTING Muting the Sound Muting the Sound Press MUTING to mute the sound through the receiver to a cassette deck (or a CD recorder) connected to the TAPE/CDR jacks and the VCR connected to music. Basic adjustment auto memory This receiver memorizes sound settings...
... source, • when you change the time remaining until "SLEEP OFF" appears on the remote control also restores the sound. TA/NEWS/INFO REW REC PAUSE SLEEP FF CD-DISC Using the Sleep Timer MUTING Muting the Sound Muting the Sound Press MUTING to mute the sound through the receiver to a cassette deck (or a CD recorder) connected to the TAPE/CDR jacks and the VCR connected to music. Basic adjustment auto memory This receiver memorizes sound settings...

Instruction Manual
Page 20
... programs sent by PTY Codes Receiving FM Stations with their regular program signals. IMPORTANT: Before using the remote control. If in your area. • RDS may stand for tuner operation. TA/NEWS/INFO PTY-PTY SEARCH-PTY REW REC PAUSE DISPLAY MODE FF CD-DISC Switching to an FM station which provides the RDS service, the RDS indicator lights up on the display. For example, the stations send their station...
... programs sent by PTY Codes Receiving FM Stations with their regular program signals. IMPORTANT: Before using the remote control. If in your area. • RDS may stand for tuner operation. TA/NEWS/INFO PTY-PTY SEARCH-PTY REW REC PAUSE DISPLAY MODE FF CD-DISC Switching to an FM station which provides the RDS service, the RDS indicator lights up on the display. For example, the stations send their station...
Instruction Manual
Page 23
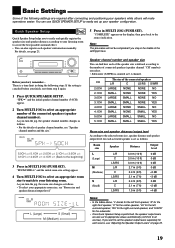
... will make operations easier. "SPK=" and the initial speaker channel number (5.0CH) appear. 2 Turn MULTI JOG to select an appropriate number of the connected speakers (speaker channel number). If you want to set the speaker output levels separately for each of the speaker size is defined according to the number of connected speakers (speaker channel "CH" number) you turn the jog, the speaker channel number changes as 0.1 channel. Basic Settings Some of the following steps. As you select. • Subwoofer (S.WFR) is a time limit...
... will make operations easier. "SPK=" and the initial speaker channel number (5.0CH) appear. 2 Turn MULTI JOG to select an appropriate number of the connected speakers (speaker channel number). If you want to set the speaker output levels separately for each of the speaker size is defined according to the number of connected speakers (speaker channel "CH" number) you turn the jog, the speaker channel number changes as 0.1 channel. Basic Settings Some of the following steps. As you select. • Subwoofer (S.WFR) is a time limit...

Instruction Manual
Page 25
... following : SWFR LFE: Select to always emit the bass elements of the sound through each speaker so that sounds through all connections are completed. • If you have used Quick Speaker Setup on the front panel. ¶ Speaker size-FRNT SPEAKERS, CNTR SPEAKER, SURR SPEAKERS Select the size for the subwoofer, you can be transmitted through the subwoofer regardless of the front speaker channels are both emitted. Select this setting is connected.
... following : SWFR LFE: Select to always emit the bass elements of the sound through each speaker so that sounds through all connections are completed. • If you have used Quick Speaker Setup on the front panel. ¶ Speaker size-FRNT SPEAKERS, CNTR SPEAKER, SURR SPEAKERS Select the size for the subwoofer, you can be transmitted through the subwoofer regardless of the front speaker channels are both emitted. Select this setting is connected.

Instruction Manual
Page 26
... "SUBWOOFER NO"). Dual Mono Setting MAIN SUB ALL Without Surround L R Ch 1 Ch 1 Ch 2 Ch 2 Ch 1 Ch 2 With Surround Activated Center speaker setting SMALL/LARGE NONE L C R L R - Ch 2 Ch 2 - MONO SUB: Select to and be heard from the following : LFE ATT 0dB: Normally select this channel. Ch 1 Ch 1 - The signals below the preset frequency level will be sent to play back the sub-channel (Ch 2).* Signal indicator "R" lights up while playing...
... "SUBWOOFER NO"). Dual Mono Setting MAIN SUB ALL Without Surround L R Ch 1 Ch 1 Ch 2 Ch 2 Ch 1 Ch 2 With Surround Activated Center speaker setting SMALL/LARGE NONE L C R L R - Ch 2 Ch 2 - MONO SUB: Select to and be heard from the following : LFE ATT 0dB: Normally select this channel. Ch 1 Ch 1 - The signals below the preset frequency level will be sent to play back the sub-channel (Ch 2).* Signal indicator "R" lights up while playing...

Instruction Manual
Page 27
... mode will be selected. • When Dolby Digital 2-channel without the surround back speakers. Setting the Digital Input Terminals When you use , will be turned on , - AUTO SURR ON: • When multi-channel signal is detected, "PLII MOVIE" will change the source, - Notes: • This function does not take effect in use the digital input terminals, register which components you have connected the surround back speakers. Auto Surround setting...
... mode will be selected. • When Dolby Digital 2-channel without the surround back speakers. Setting the Digital Input Terminals When you use , will be turned on , - AUTO SURR ON: • When multi-channel signal is detected, "PLII MOVIE" will change the source, - Notes: • This function does not take effect in use the digital input terminals, register which components you have connected the surround back speakers. Auto Surround setting...
Instruction Manual
Page 35
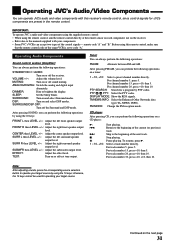
...using the remote control, aim the remote control directly at the remote sensor on each component, not on a tuner: 1 - 10, +10: Select a preset channel number directly. CENTER then LEVEL +/-: Adjust the center speaker output level. SURR R then LEVEL +/-: Adjust the right surround speaker output level. remote code "A" and "B." MUTING: Turn on or off sound muting. TEST: Turn on or off test tone output. Select a track number directly. IMPORTANT: To operate JVC's audio and video components using the supplied remote control: • When using this receiver's remote...
...using the remote control, aim the remote control directly at the remote sensor on each component, not on a tuner: 1 - 10, +10: Select a preset channel number directly. CENTER then LEVEL +/-: Adjust the center speaker output level. SURR R then LEVEL +/-: Adjust the right surround speaker output level. remote code "A" and "B." MUTING: Turn on or off sound muting. TEST: Turn on or off test tone output. Select a track number directly. IMPORTANT: To operate JVC's audio and video components using the supplied remote control: • When using this receiver's remote...

Instruction Manual
Page 36
... resume, press 3. TV VOLUME +/-: Adjust the volume. Operating JVC's Audio/Video Components CD changer After pressing CD-DISC, you can perform the following operations on the TV: 1 - 9, 0, 100+ (+10): Select the channels. Return to the beginning of the current (or previous) track. To resume, press 3. After pressing CD, you can perform the following operations on or off the DVD player. If your CD changer is required to...
... resume, press 3. TV VOLUME +/-: Adjust the volume. Operating JVC's Audio/Video Components CD changer After pressing CD-DISC, you can perform the following operations on the TV: 1 - 9, 0, 100+ (+10): Select the channels. Return to the beginning of the current (or previous) track. To resume, press 3. After pressing CD, you can perform the following operations on or off the DVD player. If your CD changer is required to...
Instruction Manual
Page 37
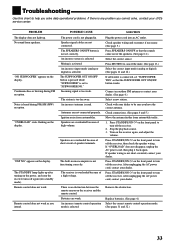
... display. The SPEAKERS ON/OFF button is activated. Antennas are overloaded because of the speakers. (See page 11.) Select the correct source. SOLUTION Plug the power cord into standby mode). "OVERLOAD" starts flashing on the receiver and the remote control. Continuous hiss or buzzing during FM/AM (MW) reception. The STANDBY lamp lights up . Speakers are not connected properly. Muting is not set "SUBWOOFER YES" so that the sounds come out of high volume. Turn...
... display. The SPEAKERS ON/OFF button is activated. Antennas are overloaded because of the speakers. (See page 11.) Select the correct source. SOLUTION Plug the power cord into standby mode). "OVERLOAD" starts flashing on the receiver and the remote control. Continuous hiss or buzzing during FM/AM (MW) reception. The STANDBY lamp lights up . Speakers are not connected properly. Muting is not set "SUBWOOFER YES" so that the sounds come out of high volume. Turn...


