
Instruction Manual
Page 5
... Using the DSP Modes 29 Reproducing the Sound Field 29 Introducing the DSP Modes 29 Activating the DSP Modes 30 Operating JVC's Audio/Video Components ... 31 Operating Audio Components 31 Operating Video Components 32 Troubleshooting 33 Specifications 34 Basic Settings 19 Quick... Speaker Setup 19 Basic Setting Items 20 Basic Procedure 20 7 Setting the Speakers 21 7 Setting the Speaker Distance 21 7 Setting the Bass Sounds 21 7 Selecting the Main or Sub...
... Using the DSP Modes 29 Reproducing the Sound Field 29 Introducing the DSP Modes 29 Activating the DSP Modes 30 Operating JVC's Audio/Video Components ... 31 Operating Audio Components 31 Operating Video Components 32 Troubleshooting 33 Specifications 34 Basic Settings 19 Quick... Speaker Setup 19 Basic Setting Items 20 Basic Procedure 20 7 Setting the Speakers 21 7 Setting the Speaker Distance 21 7 Setting the Bass Sounds 21 7 Selecting the Main or Sub...
Instruction Manual
Page 17
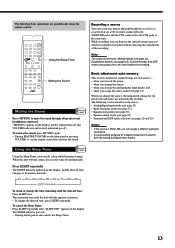
...; Turning MASTER VOLUME on the remote control also restores the sound. The remaining time until the shut-off time appears in 10 minutes intervals: 10 20 30 40 50 60 70 80 90 OFF (Canceled) To check or change the shut-off time: Press SLEEP once. on the front panel or...
...; Turning MASTER VOLUME on the remote control also restores the sound. The remaining time until the shut-off time appears in 10 minutes intervals: 10 20 30 40 50 60 70 80 90 OFF (Canceled) To check or change the shut-off time: Press SLEEP once. on the front panel or...

Instruction Manual
Page 19
... while tuning in to select a preset channel number. • For channel number 5, press 5. • For channel number 15, press +10 then 5. • For channel number 20, press +10 then 10. • For channel number 30, press +10, +10, then 10. The AUTO MUTING indicator lights up on the remote control, be...
... while tuning in to select a preset channel number. • For channel number 5, press 5. • For channel number 15, press +10 then 5. • For channel number 20, press +10 then 10. • For channel number 30, press +10, +10, then 10. The AUTO MUTING indicator lights up on the remote control, be...
Instruction Manual
Page 24
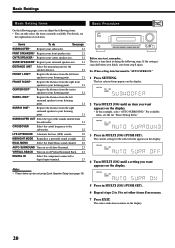
.... 5 Press in MULTI JOG (PUSH SET). The last selected item appears on the display. 2 Turn MULTI JOG until a setting you want appears on the display. 20 Before you can adjust the following items: • You can be set other items if necessary. 7 Press EXIT. Basic Settings Basic Setting Items On the...
.... 5 Press in MULTI JOG (PUSH SET). The last selected item appears on the display. 2 Turn MULTI JOG until a setting you want appears on the display. 20 Before you can adjust the following items: • You can be set other items if necessary. 7 Press EXIT. Basic Settings Basic Setting Items On the...

Instruction Manual
Page 30
...; You can feel in a real movie theater-with discrete 5.1channel sounds. Compared to the one created with only a limited number of the surround treble at 20 kHz, compared to 7 kHz for the cutoff frequency of the surround treble and enables stereo surround sound. • This receiver provides two types of Surround...
...; You can feel in a real movie theater-with discrete 5.1channel sounds. Compared to the one created with only a limited number of the surround treble at 20 kHz, compared to 7 kHz for the cutoff frequency of the surround treble and enables stereo surround sound. • This receiver provides two types of Surround...
Instruction Manual
Page 31
...through the digital input, the indicator lights up . DTS 96/24 In recent years, there has been increasing interest in the speaker setting, JVC's original 3D-PHONIC processing (which has been developed to create the surround effect through the front speakers. • If both for recording and... Surround Back (see page 22). is now adopted in the speaker setting, the corresponding channel signals are allocated to the type of 16/20/24 bits. Dual Mono can enjoy its 5.1-channel sound with those analog formats). Compared to Dolby Digital, the DTS Digital Surround format has...
...through the digital input, the indicator lights up . DTS 96/24 In recent years, there has been increasing interest in the speaker setting, JVC's original 3D-PHONIC processing (which has been developed to create the surround effect through the front speakers. • If both for recording and... Surround Back (see page 22). is now adopted in the speaker setting, the corresponding channel signals are allocated to the type of 16/20/24 bits. Dual Mono can enjoy its 5.1-channel sound with those analog formats). Compared to Dolby Digital, the DTS Digital Surround format has...
Instruction Manual
Page 35
.... After pressing SOUND, you can perform the following operations: FM/AM: Alternate between FM and AM. Stop playing. For track number 20, press +10, then 10. otherwise, the 10 keys cannot be used for operating your target source by using this receiver's remote control... (TA, NEWS, INFO). SURR L then LEVEL +/-: Adjust the left front speaker output level. Select a track number directly. IMPORTANT: To operate JVC's audio and video components using the supplied remote control: • When using the 10 keys: FRONT L then LEVEL +/-: Adjust the left surround ...
.... After pressing SOUND, you can perform the following operations: FM/AM: Alternate between FM and AM. Stop playing. For track number 20, press +10, then 10. otherwise, the 10 keys cannot be used for operating your target source by using this receiver's remote control... (TA, NEWS, INFO). SURR L then LEVEL +/-: Adjust the left front speaker output level. Select a track number directly. IMPORTANT: To operate JVC's audio and video components using the supplied remote control: • When using the 10 keys: FRONT L then LEVEL +/-: Adjust the left surround ...

Instruction Manual
Page 36
... playback. After pressing DVD, you can perform the following operations on the VCR. Stop playing. TV VOLUME +/-: Adjust the volume. For track number 20, press +10, then 10. Press 3, then, 0, 2, then 3. • Selecting disc number 10, track number 5, and starting playback.... a CD changer: 3: 4: ¢: 7: 8: 1 - 6, 7/P: Start playing. Operating JVC's Audio/Video Components CD changer After pressing CD-DISC, you can perform the following operations on the TV: 1 - 9, 0, 100+ (+10): Select the channels. Pause playing. Select the number of 200-disc loading capability (...
... playback. After pressing DVD, you can perform the following operations on the VCR. Stop playing. TV VOLUME +/-: Adjust the volume. For track number 20, press +10, then 10. Press 3, then, 0, 2, then 3. • Selecting disc number 10, track number 5, and starting playback.... a CD changer: 3: 4: ¢: 7: 8: 1 - 6, 7/P: Start playing. Operating JVC's Audio/Video Components CD changer After pressing CD-DISC, you can perform the following operations on the TV: 1 - 9, 0, 100+ (+10): Select the channels. Pause playing. Select the number of 200-disc loading capability (...

Instruction Manual
Page 38
...Ratio ('66 IHF/DIN) CD, TAPE/CDR, VCR, TV SOUND, DVD: 87 dB/62 dB Frequency Response (8 Ω) CD, TAPE/CDR, VCR, TV SOUND, DVD: 20 Hz to 50 kHz (+1 dB, -3 dB) Equalization (5 bands) 63 Hz, 250 Hz, 1 kHz, 4 kHz, 16 kHz: ±8 dB (in 2 dB steps)... harmonic distortion. RMS, driven into 8 Ω, at 1 kHz with no more than 0.8% total harmonic distortion. Specifications Amplifier Output Power At Stereo operation Front channels: 100 W per channel, min. Audio Audio Input Sensitivity/Impedance (1 kHz) CD, TAPE/CDR, VCR, TV SOUND, DVD: 220 mV/47 kΩ Audio Input (DIGITAL...
...Ratio ('66 IHF/DIN) CD, TAPE/CDR, VCR, TV SOUND, DVD: 87 dB/62 dB Frequency Response (8 Ω) CD, TAPE/CDR, VCR, TV SOUND, DVD: 20 Hz to 50 kHz (+1 dB, -3 dB) Equalization (5 bands) 63 Hz, 250 Hz, 1 kHz, 4 kHz, 16 kHz: ±8 dB (in 2 dB steps)... harmonic distortion. RMS, driven into 8 Ω, at 1 kHz with no more than 0.8% total harmonic distortion. Specifications Amplifier Output Power At Stereo operation Front channels: 100 W per channel, min. Audio Audio Input Sensitivity/Impedance (1 kHz) CD, TAPE/CDR, VCR, TV SOUND, DVD: 220 mV/47 kΩ Audio Input (DIGITAL...
