Instructions
Page 2
... 25 Digital VNR 25 MPEG NR 25 Natural Cinema 25 Video Reset 25 Display 26 Video Input Label 26 Photo Viewer 26 Aspect Ratio 28 TV 29 Closed Caption 29 C.C. Fre 35 TVPG 36 Sound 37 MTS 37 Digital Audio (ML 37 Surround 37 Sound Status 38 Audio Reset 38 Power... Noise Mute 40 Front Panel Lock 41 Transparency 41 Auto Shut Off 41 System Info 41 Auto Demo 41 Optical Out 41 Connecting Your Devices . . . . . 42 Troubleshooting 47 Specifications 49 Warranty 50 2
... 25 Digital VNR 25 MPEG NR 25 Natural Cinema 25 Video Reset 25 Display 26 Video Input Label 26 Photo Viewer 26 Aspect Ratio 28 TV 29 Closed Caption 29 C.C. Fre 35 TVPG 36 Sound 37 MTS 37 Digital Audio (ML 37 Surround 37 Sound Status 38 Audio Reset 38 Power... Noise Mute 40 Front Panel Lock 41 Transparency 41 Auto Shut Off 41 System Info 41 Auto Demo 41 Optical Out 41 Connecting Your Devices . . . . . 42 Troubleshooting 47 Specifications 49 Warranty 50 2

Instructions
Page 3
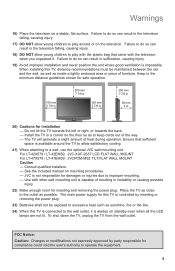
... to alert the user to the presence of uninsulated "dangerous voltage" within an equilateral triangle is unattainable. 4. Changes or modifications not approved by JVC could void the warranty. * When you don't use this product or product model meets the "ENERGY STAR®" guidelines for a long period... TO PREVENT FIRE OR SHOCK HAZARDS, DO NOT EXPOSE THIS APPARATUS TO RAIN OR MOISTURE. The exclamation point within the product's enclosure that this TV set for energy efficiency. 3 Do not remove cover (or back). Do not attempt to repair it yourself or remove the rear cover. Avoid...
... to alert the user to the presence of uninsulated "dangerous voltage" within an equilateral triangle is unattainable. 4. Changes or modifications not approved by JVC could void the warranty. * When you don't use this product or product model meets the "ENERGY STAR®" guidelines for a long period... TO PREVENT FIRE OR SHOCK HAZARDS, DO NOT EXPOSE THIS APPARATUS TO RAIN OR MOISTURE. The exclamation point within the product's enclosure that this TV set for energy efficiency. 3 Do not remove cover (or back). Do not attempt to repair it yourself or remove the rear cover. Avoid...
Instructions
Page 5
... came with the television when you unpacked it is controlled by party responsible for this TV is always on standby even when all the LED lamps are not lit. For LT-42X579 / LT-42EM59: JVC-XUF-2637 LCD FLAT WALL MOUNT For LT-47X579 / LT-47EM59: JVCPCM-MS2 TILT/FLAT WALL MOUNT Caution... - Consult qualified installers. - See the included manual on the floor so as to excessive heat such as sunshine, fire or the like. 24) When this TV, distance recommendations must be...
... came with the television when you unpacked it is controlled by party responsible for this TV is always on standby even when all the LED lamps are not lit. For LT-42X579 / LT-42EM59: JVC-XUF-2637 LCD FLAT WALL MOUNT For LT-47X579 / LT-47EM59: JVCPCM-MS2 TILT/FLAT WALL MOUNT Caution... - Consult qualified installers. - See the included manual on the floor so as to excessive heat such as sunshine, fire or the like. 24) When this TV, distance recommendations must be...

Instructions
Page 6
...is receiving through the RF input), every channel number available from your television. To avoid this is detected and appears as available for their JVC TV remote control to without blank ones in your cable company for scanning. Examples include, but temporary burn-in image on... this , mix your screen. Precautions We have an important note for extended periods of your cable company. This will all the channels your TV is important to note that you specifically subscribe to from your cable company will appear in between those channels you will only be...
...is receiving through the RF input), every channel number available from your television. To avoid this is detected and appears as available for their JVC TV remote control to without blank ones in your cable company for scanning. Examples include, but temporary burn-in image on... this , mix your screen. Precautions We have an important note for extended periods of your cable company. This will all the channels your TV is important to note that you specifically subscribe to from your cable company will appear in between those channels you will only be...
Instructions
Page 7
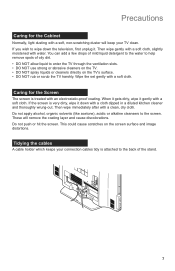
... wrung-out. When it gets dirty, wipe it . Do not push or hit the screen. Tidying the cables A cable holder which keeps your TV clean. If you wish to help remove spots of the stand. 7 These will keep your connection cables tidy is attached to the back of oily... dusting with a soft, non-scratching duster will remove the coating layer and cause discolorations. This could cause scratches on the TV's surface. • DO NOT rub or scrub the TV harshly. Wipe the set gently with an electrostatic-proof coating. Do not apply alcohol, organic solvents (like acetone), acidic or...
... wrung-out. When it gets dirty, wipe it . Do not push or hit the screen. Tidying the cables A cable holder which keeps your TV clean. If you wish to help remove spots of the stand. 7 These will keep your connection cables tidy is attached to the back of oily... dusting with a soft, non-scratching duster will remove the coating layer and cause discolorations. This could cause scratches on the TV's surface. • DO NOT rub or scrub the TV harshly. Wipe the set gently with an electrostatic-proof coating. Do not apply alcohol, organic solvents (like acetone), acidic or...

Instructions
Page 8
Precautions Disconnecting the stand If you disconnect the stand, attach the bottom cover and the screw (supplied) into the hole. 1) Place the TV face down on a soft cloth on a table. 2) Remove the six screws from the back of the TV. 3) Pull out the stand from 3) to 1). 8 Note: • To re-install the stand, reverse the procedure from the TV.
Precautions Disconnecting the stand If you disconnect the stand, attach the bottom cover and the screw (supplied) into the hole. 1) Place the TV face down on a soft cloth on a table. 2) Remove the six screws from the back of the TV. 3) Pull out the stand from 3) to 1). 8 Note: • To re-install the stand, reverse the procedure from the TV.
Instructions
Page 10
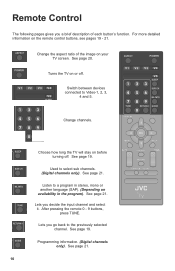
Change channels. Listen to select sub channels. (Digital channels only). Choose how long the TV will stay on or off . Used to a program in stereo, mono or another language (SAP). (Depending on availability in the program). Programming information. (...Digital channels only). See page 21. See page 21. 10 Switch between devices connected to the previously selected channel. See page 19. Turns the TV on before turning off . For more detailed information on the remote control buttons, see pages 19 - 21. See page 21. After pressing the remote 0 - ...
Change channels. Listen to select sub channels. (Digital channels only). Choose how long the TV will stay on or off . Used to a program in stereo, mono or another language (SAP). (Depending on availability in the program). Programming information. (...Digital channels only). See page 21. See page 21. 10 Switch between devices connected to the previously selected channel. See page 19. Turns the TV on before turning off . For more detailed information on the remote control buttons, see pages 19 - 21. See page 21. After pressing the remote 0 - ...

Instructions
Page 11
Save your favorite channels. View current channel information. Move sequentially through the TV's onscreen menus. See page 22. Raise or lower the volume. See page 20. 11 Remote Control Used to correct a mistake. Go back to a previous ...onscreen menu or to navigate through the channels. Choose different display settings according to access the TV's onscreen menus. Used to select the mode of sound frequencies. Press again to 0. Choose several types of closed caption Used to personal preferences. See ...
Save your favorite channels. View current channel information. Move sequentially through the TV's onscreen menus. See page 22. Raise or lower the volume. See page 20. 11 Remote Control Used to correct a mistake. Go back to a previous ...onscreen menu or to navigate through the channels. Choose different display settings according to access the TV's onscreen menus. Used to select the mode of sound frequencies. Press again to 0. Choose several types of closed caption Used to personal preferences. See ...
Instructions
Page 12
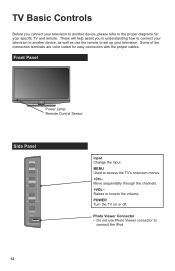
... Controls Before you in understanding how to connect your television to another device, please refer to access the TV's onscreen menus. +CH- Photo Viewer Connector • Do not use the remote to set up your television. Front Panel Power Lamp Remote Control Sensor Side ... Input Change the input MENU Used to the proper diagrams for easy connection with the proper cables. These will help assist you connect your specific TV and remote. Some of the connection terminals are color coded for your television to another device, as well as use Photo Viewer connector to connect...
... Controls Before you in understanding how to connect your television to another device, please refer to access the TV's onscreen menus. +CH- Photo Viewer Connector • Do not use the remote to set up your television. Front Panel Power Lamp Remote Control Sensor Side ... Input Change the input MENU Used to the proper diagrams for easy connection with the proper cables. These will help assist you connect your specific TV and remote. Some of the connection terminals are color coded for your television to another device, as well as use Photo Viewer connector to connect...

Instructions
Page 14
HDMI Cable, Audio Cable Input 1 + HDMI ANALOG AUDIO VIDEO and AUDIO C Component Video + Audio D S-Video + Audio E Composite Video + Audio Component Video + Audio S-Video Cable, Audio Cable Composite Video + Audio INPUT 4 or 5 INPUT 4 + AUDIO Input INPUT 4 or 5 Good Good Best AUDIO F Antenna / Cable (VHF / UHF) G OPTICAL INPUT H AUDIO INPUT (L / R) 14 RF Cable OPTICAL AUDIO Cable Audio Cable 75Ω (VHF / UHF) DIGITAL AUDIO OPTICAL OUT AUDIO OUT (L / R) TV Basic Controls Best Device Side A HDMI With Cables HDMI Cable TV Side INPUT 1, 2 or 3 B DVI + Audio DVI -
HDMI Cable, Audio Cable Input 1 + HDMI ANALOG AUDIO VIDEO and AUDIO C Component Video + Audio D S-Video + Audio E Composite Video + Audio Component Video + Audio S-Video Cable, Audio Cable Composite Video + Audio INPUT 4 or 5 INPUT 4 + AUDIO Input INPUT 4 or 5 Good Good Best AUDIO F Antenna / Cable (VHF / UHF) G OPTICAL INPUT H AUDIO INPUT (L / R) 14 RF Cable OPTICAL AUDIO Cable Audio Cable 75Ω (VHF / UHF) DIGITAL AUDIO OPTICAL OUT AUDIO OUT (L / R) TV Basic Controls Best Device Side A HDMI With Cables HDMI Cable TV Side INPUT 1, 2 or 3 B DVI + Audio DVI -

Instructions
Page 16
... can also set this setting in the "Plug in . These menus will help you setup your TV for the first time, the Initial Setup menu appears automatically. Choose the time zone you turn on the TV 2) Set the language Set Language/Langue/Idioma English Next 1 Select a language 2 Select "Next" 3) Set time attribute... Zone D.S.T. On / Off 16 Changes the clock automatically for Language, Time and Tuner Setup. Setup Initial setup When you live in Menu". 1) Turn on your TV with basic information for daylight saving time.
... can also set this setting in the "Plug in . These menus will help you setup your TV for the first time, the Initial Setup menu appears automatically. Choose the time zone you turn on the TV 2) Set the language Set Language/Langue/Idioma English Next 1 Select a language 2 Select "Next" 3) Set time attribute... Zone D.S.T. On / Off 16 Changes the clock automatically for Language, Time and Tuner Setup. Setup Initial setup When you live in Menu". 1) Turn on your TV with basic information for daylight saving time.

Instructions
Page 17
This is now complete" 17 "Thank you may, (depending on the type of hookup), have only 1 channel, usually 2, 3 or 4 in the auto tuner memory. Setup is normal. Cable Users: After your auto tuner setup is complete, you ! Initial setup (Continued) 4) Set TV attribute Set TV Attribute Tuner Mode Air Start Scan Exit Setup 1 Change settings 2 Select an item 3 Select "Start Scan" 4 Start scanning channels Tuner Mode Choose Air (antenna) or Cable * If you use a set top box (satellite or cable box), press "Exit" to skip this step.
This is now complete" 17 "Thank you may, (depending on the type of hookup), have only 1 channel, usually 2, 3 or 4 in the auto tuner memory. Setup is normal. Cable Users: After your auto tuner setup is complete, you ! Initial setup (Continued) 4) Set TV attribute Set TV Attribute Tuner Mode Air Start Scan Exit Setup 1 Change settings 2 Select an item 3 Select "Start Scan" 4 Start scanning channels Tuner Mode Choose Air (antenna) or Cable * If you use a set top box (satellite or cable box), press "Exit" to skip this step.
Instructions
Page 18
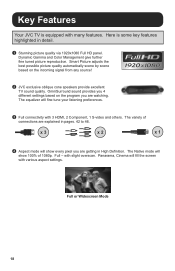
...provides you 4 different settings based on the incoming signal from any source! 2 JVC exclusive oblique cone speakers provide excellent TV sound quality. x 3 x 2 x 1 4 Aspect mode will show every pixel you are explained in pages. 42 to 46. Full - Panarama, Cinema will fine tune your listening ...HDMI, 2 Component, 1 S-video and others. The equalizer will fill the screen with slight overscan. Key Features Your JVC TV is some key features highlighted in High Definition. Smart Picture adjusts the best possible picture quality automatically scene by scene based...
...provides you 4 different settings based on the incoming signal from any source! 2 JVC exclusive oblique cone speakers provide excellent TV sound quality. x 3 x 2 x 1 4 Aspect mode will show every pixel you are explained in pages. 42 to 46. Full - Panarama, Cinema will fine tune your listening ...HDMI, 2 Component, 1 S-video and others. The equalizer will fill the screen with slight overscan. Key Features Your JVC TV is some key features highlighted in High Definition. Smart Picture adjusts the best possible picture quality automatically scene by scene based...
Instructions
Page 19
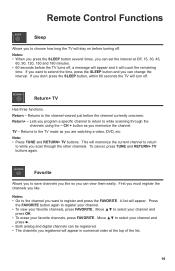
... off, a message will appear and it will count the remaining time. Return+ - Note: • Press TUNE and RETURN+ TV buttons. To cancel, press TUNE and RETURN+ TV buttons again. Favorite Allows you to save channels you like . Press the FAVORITE button again to register your channel. • To view your... favorite channels, press FAVORITE. If you don't press the SLEEP button, within 60 seconds the TV will turn off . TV - Returns to the TV mode as you memorize the channel. Remote Control Functions Sleep Allows you to choose how long the...
... off, a message will appear and it will count the remaining time. Return+ - Note: • Press TUNE and RETURN+ TV buttons. To cancel, press TUNE and RETURN+ TV buttons again. Favorite Allows you to save channels you like . Press the FAVORITE button again to register your channel. • To view your... favorite channels, press FAVORITE. If you don't press the SLEEP button, within 60 seconds the TV will turn off . TV - Returns to the TV mode as you memorize the channel. Remote Control Functions Sleep Allows you to choose how long the...
Instructions
Page 20
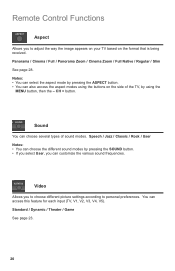
... the aspect mode by pressing the ASPECT button. • You can choose several types of the TV, by pressing the SOUND button. • If you select User, you can access this feature for each input (TV, V1, V2, V3, V4, V5). Remote Control Functions Aspect Allows you to choose different picture... settings according to adjust the way the image appears on your TV based on the side of sound modes. Panorama / Cinema / Full / Panorama...
... the aspect mode by pressing the ASPECT button. • You can choose several types of the TV, by pressing the SOUND button. • If you select User, you can access this feature for each input (TV, V1, V2, V3, V4, V5). Remote Control Functions Aspect Allows you to choose different picture... settings according to adjust the way the image appears on your TV based on the side of sound modes. Panorama / Cinema / Full / Panorama...
Instructions
Page 21
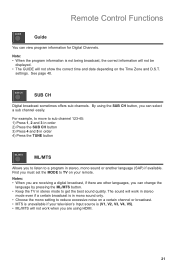
settings. See page 40. First you must set the MODE to TV on a certain channel or broadcast. • MTS is unavailable if your remote. By using HDMI. 21 SUB CH Digital broadcast sometimes offers sub channels. For ... (V1, V2, V3, V4, V5). • ML/MTS will work when you can change the language by pressing the ML/MTS button. • Keep the TV in stereo mode to a program in order 4) Press the TUNE button ML/MTS Allows you can view program information for Digital Channels. Remote Control Functions...
settings. See page 40. First you must set the MODE to TV on a certain channel or broadcast. • MTS is unavailable if your remote. By using HDMI. 21 SUB CH Digital broadcast sometimes offers sub channels. For ... (V1, V2, V3, V4, V5). • ML/MTS will work when you can change the language by pressing the ML/MTS button. • Keep the TV in stereo mode to a program in order 4) Press the TUNE button ML/MTS Allows you can view program information for Digital Channels. Remote Control Functions...
Instructions
Page 22
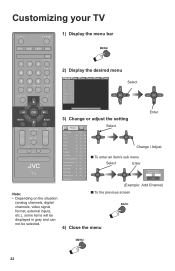
... the menu bar 2) Display the desired menu Picture Display TV Video Status Game Tint 0 - 50 - 100 Color 0 - 25 - 100 Picture 0 - 50 - 100 Bright 0 - 43 - 100 Detail 0 - 94 - 100 Backlight 0 - 50 - 100 Color Temp Cool Color ...
... the menu bar 2) Display the desired menu Picture Display TV Video Status Game Tint 0 - 50 - 100 Color 0 - 25 - 100 Picture 0 - 50 - 100 Bright 0 - 43 - 100 Detail 0 - 94 - 100 Backlight 0 - 50 - 100 Color Temp Cool Color ...

Instructions
Page 23
...lit room. Customizing your HD or SD settings are recalled for the video status you are using. 23 Standard Resets the picture display to the TV. • Each video status setting has a separate memory for HD (1080i/1080p/720p) and SD (480p/480i) video signal. Notes: &#...8226; Each mode is displayed, your TV Picture Picture Display TV Video Status Game Tint 0 - 50 - 100 Color 0 - 25 - 100 Picture 0 - 50 - 100 Bright 0 - 43 - 100 Detail 0 - 94 - 100 Backlight 0 ...
...lit room. Customizing your HD or SD settings are recalled for the video status you are using. 23 Standard Resets the picture display to the TV. • Each video status setting has a separate memory for HD (1080i/1080p/720p) and SD (480p/480i) video signal. Notes: &#...8226; Each mode is displayed, your TV Picture Picture Display TV Video Status Game Tint 0 - 50 - 100 Color 0 - 25 - 100 Picture 0 - 50 - 100 Bright 0 - 43 - 100 Detail 0 - 94 - 100 Backlight 0 ...
Instructions
Page 24
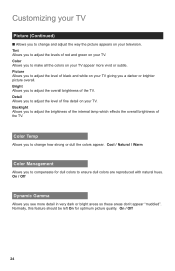
... (Continued) ■ Allows you see more vivid or subtle. Bright Allows you to adjust the overall brightness of black and white on your TV giving you to compensate for optimum picture quality. Cool / Natural / Warm Color Management Allows you a darker or brighter picture overall. Picture Allows you to...change how strong or dull the colors appear. Normally, this feature should be left On for dull colors to make all the colors on your TV appear more detail in very dark or bright areas so these areas don't appear "muddied". Color Temp Allows you to ensure dull colors are ...
... (Continued) ■ Allows you see more vivid or subtle. Bright Allows you to adjust the overall brightness of black and white on your TV giving you to compensate for optimum picture quality. Cool / Natural / Warm Color Management Allows you a darker or brighter picture overall. Picture Allows you to...change how strong or dull the colors appear. Normally, this feature should be left On for dull colors to make all the colors on your TV appear more detail in very dark or bright areas so these areas don't appear "muddied". Color Temp Allows you to ensure dull colors are ...
Instructions
Page 25
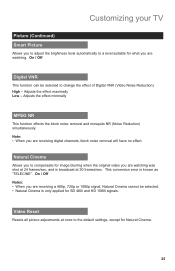
... noise removal will have no effect. Natural Cinema Allows you to compensate for image blurring when the original video you are watching. High - Customizing your TV Picture (Continued) Smart Picture Allows you to adjust the brightness level automatically to a level suitable for what you are watching was shot at 24 frames...
... noise removal will have no effect. Natural Cinema Allows you to compensate for image blurring when the original video you are watching. High - Customizing your TV Picture (Continued) Smart Picture Allows you to adjust the brightness level automatically to a level suitable for what you are watching was shot at 24 frames...


