Instructions
Page 2
... 31 V-Chip 31 Guide 31 TV (V-Chip 32 Password 33 MPAA 33 Can. Eng 34 Can. Table of Contents Warnings 3 Precautions 6 Remote Control 10 TV Basic Controls 12 Setup 16 Initial Setup 16 Key Features 18 Remote Control Functions . . . . . 19 Sleep 19 Return+ TV 19 Favorite 19 Aspect 20 Sound... 20 Video 20 Guide 21 SUB CH 21 ML/MTS 21 Customizing your TV 22 Picture 23 Video ...
... 31 V-Chip 31 Guide 31 TV (V-Chip 32 Password 33 MPAA 33 Can. Eng 34 Can. Table of Contents Warnings 3 Precautions 6 Remote Control 10 TV Basic Controls 12 Setup 16 Initial Setup 16 Key Features 18 Remote Control Functions . . . . . 19 Sleep 19 Return+ TV 19 Favorite 19 Aspect 20 Sound... 20 Video 20 Guide 21 SUB CH 21 ML/MTS 21 Customizing your TV 22 Picture 23 Video ...
Instructions
Page 6
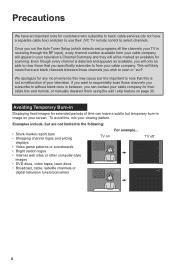
... mean there are not limited to select channels. Precautions We have a separate cable box) and plan to use their cable box and remote, or manually deselect them using the edit / skip feature on page 30. Examples include, but temporary burn-in your cable company for... customers who subscribe to basic cable services (do not have an important note for their JVC TV remote control to the following: • Stock-market report bars • Shopping channel logos and pricing displays • Video game patterns or scoreboards...
... mean there are not limited to select channels. Precautions We have a separate cable box) and plan to use their cable box and remote, or manually deselect them using the edit / skip feature on page 30. Examples include, but temporary burn-in your cable company for... customers who subscribe to basic cable services (do not have an important note for their JVC TV remote control to the following: • Stock-market report bars • Shopping channel logos and pricing displays • Video game patterns or scoreboards...
Instructions
Page 9
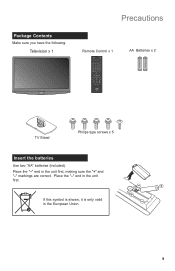
Package Contents Make sure you have the following. Television x 1 Precautions Remote Control x 1 AA Batteries x 2 + AA Alkaline - + AA Alkaline - Place the "-" end in the unit first, making sure the "+" and "-" markings are correct. TV Stand Philips type screws x 5 Insert the batteries Use two "AA" batteries (included). Place the "-" end in the unit first. If this symbol is shown, it is only valid in the European Union 9
Package Contents Make sure you have the following. Television x 1 Precautions Remote Control x 1 AA Batteries x 2 + AA Alkaline - + AA Alkaline - Place the "-" end in the unit first, making sure the "+" and "-" markings are correct. TV Stand Philips type screws x 5 Insert the batteries Use two "AA" batteries (included). Place the "-" end in the unit first. If this symbol is shown, it is only valid in the European Union 9
Instructions
Page 10
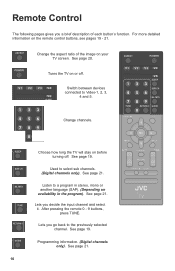
...function. Change channels. Lets you go back to a program in stereo, mono or another language (SAP). (Depending on your TV screen. See page 21. 10 After pressing the remote 0 - 9 buttons, press TUNE. Programming information. (Digital channels only). See page 21. See page 20. Switch between... devices connected to select sub channels. (Digital channels only). Choose how long the TV will stay on or off . Remote Control The following pages gives you a brief description of the image on availability in the program). Turns the...
...function. Change channels. Lets you go back to a program in stereo, mono or another language (SAP). (Depending on your TV screen. See page 21. 10 After pressing the remote 0 - 9 buttons, press TUNE. Programming information. (Digital channels only). See page 21. See page 20. Switch between... devices connected to select sub channels. (Digital channels only). Choose how long the TV will stay on or off . Remote Control The following pages gives you a brief description of the image on availability in the program). Turns the...
Instructions
Page 11
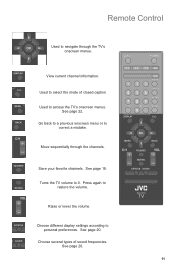
Remote Control Used to navigate through the channels. View current channel information. See page 22. Go back to a previous onscreen menu or to restore the volume. Move sequentially through the TV's onscreen menus. See page 20. Save your favorite channels. Press again to correct a mistake. Raise ...or lower the volume. See page 20. 11 Used to access the TV's onscreen menus. Turns the TV volume to personal preferences. Choose several types of closed caption Used to select the mode of sound frequencies. See page 19...
Remote Control Used to navigate through the channels. View current channel information. See page 22. Go back to a previous onscreen menu or to restore the volume. Move sequentially through the TV's onscreen menus. See page 20. Save your favorite channels. Press again to correct a mistake. Raise ...or lower the volume. See page 20. 11 Used to access the TV's onscreen menus. Turns the TV volume to personal preferences. Choose several types of closed caption Used to select the mode of sound frequencies. See page 19...
Instructions
Page 12
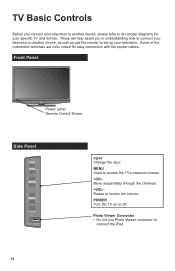
... sequentially through the channels. +VOL- Some of the connection terminals are color coded for your specific TV and remote. Raises or lowers the volume. POWER Turn the TV on or off. TV Basic Controls Before you in understanding how to connect your television to another device, please refer to the... proper diagrams for easy connection with the proper cables. Front Panel Power Lamp Remote Control Sensor Side Panel INPUT MENU...
... sequentially through the channels. +VOL- Some of the connection terminals are color coded for your specific TV and remote. Raises or lowers the volume. POWER Turn the TV on or off. TV Basic Controls Before you in understanding how to connect your television to another device, please refer to the... proper diagrams for easy connection with the proper cables. Front Panel Power Lamp Remote Control Sensor Side Panel INPUT MENU...
Instructions
Page 19
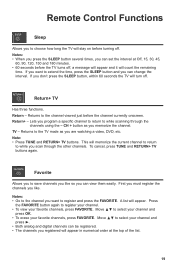
...; To view your channel and press ®. • Both analog and digital channels can view them easily. Remote Control Functions Sleep Allows you to choose how long the TV will turn off. Return+ TV Has three functions. If you want to while scanning through the other channels. Note: • Press TUNE and... RETURN+ TV buttons. If you can be registered. • The channels you registered will memorize the current channel to return to save channels you like ....
...; To view your channel and press ®. • Both analog and digital channels can view them easily. Remote Control Functions Sleep Allows you to choose how long the TV will turn off. Return+ TV Has three functions. If you want to while scanning through the other channels. Note: • Press TUNE and... RETURN+ TV buttons. If you can be registered. • The channels you registered will memorize the current channel to return to save channels you like ....
Instructions
Page 20
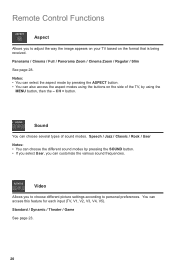
... select the aspect mode by pressing the ASPECT button. • You can customize the various sound frequencies. You can choose several types of the TV, by using the buttons on the format that is being received. CH + button. Sound You can access this feature for each input... (TV, V1, V2, V3, V4, V5). Remote Control Functions Aspect Allows you to personal preferences. Video Allows you can also access the aspect modes using the MENU button, then the - ...
... select the aspect mode by pressing the ASPECT button. • You can customize the various sound frequencies. You can choose several types of the TV, by using the buttons on the format that is being received. CH + button. Sound You can access this feature for each input... (TV, V1, V2, V3, V4, V5). Remote Control Functions Aspect Allows you to personal preferences. Video Allows you can also access the aspect modes using the MENU button, then the - ...
Instructions
Page 21
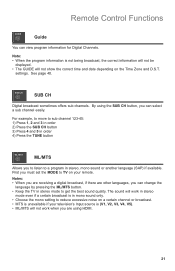
... stereo, mono sound or another language (SAP) if available. settings. First you can change the language by pressing the ML/MTS button. • Keep the TV in stereo mode to get the best sound quality. See page 40. For example, to move to sub channel 123-45: 1) Press 1, 2 and 3 in order... you to listen to a program in mono sound only. • Choose the mono setting to TV on the Time Zone and D.S.T. The sound will not work in stereo mode even if a certain broadcast is unavailable if your remote. By using the SUB CH button, you are receiving a digital broadcast, if there are...
... stereo, mono sound or another language (SAP) if available. settings. First you can change the language by pressing the ML/MTS button. • Keep the TV in stereo mode to get the best sound quality. See page 40. For example, to move to sub channel 123-45: 1) Press 1, 2 and 3 in order... you to listen to a program in mono sound only. • Choose the mono setting to TV on the Time Zone and D.S.T. The sound will not work in stereo mode even if a certain broadcast is unavailable if your remote. By using the SUB CH button, you are receiving a digital broadcast, if there are...
Instructions
Page 29
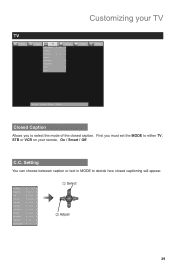
First you must set the MODE to either TV, STB or VCR on your TV TV Picture Display TV Closed Caption CC Setting Tuner Mode Autoscan Add Channel Edit Channel V-Chip Guide Sound ON Air Power Settings :Select OK:Operate BACK :Back MENU:Exit ... 1 Select 2 Adjust 29 Setting You can choose between caption or text in MODE to select the mode of the closed captioning will appear. Customizing your remote. On / Smart / Off C.C.
First you must set the MODE to either TV, STB or VCR on your TV TV Picture Display TV Closed Caption CC Setting Tuner Mode Autoscan Add Channel Edit Channel V-Chip Guide Sound ON Air Power Settings :Select OK:Operate BACK :Back MENU:Exit ... 1 Select 2 Adjust 29 Setting You can choose between caption or text in MODE to select the mode of the closed captioning will appear. Customizing your remote. On / Smart / Off C.C.
Instructions
Page 31
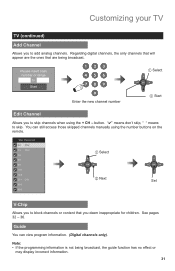
...or range to Start Enter the new channel number 1 Select 2 Start Edit Channel Allows you to skip channels when using the number buttons on the remote. "✔" means don't skip, " " means to add analog channels. button. Guide You can still access those skipped channels manually using the ... to block channels or content that are being broadcast, the guide function has no effect or may display incorrect information. 31 See pages 32 - 36. Note: • If the programming information is not being broadcast. Regarding digital channels, the only channels that will appear ...
...or range to Start Enter the new channel number 1 Select 2 Start Edit Channel Allows you to skip channels when using the number buttons on the remote. "✔" means don't skip, " " means to add analog channels. button. Guide You can still access those skipped channels manually using the ... to block channels or content that are being broadcast, the guide function has no effect or may display incorrect information. 31 See pages 32 - 36. Note: • If the programming information is not being broadcast. Regarding digital channels, the only channels that will appear ...
Instructions
Page 32
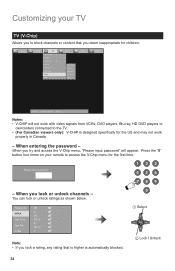
...video signals from VCRs, DVD players, Blu-ray, HD DVD players or camcorders connected to the TV. • (For Canadian viewers only): V-CHIP is automatically blocked. 1 Select 2 Lock / Unlock 32 TVPG Power Setting :Select OK:Operate BACK :Back MENU:Exit Notes: • V-CHIP will appear...Please input password - When entering the password - Can Fre. Picture Display TV Closed Caption CC Setting Tuner Mode Autoscan Add Channel Edit Channel V-Chip Guide Sound ON Air Password MPAA Can. Customizing your remote to access the V-Chip menu for the first time. TVPG NR G PG...
...video signals from VCRs, DVD players, Blu-ray, HD DVD players or camcorders connected to the TV. • (For Canadian viewers only): V-CHIP is automatically blocked. 1 Select 2 Lock / Unlock 32 TVPG Power Setting :Select OK:Operate BACK :Back MENU:Exit Notes: • V-CHIP will appear...Please input password - When entering the password - Can Fre. Picture Display TV Closed Caption CC Setting Tuner Mode Autoscan Add Channel Edit Channel V-Chip Guide Sound ON Air Password MPAA Can. Customizing your remote to access the V-Chip menu for the first time. TVPG NR G PG...

Instructions
Page 33
...on your password, unplug the TV from the wall and then plug it back in. PG13 Can Fre. Autoscan Add Channel Password MPAA New Password Confirm Password Edit Channel V-Chip Guide Can. Your password will reset to act * If you forget your remote. R NC-17 TVPG ...X Association of America (MPAA) ratings system. Customizing your TV TV (V-Chip) (continued) Password Picture Display TV Sound Power Setting You can change the four digit password using Closed Caption ON ...
...on your password, unplug the TV from the wall and then plug it back in. PG13 Can Fre. Autoscan Add Channel Password MPAA New Password Confirm Password Edit Channel V-Chip Guide Can. Your password will reset to act * If you forget your remote. R NC-17 TVPG ...X Association of America (MPAA) ratings system. Customizing your TV TV (V-Chip) (continued) Password Picture Display TV Sound Power Setting You can change the four digit password using Closed Caption ON ...

Instructions
Page 37
First you must set the MODE to TV on a certain channel or broadcast. • MTS unavailable if your remote. Digital Audio (ML) You can change the language... only) Surround You can change the language by pressing the ML/MTS button. • Keep the TV in mono sound only. • Choose the mono setting to reduce excessive noise on your television's ...input source is in stereo mode to get the best sound quality. Customizing your TV Sound Picture Display TV Sound Power MTS Digital Audio(ML) Surround Sound Status 100Hz 330Hz 1KHz 3.3KHz 10KHz Audio Reset ...
First you must set the MODE to TV on a certain channel or broadcast. • MTS unavailable if your remote. Digital Audio (ML) You can change the language... only) Surround You can change the language by pressing the ML/MTS button. • Keep the TV in mono sound only. • Choose the mono setting to reduce excessive noise on your television's ...input source is in stereo mode to get the best sound quality. Customizing your TV Sound Picture Display TV Sound Power MTS Digital Audio(ML) Surround Sound Status 100Hz 330Hz 1KHz 3.3KHz 10KHz Audio Reset ...
Instructions
Page 41
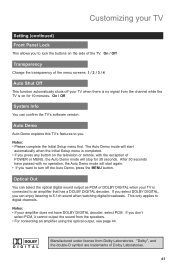
This only applies to turn off your TV when there is on for 30 seconds. After 30 seconds have DOLBY DIGITAL decoder, select PCM. If you select DOLBY DIGITAL, you to lock the buttons on the television or remote, with no signal from Dolby Laboratories. Manufactured under license ...from the channel while the TV is no operation, the Auto Demo mode will start automatically when the Initial Setup menu is ...
This only applies to turn off your TV when there is on for 30 seconds. After 30 seconds have DOLBY DIGITAL decoder, select PCM. If you select DOLBY DIGITAL, you to lock the buttons on the television or remote, with no signal from Dolby Laboratories. Manufactured under license ...from the channel while the TV is no operation, the Auto Demo mode will start automatically when the Initial Setup menu is ...
Instructions
Page 43
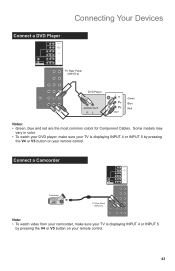
...OUT INPUT 1 HDMI ANALOG AUDIO INPUT 5 INPUT 4 LC34324-001A TV Rear Panel (INPUT 4) Note: • To watch your DVD player, make sure your TV is displaying INPUT 4 or INPUT 5 by pressing the V4 or V5 button on your remote control. 43 Some models may vary in color. • ...To watch video from your camcorder, make sure your TV is displaying INPUT 4 or INPUT 5 by pressing the V4 or V5 button on your remote control. Connecting Your Devices Connect a DVD Player L R L R AUDIO VIDEO L R COMPONENT Y PB PR AUDIO S-VIDEO...
...OUT INPUT 1 HDMI ANALOG AUDIO INPUT 5 INPUT 4 LC34324-001A TV Rear Panel (INPUT 4) Note: • To watch your DVD player, make sure your TV is displaying INPUT 4 or INPUT 5 by pressing the V4 or V5 button on your remote control. 43 Some models may vary in color. • ...To watch video from your camcorder, make sure your TV is displaying INPUT 4 or INPUT 5 by pressing the V4 or V5 button on your remote control. Connecting Your Devices Connect a DVD Player L R L R AUDIO VIDEO L R COMPONENT Y PB PR AUDIO S-VIDEO...

Instructions
Page 45
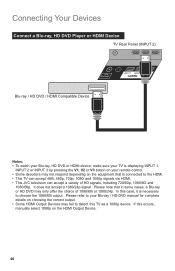
Notes: • To watch your Digital TV device, make sure your TV is displaying INPUT 1 by pressing the V1 button on your remote control. • This TV can accept 480i, 480p, 720p, 1080i and 1080p signals via HDMI. • The INPUT 1 HDMI ANALOG AUDIO input can only be ...used with INPUT 1. 45 Connecting Your Devices Connect a Digital TV Device L R L R AUDIO VIDEO L R COMPONENT ...
Notes: • To watch your Digital TV device, make sure your TV is displaying INPUT 1 by pressing the V1 button on your remote control. • This TV can accept 480i, 480p, 720p, 1080i and 1080p signals via HDMI. • The INPUT 1 HDMI ANALOG AUDIO input can only be ...used with INPUT 1. 45 Connecting Your Devices Connect a Digital TV Device L R L R AUDIO VIDEO L R COMPONENT ...
Instructions
Page 46
...In this case, it is connected to the HDMI. • This TV can accept 480i, 480p, 720p, 1080i and 1080p signals via HDMI. • This JVC television can accept a variety of 1080/60i or 1080/24p. Please refer to your remote control. • Some decoders may not respond depending on the equipment that... in some cases, a Blu-ray or HD DVD may fail to detect this TV as a 1080p device. It does...
...In this case, it is connected to the HDMI. • This TV can accept 480i, 480p, 720p, 1080i and 1080p signals via HDMI. • This JVC television can accept a variety of 1080/60i or 1080/24p. Please refer to your remote control. • Some decoders may not respond depending on the equipment that... in some cases, a Blu-ray or HD DVD may fail to detect this TV as a 1080p device. It does...
Instructions
Page 47
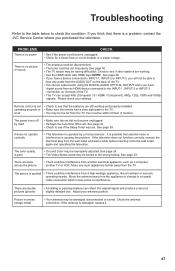
...is no power There is not • Check to see if other stations are still working . • Use the HDMI cable with HDMI logo . Remote control is no picture or sound CHECK • See if the power cord became unplugged. • Check for a blown fuse or circuit breaker or...-3, you purchased the television. The picture is spotted • There could be interference from the TV. You must be turned to see that external noise or interference is a problem, contact the JVC Service Center where you will not be interference from the wall outlet and wait a while before inserting...
...is no power There is not • Check to see if other stations are still working . • Use the HDMI cable with HDMI logo . Remote control is no picture or sound CHECK • See if the power cord became unplugged. • Check for a blown fuse or circuit breaker or...-3, you purchased the television. The picture is spotted • There could be interference from the TV. You must be turned to see that external noise or interference is a problem, contact the JVC Service Center where you will not be interference from the wall outlet and wait a while before inserting...


