Instructions
Page 2
...Precautions 7 Remote Control 10 TV Basic Controls 12 Key Features 17 Setup 18 Interactive Plug-In Menu 18 Remote Control Functions . . . . . 20 Return+ TV 20 Favorite 20 Aspect 20 Sound 21 Video 21 Guide 21 SUB CH 21 C.C 22 TWIN 22 Sleep 23 ML/MTS 23 SWAP 23 SELECT 23 Customizing your TV 24 Initial... Off 39 Quick Start-up 39 Aspect 40 Position Adjustment 41 Illumination 41 Power indicator 41 HDMI Size 41 Control with HDMI 42 Video-1 Audio 42 Video Input Label 42 Key Items 43 Favorite 43 Guide 43 Display 43 Sleep Timer 43 Multi Language/MTS 44 Photo Viewer 45 ...
...Precautions 7 Remote Control 10 TV Basic Controls 12 Key Features 17 Setup 18 Interactive Plug-In Menu 18 Remote Control Functions . . . . . 20 Return+ TV 20 Favorite 20 Aspect 20 Sound 21 Video 21 Guide 21 SUB CH 21 C.C 22 TWIN 22 Sleep 23 ML/MTS 23 SWAP 23 SELECT 23 Customizing your TV 24 Initial... Off 39 Quick Start-up 39 Aspect 40 Position Adjustment 41 Illumination 41 Power indicator 41 HDMI Size 41 Control with HDMI 42 Video-1 Audio 42 Video Input Label 42 Key Items 43 Favorite 43 Guide 43 Display 43 Sleep Timer 43 Multi Language/MTS 44 Photo Viewer 45 ...
Instructions
Page 6
...party responsible for customers who subscribe to basic cable services (do not have a separate cable box) and plan to use their cable box and remote, or manually deselect them using the edit / skip feature on page 25. 6 If this equipment does cause harmful interference to radio or television...will only be marked as available, you will not occur in between, you specifically subscribe to from your cable company for their JVC TV remote control to select channels. Once you subscribe to without blank ones in a particular installation. This will all be able to view those channels ...
...party responsible for customers who subscribe to basic cable services (do not have a separate cable box) and plan to use their cable box and remote, or manually deselect them using the edit / skip feature on page 25. 6 If this equipment does cause harmful interference to radio or television...will only be marked as available, you will not occur in between, you specifically subscribe to from your cable company for their JVC TV remote control to select channels. Once you subscribe to without blank ones in a particular installation. This will all be able to view those channels ...

Instructions
Page 9
... Contents Make sure you may damage it is shown, it . VOL + LIGHT MUTING OK AVORITE DVR STATUS SOUND VIDEO ASPECT GUIDE SUB CH TV/VCR C.C. Insert the batteries Use two "AA" batteries (included). Place the "-" end in the unit first, making sure the "+" and ...you have protection sheets attached to clean the frame and stand Your TV has a glossy frame and stand which have the following. Television x 1 Remote Control x 1 POWER MODE TV STB VCR DVD AUDIO INPUT V1 V2 V3 V4 V5 1 2 3 4 5 6 7 8 9 RETURN + TUNE 0 TV - Place the "-" end in the unit first. + AA ...
... Contents Make sure you may damage it is shown, it . VOL + LIGHT MUTING OK AVORITE DVR STATUS SOUND VIDEO ASPECT GUIDE SUB CH TV/VCR C.C. Insert the batteries Use two "AA" batteries (included). Place the "-" end in the unit first, making sure the "+" and ...you have protection sheets attached to clean the frame and stand Your TV has a glossy frame and stand which have the following. Television x 1 Remote Control x 1 POWER MODE TV STB VCR DVD AUDIO INPUT V1 V2 V3 V4 V5 1 2 3 4 5 6 7 8 9 RETURN + TUNE 0 TV - Place the "-" end in the unit first. + AA ...

Instructions
Page 10
... and select it. MENU MENU POWER Turns the TV on the remote control buttons, see pages 20 - 23. MODE TV STB VCR DVD AUDIO INPUT V1 V2 V3 V4 V5 Switch between devices connected to access the TV's onscreen menus. Switch between "TV / STB / VCR / DVD / AUDIO devices...detailed information on or off. TUNE RETURN + TV Lets you a brief description of each button's function. See page 55. Turns the TV volume to four other devices. This remote can also control up to 0. Input remote codes. See page 20. - All remote control buttons are illuminated, except for the LIGHT ...
... and select it. MENU MENU POWER Turns the TV on the remote control buttons, see pages 20 - 23. MODE TV STB VCR DVD AUDIO INPUT V1 V2 V3 V4 V5 Switch between devices connected to access the TV's onscreen menus. Switch between "TV / STB / VCR / DVD / AUDIO devices...detailed information on or off. TUNE RETURN + TV Lets you a brief description of each button's function. See page 55. Turns the TV volume to four other devices. This remote can also control up to 0. Input remote codes. See page 20. - All remote control buttons are illuminated, except for the LIGHT ...

Instructions
Page 11
... + - VOL + LIGHT MUTING OK AVORITE DVR STATUS SOUND VIDEO ASPECT GUIDE SUB CH TV/VCR C.C. SUB T. Remote Control BACK F F AVORITE DVR ASPECT STAT SOUND ATUS VIDEO GUIDE SUB CH TV/VCR C.C. DISPLAY TWIN Save your TV screen. Change the sound mode of closed caption. See page 21. Use the C.C. ..., mono or another language (SAP). (Depending on before turning off. SLEEP ML/MTS SWAP SELECT Choose how long the TV will stay on availability in the split screen window for buttons that control your external devices. Exchange the channel (or input) displayed in the program).
... + - VOL + LIGHT MUTING OK AVORITE DVR STATUS SOUND VIDEO ASPECT GUIDE SUB CH TV/VCR C.C. SUB T. Remote Control BACK F F AVORITE DVR ASPECT STAT SOUND ATUS VIDEO GUIDE SUB CH TV/VCR C.C. DISPLAY TWIN Save your TV screen. Change the sound mode of closed caption. See page 21. Use the C.C. ..., mono or another language (SAP). (Depending on before turning off. SLEEP ML/MTS SWAP SELECT Choose how long the TV will stay on availability in the split screen window for buttons that control your external devices. Exchange the channel (or input) displayed in the program).

Instructions
Page 12
... Illumination POWER LED Input Change the input MENU Used to the proper diagrams for easy connection with the proper cables. TV Basic Controls Before you in understanding how to connect your television to another device, as well as use of the connection terminals ...are color coded for your television to another device, please refer to access the TV's onscreen menus. +CH- Front Panel Side Panel Rear Panel • For governing the use the remote...
... Illumination POWER LED Input Change the input MENU Used to the proper diagrams for easy connection with the proper cables. TV Basic Controls Before you in understanding how to connect your television to another device, as well as use of the connection terminals ...are color coded for your television to another device, please refer to access the TV's onscreen menus. +CH- Front Panel Side Panel Rear Panel • For governing the use the remote...

Instructions
Page 20
... by pressing the ASPECT button. 20 TV - Panorama / Cinema / Full / Panorama Zoom / Cinema Zoom / Full Native / Regular / Slim See page 40. First you must register the channels you memorize the channel. Remote Control Functions RETURN + TV RETURN+ TV Has three functions. Returns to while... scanning through the other channels. Lets you are watching a video, DVD, etc. Returns to the TV mode as you like so you registered will ...
... by pressing the ASPECT button. 20 TV - Panorama / Cinema / Full / Panorama Zoom / Cinema Zoom / Full Native / Regular / Slim See page 40. First you must register the channels you memorize the channel. Remote Control Functions RETURN + TV RETURN+ TV Has three functions. Returns to while... scanning through the other channels. Lets you are watching a video, DVD, etc. Returns to the TV mode as you like so you registered will ...

Instructions
Page 21
...: • You can select a sub channel easily. GUIDE DISPLAY GUIDE You can view program information for each input (TV, V1, V2, V3, V4, V5). SUB CH TV/VCR TWIN SUB CH Digital broadcast sometimes offers sub channels. Remote Control Functions DVR STATU SOUND SUB CH SOUND Change the sound mode of the MaxxAudio function.
...: • You can select a sub channel easily. GUIDE DISPLAY GUIDE You can view program information for each input (TV, V1, V2, V3, V4, V5). SUB CH TV/VCR TWIN SUB CH Digital broadcast sometimes offers sub channels. Remote Control Functions DVR STATU SOUND SUB CH SOUND Change the sound mode of the MaxxAudio function.

Instructions
Page 22
...8224; buttons and press OK. • Smart Caption will appear when you are in TWIN mode, the menu screen will appear on the remote control. cannot be the mode selected in PC mode or use HDMI, C.C. To turn split-screen off and return to select the mode of.... 22 TWIN TWIN SWAP Activate the split-screen option by pressing TWIN on the right. At first, select TV mode to use the TWIN function. C.C. (Closed Caption) SLEEP Use the C.C. (Closed Caption) button to normal television viewing, press TWIN again or press the BACK button. Remote Control Functions C.C. SUB T.
...8224; buttons and press OK. • Smart Caption will appear when you are in TWIN mode, the menu screen will appear on the remote control. cannot be the mode selected in PC mode or use HDMI, C.C. To turn split-screen off and return to select the mode of.... 22 TWIN TWIN SWAP Activate the split-screen option by pressing TWIN on the right. At first, select TV mode to use the TWIN function. C.C. (Closed Caption) SLEEP Use the C.C. (Closed Caption) button to normal television viewing, press TWIN again or press the BACK button. Remote Control Functions C.C. SUB T.
Instructions
Page 23
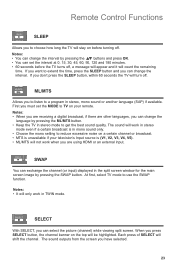
... are other languages, you must set the interval at 0, 15, 30, 45, 60, 90, 120 and 180 minutes. • 60 seconds before turning off . Remote Control Functions SLEEP SELECT SLEEP Allows you to listen to a program in stereo, mono sound or another language (SAP) if available. ML/MTS ML/MTS Allows... you to choose how long the TV will be highlighted. Notes: • It will shift the channel. SELECT SELECT With SELECT, you press SELECT button, the channel banner on the top ...
... are other languages, you must set the interval at 0, 15, 30, 45, 60, 90, 120 and 180 minutes. • 60 seconds before turning off . Remote Control Functions SLEEP SELECT SLEEP Allows you to listen to a program in stereo, mono sound or another language (SAP) if available. ML/MTS ML/MTS Allows... you to choose how long the TV will be highlighted. Notes: • It will shift the channel. SELECT SELECT With SELECT, you press SELECT button, the channel banner on the top ...

Instructions
Page 42
...an HDMI cable, you use of the operating device. • Turn the TV off the TV. • Some device may not be controlled with HDMI If you may not support this TV is connected to label all Video Input Label settings. 42 If "HDMI CEC" does not work correctly: • When HDMI CEC ... "Auto" for DVI devices for INPUT1. (Not available for INPUT2 and INPUT5) Video Input Label Allows you to INPUT1, INPUT2 or INPUT5 with a single remote. Control the TV using the TV - • Turn off the operating device by turning off with the HDMI CEC enabled device you have connected to the...
...an HDMI cable, you use of the operating device. • Turn the TV off the TV. • Some device may not be controlled with HDMI If you may not support this TV is connected to label all Video Input Label settings. 42 If "HDMI CEC" does not work correctly: • When HDMI CEC ... "Auto" for DVI devices for INPUT1. (Not available for INPUT2 and INPUT5) Video Input Label Allows you to INPUT1, INPUT2 or INPUT5 with a single remote. Control the TV using the TV - • Turn off the operating device by turning off with the HDMI CEC enabled device you have connected to the...
Instructions
Page 49
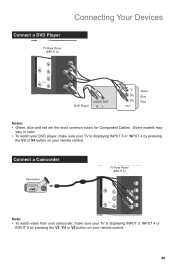
... 5 R - Some models may vary in color. • To watch video from your camcorder, make sure your TV is displaying INPUT 3, INPUT 4 or INPUT 5 by pressing the V3 or V4 button on your remote control. AUDIO - L Y PR PB S-VIDEO VIDEO AUDIO OUT DVD Player R L Y PB PR OUT Green Blue ... 3 R - L Note: • To watch your DVD player, make sure your TV is displaying INPUT 3 or INPUT 4 by pressing the V3, V4 or V5 button on your remote control. 49 Connect a Camcorder Camcorder INPUT 4 INPUT 5 TV Rear Panel R - AUDIO - L Notes: • Green, blue and red are ...
... 5 R - Some models may vary in color. • To watch video from your camcorder, make sure your TV is displaying INPUT 3, INPUT 4 or INPUT 5 by pressing the V3 or V4 button on your remote control. AUDIO - L Y PR PB S-VIDEO VIDEO AUDIO OUT DVD Player R L Y PB PR OUT Green Blue ... 3 R - L Note: • To watch your DVD player, make sure your TV is displaying INPUT 3 or INPUT 4 by pressing the V3, V4 or V5 button on your remote control. 49 Connect a Camcorder Camcorder INPUT 4 INPUT 5 TV Rear Panel R - AUDIO - L Notes: • Green, blue and red are ...

Instructions
Page 51
... FOR HDMI 1 VIDEO HDMI ANALOG AUDIO R - Notes: • To watch your Digital TV device, make sure your TV is displaying INPUT 1 by pressing the V1 button on your IR Device's manual for more information. L TV Rear Panel (INPUT 1) DIGITAL AUDIO OPTICAL OUT PC IN (D-SUB) INPUT 5 PHOTO VIEWER ...INPUT 2 INPUT 1 UDIO AOUUDTIO OUT Digital TV Device LR AUDIO OUT DIGITAL OUT After the connections have been made, tighten the screw to your remote control. • This TV can accept 480i, 480p, 720p, 1080i and 1080p signals via HDMI. AUDIO - Connect ...
... FOR HDMI 1 VIDEO HDMI ANALOG AUDIO R - Notes: • To watch your Digital TV device, make sure your TV is displaying INPUT 1 by pressing the V1 button on your IR Device's manual for more information. L TV Rear Panel (INPUT 1) DIGITAL AUDIO OPTICAL OUT PC IN (D-SUB) INPUT 5 PHOTO VIEWER ...INPUT 2 INPUT 1 UDIO AOUUDTIO OUT Digital TV Device LR AUDIO OUT DIGITAL OUT After the connections have been made, tighten the screw to your remote control. • This TV can accept 480i, 480p, 720p, 1080i and 1080p signals via HDMI. AUDIO - Connect ...

Instructions
Page 52
... HDMI Compatible Device Notes: • To watch your Blu-ray or HDMI device, make sure your TV is displaying INPUT 1, INPUT 2 or INPUT 5 by pressing the V1, V2 or V5 button on your remote control. • Some decoders may fail to detect this occurs, manually select 1080p on the equipment that... is connected to the HDMI. • This TV can accept 480i, 480p, 720p, 1080i and 1080p signals via HDMI. • This JVC television can accept a variety of ...
... HDMI Compatible Device Notes: • To watch your Blu-ray or HDMI device, make sure your TV is displaying INPUT 1, INPUT 2 or INPUT 5 by pressing the V1, V2 or V5 button on your remote control. • Some decoders may fail to detect this occurs, manually select 1080p on the equipment that... is connected to the HDMI. • This TV can accept 480i, 480p, 720p, 1080i and 1080p signals via HDMI. • This JVC television can accept a variety of ...
Instructions
Page 54
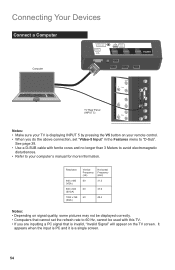
... displaying INPUT 5 by pressing the V5 button on the TV screen. See page 39. • Use a D-SUB cable with this TV. • If you do the above connection, set "Video-5 Input" in the Features menu to "D-Sub". It appears when the input is PC and it ... the refresh rate to 60 Hz, cannot be used with ferrite cores and no longer than 3 Meters to avoid electromagnetic disturbances. • Refer to your remote control. • When you are inputting a PC signal that is a single screen. 54 Connecting Your Devices Connect a Computer DIGITAL AUDIO OPTICAL OUT PC IN (D-SUB) INPUT...
... displaying INPUT 5 by pressing the V5 button on the TV screen. See page 39. • Use a D-SUB cable with this TV. • If you do the above connection, set "Video-5 Input" in the Features menu to "D-Sub". It appears when the input is PC and it ... the refresh rate to 60 Hz, cannot be used with ferrite cores and no longer than 3 Meters to avoid electromagnetic disturbances. • Refer to your remote control. • When you are inputting a PC signal that is a single screen. 54 Connecting Your Devices Connect a Computer DIGITAL AUDIO OPTICAL OUT PC IN (D-SUB) INPUT...
Instructions
Page 55
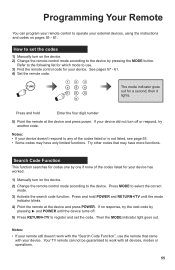
... of the codes listed for a second, then it lights. Then the MODE indicator light goes out. Your TV remote can program your remote control to the device. How to set the codes 1) Manually turn off . 5) Press RETURN+/TV to select the correct mode. 3) Activate the search code function. Try other codes that came with all...
... of the codes listed for a second, then it lights. Then the MODE indicator light goes out. Your TV remote can program your remote control to the device. How to set the codes 1) Manually turn off . 5) Press RETURN+/TV to select the correct mode. 3) Activate the search code function. Try other codes that came with all...
Instructions
Page 56
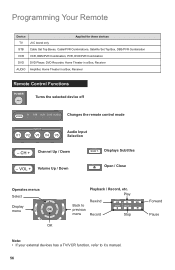
...Remote Device Applied for these devices TV JVC brand only STB Cable Set Top Boxes, Cable/PVR Combinations, Satellite Set Top Box, DBS/PVR Combination VCR VCR, DBS/PVR Combination, PVR, DVD/PVR Combination DVD DVD Player, DVD Recorder, Home Theater in a Box, Receiver AUDIO Amplifier, Home Theater in a Box, Receiver Remote Control... Functions POWER Turns the selected device off MODE TV STB VCR DVD AUDIO Changes the remote control mode INPUT V1 V2 V3 V4 V5 Audio Input Selection - Play Back to...
...Remote Device Applied for these devices TV JVC brand only STB Cable Set Top Boxes, Cable/PVR Combinations, Satellite Set Top Box, DBS/PVR Combination VCR VCR, DBS/PVR Combination, PVR, DVD/PVR Combination DVD DVD Player, DVD Recorder, Home Theater in a Box, Receiver AUDIO Amplifier, Home Theater in a Box, Receiver Remote Control... Functions POWER Turns the selected device off MODE TV STB VCR DVD AUDIO Changes the remote control mode INPUT V1 V2 V3 V4 V5 Audio Input Selection - Play Back to...
Instructions
Page 62
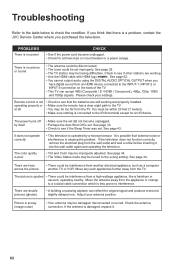
...INPUT-5 connection on the back of the TV. • This TV can reflect the original signal and produce a second, slightly delayed one. See page 52. • You cannot output audio using the DIGITAL AUDIO OPTICAL OUTPUT when you purchased the television. Remote control is causing the problem. The power turns...the set did not become unplugged. • Perhaps the Auto Shut Off is a problem, contact the JVC Service Center where you have digital sound from an HDMI device connected to the TV. • You may be turned to check the condition. See page 33. • Check to ...
...INPUT-5 connection on the back of the TV. • This TV can reflect the original signal and produce a second, slightly delayed one. See page 52. • You cannot output audio using the DIGITAL AUDIO OPTICAL OUTPUT when you purchased the television. Remote control is causing the problem. The power turns...the set did not become unplugged. • Perhaps the Auto Shut Off is a problem, contact the JVC Service Center where you have digital sound from an HDMI device connected to the TV. • You may be turned to check the condition. See page 33. • Check to ...


