Instructions
Page 1
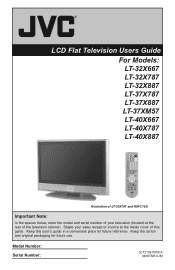
Staple your television (located at the rear of this user's guide in a convenient place for future use. Keep the carton and original packaging for future reference. Model Number: Serial Number: LCT2104-001B-A 0406TNH-II-IM Keep this guide. LCD Flat Television Users Guide For Models: LT-32X667 LT-32X787 LT-32X887 LT-37X787 LT-37X887 LT-37XM57 LT-40X667 LT-40X787 LT-40X887 Illustration of LT-32X787 and RM-C18G Important Note: In the spaces below, enter the model and serial number of your sales receipt or invoice to the inside cover of the television cabinet).
Staple your television (located at the rear of this user's guide in a convenient place for future use. Keep the carton and original packaging for future reference. Model Number: Serial Number: LCT2104-001B-A 0406TNH-II-IM Keep this guide. LCD Flat Television Users Guide For Models: LT-32X667 LT-32X787 LT-32X887 LT-37X787 LT-37X887 LT-37XM57 LT-40X667 LT-40X787 LT-40X887 Illustration of LT-32X787 and RM-C18G Important Note: In the spaces below, enter the model and serial number of your sales receipt or invoice to the inside cover of the television cabinet).
Instructions
Page 4
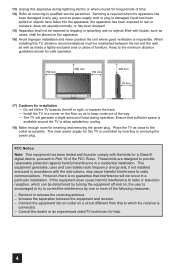
... power plug. Reorient or relocate the receiving antenna. - Increase the separation between the set and the wall, as well as possible. The TV will not occur in a residential installation. FCC Notice: Note: This equipment has been tested and found to comply with the instructions, may... mm 200 mm 50 mm 17) Cautions for this equipment does cause harmful interference to radio or television reception, which the receiver is connected. - When installing this apparatus during operation. Install the TV in accordance with the limits for long periods of the FCC Rules. Place the...
... power plug. Reorient or relocate the receiving antenna. - Increase the separation between the set and the wall, as well as possible. The TV will not occur in a residential installation. FCC Notice: Note: This equipment has been tested and found to comply with the instructions, may... mm 200 mm 50 mm 17) Cautions for this equipment does cause harmful interference to radio or television reception, which the receiver is connected. - When installing this apparatus during operation. Install the TV in accordance with the limits for long periods of the FCC Rules. Place the...

Instructions
Page 5
...(which detects and programs all be able to view those that this is not a malfunction of time can contact your cable company for their JVC TV remote control to the following: • Stock-market report bars • Shopping channel logos and pricing displays • Video game patterns or...Internet web sites or other computer-style images. • DVD discs, video tapes, laser discs • Broadcast, cable, satellite channels or digital television tuners/converters. Warnings We have a separate cable box) and plan to use their cable box and remote. Once you will likely mean there ...
...(which detects and programs all be able to view those that this is not a malfunction of time can contact your cable company for their JVC TV remote control to the following: • Stock-market report bars • Shopping channel logos and pricing displays • Video game patterns or...Internet web sites or other computer-style images. • DVD discs, video tapes, laser discs • Broadcast, cable, satellite channels or digital television tuners/converters. Warnings We have a separate cable box) and plan to use their cable box and remote. Once you will likely mean there ...
Instructions
Page 6
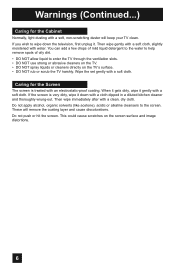
...to the water to help remove spots of oily dirt. • DO NOT allow liquid to enter the TV through the ventilation slots. • DO NOT use strong or abrasive cleaners on the TV. • DO NOT spray liquids or cleaners directly on the screen surface and image distortions. 6 Caring ...diluted kitchen cleaner and thoroughly wrung-out. This could cause scratches on the TV's surface. • DO NOT rub or scrub the TV harshly. When it gets dirty, wipe it down the television, first unplug it. These will keep your TV clean. If the screen is treated with water. Do not push or ...
...to the water to help remove spots of oily dirt. • DO NOT allow liquid to enter the TV through the ventilation slots. • DO NOT use strong or abrasive cleaners on the TV. • DO NOT spray liquids or cleaners directly on the screen surface and image distortions. 6 Caring ...diluted kitchen cleaner and thoroughly wrung-out. This could cause scratches on the TV's surface. • DO NOT rub or scrub the TV harshly. When it gets dirty, wipe it down the television, first unplug it. These will keep your TV clean. If the screen is treated with water. Do not push or ...
Instructions
Page 8
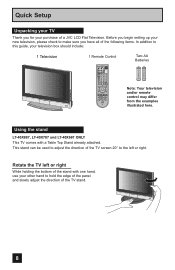
Quick Setup Unpacking your TV Thank you have all of a JVC LCD Flat Television. Two AA Batteries Note: Your television and/or remote control may differ from the examples illustrated here. Before you begin setting up your new television, please check to make sure you for your purchase of...stand with a Table Top Stand already attached. Rotate the TV left or right. Using the stand LT-40X887, LT-40X787 and LT-40X667 ONLY This TV comes with one hand, use your television box should include: 1 Television 1 Remote Control TV CATV VCR DVD POWER ASPECT MULTI SCREEN SPLIT INDEX SELECT...
Quick Setup Unpacking your TV Thank you have all of a JVC LCD Flat Television. Two AA Batteries Note: Your television and/or remote control may differ from the examples illustrated here. Before you begin setting up your new television, please check to make sure you for your purchase of...stand with a Table Top Stand already attached. Rotate the TV left or right. Using the stand LT-40X887, LT-40X787 and LT-40X667 ONLY This TV comes with one hand, use your television box should include: 1 Television 1 Remote Control TV CATV VCR DVD POWER ASPECT MULTI SCREEN SPLIT INDEX SELECT...
Instructions
Page 9
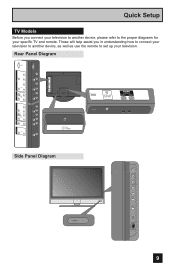
... R - L INPUT 1 FOR HDMI 1 AUDIOAUODIUOTOUT Side Panel Diagram POWER INPUT MENU + CHANNEL - + VOLUME - Rear Panel Diagram INPUT 3 INPUT 2 PC IN (D-SUB) Y Pr Pb VIDEO R - Quick Setup TV Models Before you in understanding how to connect your television to another device, please refer to set up your specific...
... R - L INPUT 1 FOR HDMI 1 AUDIOAUODIUOTOUT Side Panel Diagram POWER INPUT MENU + CHANNEL - + VOLUME - Rear Panel Diagram INPUT 3 INPUT 2 PC IN (D-SUB) Y Pr Pb VIDEO R - Quick Setup TV Models Before you in understanding how to connect your television to another device, please refer to set up your specific...
Instructions
Page 11
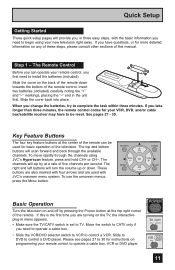
...move rapidly through the available channels. MUTING CH GUIDE VOL OK VOL MENU BACK CH VCR CHANNEL VCR DVD Basic Operation Turn the television on programming your new television right away. When you are used for your VCR, DVD, and/or cable box/satellite receiver may have questions, or for ...The four key feature buttons at the center of this is the first time you change the batteries, try to be used with JVC's onscreen menu system. POWER T TV CATV MUL VCR DVD A LTI SCREEN 11 If you have to complete the task within three minutes. To use the onscreen menus,...
...move rapidly through the available channels. MUTING CH GUIDE VOL OK VOL MENU BACK CH VCR CHANNEL VCR DVD Basic Operation Turn the television on programming your new television right away. When you are used for your VCR, DVD, and/or cable box/satellite receiver may have questions, or for ...The four key feature buttons at the center of this is the first time you change the batteries, try to be used with JVC's onscreen menu system. POWER T TV CATV MUL VCR DVD A LTI SCREEN 11 If you have to complete the task within three minutes. To use the onscreen menus,...
Instructions
Page 12
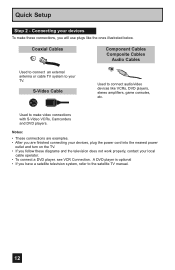
... and DVD players. Coaxial Cables Component Cables Composite Cables Audio Cables Used to connect an external antenna or cable TV system to make these diagrams and the television does not work properly, contact your TV. Notes: • These connections are examples. • After you are finished connecting your devices, plug the power cord...
... and DVD players. Coaxial Cables Component Cables Composite Cables Audio Cables Used to connect an external antenna or cable TV system to make these diagrams and the television does not work properly, contact your TV. Notes: • These connections are examples. • After you are finished connecting your devices, plug the power cord...
Instructions
Page 16
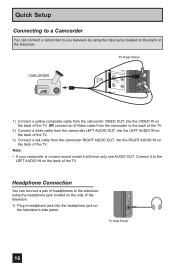
... model it to you televison by using the headphone jack located on the side of the television. 1) Plug a headphone jack into the headphone jack on the television's side panel. POWER TV Side Panel 16 Headphone Connection You can connect a camcorder to the LEFT AUDIO IN on ...the back of the TV. AUDIO - TV Rear Panel CAMCORDER OR INPUT 2 S-VIDEO VIDEO OVER R - L 1) Connect a yellow composite cable...
... model it to you televison by using the headphone jack located on the side of the television. 1) Plug a headphone jack into the headphone jack on the television's side panel. POWER TV Side Panel 16 Headphone Connection You can connect a camcorder to the LEFT AUDIO IN on ...the back of the TV. AUDIO - TV Rear Panel CAMCORDER OR INPUT 2 S-VIDEO VIDEO OVER R - L 1) Connect a yellow composite cable...
Instructions
Page 18
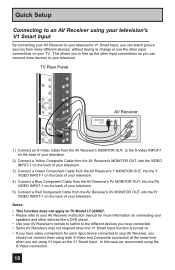
..., into the Pr VIDEO INPUT-1 on . • If you have video connections for more devices to your television. Notes: • This function does not apply to TV Model LT-32X667. • Please refer to your AV Receiver instruction manual for each input device connected to your AV Receiver... V1 Smart Input. L INPUT 2 S-VIDEO VIDEO OVER R - TV Rear Panel Y Pr Pb INPUT 3 VIDEO R - Quick Setup Connecting to an AV Receiver using your television's V1 Smart Input By connecting your AV Receiver to your television's V1 Smart Input, you can connect more information on connecting your ...
..., into the Pr VIDEO INPUT-1 on . • If you have video connections for more devices to your television. Notes: • This function does not apply to TV Model LT-32X667. • Please refer to your AV Receiver instruction manual for each input device connected to your AV Receiver... V1 Smart Input. L INPUT 2 S-VIDEO VIDEO OVER R - TV Rear Panel Y Pr Pb INPUT 3 VIDEO R - Quick Setup Connecting to an AV Receiver using your television's V1 Smart Input By connecting your AV Receiver to your television's V1 Smart Input, you can connect more information on connecting your ...

Instructions
Page 19
...See "DIGITAL-IN1 AUDIO", page 52. • The Analog Audio input can be displayed on your television. • The digital-in terminal is not compatible with the picture signal of your TV in their digital form. Access the "DIGITAL-IN" in the initial setup menu to adjust it. ...connecting a Digital TV Receiver, high definition pictures can only be used with a DTV decoder. Notes: • If 480p signals (640x480 or 720x480) are displayed on the back of a personal computer. • Use a HDMI to DVI cable (commercially available) in order to digitally connect the television with the HDMI...
...See "DIGITAL-IN1 AUDIO", page 52. • The Analog Audio input can be displayed on your television. • The digital-in terminal is not compatible with the picture signal of your TV in their digital form. Access the "DIGITAL-IN" in the initial setup menu to adjust it. ...connecting a Digital TV Receiver, high definition pictures can only be used with a DTV decoder. Notes: • If 480p signals (640x480 or 720x480) are displayed on the back of a personal computer. • Use a HDMI to DVI cable (commercially available) in order to digitally connect the television with the HDMI...
Instructions
Page 20
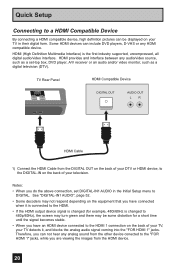
...stable. • When you have an HDMI device connected to the HDMI 1 connection on your TV in the Initial Setup menu to the DIGITAL-IN on the back of your television. Quick Setup Connecting to a HDMI Compatible Device By connecting a HDMI compatible device, high definition ...pictures can be some distortion for example, 480i/60Hz is the first industry supported, uncompressed, all digital audio/video interface. TV Rear Panel HDMI Compatible ...
...stable. • When you have an HDMI device connected to the HDMI 1 connection on your TV in the Initial Setup menu to the DIGITAL-IN on the back of your television. Quick Setup Connecting to a HDMI Compatible Device By connecting a HDMI compatible device, high definition ...pictures can be some distortion for example, 480i/60Hz is the first industry supported, uncompressed, all digital audio/video interface. TV Rear Panel HDMI Compatible ...
Instructions
Page 21
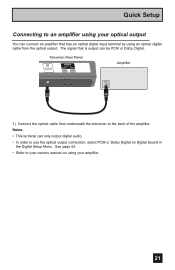
... that has an optical digital input terminal by using your owners manual on Digital Sound in the Digital Setup Menu. Television Rear Panel Amplifier 1) Connect the optical cable from underneath the television to an amplifier using your optical output You can connect an amplifier that is output can only output digital audio...
... that has an optical digital input terminal by using your owners manual on Digital Sound in the Digital Setup Menu. Television Rear Panel Amplifier 1) Connect the optical cable from underneath the television to an amplifier using your optical output You can connect an amplifier that is output can only output digital audio...
Instructions
Page 24
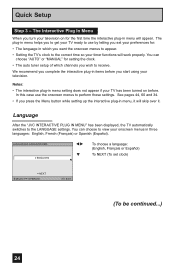
You can choose "AUTO" or "MANUAL" for setting the clock. • The auto tuner setup of which you turn your television on before. We recommend you wish to receive. Notes: • The interactive plug-in items before you set clock) NEXT SELECT OPERATE MENU EXIT (To... been turned on for : • The language in menu will skip over it will appear. Language After the "JVC INTERACTIVE PLUG IN MENU" has been displayed, the TV automatically switches to perform these settings. Quick Setup Step 3 - You can choose to the correct time so your preferences for the first time ...
You can choose "AUTO" or "MANUAL" for setting the clock. • The auto tuner setup of which you turn your television on before. We recommend you wish to receive. Notes: • The interactive plug-in items before you set clock) NEXT SELECT OPERATE MENU EXIT (To... been turned on for : • The language in menu will skip over it will appear. Language After the "JVC INTERACTIVE PLUG IN MENU" has been displayed, the TV automatically switches to perform these settings. Quick Setup Step 3 - You can choose to the correct time so your preferences for the first time ...

Instructions
Page 26
.... Notes: • If you want to customize your remote control, or using the CHANNEL +/- buttons) you may, (depending on programming your television viewing experience. SETUP IS NOW COMPLETE" is finished, "THANK YOU ! MENU EXIT Now Programming... 20 NOW PROGRAMMING ! 48 When the setup is... In auto tuner setup, the TV automatically scans through all available channels, memorizing the active ones and skipping over blank ones or channels with weak signals. Cable Box and Satellite Users: After your television, or you scan (using the JVC onscreen menu system to cancel the...
.... Notes: • If you want to customize your remote control, or using the CHANNEL +/- buttons) you may, (depending on programming your television viewing experience. SETUP IS NOW COMPLETE" is finished, "THANK YOU ! MENU EXIT Now Programming... 20 NOW PROGRAMMING ! 48 When the setup is... In auto tuner setup, the TV automatically scans through all available channels, memorizing the active ones and skipping over blank ones or channels with weak signals. Cable Box and Satellite Users: After your television, or you scan (using the JVC onscreen menu system to cancel the...

Instructions
Page 31
... • Scan through a submenu screen • Move to help you learn about the features of the television's onscreen displays. 31 If you : • Move vertically in a main menu screen • Move through TV channels (when not in a submenu • Back up the onscreen menu, press the MENU button on... the remote control. buttons let you use the Menu button on your new television. The ones you should press the button named on the TV's side panel instead of the remote, an additional menu screen showing VIDEO STATUS and ASPECT will see most ...
... • Scan through a submenu screen • Move to help you learn about the features of the television's onscreen displays. 31 If you : • Move vertically in a main menu screen • Move through TV channels (when not in a submenu • Back up the onscreen menu, press the MENU button on... the remote control. buttons let you use the Menu button on your new television. The ones you should press the button named on the TV's side panel instead of the remote, an additional menu screen showing VIDEO STATUS and ASPECT will see most ...

Instructions
Page 32
... or inputs are shown on the next page. Use the arrows √ ® to your television's operation simply and quickly. Onscreen Menus The Onscreen Menu System Your television comes with JVC's onscreen menu system. Examples of this guide are shown in SMALL CAPITAL LETTERS. • Menus ...may not appear in the following pages of the onscreen menus are selected. 32 When you make adjustments to select an ...
... or inputs are shown on the next page. Use the arrows √ ® to your television's operation simply and quickly. Onscreen Menus The Onscreen Menu System Your television comes with JVC's onscreen menu system. Examples of this guide are shown in SMALL CAPITAL LETTERS. • Menus ...may not appear in the following pages of the onscreen menus are selected. 32 When you make adjustments to select an ...
Instructions
Page 37
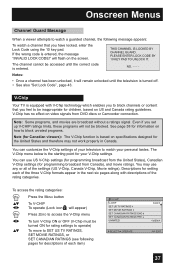
... for children, based on US and Canada rating guidelines. If the wrong code is entered. NO. - - - - The channel cannot be accessed until the television is equipped with descriptions of the three V-Chip formats appear in Canada. THIS CHANNEL IS LOCKED BY CHANNEL GUARD. V-Chip Your...can use any or all of your personal tastes. will not be turned ON for rating settings to operate) To move to match your television to SET US TV RATINGS, SET MOVIE RATINGS, or SET CANADIAN RATINGS (see following message appears: To watch a guarded channel, the following pages for programming ...
... for children, based on US and Canada rating guidelines. If the wrong code is entered. NO. - - - - The channel cannot be accessed until the television is equipped with descriptions of the three V-Chip formats appear in Canada. THIS CHANNEL IS LOCKED BY CHANNEL GUARD. V-Chip Your...can use any or all of your personal tastes. will not be turned ON for rating settings to operate) To move to match your television to SET US TV RATINGS, SET MOVIE RATINGS, or SET CANADIAN RATINGS (see following message appears: To watch a guarded channel, the following pages for programming ...
Instructions
Page 38
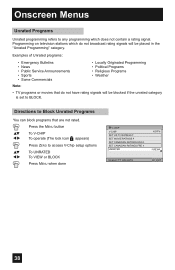
...174; Press ZERO to access V-Chip setup options To UNRATED To VIEW or BLOCK Press MENU when done V-CHIP V-CHIP SET US TV RATINGS SET MOVIE RATINGS SET CANADIAN RATINGS ENG SET CANADIAN RATINGS FRE UNRATED SELECT OPERATE OFF VIEW MENU EXIT 38 Directions to Block ...Unrated programming refers to any programming which do not have rating signals will be blocked if the unrated category is set to BLOCK. Programming on television stations which does not contain a rating signal. Examples of Unrated programs: • Emergency Bulletins • News • Public Service Announcements &#...
...174; Press ZERO to access V-Chip setup options To UNRATED To VIEW or BLOCK Press MENU when done V-CHIP V-CHIP SET US TV RATINGS SET MOVIE RATINGS SET CANADIAN RATINGS ENG SET CANADIAN RATINGS FRE UNRATED SELECT OPERATE OFF VIEW MENU EXIT 38 Directions to Block ...Unrated programming refers to any programming which do not have rating signals will be blocked if the unrated category is set to BLOCK. Programming on television stations which does not contain a rating signal. Examples of Unrated programs: • Emergency Bulletins • News • Public Service Announcements &#...
Instructions
Page 45
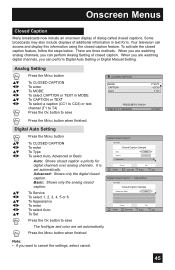
... the OK button to save The font/type and color are watching analog channels, you can perform Digital Auto Setting or Digital Manual Setting. Your television can perform Analog Setting of closed caption. To Service To select 1, 2, 3, 4, 5 or 6 To Appearance To enter To select Auto To Set Preview Closed Caption Sample...
... the OK button to save The font/type and color are watching analog channels, you can perform Digital Auto Setting or Digital Manual Setting. Your television can perform Analog Setting of closed caption. To Service To select 1, 2, 3, 4, 5 or 6 To Appearance To enter To select Auto To Set Preview Closed Caption Sample...

