Instruction Manual
Page 2
... screen operations 7 Selecting the playback source/option 10 Using the pop-up short-cut menu 11 DISCS 12 USB 16 iPod/iPhone 19 APPS-Apple CarPlay 22 Tuner 24 SiriusXM® Satellite Radio 26 OTHER EXTERNAL COMPONENTS 37 Using a rear view camera 37 Using external audio/video players-AV‑IN.........38 Using ADS adapter features 39 BLUETOOTH 40 SETTINGS 51 Settings for using applications of iPod/iPhone/ Android 51 Selecting different sources for the front and rear monitors-Zone Control 52 Sound adjustment-Audio...
... screen operations 7 Selecting the playback source/option 10 Using the pop-up short-cut menu 11 DISCS 12 USB 16 iPod/iPhone 19 APPS-Apple CarPlay 22 Tuner 24 SiriusXM® Satellite Radio 26 OTHER EXTERNAL COMPONENTS 37 Using a rear view camera 37 Using external audio/video players-AV‑IN.........38 Using ADS adapter features 39 BLUETOOTH 40 SETTINGS 51 Settings for using applications of iPod/iPhone/ Android 51 Selecting different sources for the front and rear monitors-Zone Control 52 Sound adjustment-Audio...
Instruction Manual
Page 3
... approved for an uncontrolled environment and meets the FCC radio frequency (RF) Exposure Guidelines in the car becomes normal before operating the unit. Chemical changes occur inside the car... BEFORE USE ◊ CAUTION Use of controls or adjustments or performance of procedures other users, the antenna type and its gain should be installed and operated keeping the radiator at least 20 cm or more than...
... approved for an uncontrolled environment and meets the FCC radio frequency (RF) Exposure Guidelines in the car becomes normal before operating the unit. Chemical changes occur inside the car... BEFORE USE ◊ CAUTION Use of controls or adjustments or performance of procedures other users, the antenna type and its gain should be installed and operated keeping the radiator at least 20 cm or more than...

Instruction Manual
Page 4
... SETUP] [DEMO] Configure settings for the connected rear view camera. (Page 37) Configure settings for the connected ADS adapter. (Page 63) Activate ([ON]) or deactivate ([OFF]) the display demonstration. (Page 64) 2 Finish the procedure. 3 Display the screen. 4 Select the method to set the clock. • Scroll the page to show the item. [Language] [Clock] [Color] Select the text language used for on the monitor panel. (Page 59) • Touch [Panel Color Coordinate], then select...
... SETUP] [DEMO] Configure settings for the connected rear view camera. (Page 37) Configure settings for the connected ADS adapter. (Page 63) Activate ([ON]) or deactivate ([OFF]) the display demonstration. (Page 64) 2 Finish the procedure. 3 Display the screen. 4 Select the method to set the clock. • Scroll the page to show the item. [Language] [Clock] [Color] Select the text language used for on the monitor panel. (Page 59) • Touch [Panel Color Coordinate], then select...
Instruction Manual
Page 5
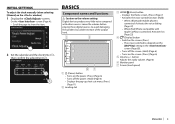
...) 2 Loading slot ENGLISH 5 The screen switched to depends on the volume setting: Digital devices produce very little noise compared with Apple CarPlay is connected: Activates the voice dialing. (Page 47) -- button Adjusts the audio volume. (Page 6) 6 Monitor panel 7 Screen (touch panel) 1 (Power) button • Turns on the power. (Press) (Page 6) • Turns off the screen. (Hold) (Page 6) • Turns on the window) 1 Display the screen. INITIAL SETTINGS To adjust the clock manually (when selecting [Manual] on the screen. (Press) (Page...
...) 2 Loading slot ENGLISH 5 The screen switched to depends on the volume setting: Digital devices produce very little noise compared with Apple CarPlay is connected: Activates the voice dialing. (Page 47) -- button Adjusts the audio volume. (Page 6) 6 Monitor panel 7 Screen (touch panel) 1 (Power) button • Turns on the power. (Press) (Page 6) • Turns off the screen. (Hold) (Page 6) • Turns on the window) 1 Display the screen. INITIAL SETTINGS To adjust the clock manually (when selecting [Manual] on the screen. (Press) (Page...
Instruction Manual
Page 10
... CarPlay screen from the connected iPod touch/iPhone. (Pages 22) [Tuner] Switches to the radio broadcast. (Page 24) [BT Audio] Plays a Bluetooth audio player. (Page 40) [DISC] Plays a disc. (Page 12) [USB] Plays files on this area by customizing the source/option selection screen. (Page 11) • To display more items, touch or flick to the SiriusXM® satellite radio broadcast. (Page 26) [Audio] Displays the sound adjustment screen. (Page 53) [AV OFF] Turns off the AV source. (Page 6) [ ] Displays the menu screen...
... CarPlay screen from the connected iPod touch/iPhone. (Pages 22) [Tuner] Switches to the radio broadcast. (Page 24) [BT Audio] Plays a Bluetooth audio player. (Page 40) [DISC] Plays a disc. (Page 12) [USB] Plays files on this area by customizing the source/option selection screen. (Page 11) • To display more items, touch or flick to the SiriusXM® satellite radio broadcast. (Page 26) [Audio] Displays the sound adjustment screen. (Page 53) [AV OFF] Turns off the AV source. (Page 6) [ ] Displays the menu screen...
Instruction Manual
Page 22
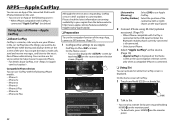
..., connect a GPS antenna. (Page 72) 1 Configure the settings to use Siri voice control to make calls, send and receive messages, and listen to Siri. • You can also activate Siri by touching [ ] on the Home screen or the source/option selection screen only when a compatible iPhone is connected. ❏❏ Using Siri You can activate Siri while the CarPlay screen is displayed on the source/option selection screen. (Page 8) Compatible iPhone devices You can also display...
..., connect a GPS antenna. (Page 72) 1 Configure the settings to use Siri voice control to make calls, send and receive messages, and listen to Siri. • You can also activate Siri by touching [ ] on the Home screen or the source/option selection screen only when a compatible iPhone is connected. ❏❏ Using Siri You can activate Siri while the CarPlay screen is displayed on the source/option selection screen. (Page 8) Compatible iPhone devices You can also display...

Instruction Manual
Page 38
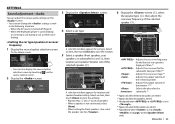
... change settings for video playback, see page 58. ❏❏Starting playback 1 Connect an external component to the reverse (R) position. • To erase the operation buttons, touch the screen. OTHER EXTERNAL COMPONENTS ❏❏Displaying the picture from the rear view camera manually 1 Display the pop-up short-cut menu. 2 To exit the rear view screen Using external audio/video players-AV‑IN When the operation buttons are not displayed on the screen...
... change settings for video playback, see page 58. ❏❏Starting playback 1 Connect an external component to the reverse (R) position. • To erase the operation buttons, touch the screen. OTHER EXTERNAL COMPONENTS ❏❏Displaying the picture from the rear view camera manually 1 Display the pop-up short-cut menu. 2 To exit the rear view screen Using external audio/video players-AV‑IN When the operation buttons are not displayed on the screen...
Instruction Manual
Page 40
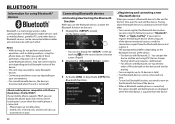
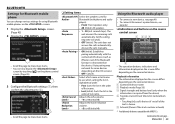
... connect to register the Bluetooth device while using the following sources: "Bluetooth", "iPod", or "Apple CarPlay". If you use the Bluetooth function, you need to turn on the source/option selection screen. (Page 8) 2 Display the screen. 3 Activate ([ON]) or deactivate ([OFF]) the Bluetooth function. ❏❏Registering and connecting a new Bluetooth device When you connect a Bluetooth device to communicate with Bluetooth 2.1: You can be connected without cables and communicate with Phone Book Access Profile (PBAP) If your mobile phone supports PBAP, you are displayed...
... connect to register the Bluetooth device while using the following sources: "Bluetooth", "iPod", or "Apple CarPlay". If you use the Bluetooth function, you need to turn on the source/option selection screen. (Page 8) 2 Display the screen. 3 Activate ([ON]) or deactivate ([OFF]) the Bluetooth function. ❏❏Registering and connecting a new Bluetooth device When you connect a Bluetooth device to communicate with Bluetooth 2.1: You can be connected without cables and communicate with Phone Book Access Profile (PBAP) If your mobile phone supports PBAP, you are displayed...
Instruction Manual
Page 43
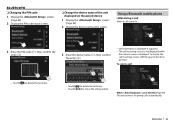
...; Touch [ ] to delete the last entry. • Touch [H]/[I] to move the entry position. To reject a call incoming screen, shift the gear to [ON] (Page 49) The unit answers incoming calls automatically. BLUETOOTH ❏❏Changing the PIN code 1 Display the screen. (Page 42) 2 Display the PIN code input screen. ❏❏Change the device name of the unit displayed on the paired device 1 Display the screen. (Page 42) 2 Display the device name entry...
...; Touch [ ] to delete the last entry. • Touch [H]/[I] to move the entry position. To reject a call incoming screen, shift the gear to [ON] (Page 49) The unit answers incoming calls automatically. BLUETOOTH ❏❏Changing the PIN code 1 Display the screen. (Page 42) 2 Display the PIN code input screen. ❏❏Change the device name of the unit displayed on the paired device 1 Display the screen. (Page 42) 2 Display the device name entry...

Instruction Manual
Page 45
BLUETOOTH ❏❏Switching between two connected devices When two devices are connected, you want to use. 1 Display the phone control screen. While talking... ❏❏Making a call using a Bluetooth mobile phone, select the device you can change the device to use . 2 Input the tone to send. To restore the volume, touch [ ]. Continued on the pop-up short-cut menu. (Page 11) 2 Select the device to make a call. • You can also display the phone control screen by touching [ ]. * When the...
BLUETOOTH ❏❏Switching between two connected devices When two devices are connected, you want to use. 1 Display the phone control screen. While talking... ❏❏Making a call using a Bluetooth mobile phone, select the device you can change the device to use . 2 Input the tone to send. To restore the volume, touch [ ]. Continued on the pop-up short-cut menu. (Page 11) 2 Select the device to make a call. • You can also display the phone control screen by touching [ ]. * When the...
Instruction Manual
Page 49
... on the connected device. 1 Connected device name 2 Playback mode (Page 50) 3 Signal strength and battery level (only when the information is deactivated on the device. (Auto pairing may not work for using Bluetooth mobile phones on the screen. 1 Display the screen. (Page 42) 2 Display the screen. • Scroll the page to +5 (initial: 0). Answer the calls manually. • ON (Initial): Establishes pairing automatically with the connected iOS device (such as iPhone) even if the Bluetooth function is...
... on the connected device. 1 Connected device name 2 Playback mode (Page 50) 3 Signal strength and battery level (only when the information is deactivated on the device. (Auto pairing may not work for using Bluetooth mobile phones on the screen. 1 Display the screen. (Page 42) 2 Display the screen. • Scroll the page to +5 (initial: 0). Answer the calls manually. • ON (Initial): Establishes pairing automatically with the connected iOS device (such as iPhone) even if the Bluetooth function is...
Instruction Manual
Page 53
... set all speakers. • When a speaker is not connected, select [None]. • When setting the front speakers, also select the speaker size for . 6 Display the A selection window appears for car type. When the Bluetooth phone is turned off (Page 6) -- On the Home screen: • You can adjust the various audio settings on the source control screen. 2 Display the screen. 3 Display the screen. 4 Select a car type. SETTINGS Sound adjustment-Audio You can also display the source/option selection screen by touching [ ] on the screen. • You cannot change the settings...
... set all speakers. • When a speaker is not connected, select [None]. • When setting the front speakers, also select the speaker size for . 6 Display the A selection window appears for car type. When the Bluetooth phone is turned off (Page 6) -- On the Home screen: • You can adjust the various audio settings on the source control screen. 2 Display the screen. 3 Display the screen. 4 Select a car type. SETTINGS Sound adjustment-Audio You can also display the source/option selection screen by touching [ ] on the screen. • You cannot change the settings...
Instruction Manual
Page 54
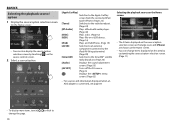
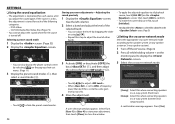
...) 3 Display the preset sound modes (1), then select a sound mode (2). CD/VCD/Audio files/Video files (Page 73) • You cannot adjust the sound when the AV source is turned off the AV source. (Page 6) 2 Press while holding volume + on the monitor panel to display the Storing your own adjustments-Adjusting the sound precisely 1 Display the screen. (See the left column.) 2 Select a band and adjust the level of the selected band. • You can also display the phone control screen by...
...) 3 Display the preset sound modes (1), then select a sound mode (2). CD/VCD/Audio files/Video files (Page 73) • You cannot adjust the sound when the AV source is turned off the AV source. (Page 6) 2 Press while holding volume + on the monitor panel to display the Storing your own adjustments-Adjusting the sound precisely 1 Display the screen. (See the left column.) 2 Select a band and adjust the level of the selected band. • You can also display the phone control screen by...

Instruction Manual
Page 63
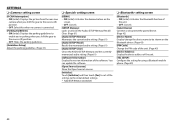
...; setting screen [Dimmer] • ON: Activates dimmer. • OFF: Cancels. • SYNC (Initial): Dims the screen and button illumination when you can determine the use of the external component connected to the VIDEO OUT/ AV-OUT AUDIO terminal. • OFF (Initial)/AV-IN/DISC/USB/iPod [Automotive Mirroring] Select the usage of the iPhone compatible with the GPS. (Page 4) [Clock Adjust]*2 Adjust the clock manually. (Page 5) [DISP Key] Select the source screen displayed when monitor panel is...
...; setting screen [Dimmer] • ON: Activates dimmer. • OFF: Cancels. • SYNC (Initial): Dims the screen and button illumination when you can determine the use of the external component connected to the VIDEO OUT/ AV-OUT AUDIO terminal. • OFF (Initial)/AV-IN/DISC/USB/iPod [Automotive Mirroring] Select the usage of the iPhone compatible with the GPS. (Page 4) [Clock Adjust]*2 Adjust the clock manually. (Page 5) [DISP Key] Select the source screen displayed when monitor panel is...
Instruction Manual
Page 64
...; setting screen [Bluetooth] • ON (Initial): Activates the Bluetooth function of the unit. • OFF: Cancels. [Select Device] Connect or disconnect the paired device. (Page 42) [Device Name] Display/change the device name to the reverse (R) position. • OFF: Hides the parking guidelines. [Guidelines Setup] Adjust the parking guidelines. (Page 37) ❏❏ setting screen [DEMO] • ON (Initial): Activates the demonstration on the Bluetooth device. (Page 43) [PIN Code] Change the PIN code of the unit. (Page 43) [Device Address] Display...
...; setting screen [Bluetooth] • ON (Initial): Activates the Bluetooth function of the unit. • OFF: Cancels. [Select Device] Connect or disconnect the paired device. (Page 42) [Device Name] Display/change the device name to the reverse (R) position. • OFF: Hides the parking guidelines. [Guidelines Setup] Adjust the parking guidelines. (Page 37) ❏❏ setting screen [DEMO] • ON (Initial): Activates the demonstration on the Bluetooth device. (Page 43) [PIN Code] Change the PIN code of the unit. (Page 43) [Device Address] Display...
Instruction Manual
Page 67
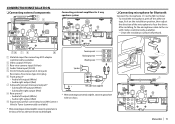
... use of your car's ignition does not have an ACC position, connect the ignition wires to a power source that in turn may be damaged or fail to work to professionals. • Make sure to ground the unit to a negative 12 V DC power supply. • Do not install the unit in a location exposed to direct sunlight or excessive heat or humidity. Metal parts such as with battery wires, the battery...
... use of your car's ignition does not have an ACC position, connect the ignition wires to a power source that in turn may be damaged or fail to work to professionals. • Make sure to ground the unit to a negative 12 V DC power supply. • Do not install the unit in a location exposed to direct sunlight or excessive heat or humidity. Metal parts such as with battery wires, the battery...
Instruction Manual
Page 71
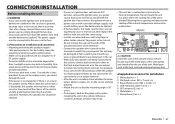
... cable to the chassis of the microphone to the car's chassis. 7 ENGLISH 71 otherwise the unit may be damaged. Clean the installation surface beforehand. 1 iDatalink input for connecting ADS adapter (commercially available) 2 Video output (Yellow) 3 Rear view camera input (Yellow) 4 Audio Video input (AV-IN) 5 AV-OUT/Audio output (ø3.5 mini jack) Resistance-free stereo type mini plug 6 Front preout* • Audio left output (White) • Audio right output (Red) 7 Subwoofer preout (monaural output)* • Subwoofer left output...
... cable to the chassis of the microphone to the car's chassis. 7 ENGLISH 71 otherwise the unit may be damaged. Clean the installation surface beforehand. 1 iDatalink input for connecting ADS adapter (commercially available) 2 Video output (Yellow) 3 Rear view camera input (Yellow) 4 Audio Video input (AV-IN) 5 AV-OUT/Audio output (ø3.5 mini jack) Resistance-free stereo type mini plug 6 Front preout* • Audio left output (White) • Audio right output (Red) 7 Subwoofer preout (monaural output)* • Subwoofer left output...
Instruction Manual
Page 75
...; iPod/iPhone that are not round. • Discs with the "Compact Disc Digital Audio" standard. DVD-Audio/DVD-ROM/DVD-VR discs -- Attempting to insert these discs using the USB device if it might be loose. • This unit may cause a malfunction. DualDisc playback The Non-DVD side of a "DualDisc" does not comply with coloring on DVD-R/RW or +R/+RW -- iPhone 5s -- iPhone 4s Continued on this unit and the USB device. • Operation and power...
...; iPod/iPhone that are not round. • Discs with the "Compact Disc Digital Audio" standard. DVD-Audio/DVD-ROM/DVD-VR discs -- Attempting to insert these discs using the USB device if it might be loose. • This unit may cause a malfunction. DualDisc playback The Non-DVD side of a "DualDisc" does not comply with coloring on DVD-R/RW or +R/+RW -- iPhone 5s -- iPhone 4s Continued on this unit and the USB device. • Operation and power...

Instruction Manual
Page 78
... players. ❏❏USB "Reading" does not disappear from the one played back using a compatible application on the screen. (Page 6) The remote controller does not work . • Check the connecting cable and its connection. • Update the firmware version. • Charge the battery. • Reset the iPod/iPhone. Tracks are not played back as you used for the connections (as well as you are asked. (Page 35) "Incorrect Lock Code" • The selected channel...
... players. ❏❏USB "Reading" does not disappear from the one played back using a compatible application on the screen. (Page 6) The remote controller does not work . • Check the connecting cable and its connection. • Update the firmware version. • Charge the battery. • Reset the iPod/iPhone. Tracks are not played back as you used for the connections (as well as you are asked. (Page 35) "Incorrect Lock Code" • The selected channel...
Instruction Manual
Page 79
... controlled. • Check whether the connected audio player supports AVRCP (Audio/Video Remote Control Profile). If the PIN code of videos comes out. • Check the connection. -- Echo or noise occurs. • Adjust the microphone unit position. • Adjust the echo volume or noise reduction volume. (Page 44) The unit does not respond when you can get a better signal reception. For iPod/iPhone Lightning model: You cannot watch video. Other cables cannot be used . The Bluetooth device...
... controlled. • Check whether the connected audio player supports AVRCP (Audio/Video Remote Control Profile). If the PIN code of videos comes out. • Check the connection. -- Echo or noise occurs. • Adjust the microphone unit position. • Adjust the echo volume or noise reduction volume. (Page 44) The unit does not respond when you can get a better signal reception. For iPod/iPhone Lightning model: You cannot watch video. Other cables cannot be used . The Bluetooth device...


