
Instruction Manual America
Page 2
... and says that the component uses laser beams that are wearing a glove, take it may obstruct visibility. • DO NOT raise the volume level too much, as Class 1. Pictures may not appear clearly or may cause hearing loss. • DO NOT operate the unit while driving. For KW-V250BT/KW-V25BT/KW-V350BT Region 1: CAUTION Use of controls or adjustments or performance of the output level...
... and says that the component uses laser beams that are wearing a glove, take it may obstruct visibility. • DO NOT raise the volume level too much, as Class 1. Pictures may not appear clearly or may cause hearing loss. • DO NOT operate the unit while driving. For KW-V250BT/KW-V25BT/KW-V350BT Region 1: CAUTION Use of controls or adjustments or performance of the output level...

Instruction Manual America
Page 4
...displays or panels. This manual mainly explains operations using the remote controller, see page 50. < > indicates the various screens/menus/ operations/settings that appear on the touch panel. [ ] indicates the keys on the power 3 Turning off the power 4 Turning off the AV source 4 Turning off the screen and button illumination..........4 Adjusting the volume 4 Attenuating the sound 4 Getting Started 5 Initial settings 5 Clock settings 5 Various Screens and Operations 6 Home screen 6 Source control screen 7 List/setting screen 9 Disc 10 Video 11 USB 13 Android 15 iPod/iPhone...
...displays or panels. This manual mainly explains operations using the remote controller, see page 50. < > indicates the various screens/menus/ operations/settings that appear on the touch panel. [ ] indicates the keys on the power 3 Turning off the power 4 Turning off the AV source 4 Turning off the screen and button illumination..........4 Adjusting the volume 4 Attenuating the sound 4 Getting Started 5 Initial settings 5 Clock settings 5 Various Screens and Operations 6 Home screen 6 Source control screen 7 List/setting screen 9 Disc 10 Video 11 USB 13 Android 15 iPod/iPhone...
Instruction Manual America
Page 7
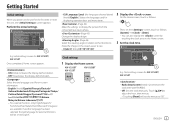
...): Selects the language used for the first time or reset the unit, the screen appears. ENGLISH 5 Touch [J]/[K] to "00". Perform the initial settings. Initial settings screen for displaying operation keys and menu items. (Page 46) Make the settings to display the picture from the connected rear view camera. (Page 43) Change the display design. (Page 46) Select the viewing angle in relation to the monitor to make the image on the Home screen. 3 Set the clock time.
...): Selects the language used for the first time or reset the unit, the screen appears. ENGLISH 5 Touch [J]/[K] to "00". Perform the initial settings. Initial settings screen for displaying operation keys and menu items. (Page 46) Make the settings to display the picture from the connected rear view camera. (Page 43) Change the display design. (Page 46) Select the viewing angle in relation to the monitor to make the image on the Home screen. 3 Set the clock time.

Instruction Manual America
Page 8
...Only for KW-V250BT/KW-V25BT: Displays the current playing source control screen. 6 Only for KW-V250BT/KW-V25BT: Displays the phone control screen. 7 Only for KW-V350BT: Ejects the disc. 8 Only for KW-V350BT: Displays the screen. Plays an iPod/iPhone. Source/option selection screen for KW-V350BT Region 1/KW-V350BT Region 4. 6 ENGLISH Switches to the source connected via ADS adapter. Turns off the power. [Camera] Switches to the camera connected to the rear view camera input. [Now Playing]*3 Displays the source currently played back. [Phone]*4 Displays the phone control screen...
...Only for KW-V250BT/KW-V25BT: Displays the current playing source control screen. 6 Only for KW-V250BT/KW-V25BT: Displays the phone control screen. 7 Only for KW-V350BT: Ejects the disc. 8 Only for KW-V350BT: Displays the screen. Plays an iPod/iPhone. Source/option selection screen for KW-V350BT Region 1/KW-V350BT Region 4. 6 ENGLISH Switches to the source connected via ADS adapter. Turns off the power. [Camera] Switches to the camera connected to the rear view camera input. [Now Playing]*3 Displays the source currently played back. [Phone]*4 Displays the phone control screen...

Instruction Manual America
Page 13
... playing back a multi-channel disc, this setting affects the signals reproduced through the front and/or rear speakers. • Dolby Surround: Reproduces multi-channel surround sound by connecting an amplifier compatible with its full dynamic range. • Normal: Reduces the dynamic range a little. • Dialog (Initial): Reproduces movie dialog more clearly. Select the monitor type to watch a wide screen picture on the source control screen E.g. Playback operations Video...
... playing back a multi-channel disc, this setting affects the signals reproduced through the front and/or rear speakers. • Dolby Surround: Reproduces multi-channel surround sound by connecting an amplifier compatible with its full dynamic range. • Normal: Reduces the dynamic range a little. • Dialog (Initial): Reproduces movie dialog more clearly. Select the monitor type to watch a wide screen picture on the source control screen E.g. Playback operations Video...
Instruction Manual America
Page 19
... source control screen" on page 8. If there is a station broadcasting a program of the operation keys may differ, however the similar operation keys have selected, that station is tuned in. [SEEK] Changes the seek mode for [S]/[T]. • AUTO1 (Initial): Auto search • AUTO2: Tunes in orange, tune into another • MANU: Manual search [S]/[T] Searches for Traffic Information is automatically memorized. The next time the unit switches to Traffic Information, the volume...
... source control screen" on page 8. If there is a station broadcasting a program of the operation keys may differ, however the similar operation keys have selected, that station is tuned in. [SEEK] Changes the seek mode for [S]/[T]. • AUTO1 (Initial): Auto search • AUTO2: Tunes in orange, tune into another • MANU: Manual search [S]/[T] Searches for Traffic Information is automatically memorized. The next time the unit switches to Traffic Information, the volume...
Instruction Manual America
Page 28
... install the most recent version. Playback operations Playback information and key operation KW-V250BT/KW-V25BT Pandora Connecting the device For Android devices Pair the Android device with this unit. (Page 34) KW-V350BT Selecting the device For selecting the playback device via Bluetooth. (Page 34) For iPhone/iPod touch • Via USB input terminal: Connect iPhone/iPod touch with optional remote controller, RM-RK258. You can also operate Pandora with the cable. (Page 15) - For 30-pin connector models: Use 30-pin to use...
... install the most recent version. Playback operations Playback information and key operation KW-V250BT/KW-V25BT Pandora Connecting the device For Android devices Pair the Android device with this unit. (Page 34) KW-V350BT Selecting the device For selecting the playback device via Bluetooth. (Page 34) For iPhone/iPod touch • Via USB input terminal: Connect iPhone/iPod touch with optional remote controller, RM-RK258. You can also operate Pandora with the cable. (Page 15) - For 30-pin connector models: Use 30-pin to use...
Instruction Manual America
Page 32
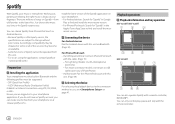
..." in Bluetooth and the following profiles must be operated from this unit via the connection method to change without prior notice. For 30-pin connector models: Use 30-pin to USB cable (accessory of Spotify cannot be supported: • SPP (Serial Port Profile) • A2DP (Advanced Audio Distribution Profile) Establish an Internet connection using the application, contact Spotify at . You can also operate Spotify with the remote controller. 30...
..." in Bluetooth and the following profiles must be operated from this unit via the connection method to change without prior notice. For 30-pin connector models: Use 30-pin to USB cable (accessory of Spotify cannot be supported: • SPP (Serial Port Profile) • A2DP (Advanced Audio Distribution Profile) Establish an Internet connection using the application, contact Spotify at . You can also operate Spotify with the remote controller. 30...
Instruction Manual America
Page 36
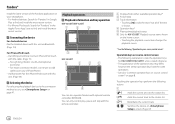
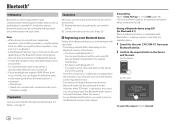
... Bluetooth audio can be registered in total. • Two devices for Bluetooth phone and one for the first time: 1 Register the device by pairing the unit and the device. 2 Connect the device to turn on the Bluetooth function of the device. - Phone book - For devices with Bluetooth 2.0: You need to the unit. (Page 35) Note • While driving, do not perform complicated operations such as mobile phones, portable PCs and other devices. Auto pairing When is set to enter a PIN code...
... Bluetooth audio can be registered in total. • Two devices for Bluetooth phone and one for the first time: 1 Register the device by pairing the unit and the device. 2 Connect the device to turn on the Bluetooth function of the device. - Phone book - For devices with Bluetooth 2.0: You need to the unit. (Page 35) Note • While driving, do not perform complicated operations such as mobile phones, portable PCs and other devices. Auto pairing When is set to enter a PIN code...

Instruction Manual America
Page 37
... follows: Then, on the screen, touch as follows: [System] : [Enter] On the screen, touch as follows: : [0000] 2 Change the PIN code. Bluetooth® Pairing a Bluetooth device using a PIN code (for the unit ("JVC KW-V") from your Bluetooth device. 4 Select the unit ("JVC KW-V") on your Bluetooth device. • If a PIN code is required, enter "0000" (initial) or new PIN code you have entered in the PIN code is 15. If you wish to skip changing the PIN code, go to step 3.
... follows: Then, on the screen, touch as follows: [System] : [Enter] On the screen, touch as follows: : [0000] 2 Change the PIN code. Bluetooth® Pairing a Bluetooth device using a PIN code (for the unit ("JVC KW-V") from your Bluetooth device. 4 Select the unit ("JVC KW-V") on your Bluetooth device. • If a PIN code is required, enter "0000" (initial) or new PIN code you have entered in the PIN code is 15. If you wish to skip changing the PIN code, go to step 3.

Instruction Manual America
Page 40
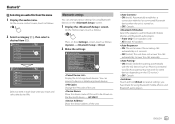
... connected Bluetooth audio device. * Available only for devices compatible with AVRCP 1.3. KW-V250BT/KW-V25BT BT Audio KW-V350BT 1 Tag data* (current track title/artist name/album title) • Pressing [ H ] scrolls the text if not all of the text is shown. 2 Signal strength and battery level (Appear only when the information is selected as the source, you can easily switch between these five devices by playing music from the device.) 3 Playing time...
... connected Bluetooth audio device. * Available only for devices compatible with AVRCP 1.3. KW-V250BT/KW-V25BT BT Audio KW-V350BT 1 Tag data* (current track title/artist name/album title) • Pressing [ H ] scrolls the text if not all of the text is shown. 2 Signal strength and battery level (Appear only when the information is selected as the source, you can easily switch between these five devices by playing music from the device.) 3 Playing time...
Instruction Manual America
Page 41
... and select the desired file. On the source control screen, touch as follows: [System] : [Enter] 2 Make the settings. On the Home screen, touch as follows: Then, on the Bluetooth device - Show the device name of the unit. • ON (Initial): Automatically establishes a connection with the iOS device (such as iPhone) connected via USB. (Auto pairing may not work for using Bluetooth devices on . • OFF: Cancels. Bluetooth Setup Paired Device List Enter PIN Code 0000 Device Name JVC KW-V Device Address...
... and select the desired file. On the source control screen, touch as follows: [System] : [Enter] 2 Make the settings. On the Home screen, touch as follows: Then, on the Bluetooth device - Show the device name of the unit. • ON (Initial): Automatically establishes a connection with the iOS device (such as iPhone) connected via USB. (Auto pairing may not work for using Bluetooth devices on . • OFF: Cancels. Bluetooth Setup Paired Device List Enter PIN Code 0000 Device Name JVC KW-V Device Address...

Instruction Manual America
Page 44
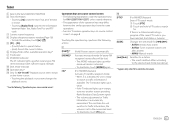
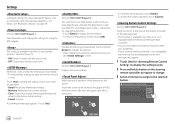
... only when screen (3). Settings Setting the speakers and crossover frequency 1 Select a car type (1), select the location of the selected speaker. 3 To determine the adjustment value, see the following "Determining the value for adjustment". • If a speaker is not connected, select . • When setting the front speakers, also select the speaker size for . Adjusts the crossover frequency for the tweeter. Adjusts the output volume of the speakers (2)*, then display the screen (3). Make fine adjustments to the delay time of the speaker output to create...
... only when screen (3). Settings Setting the speakers and crossover frequency 1 Select a car type (1), select the location of the selected speaker. 3 To determine the adjustment value, see the following "Determining the value for adjustment". • If a speaker is not connected, select . • When setting the front speakers, also select the speaker size for . Adjusts the crossover frequency for the tweeter. Adjusts the output volume of the speakers (2)*, then display the screen (3). Make fine adjustments to the delay time of the speaker output to create...
Instruction Manual America
Page 50
... connection and other general operations. Touch and hold a button on page 39. (Only for KW-V350BT Region 1) Get information, and change the functions while you have played back a file with the electrical steering remote controller. • You can only register/change the settings for KW-V350BT Region 1) Displays the serial number. Steering Remote Control Setting Please select the function to assign to the selected button. Adjust the touch positions of the remote controller on...
... connection and other general operations. Touch and hold a button on page 39. (Only for KW-V350BT Region 1) Get information, and change the functions while you have played back a file with the electrical steering remote controller. • You can only register/change the settings for KW-V350BT Region 1) Displays the serial number. Steering Remote Control Setting Please select the function to assign to the selected button. Adjust the touch positions of the remote controller on...

Instruction Manual America
Page 54
... turn may start a fire. • DO NOT cut out the fuse from a Smartphone using the graphic user interface of this application. on the car are working properly. • Do not press hard on installation and connection • Mounting and wiring this case, the speaker wire should be connected to make an audio setting using JVC Remote APP. Otherwise scratches, damage, or failure may have been activated. WARNINGS • DO NOT connect...
... turn may start a fire. • DO NOT cut out the fuse from a Smartphone using the graphic user interface of this application. on the car are working properly. • Do not press hard on installation and connection • Mounting and wiring this case, the speaker wire should be connected to make an audio setting using JVC Remote APP. Otherwise scratches, damage, or failure may have been activated. WARNINGS • DO NOT connect...

Instruction Manual America
Page 55
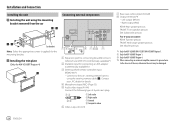
...; Wiring harness (× 1) ø Extension wire, 2 m (× 1) π Flat head screws, M5 × 8 mm (× 6) [ Round head screws, M5 x 8 mm (× 6) " Microphone, 3 m (× 1) Only for KW-V350BT Region 4 ] Trim plate (× 1) ' Steering remote cable (× 1) Installation procedure 1 Remove the key from the ignition and disconnect the · battery. 2 Make the proper input and output wire connections for each unit. 3 Connect the speaker wires of the wiring harness. 4 Connect the wires of the unconnected wires or...
...; Wiring harness (× 1) ø Extension wire, 2 m (× 1) π Flat head screws, M5 × 8 mm (× 6) [ Round head screws, M5 x 8 mm (× 6) " Microphone, 3 m (× 1) Only for KW-V350BT Region 4 ] Trim plate (× 1) ' Steering remote cable (× 1) Installation procedure 1 Remove the key from the ignition and disconnect the · battery. 2 Make the proper input and output wire connections for each unit. 3 Connect the speaker wires of the wiring harness. 4 Connect the wires of the unconnected wires or...
Instruction Manual America
Page 56
...) 7 Rear view camera input (R-CAM) 8 Output terminals*4 • Left output (White) • Right output (Red) REAR: Rear speaker preouts FRONT: Front speaker preouts SW: Subwoofer preouts For 3-way crossover: REAR: Tweeter preouts FRONT: Mid range speaker preouts SW: Woofer preouts *1 Only for KW-V250BT/KW-V25BT/KW-V350BT Region 1. *2 Only for KW-V350BT Region 1. *3 Only for KW-V350BT Region 4. *4 When connecting an external amplifier, connect its ground wire to the car's steering remote harness using the mounting bracket removed...
...) 7 Rear view camera input (R-CAM) 8 Output terminals*4 • Left output (White) • Right output (Red) REAR: Rear speaker preouts FRONT: Front speaker preouts SW: Subwoofer preouts For 3-way crossover: REAR: Tweeter preouts FRONT: Mid range speaker preouts SW: Woofer preouts *1 Only for KW-V250BT/KW-V25BT/KW-V350BT Region 1. *2 Only for KW-V350BT Region 1. *3 Only for KW-V350BT Region 4. *4 When connecting an external amplifier, connect its ground wire to the car's steering remote harness using the mounting bracket removed...

Instruction Manual America
Page 61
...; Reset the unit. (Page 3) The remote controller*1 does not work. Replace the battery. References Troubleshooting iPod/iPhone that can be connected • Via the USB terminal: Made for - iPod nano (7th Generation) - Wire or insulate the speaker cord as the instructions supplied with the component which you used for KW-V350BT Region 4. iPhone 4S, 5, 5C, 5S, 6, 6 Plus, 6S, 6S Plus, SE, 7, 7 Plus, 8, 8 Plus, X • Via Bluetooth: Made for - Consult your iPod/iPhone...
...; Reset the unit. (Page 3) The remote controller*1 does not work. Replace the battery. References Troubleshooting iPod/iPhone that can be connected • Via the USB terminal: Made for - iPod nano (7th Generation) - Wire or insulate the speaker cord as the instructions supplied with the component which you used for KW-V350BT Region 4. iPhone 4S, 5, 5C, 5S, 6, 6 Plus, 6S, 6S Plus, SE, 7, 7 Plus, 8, 8 Plus, X • Via Bluetooth: Made for - Consult your iPod/iPhone...

Instruction Manual America
Page 62
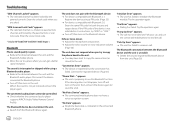
... a DVD Video disc of the speakers. Disconnect the iPod/iPhone, then connect it again. Select another USB device. Copy the tracks again, and try again. The source does not change to "USB" when you connect a USB device while listening to the radio. Connect the antenna firmly. 60 ENGLISH While playing a track, sound is distorted. Deactivate the equalizer either on this unit. (Page 59) Tuner SSM automatic presetting does not work , connect the Android device...
... a DVD Video disc of the speakers. Disconnect the iPod/iPhone, then connect it again. Select another USB device. Copy the tracks again, and try again. The source does not change to "USB" when you connect a USB device while listening to the radio. Connect the antenna firmly. 60 ENGLISH While playing a track, sound is distorted. Deactivate the equalizer either on this unit. (Page 59) Tuner SSM automatic presetting does not work , connect the Android device...
Instruction Manual America
Page 64
... devices compatible with Bluetooth 2.0: Enter the same PIN code for both the unit and target device. "Connection Error" appears. The device is preparing to use the connected mobile phone to receive a call has not ended yet. Troubleshooting "SXM Channel Locked" appears. The selected channel has been locked by the parental lock or user lock code. Enter the correct lock code. * Only for Bluetooth phone. Turn off , then turn on the unit. (When the sound...
... devices compatible with Bluetooth 2.0: Enter the same PIN code for both the unit and target device. "Connection Error" appears. The device is preparing to use the connected mobile phone to receive a call has not ended yet. Troubleshooting "SXM Channel Locked" appears. The selected channel has been locked by the parental lock or user lock code. Enter the correct lock code. * Only for Bluetooth phone. Turn off , then turn on the unit. (When the sound...


