
Instruction Manual America
Page 1
Retain this information for future reference. Serial No. B5A-2137-20 [K] Model No. and Serial No. which are located on the top or bottom of the cabinet. KW-R935BTS / KW-R930BTS CD RECEIVER INSTRUCTION MANUAL RÉCEPTEUR CD MANUEL D'INSTRUCTIONS RECEPTOR CON CD MANUAL DE INSTRUCCIONES KW-X830BTS / KW-SX83BTS DIGITAL MEDIA RECEIVER INSTRUCTION MANUAL RÉCEPTEUR MULTIMÉDIA NUMÉRIQUE MANUEL D'INSTRUCTIONS RECEPTOR DE MEDIOS DIGITALES MANUAL DE INSTRUCCIONES ENGLISH FRANÇAIS ESPAÑOL For customer Use: Enter below the Model No.
Retain this information for future reference. Serial No. B5A-2137-20 [K] Model No. and Serial No. which are located on the top or bottom of the cabinet. KW-R935BTS / KW-R930BTS CD RECEIVER INSTRUCTION MANUAL RÉCEPTEUR CD MANUEL D'INSTRUCTIONS RECEPTOR CON CD MANUAL DE INSTRUCCIONES KW-X830BTS / KW-SX83BTS DIGITAL MEDIA RECEIVER INSTRUCTION MANUAL RÉCEPTEUR MULTIMÉDIA NUMÉRIQUE MANUEL D'INSTRUCTIONS RECEPTOR DE MEDIOS DIGITALES MANUAL DE INSTRUCCIONES ENGLISH FRANÇAIS ESPAÑOL For customer Use: Enter below the Model No.

Instruction Manual America
Page 6
... the output level. Turn off the unit when parking at a low ceiling area. CONTENTS BEFORE USE 2 BASICS 3 GETTING STARTED 4 1 Cancel the demonstration 2 Set the clock and date 3 Set the basic settings RADIO 5 CD/USB/iPod/ANDROID 7 Pandora® 9 iHeartRadio® 10 Spotify 11 SiriusXM® Radio 12 BLUETOOTH® 15 AUX 23 AUDIO SETTINGS 23 DISPLAY SETTINGS 29 REFERENCES 30 Maintenance More information TROUBLESHOOTING 33 SPECIFICATIONS 36 INSTALLATION/ CONNECTION 37 2 ENGLISH BEFORE USE IMPORTANT...
... the output level. Turn off the unit when parking at a low ceiling area. CONTENTS BEFORE USE 2 BASICS 3 GETTING STARTED 4 1 Cancel the demonstration 2 Set the clock and date 3 Set the basic settings RADIO 5 CD/USB/iPod/ANDROID 7 Pandora® 9 iHeartRadio® 10 Spotify 11 SiriusXM® Radio 12 BLUETOOTH® 15 AUX 23 AUDIO SETTINGS 23 DISPLAY SETTINGS 29 REFERENCES 30 Maintenance More information TROUBLESHOOTING 33 SPECIFICATIONS 36 INSTALLATION/ CONNECTION 37 2 ENGLISH BEFORE USE IMPORTANT...

Instruction Manual America
Page 8
... power for the first time (or [FACTORY RESET] is set the date 7 Turn the volume knob to select [DATE SET], then press the knob. 8 Turn the volume knob to make the settings, then press the knob. GETTING STARTED To set to [YES], 5), the display shows: "CANCEL DEMO" "PRESS" "VOLUME KNOB" 1 Press the volume knob. [YES] is selected for the initial setup. 2 Press the volume knob again. To adjust the clock 3 Turn the volume knob to select [CLOCK ADJUST...
... power for the first time (or [FACTORY RESET] is set the date 7 Turn the volume knob to select [DATE SET], then press the knob. 8 Turn the volume knob to make the settings, then press the knob. GETTING STARTED To set to [YES], 5), the display shows: "CANCEL DEMO" "PRESS" "VOLUME KNOB" 1 Press the volume knob. [YES] is selected for the initial setup. 2 Press the volume knob again. To adjust the clock 3 Turn the volume knob to select [CLOCK ADJUST...

Instruction Manual America
Page 16
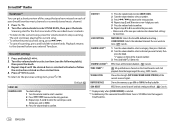
... to , all the available channels will be found on the label found by tuning to select SIRIUS XM. 2 Press . For users in the U.S.A.: Online: Go to Phone: Call 1-866-635-2349 For users in one of the number buttons (1 to 6). (or) 1 Press and hold the volume knob until "PRESET MODE" flashes. 2 Turn the volume knob to 18 channels. If "ALL CHANNEL" is selected, a pass code input screen appears. Store a channel While listening to...
... to , all the available channels will be found on the label found by tuning to select SIRIUS XM. 2 Press . For users in the U.S.A.: Online: Go to Phone: Call 1-866-635-2349 For users in one of the number buttons (1 to 6). (or) 1 Press and hold the volume knob until "PRESET MODE" flashes. 2 Turn the volume knob to 18 channels. If "ALL CHANNEL" is selected, a pass code input screen appears. Store a channel While listening to...
Instruction Manual America
Page 18
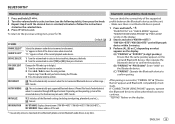
... selected. *2 Available only if the connected SiriusXM Vehicle Tuner is selected/activated or follow the instructions stated on each of your SmartFavorites music channels or currently tuned music channel. 1 Press . 2 Turn the volume knob to exit. SiriusXM settings 1 Press and hold the volume knob. NO: Cancels. USER DEFINED: Selects the individual channels the user wants to enter channel lock settings for next time. CODE SET 1 Press the volume knob to enter [NEW CODE]. 2 Turn the volume knob to select a number...
... selected. *2 Available only if the connected SiriusXM Vehicle Tuner is selected/activated or follow the instructions stated on each of your SmartFavorites music channels or currently tuned music channel. 1 Press . 2 Turn the volume knob to exit. SiriusXM settings 1 Press and hold the volume knob. NO: Cancels. USER DEFINED: Selects the individual channels the user wants to enter channel lock settings for next time. CODE SET 1 Press the volume knob to enter [NEW CODE]. 2 Turn the volume knob to select a number...

Instruction Manual America
Page 19
Hands-Free Profile (HFP) - Audio/Video Remote Control Profile (AVRCP) - For some Bluetooth devices, you may need to start pairing. • If "PAIRING" "PIN 0000" scrolls on the display. Ensure that the passkeys appear on the Bluetooth device. Advanced Audio Coding (AAC) Connect the microphone MIC (microphone input terminal) Microphone (supplied) Rear panel Adjust the microphone angle Secure using cord clamps (not supplied) if necessary. NO" "XXXXXX" is established. • This unit supports Secure Simple Pairing (SSP...
Hands-Free Profile (HFP) - Audio/Video Remote Control Profile (AVRCP) - For some Bluetooth devices, you may need to start pairing. • If "PAIRING" "PIN 0000" scrolls on the display. Ensure that the passkeys appear on the Bluetooth device. Advanced Audio Coding (AAC) Connect the microphone MIC (microphone input terminal) Microphone (supplied) Rear panel Adjust the microphone angle Secure using cord clamps (not supplied) if necessary. NO" "XXXXXX" is established. • This unit supports Secure Simple Pairing (SSP...

Instruction Manual America
Page 20
... ENGLISH BLUETOOTH® Auto Pairing When you connect iPhone/iPod touch/ Android device to [ON]. ( 19) - volume knob. Automatic pairing request is selected ( 8). JVC MUSIC PLAY application is installed on the connected phone. The following operations may differ or not available depending on the Android device ( 7) and [AUTO MODE] is activated only if: - Mobile phone Press the volume knob to a selected time. ( 17) During a call automatically if [AUTO ANSWER] is set to the USB input terminal, pairing request (via Bluetooth) is...
... ENGLISH BLUETOOTH® Auto Pairing When you connect iPhone/iPod touch/ Android device to [ON]. ( 19) - volume knob. Automatic pairing request is selected ( 8). JVC MUSIC PLAY application is installed on the connected phone. The following operations may differ or not available depending on the Android device ( 7) and [AUTO MODE] is activated only if: - Mobile phone Press the volume knob to a selected time. ( 17) During a call automatically if [AUTO ANSWER] is set to the USB input terminal, pairing request (via Bluetooth) is...
Instruction Manual America
Page 23
... phones and one Bluetooth audio device at any time. RECONNECT ON: The unit automatically reconnect when the last connected Bluetooth device is successful, "PAIRING OK" "[Device Name]" appears and Bluetooth compatibility check starts. AUTO PAIRING ON: The unit automatically pair supported Bluetooth device (iPhone/iPod touch/Android device) when it is selected/activated or follow the instructions stated on the Bluetooth device. (C) "PAIRING": Operate the Bluetooth device to continue. NO: Cancels. "BLUETOOTH" "CHECK MODE" appears. ENGLISH 19 BLUETOOTH® Bluetooth mode settings...
... phones and one Bluetooth audio device at any time. RECONNECT ON: The unit automatically reconnect when the last connected Bluetooth device is successful, "PAIRING OK" "[Device Name]" appears and Bluetooth compatibility check starts. AUTO PAIRING ON: The unit automatically pair supported Bluetooth device (iPhone/iPod touch/Android device) when it is selected/activated or follow the instructions stated on the Bluetooth device. (C) "PAIRING": Operate the Bluetooth device to continue. NO: Cancels. "BLUETOOTH" "CHECK MODE" appears. ENGLISH 19 BLUETOOTH® Bluetooth mode settings...

Instruction Manual America
Page 25
...: Install the latest version of JVC Remote application on the connected device itself also causes switching of [SELECT] is set to any playback source connected via Bluetooth. ; If IOS is selected, select iPod BT source (or iPod USB if your device before connecting. You change from the device. BLUETOOTH® To On the faceplate Switch between connected Press 6.* Bluetooth audio devices On the remote control ( Not available ) * Pressing the "Play" key on your iPhone/iPod is connected via Bluetooth. Operations and display indications may differ according to activate...
...: Install the latest version of JVC Remote application on the connected device itself also causes switching of [SELECT] is set to any playback source connected via Bluetooth. ; If IOS is selected, select iPod BT source (or iPod USB if your device before connecting. You change from the device. BLUETOOTH® To On the faceplate Switch between connected Press 6.* Bluetooth audio devices On the remote control ( Not available ) * Pressing the "Play" key on your iPhone/iPod is connected via Bluetooth. Operations and display indications may differ according to activate...

Instruction Manual America
Page 27
..., JAZZ, POP, R&B, USER, CLASSICAL • Drive equalizer (DRVN 3/DRVN 2/DRVN 1) boosts specific frequencies in [SOURCE SELECT]. ( 4) 3 Press repeatedly to select AUX. 4 Turn on the portable audio player and start playback. ENGLISH 23 Use a 3-core plug head stereo mini plug for setting ( 24) and the result is stored to [USER]. • To return to the previous setting item, press . • To exit, press . Select a preset equalizer directly Press (or) Press repeatedly. , then turn the volume knob within...
..., JAZZ, POP, R&B, USER, CLASSICAL • Drive equalizer (DRVN 3/DRVN 2/DRVN 1) boosts specific frequencies in [SOURCE SELECT]. ( 4) 3 Press repeatedly to select AUX. 4 Turn on the portable audio player and start playback. ENGLISH 23 Use a 3-core plug head stereo mini plug for setting ( 24) and the result is stored to [USER]. • To return to the previous setting item, press . • To exit, press . Select a preset equalizer directly Press (or) Press repeatedly. , then turn the volume knob within...

Instruction Manual America
Page 28
... LEVEL +05: Selects your own sound settings. • The settings are stored to [USER]. • The settings made may affect the current settings of [PRO EQ]. AUDIO SETTINGS Other settings 1 Press and hold . 2 Turn the volume knob to select an item (see the following table), then press the knob. 3 Repeat step 2 until the desired item is selected.) SUB.W 00 to SUB.W +06 (SUB.W +03): Adjusts the output level of the subwoofer connected via speaker...
... LEVEL +05: Selects your own sound settings. • The settings are stored to [USER]. • The settings made may affect the current settings of [PRO EQ]. AUDIO SETTINGS Other settings 1 Press and hold . 2 Turn the volume knob to select an item (see the following table), then press the knob. 3 Repeat step 2 until the desired item is selected.) SUB.W 00 to SUB.W +06 (SUB.W +03): Adjusts the output level of the subwoofer connected via speaker...

Instruction Manual America
Page 29
...: Cancels. Before adjustment, select the source you have selected ( [X ' OVER TYPE]), 2-way crossover or 3-way crossover setting items will not affect the subwoofer output. CAR SETTINGS X ' OVER TYPE Caution: Adjust the volume before changing the [X ' OVER TYPE] to avoid the sudden increase or decrease of the tyres. ; BALANCE *3 POSITION L15 to POSITION F15 (POSITION 00): Adjusts the front and rear speaker output balance. ENGLISH 25 AUDIO SETTINGS FADER (Not applicable...
...: Cancels. Before adjustment, select the source you have selected ( [X ' OVER TYPE]), 2-way crossover or 3-way crossover setting items will not affect the subwoofer output. CAR SETTINGS X ' OVER TYPE Caution: Adjust the volume before changing the [X ' OVER TYPE] to avoid the sudden increase or decrease of the tyres. ; BALANCE *3 POSITION L15 to POSITION F15 (POSITION 00): Adjusts the front and rear speaker output balance. ENGLISH 25 AUDIO SETTINGS FADER (Not applicable...

Instruction Manual America
Page 30
... ): Subwoofer output Subwoofer output R (right): (Mute) Connection via speaker leads For connections without using an external amplifier. SPEAKER SIZE Selects according to the selected speakers. • [SLOPE]/[F-HPF SLOPE]/[R-HPF SLOPE]/[SW LPF SLOPE]/[HPF SLOPE]/[LPF SLOPE]: Adjusts the crossover slope. Connection via lineout terminals For connections through an external amplifier. ( 39, 40) Setting on [SPK/PRE OUT] Audio signal through lineout terminal FRONT REAR SW REAR/REAR (default) Front speakers output Rear speakers output Subwoofer output SUB.W/SUB.W Front speakers...
... ): Subwoofer output Subwoofer output R (right): (Mute) Connection via speaker leads For connections without using an external amplifier. SPEAKER SIZE Selects according to the selected speakers. • [SLOPE]/[F-HPF SLOPE]/[R-HPF SLOPE]/[SW LPF SLOPE]/[HPF SLOPE]/[LPF SLOPE]: Adjusts the crossover slope. Connection via lineout terminals For connections through an external amplifier. ( 39, 40) Setting on [SPK/PRE OUT] Audio signal through lineout terminal FRONT REAR SW REAR/REAR (default) Front speakers output Rear speakers output Subwoofer output SUB.W/SUB.W Front speakers...

Instruction Manual America
Page 33
... default colors. COLOR PRESET Select illumination colors for the buttons on different zones separately. 1 Select a zone (see illustration on the left column). 3 LEVEL 00 to [DAY] setting. Default: XX DISPLAY DIMMER Dim the illumination. SCROLL AUTO: Repeats scrolling at different speeds. • CRYSTAL/FLOWER/FOREST/GRADATION/OCEAN/SUNSET/RELAX: The selected color pattern is shown.*3 (Selectable only when [ALL ZONE] is selected in step 1.) *1 The illumination control wire connection...
... default colors. COLOR PRESET Select illumination colors for the buttons on different zones separately. 1 Select a zone (see illustration on the left column). 3 LEVEL 00 to [DAY] setting. Default: XX DISPLAY DIMMER Dim the illumination. SCROLL AUTO: Repeats scrolling at different speeds. • CRYSTAL/FLOWER/FOREST/GRADATION/OCEAN/SUNSET/RELAX: The selected color pattern is shown.*3 (Selectable only when [ALL ZONE] is selected in step 1.) *1 The illumination control wire connection...

Instruction Manual America
Page 35
... than 5 m may result in [HEAD MODE]. • The song order displayed on the selection menu of this unit may not fully support Android Open Accessory (AOA) 2.0. • If the Android device supports both mass storage class device and AOA 2.0, this unit always playback via a USB hub. • Connecting a cable whose rating is a third party service, therefore the specifications are subject to change without prior notice. Android OS...
... than 5 m may result in [HEAD MODE]. • The song order displayed on the selection menu of this unit may not fully support Android Open Accessory (AOA) 2.0. • If the Android device supports both mass storage class device and AOA 2.0, this unit always playback via a USB hub. • Connecting a cable whose rating is a third party service, therefore the specifications are subject to change without prior notice. Android OS...
Instruction Manual America
Page 37
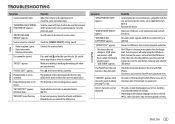
.... Disc cannot be selected. Press , then insert the disc correctly. The playback order is determined by pressing . Elapsed playing time is drawing more power than the design limit. Symptom Remedy "UNSUPPORTED DEVICE" appears. • Check whether the connected device is compatible with another source. • "USB ERROR" appears The USB port is not This depends on or does not work. This unit cannot support a USB device connected via a USB hub. The iPod/iPhone...
.... Disc cannot be selected. Press , then insert the disc correctly. The playback order is determined by pressing . Elapsed playing time is drawing more power than the design limit. Symptom Remedy "UNSUPPORTED DEVICE" appears. • Check whether the connected device is compatible with another source. • "USB ERROR" appears The USB port is not This depends on or does not work. This unit cannot support a USB device connected via a USB hub. The iPod/iPhone...
Instruction Manual America
Page 38
... Android device. • Restart the Android device. Please wait. • Connected via USB input terminal: The device is connecting to unit. ( 31) ANDROID Cannot playback at [AUTO MODE]. • Make sure JVC MUSIC PLAY APP is installed on the Android device. ( 7) • Reconnect the Android device and select the appropriate control mode. ( 8) • If this does not solve the problem, the connected Android device does not support [AUTO MODE]. ( 31) "NO DEVICE" or "READING" keeps flashing. • Switch off...
... Android device. • Restart the Android device. Please wait. • Connected via USB input terminal: The device is connecting to unit. ( 31) ANDROID Cannot playback at [AUTO MODE]. • Make sure JVC MUSIC PLAY APP is installed on the Android device. ( 7) • Reconnect the Android device and select the appropriate control mode. ( 8) • If this does not solve the problem, the connected Android device does not support [AUTO MODE]. ( 31) "NO DEVICE" or "READING" keeps flashing. • Switch off...

Instruction Manual America
Page 39
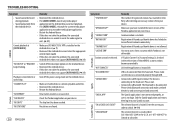
... connect the Bluetooth player again. TROUBLESHOOTING Bluetooth® SiriusXM® Radio Symptom "CH UNAVAIL" "CHECK ANTENNA" "CHECK TUNER" "NO SIGNAL" "SUBSCRIPTION UPDATED - player. • Other Bluetooth devices might not support phone switching feature. PRESS ENTER TO CONTINUE." Your subscription is unavailable. TuneScan has been aborted. • Search from the Bluetooth device again. • Reset the unit. ( 3) • Make sure you have entered the same PIN code to the instructions of a Bluetooth audio • Turn off and turn...
... connect the Bluetooth player again. TROUBLESHOOTING Bluetooth® SiriusXM® Radio Symptom "CH UNAVAIL" "CHECK ANTENNA" "CHECK TUNER" "NO SIGNAL" "SUBSCRIPTION UPDATED - player. • Other Bluetooth devices might not support phone switching feature. PRESS ENTER TO CONTINUE." Your subscription is unavailable. TuneScan has been aborted. • Search from the Bluetooth device again. • Reset the unit. ( 3) • Make sure you have entered the same PIN code to the instructions of a Bluetooth audio • Turn off and turn...

Instruction Manual America
Page 43
...Vehicle dashboard Factory wiring harness (vehicle) Custom wiring harness (separately purchased) Blue: To power antenna Blue/white: To amplifier Brown (not used) Recommended connection Antenna terminal To the steering wheel remote control adapter Light blue/yellow Join the same color wires together. ENGLISH 39 Consult your vehicle factory wiring harness does not have "12 V ignition switch" wire. *1 You can also connect a subwoofer speaker directly using this lead without an external subwoofer amplifier. Blue/white: Remote (12 V 350 mA) Orange/white: Illumination Yellow: Battery 12...
...Vehicle dashboard Factory wiring harness (vehicle) Custom wiring harness (separately purchased) Blue: To power antenna Blue/white: To amplifier Brown (not used) Recommended connection Antenna terminal To the steering wheel remote control adapter Light blue/yellow Join the same color wires together. ENGLISH 39 Consult your vehicle factory wiring harness does not have "12 V ignition switch" wire. *1 You can also connect a subwoofer speaker directly using this lead without an external subwoofer amplifier. Blue/white: Remote (12 V 350 mA) Orange/white: Illumination Yellow: Battery 12...

Instruction Manual America
Page 44
... input terminal) ( 15) KW-R935BTS: USB cable (DC 5 V 1.5 A) (approx. 1.2 m/4 feet) Expansion port (12 V 500 mA) To the optional SiriusXM Vehicle Tuner (commercially available) ( 12) Connecting external amplifiers via output terminals Signal cord (not supplied) JVC Amplifier*2 Output terminals Remote wire (not supplied) To remote lead (blue/white) of the wiring harness. ( 39) Output terminals 2-way crossover setting REAR FRONT SW : Rear output : Front output : Subwoofer output 3-way crossover setting Tweeter output Mid Range output Woofer output *2 Firmly connect the ground wire...
... input terminal) ( 15) KW-R935BTS: USB cable (DC 5 V 1.5 A) (approx. 1.2 m/4 feet) Expansion port (12 V 500 mA) To the optional SiriusXM Vehicle Tuner (commercially available) ( 12) Connecting external amplifiers via output terminals Signal cord (not supplied) JVC Amplifier*2 Output terminals Remote wire (not supplied) To remote lead (blue/white) of the wiring harness. ( 39) Output terminals 2-way crossover setting REAR FRONT SW : Rear output : Front output : Subwoofer output 3-way crossover setting Tweeter output Mid Range output Woofer output *2 Firmly connect the ground wire...


