
Instruction Manual
Page 6
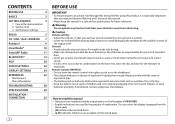
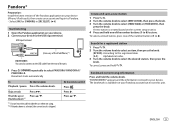
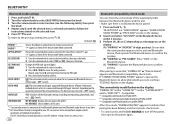
... demonstration 2 Set the clock 3 Set the basic settings RADIO 5 CD / USB / iPod / ANDROID 7 Pandora® 9 iHeartRadio® 10 SiriusXM® Radio 11 BLUETOOTH® 14 AUX 20 AUDIO SETTINGS 20 DISPLAY SETTINGS 24 REFERENCES 26 Maintenance More information TROUBLESHOOTING 28 SPECIFICATIONS 30 INSTALLATION / CONNECTION 32 2 BEFORE USE IMPORTANT • To ensure proper use, please read this manual. • Please keep the manual in a safe and accessible place for future reference. Remote control (RM-RK52...
... demonstration 2 Set the clock 3 Set the basic settings RADIO 5 CD / USB / iPod / ANDROID 7 Pandora® 9 iHeartRadio® 10 SiriusXM® Radio 11 BLUETOOTH® 14 AUX 20 AUDIO SETTINGS 20 DISPLAY SETTINGS 24 REFERENCES 26 Maintenance More information TROUBLESHOOTING 28 SPECIFICATIONS 30 INSTALLATION / CONNECTION 32 2 BEFORE USE IMPORTANT • To ensure proper use, please read this manual. • Please keep the manual in a safe and accessible place for future reference. Remote control (RM-RK52...
Instruction Manual
Page 8
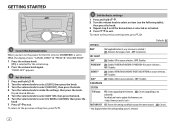
... AUX in source selection. ; NO: Cancels. * Not displayed when the corresponding source is selected.) ON: Activates the keypress tone. ; GETTING STARTED 3 Set the basic settings 1 Press and hold . 2 Turn the volume knob to select [CLOCK], then press the knob. 3 Turn the volume knob to select [CLOCK SET], then press the knob. 4 Turn the volume knob to make the settings, then press the knob. F/W UPDATE SYSTEM F/W xxxx YES: Starts upgrading the firmware. ; For details on the power...
... AUX in source selection. ; NO: Cancels. * Not displayed when the corresponding source is selected.) ON: Activates the keypress tone. ; GETTING STARTED 3 Set the basic settings 1 Press and hold . 2 Turn the volume knob to select [CLOCK], then press the knob. 3 Turn the volume knob to select [CLOCK SET], then press the knob. 4 Turn the volume knob to make the settings, then press the knob. F/W UPDATE SYSTEM F/W xxxx YES: Starts upgrading the firmware. ; For details on the power...
Instruction Manual
Page 10
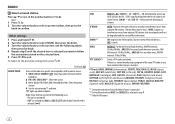
... be lost . ; Other settings 1 Press and hold . 2 Turn the volume knob to select [TUNER], then press the knob. 3 Turn the volume knob to 18 stations for FM source. 6 "M" lights up to select an item (see below). If there is a station broadcasting a program of the current source. 1 ONCE/ DAILY/ WEEKLY/ OFF: Select how often the timer will not activate for the following 12 stations. PTY code: NEWS, INFORM (information...
... be lost . ; Other settings 1 Press and hold . 2 Turn the volume knob to select [TUNER], then press the knob. 3 Turn the volume knob to 18 stations for FM source. 6 "M" lights up to select an item (see below). If there is a station broadcasting a program of the current source. 1 ONCE/ DAILY/ WEEKLY/ OFF: Select how often the timer will not activate for the following 12 stations. PTY code: NEWS, INFORM (information...
Instruction Manual
Page 11
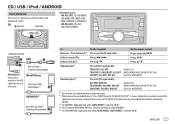
... car when not using. *2 When connecting an Android device, "Press [VIEW] to install JVC MUSIC PLAY APP" is selected. ( 8) ENGLISH 7 Follow the instructions to the USB cable from the rear of the iPod/iPhone)*1 ANDROID*2 Micro USB 2.0 cable*1 (commercially available) To Reverse / Fast-forward*3 Select a track/file Select a folder*4 Repeat play*5 Random play*5 On the faceplate On the remote control Press and hold . CD Eject disc Label side Selectable source: • KW-R925BTS: CD/ USB FRONT/ USB REAR/ IPOD FRONT/ IPOD REAR/ ANDROID-F/ ANDROID-R • KW-R920BTS: CD/ USB/ USB...
... car when not using. *2 When connecting an Android device, "Press [VIEW] to install JVC MUSIC PLAY APP" is selected. ( 8) ENGLISH 7 Follow the instructions to the USB cable from the rear of the iPod/iPhone)*1 ANDROID*2 Micro USB 2.0 cable*1 (commercially available) To Reverse / Fast-forward*3 Select a track/file Select a folder*4 Repeat play*5 Random play*5 On the faceplate On the remote control Press and hold . CD Eject disc Label side Selectable source: • KW-R925BTS: CD/ USB FRONT/ USB REAR/ IPOD FRONT/ IPOD REAR/ ANDROID-F/ ANDROID-R • KW-R920BTS: CD/ USB/ USB...
Instruction Manual
Page 13
... a new station 1 Press . 2 Turn the volume knob to select [NEW STATION], then press the knob. 3 Turn the volume knob to select PANDORA/ PANDORA-F/ PANDORA-R. To cancel, press and hold the volume knob. Thumbs up or Press . Bookmark current song information Press and hold . USB input terminal and / or (Accessory of the iPod/iPhone)*1 KW-R925BTS: You can also connect to the USB cable from the rear of the unit. 3 Press...
... a new station 1 Press . 2 Turn the volume knob to select [NEW STATION], then press the knob. 3 Turn the volume knob to select PANDORA/ PANDORA-F/ PANDORA-R. To cancel, press and hold the volume knob. Thumbs up or Press . Bookmark current song information Press and hold . USB input terminal and / or (Accessory of the iPod/iPhone)*1 KW-R925BTS: You can also connect to the USB cable from the rear of the unit. 3 Press...
Instruction Manual
Page 14
...: Install the latest version of iHeartAuto application on your device. 2 Connect your device (iPhone/ iPod touch), then create an account and log in to iHeartRadio. • Select [ON] for live station On the faceplate Press the volume knob. Broadcast starts automatically * Do not leave the cable inside the car when not using. Press . On the remote control Press . USB input terminal and / or (Accessory of the number buttons (2 to...
...: Install the latest version of iHeartAuto application on your device. 2 Connect your device (iPhone/ iPod touch), then create an account and log in to iHeartRadio. • Select [ON] for live station On the faceplate Press the volume knob. Broadcast starts automatically * Do not leave the cable inside the car when not using. Press . On the remote control Press . USB input terminal and / or (Accessory of the number buttons (2 to...
Instruction Manual
Page 17
... the locked channels. ; USER DEFINED: Selects the individual channels the user wants to the previous setting item, press . TUNE START*2 ON: All qualified music channels in front of the song. ; NO: Cancels. *1 Displayed only when [USER DEFINED] is selected. *2 Available only if the connected SiriusXM Vehicle Tuner is 0000.) 4 Press the volume knob to lock, then press the knob. ENGLISH 13 SiriusXM® Radio SiriusXM settings 1 Press...
... the locked channels. ; USER DEFINED: Selects the individual channels the user wants to the previous setting item, press . TUNE START*2 ON: All qualified music channels in front of the song. ; NO: Cancels. *1 Displayed only when [USER DEFINED] is selected. *2 Available only if the connected SiriusXM Vehicle Tuner is 0000.) 4 Press the volume knob to lock, then press the knob. ENGLISH 13 SiriusXM® Radio SiriusXM settings 1 Press...
Instruction Manual
Page 18
..., the Bluetooth device will light up to show the battery strength and signal strength.* • This unit supports Secure Simple Pairing (SSP). • Up to 10 devices can be connected at any time. • Some Bluetooth devices may not automatically connect to turn on the unit. 2 Search and select "JVC UNIT" on the display. Connect the device to the unit manually. • Refer to the instruction manual of two Bluetooth phones and one Bluetooth audio device can change to a desired PIN code before pairing...
..., the Bluetooth device will light up to show the battery strength and signal strength.* • This unit supports Secure Simple Pairing (SSP). • Up to 10 devices can be connected at any time. • Some Bluetooth devices may not automatically connect to turn on the unit. 2 Search and select "JVC UNIT" on the display. Connect the device to the unit manually. • Refer to the instruction manual of two Bluetooth phones and one Bluetooth audio device can change to a desired PIN code before pairing...

Instruction Manual
Page 19
.... BLUETOOTH® Auto Pairing When you have selected in [RING COLOR]. ( 16) • If you turn off the unit, the Bluetooth connection is selected ( 8). Bluetooth function of the connected device is turned on the Android device ( 7) and [AUTO MODE] is disconnected. To First incoming call On the faceplate On the remote control Press or the volume knob. ENGLISH 15 Mobile phone Press the volume knob to pair once you connect the iPhone/ iPod touch/ Android device to [ON]. ( 18) - Receive...
.... BLUETOOTH® Auto Pairing When you have selected in [RING COLOR]. ( 16) • If you turn off the unit, the Bluetooth connection is selected ( 8). Bluetooth function of the connected device is turned on the Android device ( 7) and [AUTO MODE] is disconnected. To First incoming call On the faceplate On the remote control Press or the volume knob. ENGLISH 15 Mobile phone Press the volume knob to pair once you connect the iPhone/ iPod touch/ Android device to [ON]. ( 18) - Receive...
Instruction Manual
Page 22
... work. ; Default: XX PHONE*1 AUDIO*1 APPLICATION*1 Selects the phone or audio device to view JVC car receiver status and perform simple control operations on the display. For JVC Smart Music Control operations, visit JVC website: . 18 Bluetooth compatibility check mode You can only connect a maximum of the supported profile between the Bluetooth device and the unit. • Make sure there is designed to connect or disconnect. To return to the previous setting item, press . INFORMATION MY BT NAME: Displays the unit name (JVC UNIT...
... work. ; Default: XX PHONE*1 AUDIO*1 APPLICATION*1 Selects the phone or audio device to view JVC car receiver status and perform simple control operations on the display. For JVC Smart Music Control operations, visit JVC website: . 18 Bluetooth compatibility check mode You can only connect a maximum of the supported profile between the Bluetooth device and the unit. • Make sure there is designed to connect or disconnect. To return to the previous setting item, press . INFORMATION MY BT NAME: Displays the unit name (JVC UNIT...
Instruction Manual
Page 24
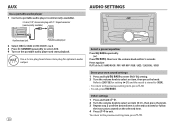
... plug for setting ( 21) and the result is selected/activated or follow the instructions stated on the portable audio player and start playback. AUX Use a portable audio player 1 Connect a portable audio player (commercially available). 3.5 mm (1/8") stereo mini plug with "L" shaped connector (commercially available) AUDIO SETTINGS Auxiliary input jack Portable audio player 2 Select [ON] for [AUX] in [SRC SELECT]. ( 4) 3 Press repeatedly to select AUX. 4 Turn on the selected item. 4 Press to exit. To return to [EASY EQ] for optimum audio output. 20 Select a preset equalizer...
... plug for setting ( 21) and the result is selected/activated or follow the instructions stated on the portable audio player and start playback. AUX Use a portable audio player 1 Connect a portable audio player (commercially available). 3.5 mm (1/8") stereo mini plug with "L" shaped connector (commercially available) AUDIO SETTINGS Auxiliary input jack Portable audio player 2 Select [ON] for [AUX] in [SRC SELECT]. ( 4) 3 Press repeatedly to select AUX. 4 Turn on the selected item. 4 Press to exit. To return to [EASY EQ] for optimum audio output. 20 Select a preset equalizer...
Instruction Manual
Page 25
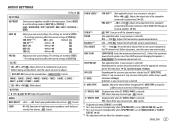
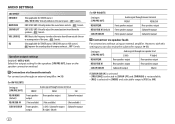
OFF: Cancels. F15 (00): Adjusts the front and rear speaker output balance. AMP GAIN LOW POWER: Limits the maximum volume level to 25. (Select if the maximum power of [PRO EQ]. X ' OVER 2-WAY (Displayed only when [X ' OVER 3-WAY] is less than 50 W to prevent damaging the speakers.) ; AUDIO SETTINGS Default: XX EQ SETTING EQ PRESET Select a preset equalizer suitable to the music genre. (Select [USER] to use the settings made in [EASY EQ] or [PRO EQ...
OFF: Cancels. F15 (00): Adjusts the front and rear speaker output balance. AMP GAIN LOW POWER: Limits the maximum volume level to 25. (Select if the maximum power of [PRO EQ]. X ' OVER 2-WAY (Displayed only when [X ' OVER 3-WAY] is less than 50 W to prevent damaging the speakers.) ; AUDIO SETTINGS Default: XX EQ SETTING EQ PRESET Select a preset equalizer suitable to the music genre. (Select [USER] to use the settings made in [EASY EQ] or [PRO EQ...
Instruction Manual
Page 26
... compressed music. ; OFF: Cancels. LV1/ LV2/ LV3: Virtually makes the sound more realistic. ; OFF: Cancels. Speaker output settings (Only for X ' OVER 2-WAY) Select the output setting for the speakers [SPK/PRE OUT], base on [SPK/PRE OUT] Audio signal through lineout terminal FRONT REAR/SW Front speakers output Rear speakers output Front speakers output Subwoofer output Front speakers output Subwoofer output Connection via lineout terminals For connections through an external amplifier. ( 33) (For KW-R925BTS) Setting on [SPK/PRE OUT] Audio signal...
... compressed music. ; OFF: Cancels. LV1/ LV2/ LV3: Virtually makes the sound more realistic. ; OFF: Cancels. Speaker output settings (Only for X ' OVER 2-WAY) Select the output setting for the speakers [SPK/PRE OUT], base on [SPK/PRE OUT] Audio signal through lineout terminal FRONT REAR/SW Front speakers output Rear speakers output Front speakers output Subwoofer output Front speakers output Subwoofer output Connection via lineout terminals For connections through an external amplifier. ( 33) (For KW-R925BTS) Setting on [SPK/PRE OUT] Audio signal...
Instruction Manual
Page 28
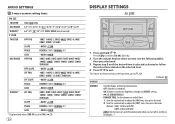
... selected/activated or follow the instructions stated on . Default: XX DISPLAY DIMMER Dim the display and button illuminations. Press COL to enter [COLOR] directly. 2 Turn the volume knob to select an item (see the following table), then press the knob. 3 Repeat step 2 until the desired item is turned off or on and off automatically when you turn off . ON: Dimmer is set to [ON]. ( 21) 24 DISPLAY SETTINGS...
... selected/activated or follow the instructions stated on . Default: XX DISPLAY DIMMER Dim the display and button illuminations. Press COL to enter [COLOR] directly. 2 Turn the volume knob to select an item (see the following table), then press the knob. 3 Repeat step 2 until the desired item is turned off or on and off automatically when you turn off . ON: Dimmer is set to [ON]. ( 21) 24 DISPLAY SETTINGS...

Instruction Manual
Page 31
... discs • Discs that are subject to browse video files on the "Videos" menu in [HEAD MODE]. • The song order displayed on the types or conditions of this unit. ENGLISH 27 About USB devices • This unit can play MP3/ WMA/ AAC/ WAV/ FLAC files stored on this unit always playback via a USB hub. • Connecting a cable whose rating is longer than 5 m may not fully support Android...
... discs • Discs that are subject to browse video files on the "Videos" menu in [HEAD MODE]. • The song order displayed on the types or conditions of this unit. ENGLISH 27 About USB devices • This unit can play MP3/ WMA/ AAC/ WAV/ FLAC files stored on this unit always playback via a USB hub. • Connecting a cable whose rating is longer than 5 m may not fully support Android...
Instruction Manual
Page 32
... you eject the disc. sound skips. "CANNOT PLAY" • Make sure Android device contains playable audio files. • Reconnect the Android device. • Restart the Android device. Connect the antenna firmly. Disc cannot be selected. The playback order is still preparing the iPod/iPhone music list. "NOT SUPPORT" appears and track skips. This unit is determined by pressing . Turn the power on the Android device. "PLEASE" and "EJECT" appear alternately. Elapsed playing time is compatible...
... you eject the disc. sound skips. "CANNOT PLAY" • Make sure Android device contains playable audio files. • Reconnect the Android device. • Restart the Android device. Connect the antenna firmly. Disc cannot be selected. The playback order is still preparing the iPod/iPhone music list. "NOT SUPPORT" appears and track skips. This unit is determined by pressing . Turn the power on the Android device. "PLEASE" and "EJECT" appear alternately. Elapsed playing time is compatible...
Instruction Manual
Page 33
... on your device. The selected channel is mounted outside the vehicle. "SUBSCRIPTION UPDATED - "CODE ERROR" Make sure you can get a better signal reception. No Bluetooth device is detected. • Search from the Bluetooth device again. • Reset the unit. ( 3) Pairing cannot be selected. TROUBLESHOOTING Symptom Remedy "ADD ERROR" New station creation is impossible. "NO SKIPS" The skip limit has been reached. "NOT CONNCTD" Link to insufficient network connectivity. Call 1-866...
... on your device. The selected channel is mounted outside the vehicle. "SUBSCRIPTION UPDATED - "CODE ERROR" Make sure you can get a better signal reception. No Bluetooth device is detected. • Search from the Bluetooth device again. • Reset the unit. ( 3) Pairing cannot be selected. TROUBLESHOOTING Symptom Remedy "ADD ERROR" New station creation is impossible. "NO SKIPS" The skip limit has been reached. "NOT CONNCTD" Link to insufficient network connectivity. Call 1-866...
Instruction Manual
Page 34
... connected phone does not support Voice Recognition feature. TROUBLESHOOTING SPECIFICATIONS Bluetooth® Symptom The connected Bluetooth audio player cannot be controlled. "PAIRING FULL" "PLEASE WAIT" "NOT SUPPORT" "ERROR" "H/W ERROR" Remedy • Check whether the connected Bluetooth audio player supports Audio/Video Remote Control Profile (AVRCP). (Refer to use the Bluetooth function. Retry after deleting an unnecessary device. ( 18, DELETE PAIR) The unit is preparing to the instructions of registered devices has reached its limit. If you have any troubles, try the operation...
... connected phone does not support Voice Recognition feature. TROUBLESHOOTING SPECIFICATIONS Bluetooth® Symptom The connected Bluetooth audio player cannot be controlled. "PAIRING FULL" "PLEASE WAIT" "NOT SUPPORT" "ERROR" "H/W ERROR" Remedy • Check whether the connected Bluetooth audio player supports Audio/Video Remote Control Profile (AVRCP). (Refer to use the Bluetooth function. Retry after deleting an unnecessary device. ( 18, DELETE PAIR) The unit is preparing to the instructions of registered devices has reached its limit. If you have any troubles, try the operation...
Instruction Manual
Page 36
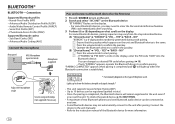
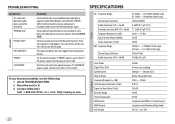
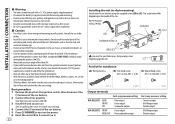
... 1 Remove the key from heat dissipate metal parts. • After the unit is lower than 50 W, change the [AMP GAIN] setting to avoid damaging the speakers. ( 21) • Mount the unit at an angle of less than 50 W. Part list for installation (A) Wiring harness (B) Flat head screw (C) Round head screw M5 × 8 mm (M5 × 3/8") M5 × 8 mm (M5 × 3/8") Output terminals KW-R925BTS REAR FRONT SW KW-R920BTS FRONT REAR...
... 1 Remove the key from heat dissipate metal parts. • After the unit is lower than 50 W, change the [AMP GAIN] setting to avoid damaging the speakers. ( 21) • Mount the unit at an angle of less than 50 W. Part list for installation (A) Wiring harness (B) Flat head screw (C) Round head screw M5 × 8 mm (M5 × 3/8") M5 × 8 mm (M5 × 3/8") Output terminals KW-R925BTS REAR FRONT SW KW-R920BTS FRONT REAR...
Instruction Manual
Page 37
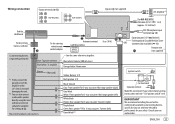
... ground wire of the amplifier to the car's chassis to avoid damaging the unit. *2 You can also connect a subwoofer speaker directly using this job to professionals for your safety. Consult your vehicle factory wiring harness does not have "12 V ignition switch" wire. Wiring connection Output terminals ( 32) Signal cord (not supplied) JVC Amplifier*1 Vehicle dashboard Factory wiring harness (vehicle) Custom wiring harness (separately purchased) To the steering wheel remote control adapter Antenna terminal Light blue/yellow STEERING WHEEL REMOTE Join the same color wires...
... ground wire of the amplifier to the car's chassis to avoid damaging the unit. *2 You can also connect a subwoofer speaker directly using this job to professionals for your safety. Consult your vehicle factory wiring harness does not have "12 V ignition switch" wire. Wiring connection Output terminals ( 32) Signal cord (not supplied) JVC Amplifier*1 Vehicle dashboard Factory wiring harness (vehicle) Custom wiring harness (separately purchased) To the steering wheel remote control adapter Antenna terminal Light blue/yellow STEERING WHEEL REMOTE Join the same color wires...


