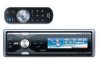

Instructions
Page 9
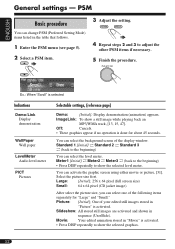
..." is shown on the display. ENGLISH Canceling the display demonstration If no operations are done for about 45 seconds, display demonstration starts. [Initial: Demo]-see page 32. 1 Enter the PSM menu (see page 5). 2 Set the hour, minute, and clock system. 1 Select "Clock Hr" (hour), then adjust the hour. 3 Finish ... adjust the minute. 3 Select "24H/12H," then select "24H" or "12H." If not, press 5 or ∞. To activate the display demonstration In step 2 above, select "Demo" or "ImageLink." For more details, see page 32. 3 Finish the procedure. 9
..." is shown on the display. ENGLISH Canceling the display demonstration If no operations are done for about 45 seconds, display demonstration starts. [Initial: Demo]-see page 32. 1 Enter the PSM menu (see page 5). 2 Set the hour, minute, and clock system. 1 Select "Clock Hr" (hour), then adjust the hour. 3 Finish ... adjust the minute. 3 Select "24H/12H," then select "24H" or "12H." If not, press 5 or ∞. To activate the display demonstration In step 2 above, select "Demo" or "ImageLink." For more details, see page 32. 3 Finish the procedure. 9
Instructions
Page 32
... Display demonstration WallPaper Wall paper LevelMeter Audio level meter PICT Pictures Selectable settings, [reference page] Demo: [Initial]; Large: [Initial]; 256 x 64 pixel (full screen size) Small: 64 x 64 pixel (CD jacket image) After select the picture size, you can change PSM (Preferred Setting Mode) items listed in sequence (UserSlide). One of the...
... Display demonstration WallPaper Wall paper LevelMeter Audio level meter PICT Pictures Selectable settings, [reference page] Demo: [Initial]; Large: [Initial]; 256 x 64 pixel (full screen size) Small: 64 x 64 pixel (CD jacket image) After select the picture size, you can change PSM (Preferred Setting Mode) items listed in sequence (UserSlide). One of the...


