Instructions
Page 2
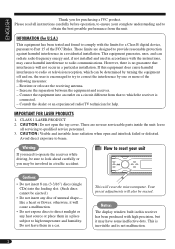
... all instructions carefully before operation, to ensure your unit Cautions: • Do not insert 8 cm (3-3/16") discs (single CDs) into an outlet on , the user is no user serviceable parts inside the unit; ENGLISH Thank you may be ejected.) • Do not insert any heat source or place them in a place subject to which can radiate radio frequency energy and, if not installed and used in...
... all instructions carefully before operation, to ensure your unit Cautions: • Do not insert 8 cm (3-3/16") discs (single CDs) into an outlet on , the user is no user serviceable parts inside the unit; ENGLISH Thank you may be ejected.) • Do not insert any heat source or place them in a place subject to which can radiate radio frequency energy and, if not installed and used in...
Instructions
Page 3
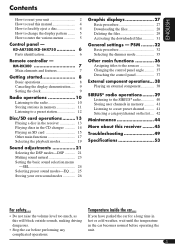
... operations 8 Canceling the display demonstration..... 9 Setting the clock 9 Radio operations 10 Listening to the radio 10 Storing stations in memory 11 Listening to a preset station 12 Disc/SD card operations ......... 13 Playing a disc in the receiver 13 Playing discs in the car becomes normal before performing any complicated operations. KD-AR7500/KD-SHX750 6 Parts identification 6 Remote controller - If you have parked the car for a long time in hot or cold weather, wait until the temperature in the CD changer 14 Playing...
... operations 8 Canceling the display demonstration..... 9 Setting the clock 9 Radio operations 10 Listening to the radio 10 Storing stations in memory 11 Listening to a preset station 12 Disc/SD card operations ......... 13 Playing a disc in the receiver 13 Playing discs in the car becomes normal before performing any complicated operations. KD-AR7500/KD-SHX750 6 Parts identification 6 Remote controller - If you have parked the car for a long time in hot or cold weather, wait until the temperature in the CD changer 14 Playing...
Instructions
Page 4
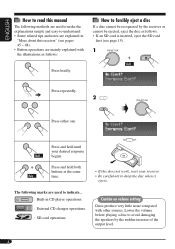
... are used to indicate... : Built-in "More about this receiver" (see pages 45 - 48). • Button operations are explained in CD player operations. : External CD changer operations. : SD card operations. Lower the volume before playing a disc to avoid damaging the speakers by the receiver or cannot be recognized by the sudden increase of the output level. 4 Press and hold both buttons at the same time. • If this does not work, reset...
... are used to indicate... : Built-in "More about this receiver" (see pages 45 - 48). • Button operations are explained in CD player operations. : External CD changer operations. : SD card operations. Lower the volume before playing a disc to avoid damaging the speakers by the receiver or cannot be recognized by the sudden increase of the output level. 4 Press and hold both buttons at the same time. • If this does not work, reset...
Instructions
Page 6
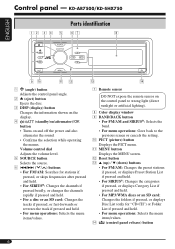
KD-AR7500/KD-SHX750 Parts identification ENGLISH DISP BACK BAND PICT SOURCE MENU 1 (angle) button Adjusts the control panel angle. 2 0 (eject) button Ejects the disc. 3 DISP (display) button Changes the information shown on the display. 4 (standby/on/attenuator)/OK button • Turns on the control panel to strong light (direct sunlight or artificial lighting). 8 Color display window 9 BAND/BACK button • For FM/AM and SIRIUS®: Selects the band. • For menu operations: Goes back to the previous screen or cancels the setting. q MENU button Displays the...
KD-AR7500/KD-SHX750 Parts identification ENGLISH DISP BACK BAND PICT SOURCE MENU 1 (angle) button Adjusts the control panel angle. 2 0 (eject) button Ejects the disc. 3 DISP (display) button Changes the information shown on the display. 4 (standby/on/attenuator)/OK button • Turns on the control panel to strong light (direct sunlight or artificial lighting). 8 Color display window 9 BAND/BACK button • For FM/AM and SIRIUS®: Selects the band. • For menu operations: Goes back to the previous screen or cancels the setting. q MENU button Displays the...
Instructions
Page 7
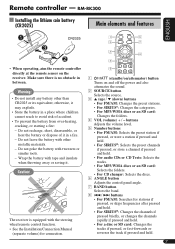
... for connection. 1 (standby/on/attenuator) button Turns on the receiver. RM-RK300 Installing the lithium coin battery (CR2025) Main elements and features ENGLISH • When operating, aim the remote controller directly at the remote sensor on and off the power and also attenuates the sound. 2 SOURCE button Selects the source. 3 5 (up) / ∞ (down) buttons • For FM/AM: Changes the preset stations. • For SIRIUS®: Changes the categories. • For MP3/WMA discs...
... for connection. 1 (standby/on/attenuator) button Turns on the receiver. RM-RK300 Installing the lithium coin battery (CR2025) Main elements and features ENGLISH • When operating, aim the remote controller directly at the remote sensor on and off the power and also attenuates the sound. 2 SOURCE button Selects the source. 3 5 (up) / ∞ (down) buttons • For FM/AM: Changes the preset stations. • For SIRIUS®: Changes the categories. • For MP3/WMA discs...

Instructions
Page 10
... Activate "Manual Search" Select station frequencies When an FM stereo broadcast is received, searching stops. ENGLISH Radio operations Listening to the radio SOURCE BACK BAND ~ SOURCE To tune in to receive 1 Enter the MODE menu (see the right column. On Off indicator lights up when receiving an FM stereo broadcast with sufficient signal strength. • For MONO, see page 5). 2 Select "Mono." 3 Select "On." on the left... Ÿ BACK BAND Current band Preset number...
... Activate "Manual Search" Select station frequencies When an FM stereo broadcast is received, searching stops. ENGLISH Radio operations Listening to the radio SOURCE BACK BAND ~ SOURCE To tune in to receive 1 Enter the MODE menu (see the right column. On Off indicator lights up when receiving an FM stereo broadcast with sufficient signal strength. • For MONO, see page 5). 2 Select "Mono." 3 Select "On." on the left... Ÿ BACK BAND Current band Preset number...
Instructions
Page 11
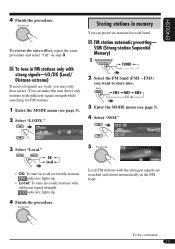
... 3. BACK BAND 3 Enter the MODE menu (see page 5). 2 Select "LO/DX." DX Local • DX: To tune in memory You can make this unit detect only stations with sufficient signal strength. To be continued.... 11 Storing stations in to all receivable stations. To tune in the FM band. FM station automatic presetting- SSM (Strong-station Sequential Memory) 1 SOURCE 2 Select the FM band (FM1 - indicator lights up . • Local: To...
... 3. BACK BAND 3 Enter the MODE menu (see page 5). 2 Select "LO/DX." DX Local • DX: To tune in memory You can make this unit detect only stations with sufficient signal strength. To be continued.... 11 Storing stations in to all receivable stations. To tune in the FM band. FM station automatic presetting- SSM (Strong-station Sequential Memory) 1 SOURCE 2 Select the FM band (FM1 - indicator lights up . • Local: To...
Instructions
Page 14
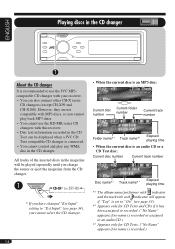
... to use the JVC MP3compatible CD changer with your receiver. • You can be played repeatedly until you change the source or eject the magazine from the CD changer. ~ SOURCE * If you have changed "Ext Input" setting to "Ext Input" (see page 34), you cannot play any WMA disc in the CD Text can also connect other CH-X series CD changers (except CH-X99 and CH-X100). ENGLISH Playing discs in the CD changer SOURCE About the CD changer...
... to use the JVC MP3compatible CD changer with your receiver. • You can be played repeatedly until you change the source or eject the magazine from the CD changer. ~ SOURCE * If you have changed "Ext Input" setting to "Ext Input" (see page 34), you cannot play any WMA disc in the CD Text can also connect other CH-X series CD changers (except CH-X99 and CH-X100). ENGLISH Playing discs in the CD changer SOURCE About the CD changer...
Instructions
Page 22
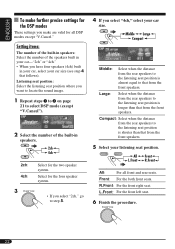
... settings you make are valid for all front and rear seats. L.Front: For the front left seat. 6 Finish the procedure. 22 on page 21 to select DSP mode (except "V.Cancel"). 2 Select the number of the speakers built in your car size (see step 4 that from the rear speakers to the listening seat position is shorter than that follows). Middle Large Compact Middle: Select...
... settings you make are valid for all front and rear seats. L.Front: For the front left seat. 6 Finish the procedure. 22 on page 21 to select DSP mode (except "V.Cancel"). 2 Select the number of the speakers built in your car size (see step 4 that from the rear speakers to the listening seat position is shorter than that follows). Middle Large Compact Middle: Select...
Instructions
Page 24
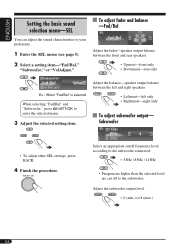
...-right only To adjust subwoofer output- Subwoofer • To adjust other SEL settings, press BACK. 4 Finish the procedure. Select an appropriate cutoff frequency level according to the subwoofer connected. • 55Hz / 85Hz / 115Hz • Frequencies higher than the selected level are cut off to your preference. 1 Enter the SEL menu (see page 5). 2 Select a setting item-"Fad/Bal," "Subwoofer," or "VolAdjust." Adjust the balance-speaker output balance between the front and rear speakers. • Upmost-front...
...-right only To adjust subwoofer output- Subwoofer • To adjust other SEL settings, press BACK. 4 Finish the procedure. Select an appropriate cutoff frequency level according to the subwoofer connected. • 55Hz / 85Hz / 115Hz • Frequencies higher than the selected level are cut off to your preference. 1 Enter the SEL menu (see page 5). 2 Select a setting item-"Fad/Bal," "Subwoofer," or "VolAdjust." Adjust the balance-speaker output balance between the front and rear speakers. • Upmost-front...
Instructions
Page 33
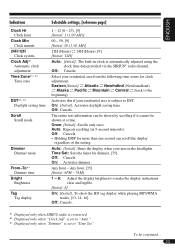
... time Scroll Scroll mode Dimmer Dimmer mode From-To*3 Dimmer time Bright Brightness Tag Tag display Selectable settings, [reference page] 1 - 12 (0 - 23), [9] [Initial: 1 (1:00 AM)] 00 - 59, [9] [Initial: 00 (1:00 AM)] 12H (Hours) O 24H (Hours), [9] [Initial: 12H] Auto: [Initial]; Off: Cancels. On: Activates dimmer. On: [Initial]; Auto: Repeats scrolling (in clock is automatically adjusted using the clock time data provided via the SIRIUS® radio channel. Select your residential area is set to make the display...
... time Scroll Scroll mode Dimmer Dimmer mode From-To*3 Dimmer time Bright Brightness Tag Tag display Selectable settings, [reference page] 1 - 12 (0 - 23), [9] [Initial: 1 (1:00 AM)] 00 - 59, [9] [Initial: 00 (1:00 AM)] 12H (Hours) O 24H (Hours), [9] [Initial: 12H] Auto: [Initial]; Off: Cancels. On: Activates dimmer. On: [Initial]; Auto: Repeats scrolling (in clock is automatically adjusted using the clock time data provided via the SIRIUS® radio channel. Select your residential area is set to make the display...
Instructions
Page 34
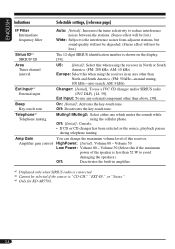
...: 50 kHz-manual tuning, 100 kHz-auto search; Ext Input: To use a JVC CD changer and/or SIRIUS radio (JVC DLP), [14, 39]. Muting1/Muting2: Select either one which mutes the sounds while using the receiver in amplifier. *1 Displayed only when SIRIUS radio is connected. *2 Cannot be selected if the source is shown on the display, [39]. Volume 00 - Volume 50 Low Power: Volume 00 - Volume 30 (Select this if the maximum power of this when using the cellular phone. ENGLISH Indications Selectable settings, [reference...
...: 50 kHz-manual tuning, 100 kHz-auto search; Ext Input: To use a JVC CD changer and/or SIRIUS radio (JVC DLP), [14, 39]. Muting1/Muting2: Select either one which mutes the sounds while using the receiver in amplifier. *1 Displayed only when SIRIUS radio is connected. *2 Cannot be selected if the source is shown on the display, [39]. Volume 00 - Volume 50 Low Power: Volume 00 - Volume 30 (Select this if the maximum power of this when using the cellular phone. ENGLISH Indications Selectable settings, [reference...
Instructions
Page 38
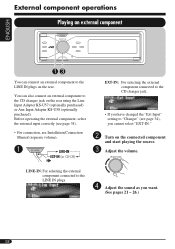
... selecting the external component connected to the LINE IN plugs. ⁄ Adjust the sound as you cannot select "EXT-IN." Ÿ Turn on the rear using the Line Input Adapter KS-U57 (optionally purchased) or Aux Input Adapter KS-U58 (optionally purchased). Adjust the volume. ENGLISH External component operations Playing an external component SOURCE You can also connect an external component to the CD changer jack on the connected component and start playing the source...
... selecting the external component connected to the LINE IN plugs. ⁄ Adjust the sound as you cannot select "EXT-IN." Ÿ Turn on the rear using the Line Input Adapter KS-U57 (optionally purchased) or Aux Input Adapter KS-U58 (optionally purchased). Adjust the volume. ENGLISH External component operations Playing an external component SOURCE You can also connect an external component to the CD changer jack on the connected component and start playing the source...
Instructions
Page 39
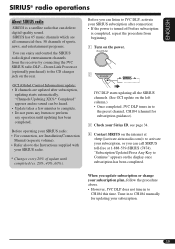
.... • However, JVC DLP does not tune in to the preset channel, CH184 (channel for subscription guidance). 3 Check your Sirius ID, see Installation/Connection Manual (separate volume). • Refer also to JVC DLP, activate your subscription, or you update subscription or change your subscription. 39 Before operating your SIRIUS radio: • For connection, see page 34. 4 Contact SIRIUS on the internet at to Continue" appears on the display once subscription...
.... • However, JVC DLP does not tune in to the preset channel, CH184 (channel for subscription guidance). 3 Check your Sirius ID, see Installation/Connection Manual (separate volume). • Refer also to JVC DLP, activate your subscription, or you update subscription or change your subscription. 39 Before operating your SIRIUS radio: • For connection, see page 34. 4 Contact SIRIUS on the internet at to Continue" appears on the display once subscription...
Instructions
Page 45
... one played back using other SD players. • This receiver may not be continued.... 45 When SSM is over, the station stored in the same preset number. Inserting a disc • When a disc is inserted upside down, the control panel moves down, and the disc automatically ejects from where playback has been stopped previously, next time you keep the control panel open for the playback source, set the "Ext Input" setting...
... one played back using other SD players. • This receiver may not be continued.... 45 When SSM is over, the station stored in the same preset number. Inserting a disc • When a disc is inserted upside down, the control panel moves down, and the disc automatically ejects from where playback has been stopped previously, next time you keep the control panel open for the playback source, set the "Ext Input" setting...
Instructions
Page 47
... is activated. - If the source is changed to source operation screen when you operate the receiver. • ImageLink will not be adjusted ("Fix" appears on the recording condition of the FM stations. Ejecting a disc • If the ejected disc is not removed within 15 seconds, the disc is selected, CCC, BBE, and preset sound modes (EQ) will not work in an MP3/WMA folder. - Sources recorded with the youngest file number is connected...
... is activated. - If the source is changed to source operation screen when you operate the receiver. • ImageLink will not be adjusted ("Fix" appears on the recording condition of the FM stations. Ejecting a disc • If the ejected disc is not removed within 15 seconds, the disc is selected, CCC, BBE, and preset sound modes (EQ) will not work in an MP3/WMA folder. - Sources recorded with the youngest file number is connected...
Instructions
Page 48
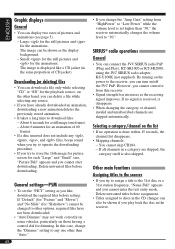
... Full" appears and you like a CD jacket (in the CD changer can delete a file while selecting any one frame). - ENGLISH Graphic displays General • You can connect the JVC SIRIUS radio PnP (Plug and Play), KT-SR1000 or KT-SR2000, using the JVC SIRIUS radio adapter, KS-U100K (not supplied). By turning on the power to any source. • If you change the "Dimmer" setting to the receiver, you cannot enter the text...
... Full" appears and you like a CD jacket (in the CD changer can delete a file while selecting any one frame). - ENGLISH Graphic displays General • You can connect the JVC SIRIUS radio PnP (Plug and Play), KT-SR1000 or KT-SR2000, using the JVC SIRIUS radio adapter, KS-U100K (not supplied). By turning on the power to any source. • If you change the "Dimmer" setting to the receiver, you cannot enter the text...
Instructions
Page 49
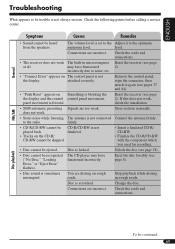
... control control panel movement. Change the disc. Check the cords and connections. • The receiver does not work . Disc is freezed. The CD player may have functioned incorrectly. Disc playback To be heard from the speakers. may have functioned 2). panel movement is locked. Reset the receiver (see page at all. Store stations manually. • Static noise while listening The antenna is not the display. finalized. • Tracks on rough roads. Connections are driving on The control panel...
... control control panel movement. Change the disc. Check the cords and connections. • The receiver does not work . Disc is freezed. The CD player may have functioned incorrectly. Disc playback To be heard from the speakers. may have functioned 2). panel movement is locked. Reset the receiver (see page at all. Store stations manually. • Static noise while listening The antenna is not the display. finalized. • Tracks on rough roads. Connections are driving on The control panel...

Instructions
Page 51
.... Disc is selected for "PICT" ("No Slide" is not connected Connect this receiver and the to finish. CD changer To be used. Download a still image. Insert disc into the magazine. Wait until the operating temperature resumes. DSP mode. • Download does not seem to It takes quite a long time to the CD changer correctly. CD changer. The CD player may function incorrectly due 2). Insert disc correctly. CD changer correctly and press the reset button of the CD changer...
.... Disc is selected for "PICT" ("No Slide" is not connected Connect this receiver and the to finish. CD changer To be used. Download a still image. Insert disc into the magazine. Wait until the operating temperature resumes. DSP mode. • Download does not seem to It takes quite a long time to the CD changer correctly. CD changer. The CD player may function incorrectly due 2). Insert disc correctly. CD changer correctly and press the reset button of the CD changer...
Instructions
Page 53
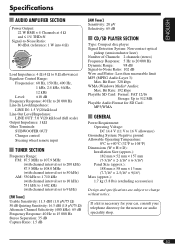
...: LINE IN: 1.5 V/20 kΩ load Line-Out Level/Impedance: LINE OUT: 5.0 V/20 kΩ load (full scale) Output Impedance: 1 kΩ Other Terminals: SUBWOOFER OUT Changer control Steering wheel remote input TUNER SECTION Frequency Range: FM: 87.5 MHz to 107.9 MHz (with channel interval set to 200 kHz) 87.5 MHz to 108.0 MHz (with channel interval set to 50 kHz) AM: 530 kHz to 1 710...
...: LINE IN: 1.5 V/20 kΩ load Line-Out Level/Impedance: LINE OUT: 5.0 V/20 kΩ load (full scale) Output Impedance: 1 kΩ Other Terminals: SUBWOOFER OUT Changer control Steering wheel remote input TUNER SECTION Frequency Range: FM: 87.5 MHz to 107.9 MHz (with channel interval set to 200 kHz) 87.5 MHz to 108.0 MHz (with channel interval set to 50 kHz) AM: 530 kHz to 1 710...


