
Instructions
Page 6
...and setting, see "Menu items." (☞ pages 52 to set up various settings from . For details of the touch pad controls and monitor are used for purpose of the selected item @ Enter the next screen. Sound Fader/Balance Volume Adjust Subwoofer Level High Pass Filter Crossover ...Through Current setting of explanation. You can use the menus to enter the setup screen. ⁄ Select an item. In this manual, English indications are turned on the monitor. (☞ page 53) 6 ENGLISH Basic operations- AV menu You can select the indication language on . Ÿ Enter .
...and setting, see "Menu items." (☞ pages 52 to set up various settings from . For details of the touch pad controls and monitor are used for purpose of the selected item @ Enter the next screen. Sound Fader/Balance Volume Adjust Subwoofer Level High Pass Filter Crossover ...Through Current setting of explanation. You can use the menus to enter the setup screen. ⁄ Select an item. In this manual, English indications are turned on the monitor. (☞ page 53) 6 ENGLISH Basic operations- AV menu You can select the indication language on . Ÿ Enter .
Instructions
Page 10
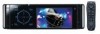
...: Displays the Original Program screen. 10 The unit is equipped with the steering wheel remote control function. • See the Installation/Connection Manual (separate volume) for operating the DVD/CD player. 1 • Turns on ). 2 "Disc," "USB," and "USB iPod": Reverse search 3 • Adjusts the volume level. • Adjusts the volume level through the...
...: Displays the Original Program screen. 10 The unit is equipped with the steering wheel remote control function. • See the Installation/Connection Manual (separate volume) for operating the DVD/CD player. 1 • Turns on ). 2 "Disc," "USB," and "USB iPod": Reverse search 3 • Adjusts the volume level. • Adjusts the volume level through the...

Instructions
Page 11
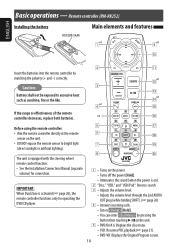
...Manual Search [Hold] "HD Radio": • 5 / ∞: Selects multicast channels. - e • "Disc," "USB," and "USB iPod": Starts and pauses • 4 / ¢: Searches for stations. - "Disc" and "Changer": • 5 / ∞: - DVD: Selects the title. • Ends the call. u • DVD...search [Hold] q "Disc," "USB," and "USB iPod": Forward search w Selects the source. Auto Search • "Bluetooth": Starts playback. - Manual Search [Hold] "Satellite Radio": • 5 / ∞: Selects categories. • Answers incoming calls. r Changes the aspect ratio of the ...
...Manual Search [Hold] "HD Radio": • 5 / ∞: Selects multicast channels. - e • "Disc," "USB," and "USB iPod": Starts and pauses • 4 / ¢: Searches for stations. - "Disc" and "Changer": • 5 / ∞: - DVD: Selects the title. • Ends the call. u • DVD...search [Hold] q "Disc," "USB," and "USB iPod": Forward search w Selects the source. Auto Search • "Bluetooth": Starts playback. - Manual Search [Hold] "Satellite Radio": • 5 / ∞: Selects categories. • Answers incoming calls. r Changes the aspect ratio of the ...

Instructions
Page 12
... indicator lights up when receiving an FM stereo broadcast with sufficient signal strength. MO ! Search for a station-Auto Search. • Manual Search: Hold either or until "Manual Search" appears on the monitor, then touch it repeatedly. • The ST indicator lights up . When an FM stereo broadcast is hard to the radio ENGLISH...
... indicator lights up when receiving an FM stereo broadcast with sufficient signal strength. MO ! Search for a station-Auto Search. • Manual Search: Hold either or until "Manual Search" appears on the monitor, then touch it repeatedly. • The ST indicator lights up . When an FM stereo broadcast is hard to the radio ENGLISH...

Instructions
Page 13
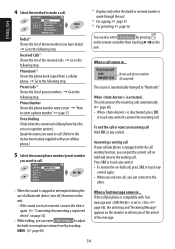
... Store 1 87.5 2 89.9 3 97.9 4 105.9 5 108.0 6 87.5 The station selected in step 2 is connected (☞ page 46), you can change the bands. 4 Select a preset number. Manual presetting Ex.: Storing the FM station of 92.5 MHz into preset number 4 of the FM1 band. 1 2 Tune in preset number 4. Selecting preset stations On the...
... Store 1 87.5 2 89.9 3 97.9 4 105.9 5 108.0 6 87.5 The station selected in step 2 is connected (☞ page 46), you can change the bands. 4 Select a preset number. Manual presetting Ex.: Storing the FM station of 92.5 MHz into preset number 4 of the FM1 band. 1 2 Tune in preset number 4. Selecting preset stations On the...
Instructions
Page 34
... 35 Voice Dialling (Only when the connected cellular phone has the voice recognition system): Speak the name you want to call. (Refer to the instruction manual supplied with Text message and is made through the unit. *2 For copying, ☞ page 35. *3 For presetting, ☞ page 36. Answering a ...Receiving Message" appears on the unit. - When is stopped or interrupted during the use of a Bluetooth device, turn off, then turn on the monitor to inform you of the arrival of phone numbers you can enter to adjust the built-in microphone volume level by pressing on the remote...
... 35 Voice Dialling (Only when the connected cellular phone has the voice recognition system): Speak the name you want to call. (Refer to the instruction manual supplied with Text message and is made through the unit. *2 For copying, ☞ page 35. *3 For presetting, ☞ page 36. Answering a ...Receiving Message" appears on the unit. - When is stopped or interrupted during the use of a Bluetooth device, turn off, then turn on the monitor to inform you of the arrival of phone numbers you can enter to adjust the built-in microphone volume level by pressing on the remote...
Instructions
Page 36
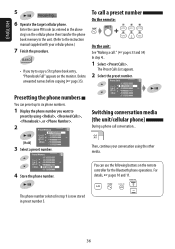
...remote: On the unit: See "Making a call conversation... Presetting the phone numbers You can use the following buttons on the monitor. The phone number selected in step 1 is now stored in the above step) on the cellular phone then transfer the ... the unit. (Refer to preset by using the other media. Then, continue your cellular phone.) 7 Finish the procedure. • If you want to the instruction manual supplied with your conversation using , , , or . 2 Preset Memory [Hold] Store 1 11122223333 2 22233336666 3 44455556666 4 99988887777 5 55566668888 6 11133334444 3 Select ...
...remote: On the unit: See "Making a call conversation... Presetting the phone numbers You can use the following buttons on the monitor. The phone number selected in step 1 is now stored in the above step) on the cellular phone then transfer the ... the unit. (Refer to preset by using the other media. Then, continue your cellular phone.) 7 Finish the procedure. • If you want to the instruction manual supplied with your conversation using , , , or . 2 Preset Memory [Hold] Store 1 11122223333 2 22233336666 3 44455556666 4 99988887777 5 55566668888 6 11133334444 3 Select ...

Instructions
Page 53
... Aspect*3 Selectable settings, [reference page] Off: Cancels. Contrast: Adjust the contrast. You can adjust the following to make the monitor clear and legible for assigning the titles also change the indication language setting, turn on the headlights.*1 Time Set: Touch ¢ ... -15 to the language selected, ☞ [66] *1 The ILLUMINATION CONTROL lead connection is required. (☞ "Installation/Connection Manual") *2 Adjustable only when the source is fixed at . Auto: Dims the monitor when you change according to +15; Aspect ratio of the picture-lighter or darker.
... Aspect*3 Selectable settings, [reference page] Off: Cancels. Contrast: Adjust the contrast. You can adjust the following to make the monitor clear and legible for assigning the titles also change the indication language setting, turn on the headlights.*1 Time Set: Touch ¢ ... -15 to the language selected, ☞ [66] *1 The ILLUMINATION CONTROL lead connection is required. (☞ "Installation/Connection Manual") *2 Adjustable only when the source is fixed at . Auto: Dims the monitor when you change according to +15; Aspect ratio of the picture-lighter or darker.

Instructions
Page 57
...have made in "Full" aspect ratio (regardless of the component detected through the camera appears on the unit. ☞ [5] Touch pad controls Monitor Normal: Always lights. touches the controls. moves close to the controls. The rear view through the CD changer jack is shown. *7 The ...TEL MUTING lead connection is required ☞ "Installation/Connection Manual." Proxi/Motion-LCD: Light up when your hand moves close to the controls. Touch Pad: Lights up when your finger Always lights. Proximity/Motion: ...
...have made in "Full" aspect ratio (regardless of the component detected through the camera appears on the unit. ☞ [5] Touch pad controls Monitor Normal: Always lights. touches the controls. moves close to the controls. The rear view through the CD changer jack is shown. *7 The ...TEL MUTING lead connection is required ☞ "Installation/Connection Manual." Proxi/Motion-LCD: Light up when your hand moves close to the controls. Touch Pad: Lights up when your finger Always lights. Proximity/Motion: ...

Instructions
Page 60
...is established automatically with the registered device, ☞ [32] Only for the device being connected. Yes: Initializes the settings. The following JVC web site: When operating the Bluetooth device, refer also to 30 or 50*1, Initial 15 Initialize all incoming calls. Settings Add Phonebook Copy ... made in . You can register up to 50 phone numbers, ☞ [35] MIC Setting Adjust the built-in the unit. Answer the calls manually. Delete the registered devices, ☞ [33] Enter the PIN code to establish the connection, ☞ [32] Once the connection is established, ...
...is established automatically with the registered device, ☞ [32] Only for the device being connected. Yes: Initializes the settings. The following JVC web site: When operating the Bluetooth device, refer also to 30 or 50*1, Initial 15 Initialize all incoming calls. Settings Add Phonebook Copy ... made in . You can register up to 50 phone numbers, ☞ [35] MIC Setting Adjust the built-in the unit. Answer the calls manually. Delete the registered devices, ☞ [33] Enter the PIN code to establish the connection, ☞ [32] Once the connection is established, ...

Instructions
Page 62
ENGLISH More about DVD-VR format and play list, refer to the instructions supplied with the extension code , , (regardless of 999 files per folder). • Use only "finalized" discs. &#... the unit, you change the source, playback also stops without ejecting the disc. Playing DVD-VR • For details about this manual, words "track" and "file" are preset in the same disc. • This unit can also turn on the monitor. Changing the source • If you can display only one-byte characters.
ENGLISH More about DVD-VR format and play list, refer to the instructions supplied with the extension code , , (regardless of 999 files per folder). • Use only "finalized" discs. &#... the unit, you change the source, playback also stops without ejecting the disc. Playing DVD-VR • For details about this manual, words "track" and "file" are preset in the same disc. • This unit can also turn on the monitor. Changing the source • If you can display only one-byte characters.

Instructions
Page 69
...used for recording. • Insert the disc correctly again. • Region code of the DVD is not correct. (☞ page 4) • The format of files is not supported by...will solve this error. • Change the disc. • Record the tracks using other players. File playback 69 REFERENCES Skip to the file names. Parking brake lead is not a ... back is not connected properly. (☞ "Installation/Connection Manual") • Connect the video cord correctly. • Select the correct input on the external monitor. The track is unplayable. Eject the disc forcibly. (☞...
...used for recording. • Insert the disc correctly again. • Region code of the DVD is not correct. (☞ page 4) • The format of files is not supported by...will solve this error. • Change the disc. • Record the tracks using other players. File playback 69 REFERENCES Skip to the file names. Parking brake lead is not a ... back is not connected properly. (☞ "Installation/Connection Manual") • Connect the video cord correctly. • Select the correct input on the external monitor. The track is unplayable. Eject the disc forcibly. (☞...
Instructions
Page 71
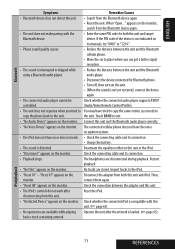
.... the unit. Deactivate the equalizer either on this unit and the Bluetooth audio player correctly. • "No Voice Device" appears on the monitor. Restart playback. • "No Files" appears on the monitor. disconnecting from the Bluetooth device again. • Reset the unit. The connected.... • "Reset 01" - Check the connecting cable and its manuals, try "0000" or "1234." • Phone sound quality is loaded. (☞ page 65) back a track containing artwork. appears on the monitor, search from both the unit and target Bluetooth device. Connect this unit...
.... the unit. Deactivate the equalizer either on this unit and the Bluetooth audio player correctly. • "No Voice Device" appears on the monitor. Restart playback. • "No Files" appears on the monitor. disconnecting from the Bluetooth device again. • Reset the unit. The connected.... • "Reset 01" - Check the connecting cable and its manuals, try "0000" or "1234." • Phone sound quality is loaded. (☞ page 65) back a track containing artwork. appears on the monitor, search from both the unit and target Bluetooth device. Connect this unit...
