
User Guide
Page 2
... a VHS Tape by Connecting to a VCR ........ 107 Using a USB External Hard Disk Drive 108 Preparing a USB External Hard Disk Drive 109 Copying All Files 109 Playing Back Files in the USB External Hard Disk Drive .. 110 Deleting Folders in the USB External Hard Disk Drive ..... 111 Formatting the USB External Hard Disk Drive 111 Copying Files to an SD Card (GZ-EX355 112 Moving Files to an SD Card (GZ-EX355 113 Copying to Windows PC (GZ-EX355/GZ-EX310 114 Verifying System Requirements (Guideline 114 Installing the Provided Software 115 Backing Up Files 116 Recording Videos to Discs 117...
... a VHS Tape by Connecting to a VCR ........ 107 Using a USB External Hard Disk Drive 108 Preparing a USB External Hard Disk Drive 109 Copying All Files 109 Playing Back Files in the USB External Hard Disk Drive .. 110 Deleting Folders in the USB External Hard Disk Drive ..... 111 Formatting the USB External Hard Disk Drive 111 Copying Files to an SD Card (GZ-EX355 112 Moving Files to an SD Card (GZ-EX355 113 Copying to Windows PC (GZ-EX355/GZ-EX310 114 Verifying System Requirements (Guideline 114 Installing the Provided Software 115 Backing Up Files 116 Recording Videos to Discs 117...
User Guide
Page 12
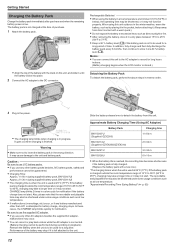
..., the CHARGE lamp blinks quickly for notification if the battery charge does not start . Approximate Battery Charging Time (Using AC Adapter) Battery Pack Charging time BN-VG107U (Supplied: GZ-E300) 1 h 50 m BN-VG114U (Supplied: GZ-EX355/GZ-EX310) 2 h 30 m BN-VG121U 3 h 30 m BN-VG138U 6 h 10 m 0 When the battery life is reached, the recording time becomes shorter even if the battery pack is fully charged. (Replace the battery pack with a new one.) *The charging time is...
..., the CHARGE lamp blinks quickly for notification if the battery charge does not start . Approximate Battery Charging Time (Using AC Adapter) Battery Pack Charging time BN-VG107U (Supplied: GZ-E300) 1 h 50 m BN-VG114U (Supplied: GZ-EX355/GZ-EX310) 2 h 30 m BN-VG121U 3 h 30 m BN-VG138U 6 h 10 m 0 When the battery life is reached, the recording time becomes shorter even if the battery pack is fully charged. (Replace the battery pack with a new one.) *The charging time is...

User Guide
Page 14
....microsoft.com/downloads/en/details.aspx? . .. . SDXC Card Memo : 0 Using SD cards (including SDHC/SDXC cards) other than those specified above may not work due to specification changes, etc. 0 To record videos with all SD cards. Mac OS X 10.6 Snow Leopard Update the OS version to 2 GB SD cards. 0 Use a Class 4 or higher compatible SD card (2 GB) for video recording. 14 Operations are guaranteed to 32 GB) for video recording. When your...
....microsoft.com/downloads/en/details.aspx? . .. . SDXC Card Memo : 0 Using SD cards (including SDHC/SDXC cards) other than those specified above may not work due to specification changes, etc. 0 To record videos with all SD cards. Mac OS X 10.6 Snow Leopard Update the OS version to 2 GB SD cards. 0 Use a Class 4 or higher compatible SD card (2 GB) for video recording. 14 Operations are guaranteed to 32 GB) for video recording. When your...
User Guide
Page 18
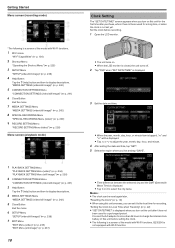
... than 24 hours to display descriptions. 4 MEDIA SETTINGS Menu "MEDIA SETTINGS (video/still image)" (A p. 242) 5 Close Button Exit the menu. 6 SETUP Menu "SETUP (video/still image)" (A p. 238) 7 EDIT Menu "EDIT Menu (video)" (A p. 235) "EDIT Menu (still image)" (A p. 237) 18 Clock Setting The "SET DATE/TIME!" Connect the AC adapter for recording. Set the clock before setting the clock. 0 The following is a screen of the model with Wi-Fi function. . .. . . . Getting Started Menu screen (recording mode) *The following is a screen of the model with Wi-Fi functions. GZ-E300 is...
... than 24 hours to display descriptions. 4 MEDIA SETTINGS Menu "MEDIA SETTINGS (video/still image)" (A p. 242) 5 Close Button Exit the menu. 6 SETUP Menu "SETUP (video/still image)" (A p. 238) 7 EDIT Menu "EDIT Menu (video)" (A p. 235) "EDIT Menu (still image)" (A p. 237) 18 Clock Setting The "SET DATE/TIME!" Connect the AC adapter for recording. Set the clock before setting the clock. 0 The following is a screen of the model with Wi-Fi function. . .. . . . Getting Started Menu screen (recording mode) *The following is a screen of the model with Wi-Fi functions. GZ-E300 is...
User Guide
Page 23
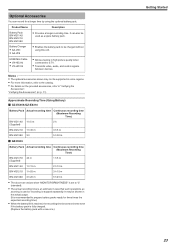
... zooming is used or recording is fully charged. (Replace the battery pack with a new one.) Getting Started 23 It can record for three times the expected recording time.) 0 When the battery life is reached, the recording time becomes shorter even if the battery pack is stopped repeatedly. It may not be charged without using the optional battery pack. HDMI Mini Cable 0 VX-HD310 0 VX-HD315 0 Allows viewing in high picture quality when connected...
... zooming is used or recording is fully charged. (Replace the battery pack with a new one.) Getting Started 23 It can record for three times the expected recording time.) 0 When the battery life is reached, the recording time becomes shorter even if the battery pack is stopped repeatedly. It may not be charged without using the optional battery pack. HDMI Mini Cable 0 VX-HD310 0 VX-HD315 0 Allows viewing in high picture quality when connected...
User Guide
Page 26
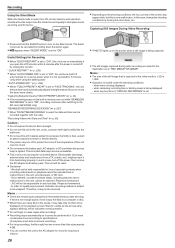
... (copy) the data to a computer or disc. 0 When there are saved to the destination set to "ON", recording continues after switching to the SD card. (GZ-EX355 only) "SEAMLESS RECORDING (GZ-EX355)" (A p. 227) 0 When "DATE/TIME RECORDING" is used , the LCD monitor darkens and operation sounds will not be forewarned. - In this unit turns on the playback screen. Please be responsible for any functions in this unit, provided parts, or SD card. - Useful Settings for Recording 0 When "QUICK...
... (copy) the data to a computer or disc. 0 When there are saved to the destination set to "ON", recording continues after switching to the SD card. (GZ-EX355 only) "SEAMLESS RECORDING (GZ-EX355)" (A p. 227) 0 When "DATE/TIME RECORDING" is used , the LCD monitor darkens and operation sounds will not be forewarned. - In this unit turns on the playback screen. Please be responsible for any functions in this unit, provided parts, or SD card. - Useful Settings for Recording 0 When "QUICK...
User Guide
Page 29
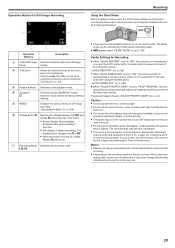
... using the battery pack) " AUTO POWER OFF " (A p. 239) 0 When "TOUCH PRIORITY AE/AF" is set . E MENU Displays the various menus of the screen may turn on the shooting conditions, the four corners of still image recording. The display button changes from functioning properly. In this unit turns itself off the power, then remove the AC adapter and battery pack. "Operating the Menu" (A p. 224) F Display Button n Switches the display between video and still image Mode modes. P/H 0 Press and hold the SILENT button to turn...
... using the battery pack) " AUTO POWER OFF " (A p. 239) 0 When "TOUCH PRIORITY AE/AF" is set . E MENU Displays the various menus of the screen may turn on the shooting conditions, the four corners of still image recording. The display button changes from functioning properly. In this unit turns itself off the power, then remove the AC adapter and battery pack. "Operating the Menu" (A p. 224) F Display Button n Switches the display between video and still image Mode modes. P/H 0 Press and hold the SILENT button to turn...
User Guide
Page 55
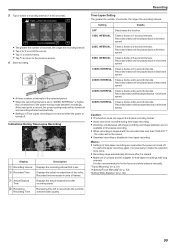
... after recording starts. Displays the actual elapsed time after it is started. 0 Make use of time-lapse recording are reset when the power is turned off . Caution : 0 This function does not support the iFrame recording format. 0 Audio cannot be turned off and recording will be recorded during time-lapse recording. 0 Zooming, simultaneous still image recording, and image stabilizer are not saved when the power is turned off . Memo : 0 Settings of a tripod and AC adapter for time-lapse recordings with the recorded time...
... after recording starts. Displays the actual elapsed time after it is started. 0 Make use of time-lapse recording are reset when the power is turned off . Caution : 0 This function does not support the iFrame recording format. 0 Audio cannot be turned off and recording will be recorded during time-lapse recording. 0 Zooming, simultaneous still image recording, and image stabilizer are not saved when the power is turned off . Memo : 0 Settings of a tripod and AC adapter for time-lapse recordings with the recorded time...
User Guide
Page 65
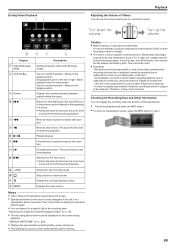
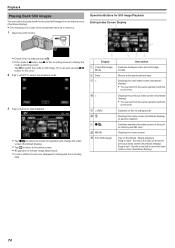
During Video Playback Playback Adjusting the Volume of Videos You can use the zoom/volume lever to control the volume. .. . Display A Video/Still Image Mode B Timeline Bar C Pointer Dh Ej El F d/e Gi Gk Hg I
During Video Playback Playback Adjusting the Volume of Videos You can use the zoom/volume lever to control the volume. .. . Display A Video/Still Image Mode B Timeline Bar C Pointer Dh Ej El F d/e Gi Gk Hg I
User Guide
Page 74
Tap B to switch the mode to display the mode switching screen. Operation Buttons for Still Image Playback During Index Screen Display . . .. 0 Check if the recording mode is B. 0 If the mode is A video, tap A on the recording screen to still image. (You can select and play back the recorded still images from an index screen (thumbnail display). 0 The following is a screen of the model with the built-in memory. 1 Open the LCD monitor. Playback Playing Back Still Images You can also use the A/B button on this unit.) 2 Tap "
Tap B to switch the mode to display the mode switching screen. Operation Buttons for Still Image Playback During Index Screen Display . . .. 0 Check if the recording mode is B. 0 If the mode is A video, tap A on the recording screen to still image. (You can select and play back the recorded still images from an index screen (thumbnail display). 0 The following is a screen of the model with the built-in memory. 1 Open the LCD monitor. Playback Playing Back Still Images You can also use the A/B button on this unit.) 2 Tap "
User Guide
Page 77
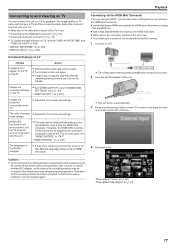
... battery becomes exhausted during operation. " DISPLAY DATE/TIME " (A p. 234) " DISPLAY ON TV " (A p. 241) Unnatural Displays on TV Trouble Images do not work properly, and the TV does not work in conjunction with the type of TV and the connecting cable. Images are using the provided one. 0 Use a High Speed HDMI mini cable as the HDMI mini cable. 0 Refer also to the instruction manual of the TV in memory. 1 Connect to a TV. 0 Turn off the power) while accessing files. Connecting to and Viewing...
... battery becomes exhausted during operation. " DISPLAY DATE/TIME " (A p. 234) " DISPLAY ON TV " (A p. 241) Unnatural Displays on TV Trouble Images do not work properly, and the TV does not work in conjunction with the type of TV and the connecting cable. Images are using the provided one. 0 Use a High Speed HDMI mini cable as the HDMI mini cable. 0 Refer also to the instruction manual of the TV in memory. 1 Connect to a TV. 0 Turn off the power) while accessing files. Connecting to and Viewing...
User Guide
Page 107
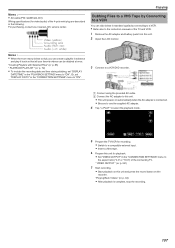
... "PLAYBACK SETTING" menu to a VCR/DVD recorder. Copying Dubbing Files to a VHS Tape by Connecting to this unit. 2 Open the LCD monitor. "Creating Playlists with Selected Files" (A p. 85) " PLAYBACK PLAYLIST " (A p. 72) 0 To include the recording date and time during dubbing, set "DISPLAY ON TV" in the following. B Connect the AC adapter to a VCR You can be dubbed at once. Or, set "DISPLAY DATE/TIME" in standard quality by connecting to a VCR. 0 Refer also to the instruction manuals of the 4-pole mini plug...
... "PLAYBACK SETTING" menu to a VCR/DVD recorder. Copying Dubbing Files to a VHS Tape by Connecting to this unit. 2 Open the LCD monitor. "Creating Playlists with Selected Files" (A p. 85) " PLAYBACK PLAYLIST " (A p. 72) 0 To include the recording date and time during dubbing, set "DISPLAY ON TV" in the following. B Connect the AC adapter to a VCR You can be dubbed at once. Or, set "DISPLAY DATE/TIME" in standard quality by connecting to a VCR. 0 Refer also to the instruction manuals of the 4-pole mini plug...
User Guide
Page 108
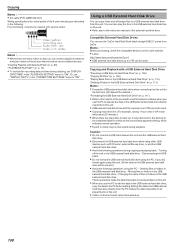
... played back on the LaCie website. 0 LaCie http://www.lacie.com/home.htm?cc=1 0 USB external hard disk drives up to 2 TB can be deleted.) "Formatting the USB External Hard Disk Drive" (A p. 111) 0 Refer to the help file of the provided LoiLoFit for video/audio) of the 4-pole mini plug are described in the USB external hard disk drive will be used . 0 Copying may take time for a while as DVD writer, external Blu-ray drive, or another USB external hard disk drive. 0 Avoid the following operations using...
... played back on the LaCie website. 0 LaCie http://www.lacie.com/home.htm?cc=1 0 USB external hard disk drives up to 2 TB can be deleted.) "Formatting the USB External Hard Disk Drive" (A p. 111) 0 Refer to the help file of the provided LoiLoFit for video/audio) of the 4-pole mini plug are described in the USB external hard disk drive will be used . 0 Copying may take time for a while as DVD writer, external Blu-ray drive, or another USB external hard disk drive. 0 Avoid the following operations using...
User Guide
Page 131
... set. Using Wi-Fi (GZ-EX355/GZ-EX310) Operating Environment To check the image on the camera from a computer or smartphone, and to transfer videos/still images, it is not designed for disaster or crime prevention. 0 To prevent the situation of forgetting to turn off the power, this unit will work with all models.) B Able to connect to the internet or "App Store™" (required for software installation...
... set. Using Wi-Fi (GZ-EX355/GZ-EX310) Operating Environment To check the image on the camera from a computer or smartphone, and to transfer videos/still images, it is not designed for disaster or crime prevention. 0 To prevent the situation of forgetting to turn off the power, this unit will work with all models.) B Able to connect to the internet or "App Store™" (required for software installation...
User Guide
Page 193
... and password on the camera. *Only the JVC dynamic DNS service can be set to "ON".) Set "UPnP" to obtain a global IP address. Unable to locate an environment with UPnP, turn off and on the camera's screen. Check the instruction manual of the router in use , and turn off automatically after powering off and on the power of the camera. In such case, change the place and time to access...
... and password on the camera. *Only the JVC dynamic DNS service can be set to "ON".) Set "UPnP" to obtain a global IP address. Unable to locate an environment with UPnP, turn off and on the camera's screen. Check the instruction manual of the router in use , and turn off automatically after powering off and on the power of the camera. In such case, change the place and time to access...
User Guide
Page 220
... this camera) 5 Tap "SET FROM QR CODE". 0 Step 2- Registering the access points (wireless LAN router) to 8 addresses can be registered) Display the screen for the TV monitor. 0 MAC address filter: set to "ON" if monitoring images with a specific TV device. 0 Add the MAC address: register the physical address when monitoring images with a specific TV device. (Up to this unit o Wi-Fi Protected Setup (WPS) Registration 1 Tap "MENU". (Operation...
... this camera) 5 Tap "SET FROM QR CODE". 0 Step 2- Registering the access points (wireless LAN router) to 8 addresses can be registered) Display the screen for the TV monitor. 0 MAC address filter: set to "ON" if monitoring images with a specific TV device. 0 Add the MAC address: register the physical address when monitoring images with a specific TV device. (Up to this unit o Wi-Fi Protected Setup (WPS) Registration 1 Tap "MENU". (Operation...
User Guide
Page 228
... mode.) Enables recording with 1 - 40x optical zoom. Memo : 0 When digital zoom is used, the image becomes grainy as the zoom operation. MIC LEVEL Make the adjustments such that are suitable for editing in active mode, or when the camera is set to the iFrame mode.) Enables recording with 1 - 40x optical zoom and 41 - 120x digital zoom, when the camera is set to off . Settings Menu VIDEO QUALITY Sets the video quality. ZOOM Sets the maximum zoom ratio. ZOOM MIC Sets the zoom microphone. Setting (if the video recording format...
... mode.) Enables recording with 1 - 40x optical zoom. Memo : 0 When digital zoom is used, the image becomes grainy as the zoom operation. MIC LEVEL Make the adjustments such that are suitable for editing in active mode, or when the camera is set to the iFrame mode.) Enables recording with 1 - 40x optical zoom and 41 - 120x digital zoom, when the camera is set to off . Settings Menu VIDEO QUALITY Sets the video quality. ZOOM Sets the maximum zoom ratio. ZOOM MIC Sets the zoom microphone. Setting (if the video recording format...
User Guide
Page 252
... on the TV. "Connecting via the HDMI Mini Connector" (A p. 77) Turn off the Silent mode. Set "VIDEO OUTPUT" in the wrong direction. Set "REC MEDIA FOR VIDEO"/"REC MEDIA FOR IMAGE" to "16:9". " OPERATION SOUND " (A p. 239) Audio sound is necessary to play back. (GZ-E300) "Verifying System Requirements (Guideline)" (A p. 121) Cannot find a recorded file. Execute "FORMAT SD CARD" in HIGH SPEED RECORDING/ TIME-LAPSE RECORDING. " VIDEO OUTPUT " (A p. 241) Adjust the TV's screen accordingly. Sometimes playback is interrupted at Intervals (TIME-LAPSE RECORDING)" (A p. 54) The...
... on the TV. "Connecting via the HDMI Mini Connector" (A p. 77) Turn off the Silent mode. Set "VIDEO OUTPUT" in the wrong direction. Set "REC MEDIA FOR VIDEO"/"REC MEDIA FOR IMAGE" to "16:9". " OPERATION SOUND " (A p. 239) Audio sound is necessary to play back. (GZ-E300) "Verifying System Requirements (Guideline)" (A p. 121) Cannot find a recorded file. Execute "FORMAT SD CARD" in HIGH SPEED RECORDING/ TIME-LAPSE RECORDING. " VIDEO OUTPUT " (A p. 241) Adjust the TV's screen accordingly. Sometimes playback is interrupted at Intervals (TIME-LAPSE RECORDING)" (A p. 54) The...
User Guide
Page 255
... function properly and error messages appear. Images and sounds may become warm when used , the image becomes grainy as it takes time for more than 2 seconds. "Connecting via the HDMI mini cable, proper images and sounds are many recorded files on this unit, cannot be guaranteed to "OFF". In such cases, set "HDMI CONTROL" to operate in this unit, provided parts, or SD card. - Operations are blinking After closing the LCD monitor, remove power source (battery...
... function properly and error messages appear. Images and sounds may become warm when used , the image becomes grainy as it takes time for more than 2 seconds. "Connecting via the HDMI mini cable, proper images and sounds are many recorded files on this unit, cannot be guaranteed to "OFF". In such cases, set "HDMI CONTROL" to operate in this unit, provided parts, or SD card. - Operations are blinking After closing the LCD monitor, remove power source (battery...
User Guide
Page 256
... problem, back up your files.) B Select "FILE + MANAGEMENT NO" in "FORMAT BUILT-IN MEM." VIDEO MANAGEMENT FILE IS DAMAGED, RECOVERY IS REQUIRED TO RECORD/PLAYBACK, RECOVER? Replace the SD card with other device. (Back up your nearest JVC dealer.) "Clock Setting" (A p. 18) COMMUNICATION ERROR Reconnect the USB cable. ERROR IN BUILT-IN MEMORY! (GZ-EX355) Turn off . Seamless videos cannot be combined if there is removed and inserted during video recording, still images cannot be saved. "FORMAT...
... problem, back up your files.) B Select "FILE + MANAGEMENT NO" in "FORMAT BUILT-IN MEM." VIDEO MANAGEMENT FILE IS DAMAGED, RECOVERY IS REQUIRED TO RECORD/PLAYBACK, RECOVER? Replace the SD card with other device. (Back up your nearest JVC dealer.) "Clock Setting" (A p. 18) COMMUNICATION ERROR Reconnect the USB cable. ERROR IN BUILT-IN MEMORY! (GZ-EX355) Turn off . Seamless videos cannot be combined if there is removed and inserted during video recording, still images cannot be saved. "FORMAT...


