
Instructions
Page 6
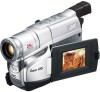
... Bright Level Indicator pg. 15 V Focus Indicator pg. 10 0 Exposure Control Level Counter pg. 13 1 White Balance Mode Indicator pg. 14 2 S-VHS/S-VHS ET Recording Indicator..... ੬ pg. 15 3 Record-Standby Mode Indicator pg. 9 4 : Cassette Indicator pg. 9 5 TBC Indicator pg. 11 6 Recording Format...14 : Recording Mode Indicator pg. 14 ; Video Light Indicator pg. 13 < Backlight Compensation Indicator pg. 10 = Recording Format Indicator (S/ S-ET pg. 15 > Tape Length Indicator pg. 14 ? Grip Strap pg. 8 . REC pg. 10 3 Power Zoom Lever [T/W pg. 10 4 • Manual Focus Button [ FOCUS].... ...
... Bright Level Indicator pg. 15 V Focus Indicator pg. 10 0 Exposure Control Level Counter pg. 13 1 White Balance Mode Indicator pg. 14 2 S-VHS/S-VHS ET Recording Indicator..... ੬ pg. 15 3 Record-Standby Mode Indicator pg. 9 4 : Cassette Indicator pg. 9 5 TBC Indicator pg. 11 6 Recording Format...14 : Recording Mode Indicator pg. 14 ; Video Light Indicator pg. 13 < Backlight Compensation Indicator pg. 10 = Recording Format Indicator (S/ S-ET pg. 15 > Tape Length Indicator pg. 14 ? Grip Strap pg. 8 . REC pg. 10 3 Power Zoom Lever [T/W pg. 10 4 • Manual Focus Button [ FOCUS].... ...
Instructions
Page 9
...tripod with the camera (do not use a small tripod. The camcorder is possible by falling over, do not tilt it locks in record mode or detached from power source. + Erase protection tab RECORDING Set REC MODE, S-VHS (S-VHS ET), TAPE LENGTH and DATE/TIME. (੬ pg. 12 - 16,... "MENU SETTINGS") 1) Remove the lens cap. Then tighten the screw. . The camcorder re-enters Record-Standby mode. For VIDEO RECORDING/VIDEO PLAYBACK • ...
...tripod with the camera (do not use a small tripod. The camcorder is possible by falling over, do not tilt it locks in record mode or detached from power source. + Erase protection tab RECORDING Set REC MODE, S-VHS (S-VHS ET), TAPE LENGTH and DATE/TIME. (੬ pg. 12 - 16,... "MENU SETTINGS") 1) Remove the lens cap. Then tighten the screw. . The camcorder re-enters Record-Standby mode. For VIDEO RECORDING/VIDEO PLAYBACK • ...

Instructions
Page 10
... When noise bars appear during Retake. Rec. To deactivate Digital Zoom, set "D.ZOOM" (੬pg. 14) to "OFF" in Record- Tape is rewound for the next shot. • Distortion may occur at an angle of playback. Zooming To produce the zoom in Record-Standby mode ...the MENU Wheel 1 downward. "3" appears and blinks. 4) To cancel the Manual Focus, press FOCUS 4. Recording starts, and after 5 seconds, the camcorder re-enters Record-Standby mode automatically. 4) To cancel the 5Sec. REC 2 again so that appear on and the viewfinder switches off automatically to...
... When noise bars appear during Retake. Rec. To deactivate Digital Zoom, set "D.ZOOM" (੬pg. 14) to "OFF" in Record- Tape is rewound for the next shot. • Distortion may occur at an angle of playback. Zooming To produce the zoom in Record-Standby mode ...the MENU Wheel 1 downward. "3" appears and blinks. 4) To cancel the Manual Focus, press FOCUS 4. Recording starts, and after 5 seconds, the camcorder re-enters Record-Standby mode automatically. 4) To cancel the 5Sec. REC 2 again so that appear on and the viewfinder switches off automatically to...
Instructions
Page 11
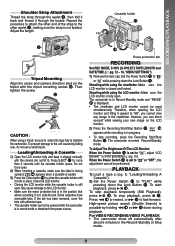
...64257;lter to deliver a stable picture even with tapes recorded on other VCRs or camcorders. TBC (Time Base Corrector) Removes jitter from fluctuating video signals to the camcorder. Consult the JVC Service Center described on the sheet included in the camcorder and the VCR. The core filter ...8226; It may take a few seconds before the editin point. If using both TV and VCR, connect the VCR output to Video Input Tape Dubbing 1) Connect the camcorder and the VCR (੬pg. 11, "Connections To A TV/VCR"). To S-Video Output 6 White to Audio Output 7 S-Video ...
...64257;lter to deliver a stable picture even with tapes recorded on other VCRs or camcorders. TBC (Time Base Corrector) Removes jitter from fluctuating video signals to the camcorder. Consult the JVC Service Center described on the sheet included in the camcorder and the VCR. The core filter ...8226; It may take a few seconds before the editin point. If using both TV and VCR, connect the VCR output to Video Input Tape Dubbing 1) Connect the camcorder and the VCR (੬pg. 11, "Connections To A TV/VCR"). To S-Video Output 6 White to Audio Output 7 S-Video ...

Instructions
Page 12
... Wheel 1 in. Using The Cassette Adapter Use this to play the tape back. • To record on a VCR using a compact cassette and the adapter, cover the adapter's recording safety hole with this camcorder on a SVHS-C/VHS VCR. 1) Slide the latch 1 to open the compartment door, then...ADE / W I ME SET 2 TO S YSTEM MENU 2 6 Hole • If there is slack in the video tape when inserting the compact cassette into the VCR and play back an S-VHS-C/VHS-C video cassette recorded with Adhesive tape. 4) To unload the cassette, turn the gear 3 in the direction of "UNLOADING" all the way until it...
... Wheel 1 in. Using The Cassette Adapter Use this to play the tape back. • To record on a VCR using a compact cassette and the adapter, cover the adapter's recording safety hole with this camcorder on a SVHS-C/VHS VCR. 1) Slide the latch 1 to open the compartment door, then...ADE / W I ME SET 2 TO S YSTEM MENU 2 6 Hole • If there is slack in the video tape when inserting the compact cassette into the VCR and play back an S-VHS-C/VHS-C video cassette recorded with Adhesive tape. 4) To unload the cassette, turn the gear 3 in the direction of "UNLOADING" all the way until it...

Instructions
Page 14
.... OFF: The Picture Stabilizer is correct, all of the indications appear on the LCD monitor/viewfinder during recording or playback: 4, tape remaining time /, , tape length >. 14 OFF: Allows you adjust white balance manually, the setting is retained even if the power is turned off or the battery...WIDE When set to "ON" black bars will be used : T20=20 minutes, T30=30 minutes, T35=35 minutes, T40=40 minutes. • Tape remaining time / is scrolled from right to set the recording mode. LANGUAGE:Select the language for TITLE. SCROLL (Wipe): Wipes in on a black screen ...
.... OFF: The Picture Stabilizer is correct, all of the indications appear on the LCD monitor/viewfinder during recording or playback: 4, tape remaining time /, , tape length >. 14 OFF: Allows you adjust white balance manually, the setting is retained even if the power is turned off or the battery...WIDE When set to "ON" black bars will be used : T20=20 minutes, T30=30 minutes, T35=35 minutes, T40=40 minutes. • Tape remaining time / is scrolled from right to set the recording mode. LANGUAGE:Select the language for TITLE. SCROLL (Wipe): Wipes in on a black screen ...

Instructions
Page 15
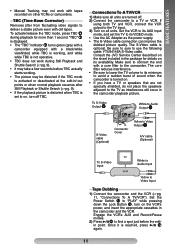
...LCD monitor or viewfinder. With a VHS cassette, "S-ET" = appears and the camcorder records with "AUTO DATE" but also on a VHS or S-VHS cassette. • JVC EHG (Extra High Grade) tapes are recommended for superior results. • Use S-VHS tape for storing recordings for an extended period or ... display will resume. • "DEMO MODE" remains "ON" even if the camcorder power is turned off or when the cassette is ejected. • To use this camcorder. • Tapes recorded in S-VHS or S-VHS ET mode can record subtle changes over an extended period of time (Animation). The...
...LCD monitor or viewfinder. With a VHS cassette, "S-ET" = appears and the camcorder records with "AUTO DATE" but also on a VHS or S-VHS cassette. • JVC EHG (Extra High Grade) tapes are recommended for superior results. • Use S-VHS tape for storing recordings for an extended period or ... display will resume. • "DEMO MODE" remains "ON" even if the camcorder power is turned off or when the cassette is ejected. • To use this camcorder. • Tapes recorded in S-VHS or S-VHS ET mode can record subtle changes over an extended period of time (Animation). The...
Instructions
Page 16
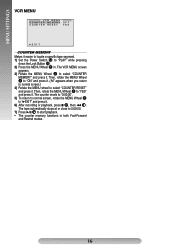
...screen.) 4) Rotate the MENU wheel to select "COUNTER RESET" and press it . Then, rotate the MENU Wheel 1 to "YES" and press it . The tape automatically stops at or close to 0:00:00. 7) Press 3/8 ( to start playback. • The counter memory functions in . MENU SETTINGS VCR MENU VCR ...MENU C OUN T E R ME MO RY OF F C OUN T E R R E S E T Y E S 2EXI T COUNTER MEMORY Makes it easier to locate a specific tape segment. 1) Set the Power Switch $ to "PLAY" while pressing down the Lock Button #. 2) Press the MENU Wheel 1 in both Fast-Forward and Rewind modes. 16
...screen.) 4) Rotate the MENU wheel to select "COUNTER RESET" and press it . Then, rotate the MENU Wheel 1 to "YES" and press it . The tape automatically stops at or close to 0:00:00. 7) Press 3/8 ( to start playback. • The counter memory functions in . MENU SETTINGS VCR MENU VCR ...MENU C OUN T E R ME MO RY OF F C OUN T E R R E S E T Y E S 2EXI T COUNTER MEMORY Makes it easier to locate a specific tape segment. 1) Set the Power Switch $ to "PLAY" while pressing down the Lock Button #. 2) Press the MENU Wheel 1 in both Fast-Forward and Rewind modes. 16
Instructions
Page 17
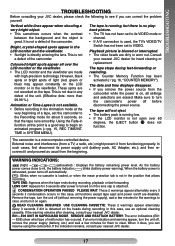
TROUBLESHOOTING TROUBLESHOOTING Before consulting your nearest JVC dealer. 17 Playback picture is used, the TV's VIDEO/TV Switch has not been set the camcorder to clear, and turn it and proceed as usual from functioning properly. The tape stops during recording, playback or fast-forwarding. In...every 3 seconds if condensation occurs. If the indication remains, consult your JVC dealer, please check the following to turn the unit off are disabled. However, black spots or bright spots of the camcorder. The tape is running low. • If the LCD monitor is exhausted, ...
TROUBLESHOOTING TROUBLESHOOTING Before consulting your nearest JVC dealer. 17 Playback picture is used, the TV's VIDEO/TV Switch has not been set the camcorder to clear, and turn it and proceed as usual from functioning properly. The tape stops during recording, playback or fast-forwarding. In...every 3 seconds if condensation occurs. If the indication remains, consult your JVC dealer, please check the following to turn the unit off are disabled. However, black spots or bright spots of the camcorder. The tape is running low. • If the LCD monitor is exhausted, ...
Instructions
Page 18
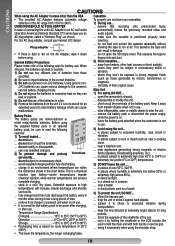
.... Be sure to read the following rules for long periods. ... beware that recording onto prerecorded tapes In case of time. ... do not modify or disassemble. ... do not open the camcorder's chassis. ... away from heaters, other than the USA Cassettes • The provided AC Adapter...camera's internal battery charging circuits. 4) Do not expose the batteries to become wet. ... subject it to excessive heat as shown. ... JVC batteries can prevent complete charging. ... short-circuit the terminals of the viewfinder at the sun. ... in places subject to enter...
.... Be sure to read the following rules for long periods. ... beware that recording onto prerecorded tapes In case of time. ... do not modify or disassemble. ... do not open the camcorder's chassis. ... away from heaters, other than the USA Cassettes • The provided AC Adapter...camera's internal battery charging circuits. 4) Do not expose the batteries to become wet. ... subject it to excessive heat as shown. ... JVC batteries can prevent complete charging. ... short-circuit the terminals of the viewfinder at the sun. ... in places subject to enter...

Instructions
Page 19
...moved from an air conditioner. • Moisture on the head drum can cause severe damage to the video tape, and can lead to internal damage to correct the interference by JVC could void the user's authority to damage the monitor. This device complies with the LCD monitor on the... that to which can radiate radio frequency energy and, if not installed and used in a residential installation. Operation is encouraged to try to the camcorder itself. 3 Blow the lens with a blower brush, then wipe it gently with it with the instructions, may not cause harmful interference, and ...
...moved from an air conditioner. • Moisture on the head drum can cause severe damage to the video tape, and can lead to internal damage to correct the interference by JVC could void the user's authority to damage the monitor. This device complies with the LCD monitor on the... that to which can radiate radio frequency energy and, if not installed and used in a residential installation. Operation is encouraged to try to the camcorder itself. 3 Blow the lens with a blower brush, then wipe it gently with it with the instructions, may not cause harmful interference, and ...
Instructions
Page 20
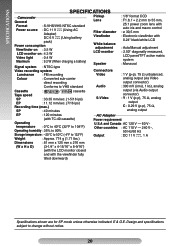
E & O.E. SPECIFICATIONS SPECIFICATIONS Camcorder General Format : S-VHS/VHS NTSC standard Power source : DC 11 V (Using AC Adapter) DC 6 V (Using battery pack) Power consumption Viewfinder on : 3.5 W LCD monitor on : 4.3 W Video light : 0.4...Video : 1 V (p-p), 75 Ω unbalanced, Colour : Converted sub-carrier analog output (via Video direct recording output connector) Conforms to VHS standard Audio : 300 mV (rms), 1 kΩ, analog Cassette : / cassette Tape speed SP : 33.35 mm/sec. (1-5/16 ips) EP : 11.12 mm/sec. (7/16 ips) Recording time (max.) SP...
E & O.E. SPECIFICATIONS SPECIFICATIONS Camcorder General Format : S-VHS/VHS NTSC standard Power source : DC 11 V (Using AC Adapter) DC 6 V (Using battery pack) Power consumption Viewfinder on : 3.5 W LCD monitor on : 4.3 W Video light : 0.4...Video : 1 V (p-p), 75 Ω unbalanced, Colour : Converted sub-carrier analog output (via Video direct recording output connector) Conforms to VHS standard Audio : 300 mV (rms), 1 kΩ, analog Cassette : / cassette Tape speed SP : 33.35 mm/sec. (1-5/16 ips) EP : 11.12 mm/sec. (7/16 ips) Recording time (max.) SP...
Instructions
Page 24
... pg. 7, 18 Brighten/Darken The Image pg. 13 Brighten/Darken The LCD Monitor.......... LX pg. 14 Super VHS Expansion Technology pg. 15 T Tape Counter pg. 16 Tape Dubbing pg. 11 Tape Length Setting pg. 14 Tele Macro pg. 14 Time Base Corrector pg. 11 Time-Lapse Shooting pg. 15 Tracking.... 9, 15 C Q Quick Review pg. 10 R Recording pg. 9 Recording Format (S-VHS/ S-VHS ET).......pg. 15 Recording Mode pg. 14 Retake pg. 10 Cassette Adapter pg. 12 Rewind The Tape pg. 9 Charging The Battery Pack pg. 7 Clean The Camcorder pg. 19 Connection To a VCR/ TV pg. 11 Counter Memory pg. 16 D ...
... pg. 7, 18 Brighten/Darken The Image pg. 13 Brighten/Darken The LCD Monitor.......... LX pg. 14 Super VHS Expansion Technology pg. 15 T Tape Counter pg. 16 Tape Dubbing pg. 11 Tape Length Setting pg. 14 Tele Macro pg. 14 Time Base Corrector pg. 11 Time-Lapse Shooting pg. 15 Tracking.... 9, 15 C Q Quick Review pg. 10 R Recording pg. 9 Recording Format (S-VHS/ S-VHS ET).......pg. 15 Recording Mode pg. 14 Retake pg. 10 Cassette Adapter pg. 12 Rewind The Tape pg. 9 Charging The Battery Pack pg. 7 Clean The Camcorder pg. 19 Connection To a VCR/ TV pg. 11 Counter Memory pg. 16 D ...

