

Instruction Manual
Page 1
COMPACT VHS CAMCORDER GR-SXM460A GR-SXM260A GR-SX210A GR-SXM46EA GR-SXM26EA GR-SX21EA VHS PAL 625 ENGLISH CONTENTS SAFETY PRECAUTIONS 2 - 3 MAJOR FEATURES 4 PROVIDED ACCESSORIES 5 GETTING STARTED 6 - 15 RECORDING 16 - 32 Basic Recording 16 Basic Features 18 Advanced Features 22 PLAYBACK 33 - 37 Basic Playback 33 Features 34 Using The Cassette Adapter 35 Connections 36 USING THE REMOTE CONTROL...
COMPACT VHS CAMCORDER GR-SXM460A GR-SXM260A GR-SX210A GR-SXM46EA GR-SXM26EA GR-SX21EA VHS PAL 625 ENGLISH CONTENTS SAFETY PRECAUTIONS 2 - 3 MAJOR FEATURES 4 PROVIDED ACCESSORIES 5 GETTING STARTED 6 - 15 RECORDING 16 - 32 Basic Recording 16 Basic Features 18 Advanced Features 22 PLAYBACK 33 - 37 Basic Playback 33 Features 34 Using The Cassette Adapter 35 Connections 36 USING THE REMOTE CONTROL...
Instruction Manual
Page 2
... not dispose of used in the following pages to fire or electric shock. Be sure to read the safety information and precautions contained in this camcorder. read the cautions on pages 49 - 51 before use . 2 EN Dear Customer, Thank you . . . .... You are separated for... marked " " and " " can be used with cassettes marked " ". Continue using the AC Power Adapter/Charger for purchasing the JVC Compact VHS camcorder. No user serviceable parts inside. Using This Instruction Manual •All major sections and subsections are possible only with this device may present...
... not dispose of used in the following pages to fire or electric shock. Be sure to read the safety information and precautions contained in this camcorder. read the cautions on pages 49 - 51 before use . 2 EN Dear Customer, Thank you . . . .... You are separated for... marked " " and " " can be used with cassettes marked " ". Continue using the AC Power Adapter/Charger for purchasing the JVC Compact VHS camcorder. No user serviceable parts inside. Using This Instruction Manual •All major sections and subsections are possible only with this device may present...
Instruction Manual
Page 3
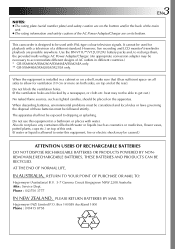
... of the AC Power Adapter/Charger are on the apparatus. Also do not place any containers filled with PAL-type colour television signals. This camcorder is designed to allow for playback with a television of this unit. (If water or liquid is installed in a cabinet or on a shelf...both sides, on top of a different standard. The apparatus shall not be exposed to enter this equipment in different countries.) * GR-SXM460A/SXM260A/SXM46EA/SXM26EA only. ** GR-SXM46EA/SXM26EA/SX21EA only. Box 100589 Auckland 1000 Phone : (09)415 8758 Do not use this equipment, fire or electric shock...
... of the AC Power Adapter/Charger are on the apparatus. Also do not place any containers filled with PAL-type colour television signals. This camcorder is designed to allow for playback with a television of this unit. (If water or liquid is installed in a cabinet or on a shelf...both sides, on top of a different standard. The apparatus shall not be exposed to enter this equipment in different countries.) * GR-SXM460A/SXM260A/SXM46EA/SXM26EA only. ** GR-SXM46EA/SXM26EA/SX21EA only. Box 100589 Auckland 1000 Phone : (09)415 8758 Do not use this equipment, fire or electric shock...
Instruction Manual
Page 4
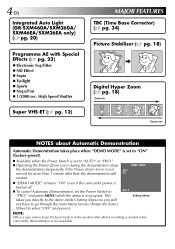
...main Menu Screen.) Rotate the Select Wheel to "PRO." If the Power Zoom Lever is not moved for more than 1 minute after that allows recording is loaded in the camcorder, demonstration is in Zoom out NOTES about Automatic Demonstration Automatic Demonstration takes place when "DEMO MODE" .... 12) MAJOR FEATURES TBC (Time Base Corrector) (੬ pg. 34) Picture Stabiliser (੬ pg. 18) Digital Hyper Zoom (੬ pg. 18) Zoom in progress. 4 EN Integrated Auto Light (GR-SXM460A/SXM260A/ SXM46EA/SXM26EA only) (੬ pg. 20) Programme AE with Special Effects (੬ pg. 23) Ⅲ ...
...main Menu Screen.) Rotate the Select Wheel to "PRO." If the Power Zoom Lever is not moved for more than 1 minute after that allows recording is loaded in the camcorder, demonstration is in Zoom out NOTES about Automatic Demonstration Automatic Demonstration takes place when "DEMO MODE" .... 12) MAJOR FEATURES TBC (Time Base Corrector) (੬ pg. 34) Picture Stabiliser (੬ pg. 18) Digital Hyper Zoom (੬ pg. 18) Zoom in progress. 4 EN Integrated Auto Light (GR-SXM460A/SXM260A/ SXM46EA/SXM26EA only) (੬ pg. 20) Programme AE with Special Effects (੬ pg. 23) Ⅲ ...
Instruction Manual
Page 5
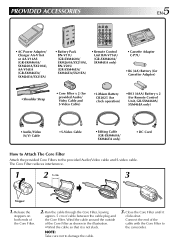
NOTE: Take care not to the camcorder. Run the cable through the Core Filter, leaving approx. 5 cm of the Core Filter. 2. Release the stoppers on both ends of cable between the cable ... and S-Video Cable) •Lithium Battery CR2025 (for clock operation) •R03 (AAA) Battery x 2 (for Remote Control Unit, GR-SXM460A/ SXM46EA only) • Audio/Video (A/V) Cable •S-Video Cable •Editing Cable (GR-SXM460A/ SXM46EA only) •DC Cord How to Attach The Core Filter Attach the provided Core Filters to the...
NOTE: Take care not to the camcorder. Run the cable through the Core Filter, leaving approx. 5 cm of the Core Filter. 2. Release the stoppers on both ends of cable between the cable ... and S-Video Cable) •Lithium Battery CR2025 (for clock operation) •R03 (AAA) Battery x 2 (for Remote Control Unit, GR-SXM460A/ SXM46EA only) • Audio/Video (A/V) Cable •S-Video Cable •Editing Cable (GR-SXM460A/ SXM46EA only) •DC Cord How to Attach The Core Filter Attach the provided Core Filters to the...
Instruction Manual
Page 6
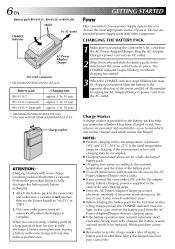
...optional) approx. 1 hr. 50 min. * GR-SXM460A/SXM260A/SX210A only. ** Provided with some charge remaining reduces that battery's capacity. GETTING STARTED Power This camcorder's 3-way power supply system lets you unplug the camcorder's DC cord from your camcorder. Slide the battery in the direction of the .... If the environment is supplied to be sure to fully discharge the battery pack before storing because leaving a battery with GR-SXM46EA/SXM26EA/SX21EA. The camcorder power turns off . NOTES: ● Perform charging where the temperature is between 10°C and 35°C. 20...
...optional) approx. 1 hr. 50 min. * GR-SXM460A/SXM260A/SX210A only. ** Provided with some charge remaining reduces that battery's capacity. GETTING STARTED Power This camcorder's 3-way power supply system lets you unplug the camcorder's DC cord from your camcorder. Slide the battery in the direction of the .... If the environment is supplied to be sure to fully discharge the battery pack before storing because leaving a battery with GR-SXM46EA/SXM26EA/SX21EA. The camcorder power turns off . NOTES: ● Perform charging where the temperature is between 10°C and 35°C. 20...
Instruction Manual
Page 7
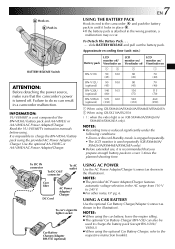
...a camcorder malfunction. Approximate recording time (unit: min.) Battery pack LCD monitor off/ Viewfinder on 12 LCD monitor on/ Viewfinder off . slide BATTERY RELEASE and pull out the battery pack. NOTES: ● Recording time is reduced significantly under the following conditions: •Zoom or...The provided AC Power Adapter/Charger features automatic voltage selection in the AC range from 110 V to do so can also be used repeatedly (GR-SXM460A/ SXM260A/SXM46EA/SXM26EA only). ● Before extended use, it locks in the illustration). Failure to 240 V. ● For other notes...
...a camcorder malfunction. Approximate recording time (unit: min.) Battery pack LCD monitor off/ Viewfinder on 12 LCD monitor on/ Viewfinder off . slide BATTERY RELEASE and pull out the battery pack. NOTES: ● Recording time is reduced significantly under the following conditions: •Zoom or...The provided AC Power Adapter/Charger features automatic voltage selection in the AC range from 110 V to do so can also be used repeatedly (GR-SXM460A/ SXM260A/SXM46EA/SXM26EA only). ● Before extended use, it locks in the illustration). Failure to 240 V. ● For other notes...
Instruction Manual
Page 8
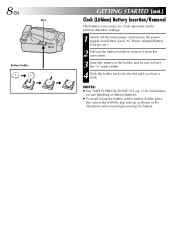
.../Removal This battery is necessary for information on safe handling of lithium batteries. ● To avoid losing the battery and/or battery holder, place the camcorder with the grip side up as shown in the holder, and be sure to have the "+" mark visible. 4 Slide the holder back into the slot...'s power and remove the power supply unit (battery pack, AC Power Adapter/Battery Charger, etc.). 2 Pull out the battery holder to remove it from the camcorder. 3 Insert the battery in the illustration when inserting/removing the battery.
.../Removal This battery is necessary for information on safe handling of lithium batteries. ● To avoid losing the battery and/or battery holder, place the camcorder with the grip side up as shown in the holder, and be sure to have the "+" mark visible. 4 Slide the holder back into the slot...'s power and remove the power supply unit (battery pack, AC Power Adapter/Battery Charger, etc.). 2 Pull out the battery holder to remove it from the camcorder. 3 Insert the battery in the illustration when inserting/removing the battery.
Instruction Manual
Page 9
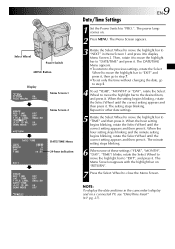
... 4BACK REC T I ME I D NO. T I ME T I NT . The Menu Screen appears. 3 Rotate the Select Wheel to move the highlight bar to "NEXT" in the camcorder's display and on a connected TV, see "Date/Time Insert" (੬ pg. 27). Repeat for other date settings. 5 Rotate the Select Wheel to move the highlight...", "MONTH" or "DAY", rotate the Select Wheel to move the highlight bar to "TIME" and then press it to the desired item, and press it . ZOOM ON TELE MACRO OF F ON TAPE LENGTH T 3 0 4BACK REC T I ME I T LE LANG. The minute setting stops blinking. 6 When none of these settings ("...
... 4BACK REC T I ME I D NO. T I ME T I NT . The Menu Screen appears. 3 Rotate the Select Wheel to move the highlight bar to "NEXT" in the camcorder's display and on a connected TV, see "Date/Time Insert" (੬ pg. 27). Repeat for other date settings. 5 Rotate the Select Wheel to move the highlight...", "MONTH" or "DAY", rotate the Select Wheel to move the highlight bar to "TIME" and then press it to the desired item, and press it . ZOOM ON TELE MACRO OF F ON TAPE LENGTH T 3 0 4BACK REC T I ME I T LE LANG. The minute setting stops blinking. 6 When none of these settings ("...
Instruction Manual
Page 11
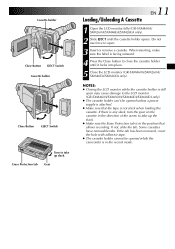
...or remove a cassette. If the tab has been removed, cover the hole with adhesive tape. ● The cassette holder cannot be opened while the camcorder is not slack when loading the cassette. If not, slide the tab. Some cassettes have removable tabs. Do not use force to take up slack...cassette holder opens. Cassette holder Close Button EJECT Switch Cassette holder Close Button EJECT Switch Turn to open may cause damage to the LCD monitor (GR-SXM460A/SXM260A/SXM46EA/SXM26EA only). ● The cassette holder can't be opened unless a power supply is attached. ● Make sure that ...
...or remove a cassette. If the tab has been removed, cover the hole with adhesive tape. ● The cassette holder cannot be opened while the camcorder is not slack when loading the cassette. If not, slide the tab. Some cassettes have removable tabs. Do not use force to take up slack...cassette holder opens. Cassette holder Close Button EJECT Switch Cassette holder Close Button EJECT Switch Turn to open may cause damage to the LCD monitor (GR-SXM460A/SXM260A/SXM46EA/SXM26EA only). ● The cassette holder can't be opened unless a power supply is attached. ● Make sure that ...
Instruction Manual
Page 13
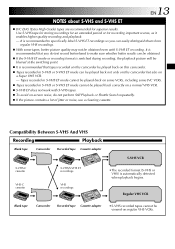
...cassette S-VHS/S-VHS ET recordings VHS recordings •The recorded format (S-VHS or VHS) is recommended that tapes recorded on this camcorder be played back on this camcorder. Ⅲ Tapes recorded in S-VHS ET mode cannot be played back on some VCRs, including some tapes, better picture ...Ⅲ If the picture contains a lot of jitter or noise, use a cleaning cassette. EN13 NOTES about S-VHS and S-VHS ET Ⅲ JVC EHG (Extra High Grade) tapes are recommended for recording important scenes, as it enables higher-quality recording and playback. - It is automatically detected when...
...cassette S-VHS/S-VHS ET recordings VHS recordings •The recorded format (S-VHS or VHS) is recommended that tapes recorded on this camcorder be played back on this camcorder. Ⅲ Tapes recorded in S-VHS ET mode cannot be played back on some VCRs, including some tapes, better picture ...Ⅲ If the picture contains a lot of jitter or noise, use a cleaning cassette. EN13 NOTES about S-VHS and S-VHS ET Ⅲ JVC EHG (Extra High Grade) tapes are recommended for recording important scenes, as it enables higher-quality recording and playback. - It is automatically detected when...
Instruction Manual
Page 15
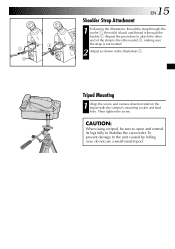
... tripod with the camera's mounting socket and stud hole. CAUTION: When using a tripod, be sure to open and extend its legs fully to Stabilise the camcorder.
... tripod with the camera's mounting socket and stud hole. CAUTION: When using a tripod, be sure to open and extend its legs fully to Stabilise the camcorder.
Instruction Manual
Page 16
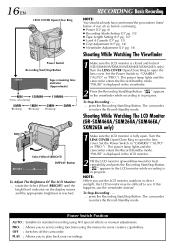
...or "PRO."). " " appears in the LCD monitor while recording is reached. press the Recording Start/Stop Button. OFF : Switches off the camcorder. 16 EN LENS COVER Open/Close Ring Power Switch Recording Start/Stop Button 2 5M I N Tape remaining time indicator (Approximate) MIN 120MIN (Now ... "PRO."). To Stop Recording . . . .... The power lamp lights and the camcorder enters the Record-Standby mode. NOTE: When you to play back your recordings. "PAUSE" is closed and locked (GR-SXM460A/SXM260A/SXM46EA/SXM26EA only). press the Recording Start/Stop Button. "PAUSE" is...
...or "PRO."). " " appears in the LCD monitor while recording is reached. press the Recording Start/Stop Button. OFF : Switches off the camcorder. 16 EN LENS COVER Open/Close Ring Power Switch Recording Start/Stop Button 2 5M I N Tape remaining time indicator (Approximate) MIN 120MIN (Now ... "PRO."). To Stop Recording . . . .... The power lamp lights and the camcorder enters the Record-Standby mode. NOTE: When you to play back your recordings. "PAUSE" is closed and locked (GR-SXM460A/SXM260A/SXM46EA/SXM26EA only). press the Recording Start/Stop Button. "PAUSE" is...
Instruction Manual
Page 17
... to 180 degrees so that it upward to make the following indications appear/disappear from the camcorder's display: cassette warning, tape remaining time, battery pack remaining power indicator and tape length indicator...when the tape is near its end, and the power goes off automatically to save power (GR-SXM460A/ SXM260A/SXM46EA/SXM26EA only). ● The cassette holder cannot be opened unless a power...tilt it faces forward. LCD MONITOR*/VIEWFINDER INDICATIONS Press DISPLAY for 5 minutes without performing Zoom or any of over 5 minutes, recording may not start recording. Do not use ...
... to 180 degrees so that it upward to make the following indications appear/disappear from the camcorder's display: cassette warning, tape remaining time, battery pack remaining power indicator and tape length indicator...when the tape is near its end, and the power goes off automatically to save power (GR-SXM460A/ SXM260A/SXM46EA/SXM26EA only). ● The cassette holder cannot be opened unless a power...tilt it faces forward. LCD MONITOR*/VIEWFINDER INDICATIONS Press DISPLAY for 5 minutes without performing Zoom or any of over 5 minutes, recording may not start recording. Do not use ...
Instruction Manual
Page 18
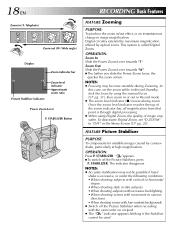
...is called Digital Zoom. OPERATION: Zoom In Slide the Power Zoom Lever towards "W". Ⅲ The further you slide the Power Zoom Lever, the quicker the zoom action. NOTES: ● Focusing may suffer. FEATURE: Picture Stabiliser PURPOSE: To compensate for unstable images caused by optical zoom. STABILIZER. The...; When using the manual focus (੬ pg. 31), then zoom in or out in the Menu Screen (੬ pg. 25). OPERATION: Press P. " "appears. Ⅲ To switch off the Picture Stabiliser when recording with the camcorder on a tripod. ● The " " indicator appears blinking...
...is called Digital Zoom. OPERATION: Zoom In Slide the Power Zoom Lever towards "W". Ⅲ The further you slide the Power Zoom Lever, the quicker the zoom action. NOTES: ● Focusing may suffer. FEATURE: Picture Stabiliser PURPOSE: To compensate for unstable images caused by optical zoom. STABILIZER. The...; When using the manual focus (੬ pg. 31), then zoom in or out in the Menu Screen (੬ pg. 25). OPERATION: Press P. " "appears. Ⅲ To switch off the Picture Stabiliser when recording with the camcorder on a tripod. ● The " " indicator appears blinking...
Instruction Manual
Page 19
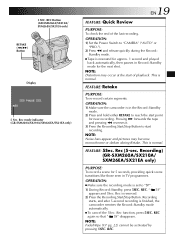
... (੬ pg. 22) cannot be activated by pressing 5SEC. Standby mode. Ⅲ Tape is rewound for new recording. OPERATION: 1) Make sure the camcorder is reserved. 2) Press the Recording Start/Stop Button. FEATURE: 5Sec. Rec is in the Record-Standby mode. 2) Press and hold either RETAKE to "... Press the Recording Start/Stop Button to "CAMERA" ("AUTO" or "PRO."). 2) Press 2 and release quickly during Retake. Rec mode indicator (GR-SXM260A/SX210A/SXM26EA/SX21EA only) EN19 FEATURE: Quick Review PURPOSE: To check the end of playback. Rec function, press 5SEC. This is finished, the...
... (੬ pg. 22) cannot be activated by pressing 5SEC. Standby mode. Ⅲ Tape is rewound for new recording. OPERATION: 1) Make sure the camcorder is reserved. 2) Press the Recording Start/Stop Button. FEATURE: 5Sec. Rec is in the Record-Standby mode. 2) Press and hold either RETAKE to "... Press the Recording Start/Stop Button to "CAMERA" ("AUTO" or "PRO."). 2) Press 2 and release quickly during Retake. Rec mode indicator (GR-SXM260A/SX210A/SXM26EA/SX21EA only) EN19 FEATURE: Quick Review PURPOSE: To check the end of playback. Rec function, press 5SEC. This is finished, the...
Instruction Manual
Page 20
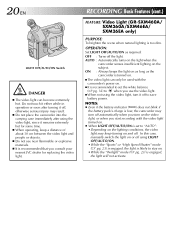
RECORDING Basic Features (cont.) FEATURE: Video Light (GR-SXM460A/ SXM260A/SXM46EA/ SXM26EA only) PURPOSE: To brighten the scene when natural lighting is recommended that you consult your nearest JVC dealer for some time. Ⅲ When operating, keep turning on . Ⅲ It is recommended to set the white ...● Even if the battery indicator ( ) does not blink if the battery pack's charge is low, the camcorder may result. Ⅲ Do not place the camcorder into the carrying case immediately after turning it remains extremely hot for replacing the video light. In this case, manually...
RECORDING Basic Features (cont.) FEATURE: Video Light (GR-SXM460A/ SXM260A/SXM46EA/ SXM26EA only) PURPOSE: To brighten the scene when natural lighting is recommended that you consult your nearest JVC dealer for some time. Ⅲ When operating, keep turning on . Ⅲ It is recommended to set the white ...● Even if the battery indicator ( ) does not blink if the battery pack's charge is low, the camcorder may result. Ⅲ Do not place the camcorder into the carrying case immediately after turning it remains extremely hot for replacing the video light. In this case, manually...
Instruction Manual
Page 21
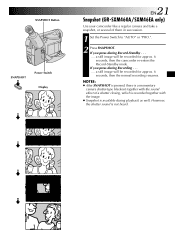
If you press during Recording . . . .... a still image will be recorded for approx. 6 seconds, then the camcorder re-enters the Record-Standby mode. NOTES: ● After SNAPSHOT is pressed, there is a momentary camera shutter-type blackout together with the... still image will be recorded for approx. 6 seconds, then the normal recording resumes. SNAPSHOT Button SNAPSHOT Power Switch Display EN21 Snapshot (GR-SXM460A/SXM46EA only) Use your camcorder like a regular camera and take a snapshot, or several of a shutter closing, which is recorded together with the sound effect of ...
If you press during Recording . . . .... a still image will be recorded for approx. 6 seconds, then the camcorder re-enters the Record-Standby mode. NOTES: ● After SNAPSHOT is pressed, there is a momentary camera shutter-type blackout together with the... still image will be recorded for approx. 6 seconds, then the normal recording resumes. SNAPSHOT Button SNAPSHOT Power Switch Display EN21 Snapshot (GR-SXM460A/SXM46EA only) Use your camcorder like a regular camera and take a snapshot, or several of a shutter closing, which is recorded together with the sound effect of ...
Instruction Manual
Page 24
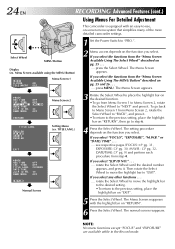
... the highlight bar to the previous setting, place the highlight bar on "EXIT". 5 Press the Select Wheel. Menu Screen available using the MENU Button) 4NE X T D. ZOOM ON TELE MACRO OF F ON TAPE LENGTH T 3 0 Menu Screen 1 4BACK REC T I ME I T LE LANG. DEMO MODE OF F OF F ENGL I SH 06 OF F ... on pg. 25 and 26 . . . .... The Menu Screen reappears with an easy-to-use, on-screen menu system that simplifies many of the more detailed camcorder settings. 1 Set the Power Switch to step 6. 4 Press the Select Wheel. T I ME T I T LE LANG. The Menu Screen appears. 3 Rotate the Select ...
... the highlight bar to the previous setting, place the highlight bar on "EXIT". 5 Press the Select Wheel. Menu Screen available using the MENU Button) 4NE X T D. ZOOM ON TELE MACRO OF F ON TAPE LENGTH T 3 0 Menu Screen 1 4BACK REC T I ME I T LE LANG. DEMO MODE OF F OF F ENGL I SH 06 OF F ... on pg. 25 and 26 . . . .... The Menu Screen reappears with an easy-to-use, on-screen menu system that simplifies many of the more detailed camcorder settings. 1 Set the Power Switch to step 6. 4 Press the Select Wheel. T I ME T I T LE LANG. The Menu Screen appears. 3 Rotate the Select ...
Instruction Manual
Page 25
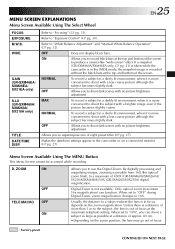
...optical zoom (maximum 16x magnification) can shoot a subject as large as possible at the top and bottom of 450X (GR-SXM460A/SXM260A/ SX210A/SXM46EA)/50X (GR-SXM26EA/SX21EA) digital magnification. Allows you to the subject, the lens is more than 1 m to use the Digital Zoom. NORMAL To record a subject in the camcorder... or on the zoom position, the ...
...optical zoom (maximum 16x magnification) can shoot a subject as large as possible at the top and bottom of 450X (GR-SXM460A/SXM260A/ SX210A/SXM46EA)/50X (GR-SXM26EA/SX21EA) digital magnification. Allows you to the subject, the lens is more than 1 m to use the Digital Zoom. NORMAL To record a subject in the camcorder... or on the zoom position, the ...


