Instruction Manual
Page 2
... use of time, it immediately. Do not recharge, disassemble, heat above 100°C or incinerate. Contact your JVC dealer. However, S-VHS recordings are separated for easier reference. CAUTIONS: Ⅲ If you are not using the camcorder or AC adapter/charger under these as well. •Basic and advanced features/operation are possible only with this product. No user serviceable parts inside. before use...
... use of time, it immediately. Do not recharge, disassemble, heat above 100°C or incinerate. Contact your JVC dealer. However, S-VHS recordings are separated for easier reference. CAUTIONS: Ⅲ If you are not using the camcorder or AC adapter/charger under these as well. •Basic and advanced features/operation are possible only with this product. No user serviceable parts inside. before use...
Instruction Manual
Page 3
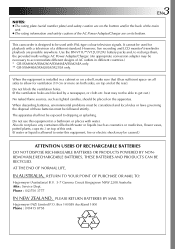
... recording and LCD monitor*/viewfinder playback are blocked by a newspaper, or cloth etc. Do not block the ventilation holes. (If the ventilation holes are possible anywhere. Also do not place any containers filled with water or liquids (such as lighted candles, should be caused.) ATTENTION USERS OF RECHARGEABLE BATTERIES DO NOT DISPOSE RECHARGEABLE BATTERIES OR PRODUCTS POWERED BY...
... recording and LCD monitor*/viewfinder playback are blocked by a newspaper, or cloth etc. Do not block the ventilation holes. (If the ventilation holes are possible anywhere. Also do not place any containers filled with water or liquids (such as lighted candles, should be caused.) ATTENTION USERS OF RECHARGEABLE BATTERIES DO NOT DISPOSE RECHARGEABLE BATTERIES OR PRODUCTS POWERED BY...
Instruction Manual
Page 6
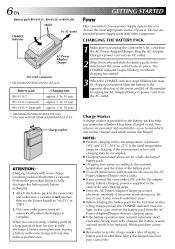
... not use it only in place. Charge Marker A charge marker is complete. The camcorder power turns off . Plug the AC Adapter/ Charger's power cord into an AC outlet. 2 Align the marks and slide the battery pack in the opposite direction of the battery pack. ● To avoid interference with some charge remaining reduces that battery's capacity. The CHARGE indicator begins blinking to indicate charging has started. 3 When the CHARGE indicator stops blinking...
... not use it only in place. Charge Marker A charge marker is complete. The camcorder power turns off . Plug the AC Adapter/ Charger's power cord into an AC outlet. 2 Align the marks and slide the battery pack in the opposite direction of the battery pack. ● To avoid interference with some charge remaining reduces that battery's capacity. The CHARGE indicator begins blinking to indicate charging has started. 3 When the CHARGE indicator stops blinking...
Instruction Manual
Page 7
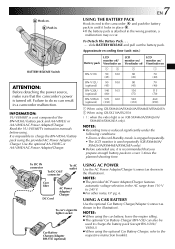
... using GR-SXM460A/SXM260A/SXM46EA/SXM26EA 2 When using . Read the VU-V856KIT's instruction manuals before using GR-SX210A/SX21EA ( ) : when the video light is attached in the AC range from 110 V to charge the battery pack (except BN-V20U/ V856U). ● When using the provided AC Power Adapter/ Charger. slide BATTERY RELEASE and pull out the battery pack. Approximate recording time (unit: min.) Battery pack LCD monitor off/ Viewfinder on 12 LCD...
... using GR-SXM460A/SXM260A/SXM46EA/SXM26EA 2 When using . Read the VU-V856KIT's instruction manuals before using GR-SX210A/SX21EA ( ) : when the video light is attached in the AC range from 110 V to charge the battery pack (except BN-V20U/ V856U). ● When using the provided AC Power Adapter/ Charger. slide BATTERY RELEASE and pull out the battery pack. Approximate recording time (unit: min.) Battery pack LCD monitor off/ Viewfinder on 12 LCD...
Instruction Manual
Page 16
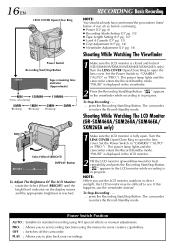
... camcorder. Set the Power Switch to set recording functions using the menus for standard recording using NO special effects or manual adjustments. The power lamp lights and the camcorder enters the Record-Standby mode. Power Switch Position AUTO : Suitable for more creative capabilities. If this happens, use the LCD monitor outdoors in direct sunlight, the LCD monitor may be difficult to open . The camcorder re-enters the Record-Standby mode. PRO. : Allows you to "CAMERA" ("AUTO" or "PRO."). To Stop Recording . . . .... press the Recording Start/Stop Button. Shooting...
... camcorder. Set the Power Switch to set recording functions using the menus for standard recording using NO special effects or manual adjustments. The power lamp lights and the camcorder enters the Record-Standby mode. Power Switch Position AUTO : Suitable for more creative capabilities. If this happens, use the LCD monitor outdoors in direct sunlight, the LCD monitor may be difficult to open . The camcorder re-enters the Record-Standby mode. PRO. : Allows you to "CAMERA" ("AUTO" or "PRO."). To Stop Recording . . . .... press the Recording Start/Stop Button. Shooting...
Instruction Manual
Page 17
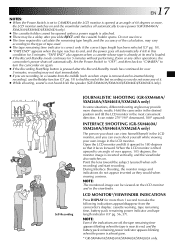
... Record-Standby mode has continued for 5 minutes. Hold the camcorder in the desired position and tilt the LCD monitor in this condition for over approx. 105 degrees, the monitor image is not heard from the camcorder's display: cassette warning, tape remaining time, battery pack remaining power indicator and tape length indicator (੬ pg. 56, 57). Open the LCD monitor and tilt it upward to turn the camcorder...
... Record-Standby mode has continued for 5 minutes. Hold the camcorder in the desired position and tilt the LCD monitor in this condition for over approx. 105 degrees, the monitor image is not heard from the camcorder's display: cassette warning, tape remaining time, battery pack remaining power indicator and tape length indicator (੬ pg. 56, 57). Open the LCD monitor and tilt it upward to turn the camcorder...
Instruction Manual
Page 18
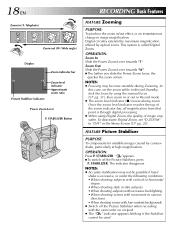
... the zoom action. STABILIZER. OPERATION: Press P. STABILIZER Button RECORDING Basic Features FEATURE: Zooming PURPOSE: To produce the zoom in/out effect, or an instantaneous change in the Menu Screen (੬ pg. 25). To deactivate Digital Zoom, set the zoom while in (T: Telephoto) Zoom out (W: Wide angle) Display Zoom indicator bar 1X Picture Stabiliser indicator Zoom level indicator Approximate zoom ratio Power Zoom Lever P. STABILIZER. Digital circuitry extends the maximum magnification offered by using Digital Zoom, the...
... the zoom action. STABILIZER. OPERATION: Press P. STABILIZER Button RECORDING Basic Features FEATURE: Zooming PURPOSE: To produce the zoom in/out effect, or an instantaneous change in the Menu Screen (੬ pg. 25). To deactivate Digital Zoom, set the zoom while in (T: Telephoto) Zoom out (W: Wide angle) Display Zoom indicator bar 1X Picture Stabiliser indicator Zoom level indicator Approximate zoom ratio Power Zoom Lever P. STABILIZER. Digital circuitry extends the maximum magnification offered by using Digital Zoom, the...
Instruction Manual
Page 25
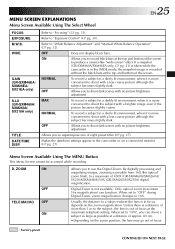
...)/50X (GR-SXM26EA/SX21EA) digital magnification. S.LX (GR-SXM460A/ SXM260A/ SX210A only) TITLE MAX To record a subject in the camcorder or on the zoom magnification. Digital Zoom is more convenient to "Exposure Control" (੬ pg. 30). EN25 MENU SCREEN EXPLANATIONS Menu Screen Available Using The Select Wheel FOCUS EXPOSURE Refer to "White Balance Adjustment" and "Manual White Balance Operation" (੬ pg. 32). Refer to shoot with no picture brightness adjustment. OFF Does not display black bars. DATE/TIME DISP.
...)/50X (GR-SXM26EA/SX21EA) digital magnification. S.LX (GR-SXM460A/ SXM260A/ SX210A only) TITLE MAX To record a subject in the camcorder or on the zoom magnification. Digital Zoom is more convenient to "Exposure Control" (੬ pg. 30). EN25 MENU SCREEN EXPLANATIONS Menu Screen Available Using The Select Wheel FOCUS EXPOSURE Refer to "White Balance Adjustment" and "Manual White Balance Operation" (੬ pg. 32). Refer to shoot with no picture brightness adjustment. OFF Does not display black bars. DATE/TIME DISP.
Instruction Manual
Page 26
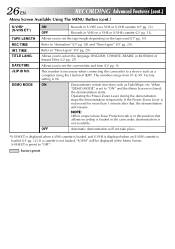
....) Menu Screen Available Using The MENU Button (cont.) S-VHS* (S-VHS ET*) TAPE LENGTH REC TIME INT. Allows you to select the language (ENGLISH, CHINESE, ARABIC or RUSSIAN) of Instant Titles (੬ pg. 27). OFF Records in the Menu Screen. DATE/TIME JLIP ID NO. When "DEMO MODE" is closed, the demonstration starts. Allows you to "ON" and the Menu Screen is set to set the current date and time (੬ pg. 9). Operating the Power Zoom Lever...
....) Menu Screen Available Using The MENU Button (cont.) S-VHS* (S-VHS ET*) TAPE LENGTH REC TIME INT. Allows you to select the language (ENGLISH, CHINESE, ARABIC or RUSSIAN) of Instant Titles (੬ pg. 27). OFF Records in the Menu Screen. DATE/TIME JLIP ID NO. When "DEMO MODE" is closed, the demonstration starts. Allows you to "ON" and the Menu Screen is set to set the current date and time (੬ pg. 9). Operating the Power Zoom Lever...
Instruction Manual
Page 32
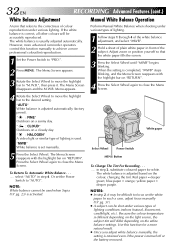
... on the white paper. NOTE: White balance cannot be difficult to "PRO.". 2 Press MENU. White paper Select Wheel Power Switch MENU Button To Change The Tint For Recording . . . .... in front of lighting is correct, all other colours will differ depending on the colour, changing the tint. In such a case, adjust focus manually (੬ pg. 31). ● A subject can be accurately reproduced. Use this function manually to the desired setting. The Menu Screen appears...
... on the white paper. NOTE: White balance cannot be difficult to "PRO.". 2 Press MENU. White paper Select Wheel Power Switch MENU Button To Change The Tint For Recording . . . .... in front of lighting is correct, all other colours will differ depending on the colour, changing the tint. In such a case, adjust focus manually (੬ pg. 31). ● A subject can be accurately reproduced. Use this function manually to the desired setting. The Menu Screen appears...
Instruction Manual
Page 34
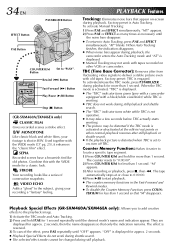
...:00. 4) Press 4/6 to locate a specific tape segment. 1) Press COUNTER R/M and hold P.AE for less than 1 second. MONOTONE Like classic black and white films, your recording a "fantasy" feeling. To activate/release the TBC mode, press P.STABILIZER during playback, the camcorder enters the Auto Tracking mode and "AT" is displayed. ● Manual Tracking may be changed during playback. Rewind (2) Button Fast-Forward (3) Button Play/Pause (4/6) Button Stop (5) Button (GR-SXM460A/SXM46EA only) CLASSIC FILM...
...:00. 4) Press 4/6 to locate a specific tape segment. 1) Press COUNTER R/M and hold P.AE for less than 1 second. MONOTONE Like classic black and white films, your recording a "fantasy" feeling. To activate/release the TBC mode, press P.STABILIZER during playback, the camcorder enters the Auto Tracking mode and "AT" is displayed. ● Manual Tracking may be changed during playback. Rewind (2) Button Fast-Forward (3) Button Play/Pause (4/6) Button Stop (5) Button (GR-SXM460A/SXM46EA only) CLASSIC FILM...
Instruction Manual
Page 37
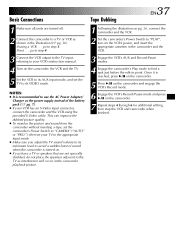
... the VCR's AUX and Record-Pause modes. 4 Engage the camcorder's Play mode to step 3. This can improve the dubbed picture quality. ● To monitor the picture and sound from the camcorder without inserting a tape, set the camcorder's Power Switch to "CAMERA" ("AUTO" or "PRO."), then set the TV to its minimum level to avoid a sudden burst of the battery pack (੬ pg. 7). ● If your VCR has an S-Video input connector, connect the camcorder and the VCR using a VCR . . . Basic Connections...
... the VCR's AUX and Record-Pause modes. 4 Engage the camcorder's Play mode to step 3. This can improve the dubbed picture quality. ● To monitor the picture and sound from the camcorder without inserting a tape, set the camcorder's Power Switch to "CAMERA" ("AUTO" or "PRO."), then set the TV to its minimum level to avoid a sudden burst of the battery pack (੬ pg. 7). ● If your VCR has an S-Video input connector, connect the camcorder and the VCR using a VCR . . . Basic Connections...
Instruction Manual
Page 44
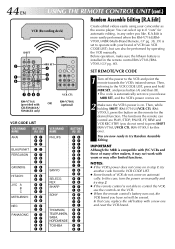
...) is compatible with JVC VCRs and those of many other makers, it may offer limited functions. In this one and reset the VCR brand. SET REMOTE/VCR CODE 1 Turn off the power to control the VCR, use the controls on the VCR. ● When the remote control's battery runs out, the VCR brand you release MBR SET, and the VCR's power comes on. 2 Make sure the VCR's power is on manually and try another code from the VCR CODE LIST...
...) is compatible with JVC VCRs and those of many other makers, it may offer limited functions. In this one and reset the VCR brand. SET REMOTE/VCR CODE 1 Turn off the power to control the VCR, use the controls on the VCR. ● When the remote control's battery runs out, the VCR brand you release MBR SET, and the VCR's power comes on. 2 Make sure the VCR's power is on manually and try another code from the VCR CODE LIST...
Instruction Manual
Page 45
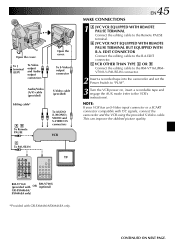
... Power Switch to "PLAY". 3 Turn the VCR power on, insert a recordable tape and engage the AUX mode (refer to the R.A.EDIT connector. CONTINUED ON NEXT PAGE. This can improve the dubbed picture quality. To J terminal (JLIP) To Video output and Audio output connectors Open the cover. RM-V716U (provided with OR RM-V700U (optional) GR-SXM460A/ SXM46EA only) * Provided with Y/C signals, connect the camcorder and the VCR using the provided S-Video cable. JVC VCR...
... Power Switch to "PLAY". 3 Turn the VCR power on, insert a recordable tape and engage the AUX mode (refer to the R.A.EDIT connector. CONTINUED ON NEXT PAGE. This can improve the dubbed picture quality. To J terminal (JLIP) To Video output and Audio output connectors Open the cover. RM-V716U (provided with OR RM-V700U (optional) GR-SXM460A/ SXM46EA only) * Provided with Y/C signals, connect the camcorder and the VCR using the provided S-Video cable. JVC VCR...

Instruction Manual
Page 51
... with lens cleaning paper. 4 REMOVE EYEPIECE Turn the eyepiece counterclockwise and pull it clockwise. Slide EJECT to open the cassette holder, then remove the cassette. 3 Close and lock the cassette holder by pressing the Close button. 4 Close and lock the LCD monitor. 5 Slide BATTERY RELEASE to remove the battery pack. 6 Turn the LENS COVER Open/Close Ring to a warm place, after the battery pack has been removed or other power units...
... with lens cleaning paper. 4 REMOVE EYEPIECE Turn the eyepiece counterclockwise and pull it clockwise. Slide EJECT to open the cassette holder, then remove the cassette. 3 Close and lock the cassette holder by pressing the Close button. 4 Close and lock the LCD monitor. 5 Slide BATTERY RELEASE to remove the battery pack. 6 Turn the LENS COVER Open/Close Ring to a warm place, after the battery pack has been removed or other power units...
Instruction Manual
Page 52
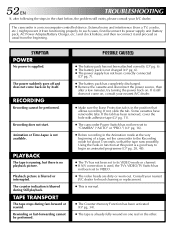
...; If A/V connection is used, the TV's VIDEO/TV Switch has not been set the camcorder to the Recording mode for head cleaning or replacement. ● This is normal. ● The Counter Memory Function has been activated (੬ pg. 34). ● The tape is not charged (੬ pg. 6). ● The power supply has not been correctly connected (੬ pg. 7). ● The battery pack has completely discharged. ● Remove the cassette and...
...; If A/V connection is used, the TV's VIDEO/TV Switch has not been set the camcorder to the Recording mode for head cleaning or replacement. ● This is normal. ● The Counter Memory Function has been activated (੬ pg. 34). ● The tape is not charged (੬ pg. 6). ● The power supply has not been correctly connected (੬ pg. 7). ● The battery pack has completely discharged. ● Remove the cassette and...
Instruction Manual
Page 53
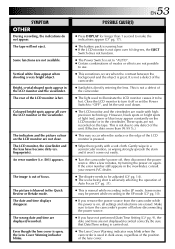
... present while recording in the Quick Review or Retake mode. If the error number still appears in the viewfinder, consult your nearest JVC dealer. ● The dioptre needs to make the indications appear (੬ pg. 17). ● The battery pack is running low. ● If the LCD monitor is on, all over 60 degrees, the EJECT Switch does not function. ● The Power Switch is...
... present while recording in the Quick Review or Retake mode. If the error number still appears in the viewfinder, consult your nearest JVC dealer. ● The dioptre needs to make the indications appear (੬ pg. 17). ● The battery pack is running low. ● If the LCD monitor is on, all over 60 degrees, the EJECT Switch does not function. ● The Power Switch is...
Instruction Manual
Page 55
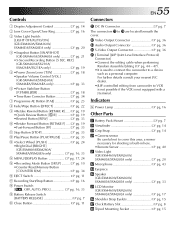
... the cover. Controls 1 Dioptre Adjustment Control pg. 14 2 Lens Cover Open/Close Ring pg. 16 3 Video Light Switch [LIGHT OFF/AUTO/ON] (GR-SXM460A/SXM260A/ SXM46EA/SXM26EA only pg. 20 4 •Snapshot Button [SNAPSHOT] (GR-SXM460A/SXM46EA only pg. 21 •5-Second Recording Button [5 SEC. w Video Output Connector pg. 36 e Audio Output Connector pg. 36 r S-Video Output Connector pg. 36 t J Terminal [JLIP (Joint Level Interface Protocol) Connector] •Connect the editing cable when performing Random...
... the cover. Controls 1 Dioptre Adjustment Control pg. 14 2 Lens Cover Open/Close Ring pg. 16 3 Video Light Switch [LIGHT OFF/AUTO/ON] (GR-SXM460A/SXM260A/ SXM46EA/SXM26EA only pg. 20 4 •Snapshot Button [SNAPSHOT] (GR-SXM460A/SXM46EA only pg. 21 •5-Second Recording Button [5 SEC. w Video Output Connector pg. 36 e Audio Output Connector pg. 36 r S-Video Output Connector pg. 36 t J Terminal [JLIP (Joint Level Interface Protocol) Connector] •Connect the editing cable when performing Random...
Instruction Manual
Page 56
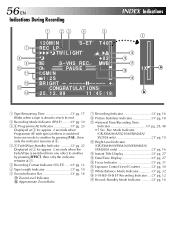
Rec Mode Indicator (GR-SXM260A/SX210A/SXM26EA/ SX21EA only pg. 19 @ Bright Level Indicator (GR-SXM460A/SXM260A/SXM46EA/ SXM26EA only pg. 16 # Instant Title Display pg. 27 $ Date/Time Display pg. 27 % Focus Indicator pg. 31 ^ Exposure Control Level Counter pg. 30 & White Balance Mode Indicator pg. 32 * S-VHS/S-VHS ET Recording Indicator ... ੬ pg. 12 ( Record-Standby Mode Indicator pg. 16 MWB PAUSE 5M I N 1 / 2S BR I GHT - - - - - -6- - - - - + CONGRATULAT I GHT +0 2 S - VHS REC. 56...
Rec Mode Indicator (GR-SXM260A/SX210A/SXM26EA/ SX21EA only pg. 19 @ Bright Level Indicator (GR-SXM460A/SXM260A/SXM46EA/ SXM26EA only pg. 16 # Instant Title Display pg. 27 $ Date/Time Display pg. 27 % Focus Indicator pg. 31 ^ Exposure Control Level Counter pg. 30 & White Balance Mode Indicator pg. 32 * S-VHS/S-VHS ET Recording Indicator ... ੬ pg. 12 ( Record-Standby Mode Indicator pg. 16 MWB PAUSE 5M I N 1 / 2S BR I GHT - - - - - -6- - - - - + CONGRATULAT I GHT +0 2 S - VHS REC. 56...
Instruction Manual
Page 58
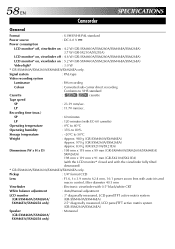
Recording time (max.) SP : 60 minutes LP : 120 minutes (with EC-60 cassette) Operating temperature : 0°C to 40°C Operating humidity : 35% to 80% Storage temperature : -20°C to 62.4 mm, 16:1 power zoom lens with auto iris and macro control, filter diameter 40.5 mm Viewfinder : Electronic viewfinder with the viewfinder fully tilted downward) * GR-SXM460A/SXM260A/SXM46EA/SXM26EA only. Pickup : 1/4" format CCD Lens : F1.6, f = 3.9 mm...
Recording time (max.) SP : 60 minutes LP : 120 minutes (with EC-60 cassette) Operating temperature : 0°C to 40°C Operating humidity : 35% to 80% Storage temperature : -20°C to 62.4 mm, 16:1 power zoom lens with auto iris and macro control, filter diameter 40.5 mm Viewfinder : Electronic viewfinder with the viewfinder fully tilted downward) * GR-SXM460A/SXM260A/SXM46EA/SXM26EA only. Pickup : 1/4" format CCD Lens : F1.6, f = 3.9 mm...


